Select the product 7200-1200AC 7200-1200-1200DC 7200-2000ac 7200-2000dc 7200-24 7200-24-24-24g2xg 7200-24ge 7200-48 7200-48p 7200-4xg 7200-512ram 7200 -ase3 7200-cm1 7200 -cm2222ram ANT24-0802C ANT24-1200 ANT24-1201 ANT24-2100 ANT24-CB01N ANT24-CB03N ANT24-CB06N ANT24-CB09MAN ANT24 ODU3M ANT70-0800 ANT70-1000 ANT70-1400N ANT70-1800 ANT70-CB1N ANT70-CB1RN ANT-SP CWM-100 DAP-1325 DAP-1360U DAP-1420 DAP-1513 DAP-1520 DAP-1610 DAP-1620 DAP-2230 DAP -2310 DAP-2330 DAP-2360 DAP-2660 DAP-2680 DAP-2695 DAP-3310 DAP-3320 DAP-3410 DAP-3662 DAP-3760 DAP-3860 DAS-3216/RU DAS-3248/EA DAS-3626 DAS- 4192-20 DAS-4192-30 DAS-4192-40 DAS-4192-50 DAS-4192-60 DAS-4672 DAS-4672-10 DAS-4672-20 DAS-4672-30 DAS-4672-40 DAS-4672- 50 DAS-CB1 DCH-M225 DCM-202/RU/C DCS-100 DCS-210 DCS-3010 DCS-3511 DCS-4602EV DCS-4603 DCS-4622 DCS-4701E DCS-4703E DCS-4705E DCS-4802E DCS-6510 DCS-6513 DCS-6517 DCS-6616 DCS-6915 DCS-700L DCS-7110 DCS-741 3 DCS-7513 DCS-7517 DCS-8000LH DCS-8100LH DCS-825L DCS-8515LH DCS-8600LH DEM-210 DEM-211 DEM-220R DEM-220T DEM-302S-BXD DEM-302S-BXU DEM-302S-LX DEM -310GM2 DEM-310GT DEM-311GT DEM-312GT2 DEM-314GT DEM-315GT DEM-330R DEM-330T DEM-331R DEM-331T DEM-410CX DEM-410X DEM-412CX DEM-421XT DEM-422XT DEM-423XT DEM-424XT DEM-431XT DEM-432XT DEM-433XT DEM-434XT DEM-435XT DEM-436XT-BXD DEM-436XT-BXU DEM-CB100 DEM-CB100QXS-4XS DEM-CB100S DEM-CB300 DEM-CB300CX DEM-CB300QXS DEM-CB300S DEM- CB50 DEM-CB50CXP DEM-CB50ICX DEM-CB700S DEM-PB1S-OLT DEM-QX01Q-SR4 DEM-QX10Q-LR4 DEM-X10CX-1271 DEM-X10CX-1291 DEM-X10CX-1311 DEM-X10CX-1331 DEM-X40CX-1471 DEM-X40CX-1491 DEM-X40CX-1511 DEM-X40CX-1531 DEM-X40CX-1551 DEM-X40CX-1571 DEM-X40CX-1591 DEM-X40CX-1611 DEM-X70CX-1471 DEM-X70CX-1491 DEM-X70CX-1511 DEM-X70CX-1531 DEM-X70CX-1551 DEM-X70CX-1571 DEM-X70CX-1591 DEM-X70CX-1611 DES-1005C DES-1005D DES-1005P DES-1008C DES-1008D DES-1008P DES-1008P+ DES-1016A DES -1016D DES-1018MP DES-1018P DES-1024A DES-1024D DES-1026G DES-1050G DES-1100-16 DES-1100-24 DES-1210-08P DES-1210-28 DES-1210-28/ME DES-1210-28P DES-1210-52 DES-1210-52/ME DES-1228 /ME DES-3026 DES-3028G DES-3028P DES-3200-10 DES-3200-26 DES-3200-28 DES-3526 DES-3528 DES-7206-Base DES-7210-Base DFE-520TX DFE-551FX DFE- 560FX DFL-870 DGE-528T DGE-530T DGE-550SX DGE-560SX DGE-560T DGS-1005A DGS-1005D DGS-1005P DGS-1008A DGS-1008D DGS-1008MP DGS-1008P DGS-1010MP DGS-1016C DGS-1024C DGS -1026MP DGS-1026X DGS-1052X DGS-1100-05 DGS-1100-05PD DGS-1100-06/ME DGS-1100-08 DGS-1100-08P DGS-1100-08PD DGS-1100-10/ME DGS-1100 -10MP DGS-1100-10MPP DGS-1100-16 DGS-1100-16/ME DGS-1100-24 DGS-1100-24/ME DGS-1100-24P DGS-1100-24P/ME DGS-1100-26MP DGS- 1100-26MPP DGS-1210-10 DGS-1210-10/FL DGS-1210-10/ME DGS-1210-10MP DGS-1210-10MP/FL DGS-1210-10P DGS-1210-10P/FL DGS-1210- 10P/ME DGS-1210-12TS/ME DGS-1210-20 DGS-1210-20/FL DGS-1210-20/ME DGS-1210-26 DGS-1210-26/FL DGS-1210-28 DGS-1210- 28/FL DGS-1210-28/ME DGS-1210-28MP DGS-1210-28MP/FL DGS-1210-28MP/ME DGS-1210-28P D GS-1210-28P/FL DGS-1210-28P/ME DGS-1210-28X/ME DGS-1210-28XS/ME DGS-1210-52 DGS-1210-52/FL DGS-1210-52/ME DGS-1210 -52MP DGS-1210-52MP/FL DGS-1210-52MP/ME DGS-1210-52MPP DGS-1210-52MPP/ME DGS-1210-52P/ME DGS-1250-28X DGS-1250-28XMP DGS-1250-52X DGS-1250-52XMP DGS-1510-20 DGS-1510-28L/ME DGS-1510-28P DGS-1510-28X DGS-1510-28XMP DGS-1510-28XMP/ME DGS-1510-52X DGS-1510-52XMP DGS -3000-10L DGS-3000-10TC DGS-3000-20L DGS-3000-26TC DGS-3000-28L DGS-3000-28LP DGS-3000-28SC DGS-3000-28X DGS-3000-28XMP DGS-3000-28XS DGS -3000-52L DGS-3000-52X DGS-3120-24PC/*RI DGS-3120-24SC/*EI DGS-3120-24SC/*RI DGS-3120-24TC/*RI DGS-3120-48PC/*RI DGS -3120-48TC/*RI DGS-3130-30PS DGS-3130-30S DGS-3130-30TS DGS-3130-54PS DGS-3130-54S DGS-3130-54TS DGS-3200-10 DGS-3420-26SC DGS-3420 -28PC DGS-3420-28SC DGS-3420-28TC DGS-3420-52P DGS-3420-52T DGS-3427 DGS-3610-50P DGS-3612G DGS-3620-28SC DGS-3620-52P DGS-3620-52T DGS- 3627 DGS-3630-28PC DGS-3630-28SC DGS-3630-28TC DGS-3630-52PC DGS-3630-52TC DGS-6600-24SC2XS DGS-6600-24 SC2XS-C DGS-6600-48S DGS-6600-48S-C DGS-6600-48T DGS-6600-48TS DGS-6600-8XG DGS-6600-CM DGS-6600-CM-II DGS-6600-FAN DGS-6600 -FAN-II DGS-6600-PWR DGS-6600-PWRDC DGS-6604 DGS-6608 DGS-703 DGS-707 DGS-711 DGS-712 DHP-1220AV DHP-1565 DHP-208AV DHP-209AV DHP-309AV DHP-329AV DHP-346AV DHP-P308AV DHP-P309AV DHP-W310AV DIB-110 DIB-200 DIB-360 DIR-615 DIR-615/GF DIR-620S DIR-640L DIR-806A DIR-806A/R DIR-815 DIR-815/ AC DIR-822 DIR-825 DIR-825/ACF DIR-841 DIR-842 DIR-853 DIR-878 DIR-879 DIR-882 DIS-100E-5W DIS-100E-8W DIS-100G-5PSW DIS-100G-5SW DIS-100G-5W DIS-200G-12PS DIS-200G-12S DIS-PWR180AC DIS-PWR40AC DIS-RK200G DIS-S301SX DIS-S302SX DIS-S310LX DIS-S310R DIS-S310T DIS-S330LH DIS-S330R DIS-S330T DIS- S350LHX DIS-S380ZX DKVM-4K DKVM-4U DKVM-CB DKVM-CB/1.2M DKVM-CB3 DKVM-CB5 DKVM-CU DKVM-CU3 DKVM-CU5 DKVM-IP1 DKVM-IP16 DKVM-IP16LCD DKVM-IP8 DKVM-IPCB DKVM -IPCB5 DKVM-IPVUCB DMC-1000 DMC-1001 DMC-1001/DC DMC-1002 DMC-1910R DMC-1910T DMC-300SC DMC-515SC DMC-530SC DMC-700SC DMC-
see also
Question: Setting up a D-Link DI-824VUP+ wireless router to work on a Netbynet network
Answer:
1. Connect the device to the computer's network card using a cable.
Connect to the port marked with the number 1.
2. Connect network cable from our equipment to the port on the "WAN" router ![]()
3. Connect the device's power supply to the mains (~220 Volts).
4. Turn on the computer.
5. After the computer boots up, run Internet Explorer
6. In address bar Internet Explorer dial the address http://192.168.0.1
User: admin
You don't need to enter a password!

7. Choose a section Home.
Go to subsection LAN. 
In line IP address enter the new internal ip address of the device
IP Address - 192.168.0.1
Subnet Mask - 255.255.255.0
Click on the button apply
.
After pressing, it is desirable to perform the following operation:
Go to - Start
- Control Panel
- Network connections
- Double click with the left mouse button on the icon
"Connection by local network"
- in the window that opens, select the tab "Support"
and press the button "To correct"
.
8. Open Internet Explorer
Enter in the address bar http://192.168.0.1
User: admin
You don't need to enter a password!
We go to the section status.
Check the firmware version of the device
Version number Firmware version must be at least v1.06b07
if the firmware number is lower - the device needs to be flashed up to latest version in accordance with the documentation. (firmware address) 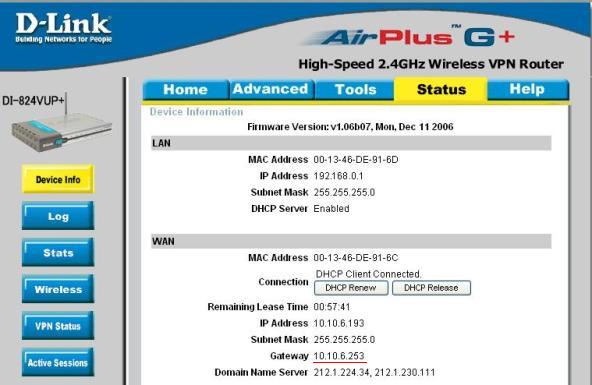
You should also write out the following parameter on a separate sheet - Gateway.
You will need it for further settings.
9. Choose a subsection WAN
Prescribe DNS servers 
Primary DNS Address -> 212.1.224.34
Secondary DNS Address -> 212.1.230.111
apply.
10. Set connection parameters with vpn server
WAN Settings-> Others -> PPTP
PPTP Client-> Dynamic IP
Server IP/Name-> ppp.lan
account enter the username in accordance with the agreement (vpp_*****)
Password enter user password
Retype Password repeat password entry
Connect Mode Select the connection mode to the vpn server
-> always-on(Always on)
-> Manual(Connect manually from a browser by going to 192.168.0.1)
-> Connect-on-demand(Turns on any time you try to access the Internet) 
We fix the selected settings with the key apply.
11. Wireless Settings- configurable in case of connection
laptop or other device via IEE802 standard radio channel to the router D-Link.
Wireless Radio-> On
Network ID(SSID)-> (radio network name - select any network name, for example homenet)
Channel -> 6
security-> WPA-PSK
Preshare Key-> (for example - 45612232) 
We fix the selected settings with the key apply.
12. Checking the connection of the D-Link router to the VPN or manual connection vpn is made on this page: 
13. We check the operation of the computer on the Internet
14. Set a password for D-link router DI-824VUP+

15. We fix the selected settings with the key apply
16. We check the entrance to the device with a password at http://192.168.0.1/ from the browser.
17. Routing setup.
To access local resources, you must configure the routing table (routing)
We go to the section Advanced
Further to the subsection Routing 
Enter the values in the fields of the table in accordance with the figure. In field Gateway you should enter the LAN gateway that we saved a little earlier (see Settings item No. 8)
| Destination | subnet mask | Gateway | ||
| 10.0.0.0 | 255.0.0.0 | |||
| 212.1.224.0 | 255.255.255.0 | |||
| 212.1.255.0 | 255.255.255.0 | |||
| 89.20.128.0 | 255.255.255.0 | |||
| 213.141.128.0 | 255.255.255.0 | |||
| 192.168.0.0 | 255.255.0.0 |
Setup completed
Logging into the router using ip or html address 192.168.0.1 is suitable for the vast majority of TP-Link, D-Link (DIR 300, 615), Tenda or some Rostelecom WiFi modems. At the same time, the login and password for entering the administrator system settings are also most often the same - admin-admin. Please note that in order to enter the personal account of Asus RT and Zyxel routers from a computer or phone, you must use another source -. However, it happens that you will not be taken to the web interface, but to some other page with the “index.html” or “home.php” extension. Or on the search results from which you just found this article. To avoid this and open https://192.168.0.1 for sure next time to enter the router control panel, you need to make some settings on the computer. It is about them that we will now talk.
How to enter your personal account 192.168.0.1 through Admin-Admin?
Before you open the http://192.168.0.1 router login page, you need to follow the usual steps to connect it to a PC or laptop.
Is the entry address to the router settings http://192.168.0.1 or something else?
So, in order to access the router, first of all, you need to know its IP address (what is it?), which is on it by default. Today we will talk specifically about those devices that use 192.168.0.1 as it. However, to clarify, I recommend looking at the case. Usually on its bottom, there is a sticker that indicates this information.

This address may also have a different form, reminiscent of the site address, for example, TP-Link has “tplinkwifi.net” and “tplinklogin.net” or “tendawifi.com” for Tenda. This is the so-called hostname, which is at the level software router replaces the standard IP address with a more familiar one for a person.
Usually, the admin panel is available at two addresses at once, so the label says that the login is by hostname. But if you can’t enter the router using it, then you can simply use IP - 192.168.0.1. They work simultaneously and there is no difference for access to your personal account.
Error http 192.168.o.1, 192.168.o.l and html 192.168.0.1 net, ru or com
- Be careful! Often, an error when entering the personal account of the router 192.168.0.1 occurs due to the fact that instead of the numbers “zero” and “one”, the letters “O” or “L” are entered, which are visually similar to them. As a result, the address looks like 192.168.o.1 or 192.168.o.l. For our eyes, the same thing, but for the computer - completely different values!
- Another popular misspelling of an address is adding an extra number, such as 192.168.0.1.1 . Remember, between the separators in the form of dots there should be only 4 blocks of numbers - no more and no less.
- Or it happens that the last digits are swapped in the address, for example like this - 192.168.l.0
- Finally, by mistake, the word “net”, “ru” or “com” is attributed at the end. Like 192.168.0.1.net, 192.168.0.1.ru or 192.168.0.1.com. Or an extension more typical for “home” or “index” pages of regular sites - HTML or PHP
As you understand, since these addresses do not exist in nature, then remember that it is impossible to enter the router.
If the IP address was changed by the previous owner to some non-standard one and you don’t know it, then a complete reset helps, which I mentioned at the beginning of the article. However, if you still need to save network configurations, then finding out its current IP is quite simple by looking at network settings on a computer or laptop. They are displayed in the "Details - Status" menu in the network adapter settings.
In order to avoid errors and accurately get to the authorization page in the admin panel, you also need to additionally check that on the computer in the settings of the Windows network adapter in the “Connection via TCP / IP” section, all parameters are set to auto mode.
How to enter the personal account of the wifi router 192.168.0.1 from a computer?
After you have set the necessary parameters on a computer or laptop, you can already go to the settings. We type “http://192.168.0.1” in the browser and get to the login page for the router’s personal account.
Login and password depending on the model and manufacturer again may differ. But 99% I can say that TP-Link, D-Link and Zyxel have admin-admin. For clarification, you can look again at the same sticker.
- Set up router connection to ISP
- Set options for WiFi work networks
Most often, for the convenience of users, the manufacturer provides step by step wizard settings. However, different firms appearance The web interface of the router settings is different, so it makes sense to study each one separately. We have prepared specific articles on the most popular models in our country, so I advise you to study them depending on which one you are going to use:
How to change the Admin password and put your own on the input 192.168.0.l?
When the primary configurations are saved, I would recommend for security reasons to change the “Admin” password and set some other password to enter 192.168.0.1. It doesn't have to be too complicated - it's unlikely that your neighbors will need to hack into your WiFi. But you still need to take care of the most elementary security methods.
Entering the router settings 192.168.0.1 from the phone
As I said, the address 192.168.0.1 can be used not only to configure the router from a computer, but also to enter it from a phone. To do this, just open a mobile browser and log in with the “admin-admin” login-password. However, these days, almost every major network equipment manufacturer has a proprietary mobile app which makes this process much easier.

For example, I have been using a laptop for a long time only for recording training videos. In fact, I manage all wifi network from a smartphone. Separate articles about this method settings for each model are available on our website.
That's all for today - I tried to describe the whole process of entering the settings wifi router most detailed. I hope I succeeded. I'm sure you will succeed too! If you still have questions, then ask them in the comments. I will try to answer them as far as possible.
The router control panel is needed so that you can set up an Internet connection, change the access point name and password, check the Internet is working, etc. Most routers are programmed under single address 192.168.1.1 or 192.168.0.1. But it is not always possible to simply enter this address in the browser and gain access to the router's personal account. Sometimes there are problems that prevent this.
What to do to enter the control panel through http://192.168.1.1
The most important aspect is that your router must support an active Wi-Fi hotspot. The device must do this even if it does not connect to the Internet. If this does not happen, try disconnecting the router from power, wait 20-30 seconds. and connect it to the network again.
Also, sometimes a complete reset of the settings helps - for this, a special button is provided on the router, which is often signed as “reboot” or “reset”. Sometimes, instead of a convex button, a narrow hole is provided where you need to insert a needle or match and hold the button for 30 seconds. before full reset settings. In this case, the connection name (192.168.1.1) and password are returned to the factory values (admin admin) - they must be indicated on the router case.
After the dot WiFi access will be detected by your computer, connect and go to the browser. Type in the address bar. If nothing happens, try 192.168.0.1. On the page that opens, you need to enter the username and password of the administrator.
Please note that the authorization data of your access point is not related to the admin panel. If you did not change it yourself, then you can enter your personal account using the login and password "admin". Sometimes the manufacturer sets other standard settings- look for information on the box of the router or in its documentation.
The router works, but does not enter the personal account 192.168.1.1
If you encounter this situation, make sure you are using the correct control panel address. On most routers this is http://192.168.1.1, but on some models (D-Link, Tenda, etc.) 192.168.0.1 is used. Try connecting the router using the built-in power cord slot. In this case, the computer must independently connect to the Internet, which is configured on the router.
If that doesn't work, check your IP and DNS settings in the Network and Sharing Center and public access(on Windows 7 and 10). To do this, click right click click on the Internet connection icon, click LMB (left mouse button) on the section with the appropriate name. The control panel will open, right-click (right-click) on the connection name opposite "access type" and in the opened context menu select properties > IPv4.
Here you need to check the boxes next to the items that cause the automatic determination of DNS and IP addresses. Static data should only be specified if it is predetermined by your ISP.
In this case, you need to indicate those identifiers and registration subscriber data that were issued to you during the execution of the contract. If you were not given them or you have lost the information you need, call technical support provider and find out IP/DNS.
I think I will surprise some users a lot if I say that their ADSL modem, WiFi router or GPON ONT terminal is actually a whole mini-computer, with its own processor and RAM. To configure and manage it, as a rule, there are 2 ways - command line through a telnet client and a web interface, which is a whole site that contains all the basic device settings. And it is this site that users refer to as Personal Area router or modem.
In fact, such a term can confuse a more advanced user. Why? I'll try to explain. The fact is that the concept of "Personal Account" in itself implies the presence of information there about or for a specific user. An example is LC Beeline, Rostelecom or Megafon. There you can find information about your personal account, payments, debits, etc. That is, all information about a particular user is collected there. Hence the name - Personal, that is, personal or containing information about the individual.
In the case of a network device, no data is stored in the web configurator of the device. Well, except for the login and password for accessing the Internet. Therefore, in my opinion, to call the input in d-link settings, TP-Link, Zyxel, Asus, etc. through 192.168.1.1 and 192.168.0.1 - Personal account admin or Internet cabinet- this is not entirely true.
With more success, you can call the configurator as "Router Settings Site". This will be a little more correct. At least - this is a site and on it you can find all the main parameters of a network device.
How to log in to your Personal Account?
It's very simple, to get to the router's website, you need to launch a web browser Google Chrome or Internet Explorer.
Then in the address bar we write the IP of the router's Personal Account - 192.168.0.1 for D-Link and TP-Link;

192.168.1.1 for Zyxel, Asus, Trendnet, LinkSys, etc.:

If Network Card configured correctly, you should see an authorization request in response. That is, to enter the web interface, you must enter your username and password:

On almost all modems and routers, the login to enter the Personal Account is admin, sometimes there are options:
superadmin
-superuser
- administrator
- user
- root
Passwords used on network devices default:
Admin
- user
- 1234
-password
- empty line
If you have Can't login to router web interface, then most likely the password was changed during its initial setup. In this case, you will need to reset the device using the Reset button and then reconfigure it.