Greetings, colleagues!
Everyone who is involved in supporting, maintaining and updating information databases on the 1C 8 platform sooner or later has to update their database to standard releases to make changes related primarily to changing legislation (Government minds do not eat their bread in vain).
How to do this is well described in the articles: - thanks to the authors.
In this article I would like to pay attention to the following points: when updating the SCP release from release 1.3.17 to 1.3.48, I was faced with the need to support the vendor configuration.
I’ll note right away that the main configuration of 1.3.17 in my case differs significantly from the typical 1.3.17. Most of the critical changes that were released in releases from 1.3.18 to 1.3.47 were made through comparing and combining the necessary modules and subsystems, since this method takes less time (a significant part of the SCP was radically rewritten to suit the specifics of our enterprise).
So, updating the configurations through comparison and merging, I got the main configuration 1.3.48, while the supplier configuration is 1.3.17 Fig. 1. and Fig.2.
Rice. 1. Basic configuration. Release 1.3.48.1

Fig.2. Provider Configuration 1.3.17.1
How can you set the configuration to support the current release and not lose any changes made?
Configuration - Support - Support settings - "Remove from support". We remove the configuration from the support of Fig. 3. and close the settings window.

Fig.3. Configuration is not supported
Using “Compare, merge with configuration from file”, we perform a combination with a standard, current CF configuration (in in this case 1.3.48.1). To the question, Fig. 4. about the possibility of applying for support o We answer “Yes.”

Fig. 4. Possibility of combining with support was discovered
Let's do it “Empty” comparison and combination of configurations, having previously unchecked all the “checkboxes” as in Fig. 5.

Fig.5. "Empty" comparison and merging of configurations
The configurator will offer to configure support rules. If the ability to edit configuration objects is required in the future, then we configure the support rules as shown in Fig. 6.

Fig.6. Setting up support rules
It would seem not very logical - but in the end the configuration object "Production Enterprise Management" - i.e. the entire configuration will be removed from support. To apply for support, do the following: Configuration - Support - Setting up support. We change the support rules for the "Production Enterprise Management" object. If you need the ability to edit configuration objects in the future, then set the parameters as shown in Fig. 7. Be sure to check the “Install for subordinate objects” checkbox. Close the settings window.

Fig.7. Support of the object "Production Enterprise Management"
After this, our configuration is fully supported by the supplier. Save and update the database configuration (F7).
It happens that certain heavily modified configuration objects that do not need to be further compared with the vendor configuration need to be removed from support. An example of how to do this is in Fig. 8.

That's all it seems. Questions are welcome. I hope that this article will be useful for someone. With respect to the community, Andrey.
Hello.
Today I'll tell you what it is support for standard configurations, how important this is and why it is advisable not to remove the configuration from full support. I’ll make a reservation right away and say that this does not apply to those who develop the configuration from scratch.
Configuration Updates this is one of the functions, but the update should be easy and painless the configuration does not need to be removed from support.
Configuration is under support
For those who didn’t know, I’ll tell you :) . Standard solutions are available at supplier support. This means that 1C periodically releases new releases in which existing errors are corrected, new functionality is added, and configuration changes are made in accordance with legal requirements.
If the user's configuration is supported, then when a new release is released, you can independently execute or execute .
A programmer should try to solve problems standard means, make minimal changes to standard solutions to speed up the update procedure.
The default configuration needs to be changed
It often happens that standard tools are not enough and changes need to be made to the configuration, then you need to follow the following scenario.
1. Enable the ability to make changes to the configuration.
To do this, run the command Configuration – Support – Support Setup. The “Support Setup” form opens. In this form, click the button Enable edit option. Answer “Yes” to the system’s question about the impossibility of performing automatic updates.
2. In the “Set up support rules” form that opens, set the switches to values The supplier object is not editable.
After these steps, you can provide targeted access to those configuration objects to which changes need to be made. The figure shows an example of opening access to edit the List Form of the Customer Order Document.
Adding new objects
To enable the ability to add new objects to a standard configuration, you must perform the following steps. Set up a support rule for the root configuration node The supplier object is edited while maintaining support. Flag Set for subordinate objects do not install.
That's all, if anyone wants to add I'm always for it and I'm waiting for you in the comments.
If you need to resume support or update your configuration, please visit the page.
P.S. In a programmer's practice, making changes to a standard configuration is commonplace, and there is no need to increase the complexity of system maintenance. It is necessary to be honest to your clients and the value of a programmer is not that without him nothing can be done, everything is surrounded by passwords, the code is not commented. Some also manage to insert cunning procedures, because of which the program begins to glitch and after 2-3 months you have to call the programmer again.
P.P.S When I was writing the article, I remembered a moment from the movie Lethal Force.
This is our cow and we are milking it!
Very often there are configurations that have been removed from support, but no global changes have been made to them. Some of the required changes could be implemented through external processing. Therefore, there is a need to put the configuration on support.
With the advent of the configuration extensions mechanism, we have a more flexible way to make the necessary changes.
Fast passage
Two options for a deprecated configuration
- The configuration can be changed - you just need to change it through the menu “Configuration\Load configuration from file”
- The configuration is completely removed from support, it is first put on support through an update, and then replaced with a standard one
The first thing any update of this kind begins with is creating a complete copy of the database. Without this, don't even start. The cost of an error may be the loss of information.
In both cases, the first task is to synchronize the configurations with the vendor configuration. This can be done with or without an update. If the release is old and it is found, then it is easier to put it on support and update subsequent configurations already put on support.
Why is that? Because a side effect of removing support is that the update slows down by a factor of 2, so in this case the update is performed on two configurations (vendor and current configuration).
1. Replacing the configuration from a file
Once you have synchronized the configurations - and the data structure and configurations are absolutely identical, you can begin replacing the configuration.
In the menu “Configuration\Support\Support Settings”:
Unlock all objects (the ability to edit) if there is a “lock”, otherwise at the next stage the message “To execute the command you need to unlock all objects” will appear:

Proceed to replacement - done through the “Configuration” menu:


2. The case is a completely desupported configuration
If you have it removed via “Remove from support”, then the configuration does not have any icons, otherwise the presence of a “yellow cube” or “Lock with a yellow cube” means that you can immediately act on the first case.

If you have it removed, you will need a configuration file, it can be any next release
Go to the “Configuration\Merge Configurations” menu and select this file:

If everything is correct (the version is suitable), then a window will appear with the message: “The possibility of combining with setting up for support has been detected,” to the question “Set up for support?” answer “Yes”

This way you kill two birds with one stone and update the configuration and put it on support.

Before clicking Execute, you also need to check the “Settings” button to allow deletion of main configuration objects (so that unnecessary and old objects are deleted).
At the end there will be a message “Configuration merging complete”

Now you perform its replacement in case 1, here you are sure that they are identical.
Very often the question arises about how you can remove the 1C 8 configuration from support, and then install it again. Let’s immediately find out what support is?
Maintenance is a special configuration state where each configuration object is assigned a change rule. The configuration can be in one of three states:
1) on support without the ability to edit (if the “Enable editing ability” button is available in the support window);
2) on support with the ability to edit the configuration (in this case, the “Enable the ability to change” button is missing and the “Remove from support” button appears instead. There is no ability to configure automatic updating of configurations; updates can only be performed by a programmer);
3) no longer supported (update is possible using “manual” comparison and merging of configurations).
Now we will clearly look at how you can remove the 1C 8 configuration partially or completely from support, and then put it back on support. It is not recommended to remove the configuration from support unless absolutely necessary, so before doing this, think about whether you can do without it. For example, by connecting external treatments, reports and printed forms, because subsequently it will be more difficult to update a non-standard configuration. If the configuration was removed from support by accident, or you removed it in order to experiment, or you no longer need changes to the configuration, then you will need to set the configuration to full support, i.e. make it standard, so that in the future you will not experience difficulties with updating . I would like to note that completely removing the configuration from support threatens a completely “manual” update with a lot of time.
How to remove the 1C 8 configuration from support (enable editing)
I repeat once again that we carry out the process of removing the configuration only when absolutely necessary. And only, only in the case where all the possibilities for painlessly editing objects, such as the use of external processing, reports, etc. have been tried and did not lead to a satisfactory result. If everything is clear with this, then let's get started.
For example, let’s remove the standard configuration of 1C Enterprise Accounting 2.0 from support. To do this, you need to go to the configurator. A padlock next to the configuration name means that the configuration is fully supported by 1C, i.e. it has not been modified and matches the vendor configuration, i.e. 1C. This is shown in the picture.

Figure 2.
Click Enable change option:

Figure 3.
In Figure 4 we see a program warning that changing the mode will make it impossible to update the configuration fully automatically. This is understandable, so click Yes:

Figure 4.
Figure 5 shows how the rules for changing objects are set: Edited while maintaining support, if there is no need to completely remove the configuration from support and press the OK button:

Figure 5.
It may take quite some time for the changes to be accepted, so you will have to wait a bit. After the lock opposite the configuration name disappears, which can be clearly seen in Figure 6, we begin to make further changes.

Figure 6.
How to put a 1C configuration on support (disable the ability to edit)
Above, we simulated the changes, which means that we can begin restoration. Enrolling in full support only makes sense if automatic centralized updates are planned. And, most importantly, if there were no significant changes in objects. In order to put a configuration on support, we must ENSURE that no changes have been made to the infobase configuration that affect the data structure, because if this is the case, then this data will be lost, so it is absolutely impossible to put such a configuration on support using this method! !! And some changes may require serious intervention from qualified specialists. If you are not sure what changes were previously made to the configuration, it is better to contact specialists for an assessment.
Below, I propose to consider the case when minor changes were made to the configuration. For example, the layout of a printed form was changed, a report, processing, etc. were added. Before you start making changes, I strongly recommend that you do backup copy information base.
Now we will support the 1C Enterprise Accounting 2.0 configuration, which we removed from support above. The thing is that three configurations are stored simultaneously in the 1C database: the first is the main configuration (i.e. the one that we see in the configurator); the second is the supplier’s configuration or the standard 1C configuration, the release of which corresponds to the release of your configuration when correct update; the third is the configuration of the information base.
The typical mechanism for updating 1C configurations is as follows: first, the vendor configuration is updated, and if your configuration is fully supported, then the vendor configuration replaces the main configuration. If editing is enabled in your configuration, then the mode for comparing and merging the main configuration and the supplier configuration is enabled so that you can choose which objects to replace and which not. Then the infobase configuration is updated.
First, let's try to make sure that your configuration version matches the vendor configuration version (Figure 7.). To do this, go to Help => About the program and look at the current release of the infobase configuration:


Figure 8.
Here you can clearly see that the release of the supplier’s configuration coincides with the release of your configuration. Therefore, we upload the supplier configuration to a file, click Save to file and select the further path for saving - Figure 9.

Figure 9.
Then, go to Configuration => Load configuration from file (Figure 10):

Figure 10.
The program warns you that this will lead to a complete replacement of your main configuration, we agree. If a message appears stating that objects are blocked, then the configuration must be completely removed from support. To do this, go to Configuration=>Support=>Support Settings and select Remove from support (Figure 11).

Figure 11.
Next, the program prompts you to update the database configuration; we agree by clicking Yes (Figure 12). I warn you right away that this operation may take some time, so we are waiting again.

Figure 12.
Now we see that the lock opposite the configuration has appeared again - this means that full support for the configuration has been restored.
In this guide, you will learn how to determine if your configuration is in support and how to return the configuration to support.
- How can I determine if a configuration is supported?
You need to run the program in “Configurator” mode:
In the main menu, select “Configuration - Support”; if the menu items are not active, then in the same menu you should click “Open configuration”. After performing this action, a list of configuration objects will appear on the left, and in the main menu “Configuration - Support” the “Support Settings” item will become active. You should go to this menu item.

- If the “Enable the ability to change” button is active in the “Support Settings” window that opens, then the configuration is supported. To update the configuration, go to instruction No. 435 “Procedure for updating the configurations “Infocraft: Housing and Communal Services Formula” and “Infocraft: Housing and Communal Services Formula + Accounting”:
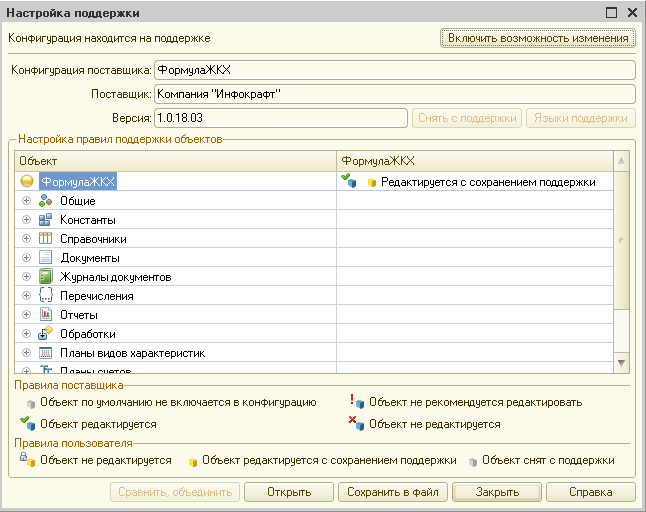
- If in the “Support Settings” window that opens there is no “Enable the ability to change” button and the “Remove from support” button is not active, then the configuration is not supported. To set the configuration to support future updates, go to step 2 of the current instructions:

- If in the “Support Settings” window that opens there is no “Enable the ability to change” button, and the “Remove from support” button is active, then the configuration is on support with the ability to change configuration objects. To set the configuration to support future updates, go to step 2 of the current instructions:

- How to put the vendor's configuration on support?
Important! Further actions may violate the integrity of the infobase; you should make sure that no changes have been made to the infobase configuration that affect the data structure, otherwise the data will be lost. Before performing the operation, it is recommended to make a backup copy of the infobase.
- If the vendor configuration is in support with the possibility of change, then you must first completely remove the configuration from support by clicking the “Remove from support” button. Otherwise, you should immediately proceed to the next step.

In the window that opens, specify the path to the 1Cv8.cf configuration template:

In order to determine the directory in which the configuration template is located, you should select the required information base in the 1C: Enterprise launch window and click the “Settings” button:

In the “Setting the launch dialog” window that opens, in the “Configuration template and update directories” section, the path to the directory in which the configuration template is located will be indicated.