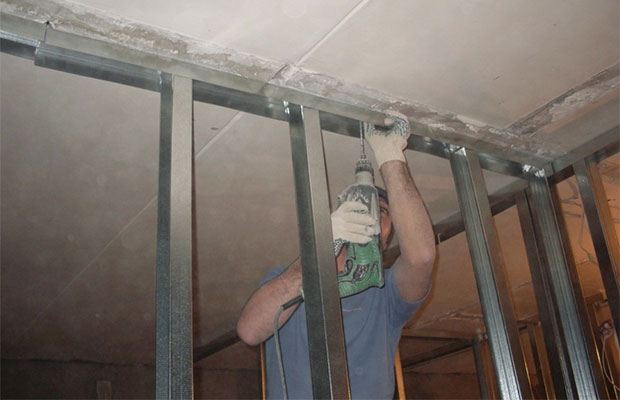
The main type of drywall fastening is a frame structure, which is attached to the surface to be finished. Essentially, this is the construction of a new frame-type wall. Since drywall has a certain mass, the requirements for lathing have always been stringent. More recently, it was built from wooden bars (slats), but this is already a thing of the past, because they were replaced by higher quality materials - metal profiles.
Although it must be given its due, slats are sometimes still used today, but extremely rarely. Why did this happen? Firstly, wood has the ability to change its size under the influence of changes in humidity and temperature. Over time, the bars dry out, crack, become covered with wormholes and mold. In damp rooms they quickly warp.
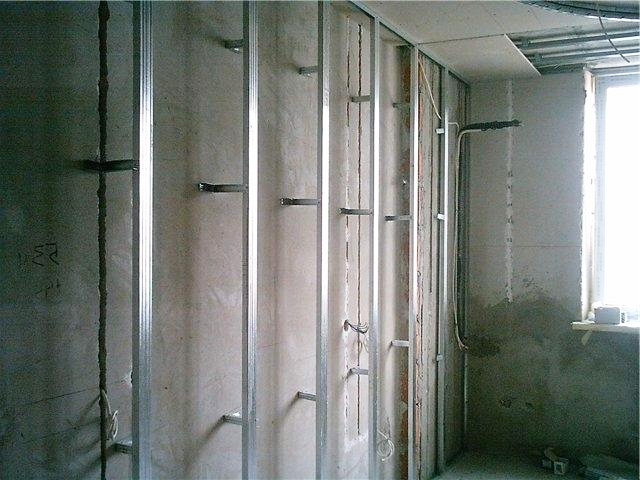
Photo: frame for metal profile plasterboard
All this is absent from a metal profile, so this particular material has now become the basis for the construction of a frame for plasterboard.
Types of profiles for frames for plasterboard
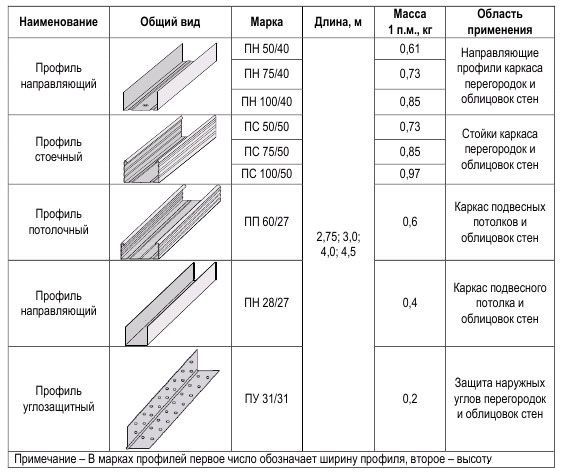
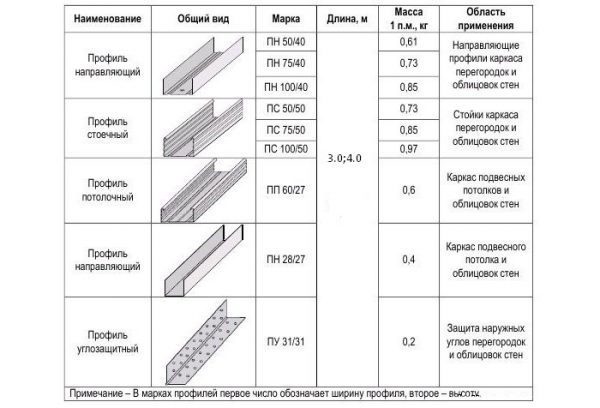
Manufacturers offer several types of profiles, each of which has its own purpose.

Different shapes of profiles for drywall

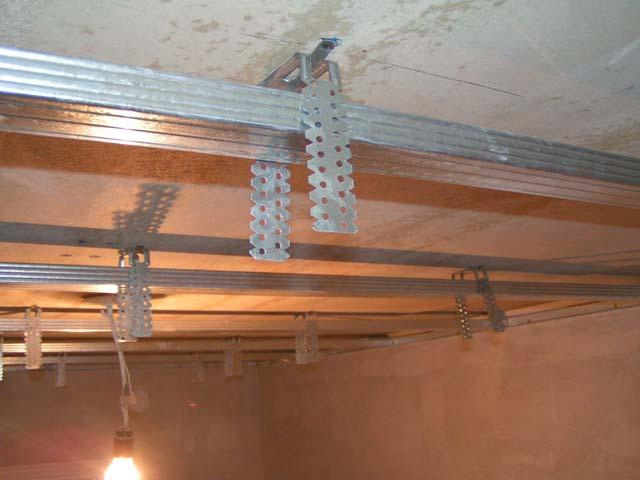
Add to profile products direct hangers, with the help of which ceiling and rack profiles are attached to the walls and ceiling, respectively. It is with their help that a suspended structure can be erected on the ceiling.

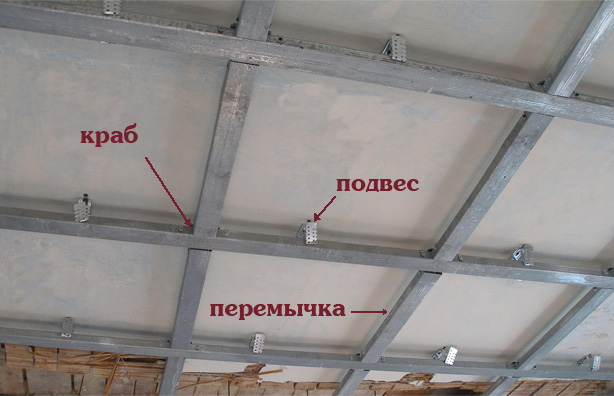
And one more element - crab. This is a special fastener that helps connect four connecting profiles at one point, forming a cross.
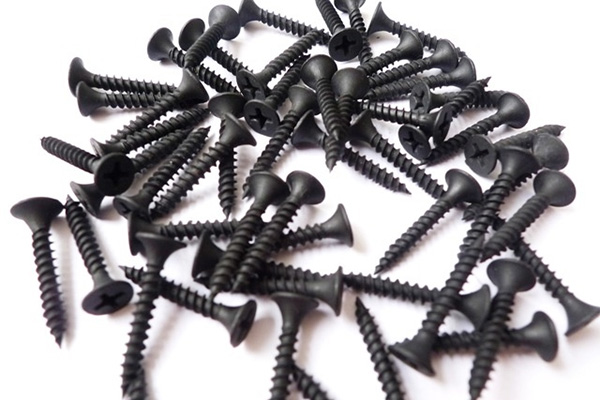
Photo: regular self-tapping screws for drywall
And the last thing is self-tapping screws. There are several types of them, and each has its own purpose. If the base of the wall is wooden, then ordinary self-tapping screws measuring 6x70 or 6x80 mm are used. If the surfaces are concrete, then it is best to use metal dowels or self-tapping screws with plastic dowels.

To connect the profiles to each other, so-called self-tapping screws are used (other names are often found - fleas or seeds).
Installation of a frame under plasterboard
If the plan for carrying out repair work is to finish both the walls and the ceiling with plasterboard, then you need to start from the ceiling. The thing is that this surface rarely has even angles (90°). And if you start leveling from the walls, it will be very difficult to adjust the plasterboard panels to the resulting ceiling dimensions. The end result will be enough a large number of waste.
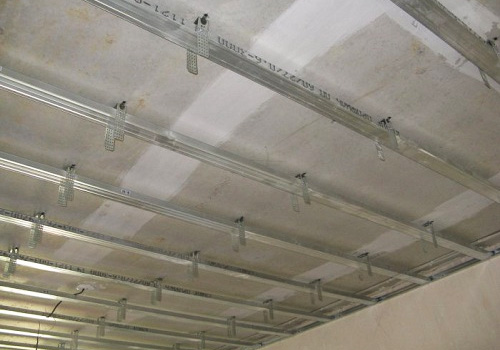
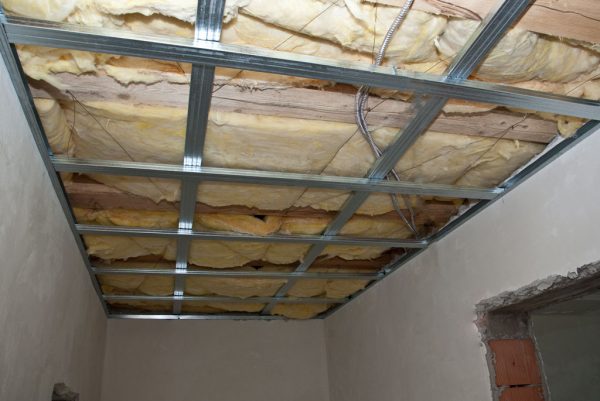
Mounting the frame on the ceiling
First of all, you need to determine the lowest corner in the room. To do this, you will need a tape measure, which measures the distance from floor to ceiling in each corner. Compare the results, the smallest size is what you need. Please note that this method can be used as a basis if the floor has already been leveled.

Marking the ceiling for plasterboard
So, a laser level is installed in the selected corner near the ceiling. The installation location is determined by the height of the future suspended structure. The light rays of the device will show a contour located in the horizontal plane; it is along this contour that the PNP profiles need to be installed.
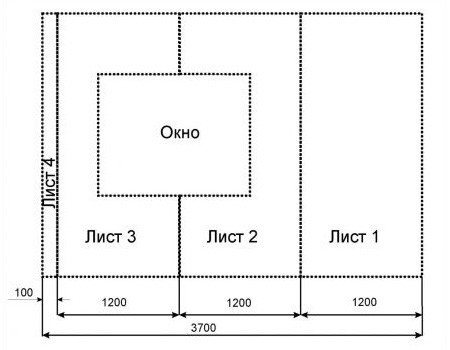
Now pay attention to one recommendation from a specialist. Typically, rooms have a rectangular shape, the long side of which is perpendicular to the wall where the window is located. It is in this direction that the sheets of drywall need to be laid. If the room is square, then place the panels towards the window anyway.
So, now we need to install the PP profiles. To do this, parallel lines are drawn. They are placed from the long wall every 60 cm. Why this particular size? The width of the plasterboard is 120 cm, three profiles are installed under each sheet: one in the middle, two at the edges. But keep in mind that two adjacent panels will be mounted on one profile. That is, the lines on the ceiling are the middle of the profile.
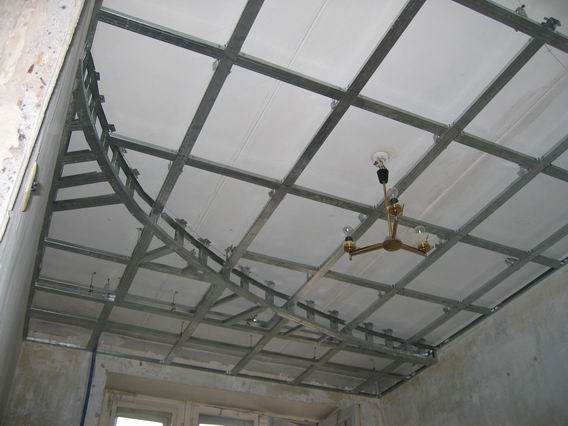
Frame for a single-level plasterboard ceiling
Along these lines, straight hangers must be installed every 30-40 cm. When this operation is completed, you can install the profiles themselves, whose ends will rest on the PNP guides. There they are secured with fleas.
The profiles will sag under their weight, so several rows of strong thread must be stretched between the length of the wall guides, which will create a horizontal plane. It will be necessary to align the PP profiles using it and secure them to the hangers. By the way, the antennae of the suspensions protruding beyond the profile simply bend upward.
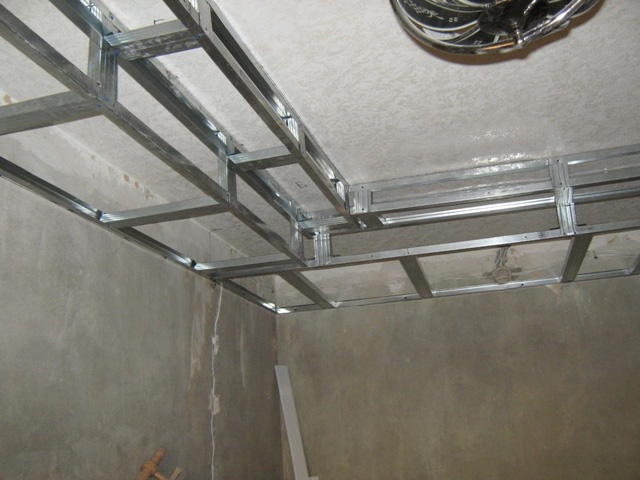
Frame for a two-level suspended ceiling
To add rigidity to the structure, it is necessary to install crossbars cut from PP. Since the distance between the profiles is the same (60 cm), the size is known. The installation of crossbars is carried out along the room at intervals of 30 to 60 cm in increments of 10 cm. This is where the crab is used. It is installed on top of the PP at the junction with the crossbars. This is a cross-shaped product with paws on the sides. PPs fit well in them. The same fleas are used for fastening.
Complete instructions on how to make a plasterboard ceiling yourself.
Mounting the frame on the wall
Installation of the frame begins with determining where the wall itself is inclined. If its top edge “looks” into the room, then the installation of the guide (PN) must begin from the ceiling. From it, using a plumb line, the installation location of the floor profile is determined. If it “looks” outward, then the floor element is installed first. Then a plumb line determines the location on the ceiling.
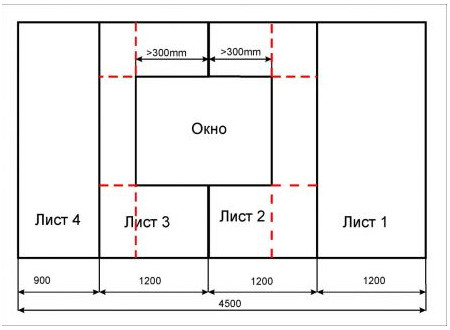
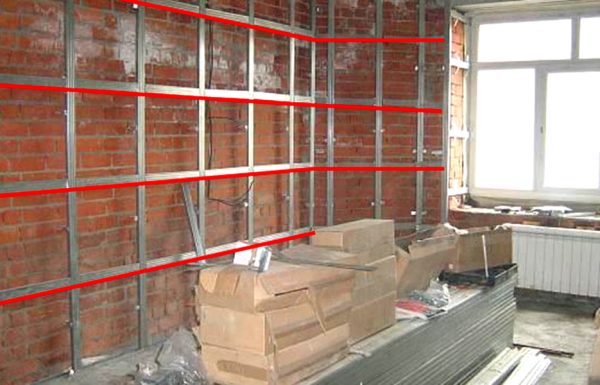
Red dotted line - how not to divide sheets
Marking option if there is a narrow strip

If the ceiling height is greater than the length of the sheet, the sheets are attached staggered
So, two profiles are already installed (on the ceiling and floor). Now it's up to the rack profiles. First, the two outermost elements are mounted, they are attached to the PN and to adjacent walls. Then every 60 cm. This is easy to do: apply markings on the ceiling guide and lower the points onto the floor element with a plumb line, now the two points can be connected to each other.
On the resulting lines, straight hangers must be installed every 50-60 cm. PS will be attached to them, the ends of which will be installed in the guides. In order for all profiles to be in the same vertical plane, it is necessary to stretch a strong thread in several rows (4-5) between the two extreme elements. Now each profile is set according to them and attached to the hangers.

If you decide to choose plasterboard with high degree strength, which could bear high loads (its thickness varies between 16-24 mm), it is recommended to install three profiles under each sheet. This means that you will have to install, starting from the edge (from the wall), every 120 cm, two joined vertical rack profiles.
What is the easiest way to make the perfect wall for any type of subsequent interior decoration? Assemble a frame from a metal profile and cover it with one or two layers of gypsum plasterboard (plasterboard). We'll tell you how to minimize the complexity of selecting the necessary material and assemble a frame for drywall.
Advantages of plasterboard wall construction
GKL (plasterboard sheet) is a universal material for rough finishing of any type of heated premises. A wall surface made with this material, after minimal modification, is suitable for painting, wallpapering, and laying any types of tiles. Nowadays, frameless technology exists and is often used, which involves installing plasterboard boards directly onto the base wall using specialized glue. But still, the main method of creating a wall surface from gypsum plasterboard is the preliminary creation of a lathing onto which plasterboard sheets are sewn.
Why is a frame for drywall on the wall a priority? This technology has several undoubted advantages, such as:
- convenience of hidden installation of various communications (from electrical wiring to sewer pipes);
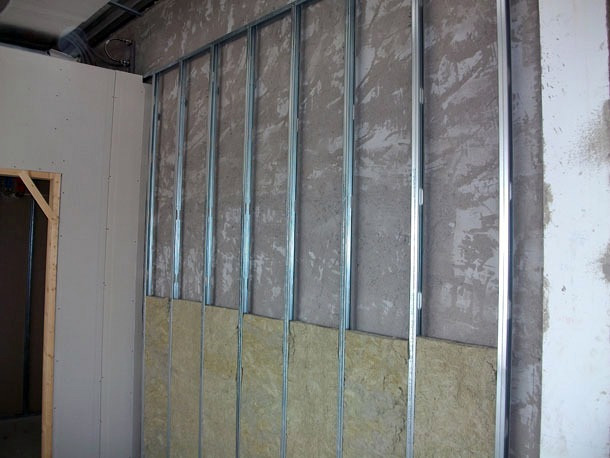
- the possibility of laying insulation or soundproofing material in the gap between the base surface and the sheathing;
- structural strength and long term services;
- the ability to create a smooth surface that meets modern finishing requirements (when installing drywall with glue it is difficult to achieve an ideal result).
Depending on the material used, the lathing for subsequent cladding can be made of wood or metal. When the technology was first introduced, priority was given wooden structures. There were several reasons for this:
- there were no metal profiles for drywall on sale; if they appeared, their quality was low;
- there was no choice of additional fastening devices (hangers, “crabs”, etc.), the necessary hardware for installing a frame under plasterboard made of metal profiles;
- the technology of assembling a metal structure had not been mastered, so the craftsmen preferred intuitive wooden bars and slats to metal products.
Now the situation has changed radically. The choice of components for assembling the frame is large, and the quality of the parts is excellent. For each item you can choose from 2-3 types of products from different manufacturers. In terms of total cost, a metal structure is a little more expensive than a wooden structure, but profile lathing is easier to assemble and much more durable. For these reasons, now in most cases the frame is made from a profile for plasterboard, and wooden lathing is gradually becoming a thing of the past. The technology for assembling a wall structure from galvanized metal profiles has been thoroughly studied and supplemented with some improvements by domestic craftsmen. Its rules and subtleties will be discussed later, but now we’ll tell you what set of materials will be needed for the work.
We select the necessary material - it is important to count everything and not forget anything
To assemble a metal sheathing, you will need many different components, both in quantity and in name. Let's start with the names of the frame parts and their purpose.
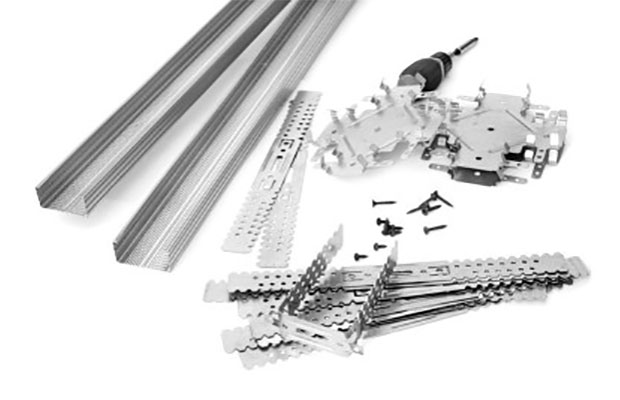
So, regardless of the volume of work to be done, to create a wall structure you will need the following materials:
- profiles of two types - guides (PN) and load-bearing (also known as ceiling profiles (PP));
- direct hangers or “pawns” (in construction slang);
- single-level profile connectors or “crabs”;
- special screws for metal (“fleas”);
- quick installation dowels or wood screws (depending on the material of the base wall, ceiling and floor);
Despite the fact that we are talking about assembling the frame, drywall is purchased immediately. Why? You will understand from the description of the technological process.
Now in more detail about each type of necessary materials. Profiles for mounting frames come in a variety of configurations and sizes. For a wall structure, only two types are needed. The PN profile is designed to create a guide perimeter for precise installation of the remaining components of the sheathing. At the end it has dimensions of 270/270 mm and a smooth surface. A supporting structure is formed from the PP profile, where these parts serve as vertical posts. The end size of the supporting profile is 540/270 mm. Its side surfaces (shelves) have three longitudinal grooves, and the front surface of the back has many small pits. That those other profiles come in lengths of 3 and 4 meters. The required number of PN profiles is calculated based on the footage of the perimeters of the walls being sheathed; the PP profile is calculated based on the selected pitch of the racks (40 cm or 60 cm).
Direct hangers are rigid perforated plates made of galvanized steel. Their purpose is to connect the load-bearing posts of the drywall frame to the base surface. They were called “pawns” because in the working position (after bending) the plates have a U-shape. Suspensions come in different lengths and rigidity. The longer the “pawn”, the thicker and harder the metal. The minimum length of the parts is 25 cm (unfolded), the maximum is 70 cm. For the installation of wall sheathing, the shortest (less often) or medium-length (40 cm) straight hangers are usually used. “Pawns” are calculated as follows - 3 pieces for each rack up to 2.5 m high and 4 pieces for a height of 2.5-3.5 m.
“Crabs” are needed to install transverse jumpers between the posts, cut from a PP profile (additional rigidity). The “crab” design allows you to quickly and reliably connect the elements of the supporting profile in the same plane and in a mutually perpendicular direction. Often, instead of “crabs”, masters use other, more simple ways cross connection, but if you strictly follow the technology, it is necessary to use single-level connectors. The number of these parts depends on the number of reinforcing ribs. You need one “crab” for each rack with one cross member.
To connect the various metal parts of the frame to each other, “fleas” are used - small self-tapping screws (the slang name was given due to their size) equipped with a drill at the end. Thanks to this design of the fleas, there is no need to additionally drill a hole before screwing in a small connecting screw, which significantly speeds up the work. The number of fleas is taken arbitrarily with a reserve (screws are cheap and sold in packs of 100 to 1000 pieces).
To screw the gypsum board to the posts and cross members of the sheathing, you will need special self-tapping screws. They resemble black wood screws, but have a more frequent thread pitch. To create a plasterboard wall, you need self-tapping screws 25 mm long for single-layer sheathing and 45 mm long when installing two layers of plasterboard. For high-quality installation of a whole sheet of drywall, you need approximately 50 pieces of self-tapping screws.
To install guide profiles and fix direct hangers to the base wall, you will need dowels or wood screws. Dowels (6x40 mm or 6x60 mm) for quick installation are useful if the wall is made of dense building material (brick, concrete). If the basic building structure is made of porous material (foam blocks, aerated concrete, shell rock) or wood, wood screws are used as fixing hardware. The same situation occurs with the ceiling (ceiling) and floor when installing guide profiles. To fix one suspension you will need 2 fasteners, to install 1 m of the PN profile 1.5-2 dowels (screws).
Wall 12.5 mm comes in several types. Moisture-resistant (designated GKLV), fire-resistant (GKLO) and endowed with resistance to moisture and temperature influences at the same time (GKLVO). For ordinary rooms with a normal microclimate, simple plasterboard is chosen, for bathrooms and kitchens - moisture-resistant. If you need to sheathe an unheated boiler room, you should choose GKLVO. Regardless of the properties, wall sheets are available in two sizes - 120x250 cm and 120x300 cm. The required amount of gypsum board is calculated based on the total area of the walls plus a small (about 5%) reserve for a possible pattern.
A convenient tool is half the success in your work
Installing a frame under drywall requires not only the availability of the necessary materials in sufficient quantities, but also the selection of a set of the necessary tools. The list of tools for assembling the sheathing is presented in the following list:
- a hammer drill will be needed to drill holes for dowels, so you should equip the power tool with a Pobedit drill with a diameter of 6 mm;
- a screwdriver is the most popular device when assembling a load-bearing metal structure; you will need two bits for it - a regular figured one and one with a limiter for screwing in plasterboard screws when covering the finished sheathing;
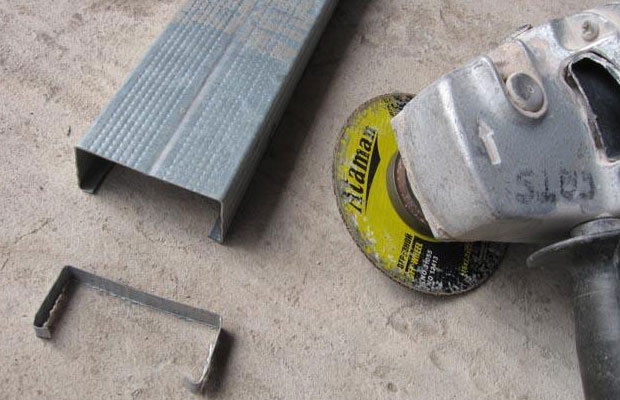
- an angle grinder (angle grinder) with a metal disc or metal scissors for cutting profiles of the required length (it is better to work with scissors, but there are craftsmen who are accustomed to using an angle grinder - whatever is more convenient for you);
- a bubble level (spirit level) and a plumb line will be needed to control verticality when installing guide profiles and supporting posts;
- painting thread with paint will help you easily draw the contours according to which the PN profiles will be attached;
- measuring tape – you don’t need to remind us about the function of the tool once again;
- a thick fishing line or nylon thread will be needed as a guide when aligning the supporting posts in one plane;
- construction knife with a set of replaceable blades for cutting gypsum boards.
A laser level can replace a plumb line and, in many cases, a building level. Using this tool is much more convenient and the result will ultimately be more accurate, so if you have a laser level, it would be a sin not to use it.
If you decide to use a grinder to cut the profile, take care of basic safety rules. Be sure to wear glasses when cutting metal profiles, do not work with the tool overhead, and do not remove the protective casing from the angle grinder, which is “interfering” with many people.
Having collected a set of the necessary tools on hand, and stocked up on the material for assembling a frame from a metal profile for drywall, you can read the next section and begin the practical implementation of your plan.
In assembling a structure from a profile for gypsum board sheathing, you will need an assistant, especially if the area and height of the wall are significant.
How to make a frame from a profile - step-by-step instructions
Before you begin assembling the sheathing, you need to consider some points. Firstly, all communications planned here are laid first. Particular attention is paid to electrical wiring and layout of switches and sockets. It is necessary to route the cables in such a way (not forgetting to “hide” them in the cable channels) so that you don’t have to search for the necessary wires when the frame is sheathed with plasterboard.
Secondly, it is necessary to provide for the installation after finishing the finishing work of hanging items, especially bulky and heavy ones (the “top” of a kitchen unit, a boiler, a wall-mounted heating boiler, a TV, etc.). To avoid problems with the reliable installation of such items, it is advisable to attach thick wooden blocks to the base surface in the section of the wall intended for installation and mark their coordinates on the sketch (after finishing, you may not remember the exact location of the mounting pads). It is more convenient to do this after installing the racks, before covering them. The main thing is not to forget.
You need to assemble a frame from a plasterboard profile so that all the corners in the room end up being straight. To do this, initially a perimeter is marked on the floor surface, taking into account the rectangularity of the corners (painting thread is used) and the distance from the mounting wall. Having made such markings and made sure that the angles are right (we apply school knowledge - the Pythagorean theorem), we proceed to install the floor guide profile - we place it on the floor so that the outer shelf coincides with the drawn line and pull it to the surface.
Next, we’ll look at how to make a frame for drywall using one wall as an example. We cut off a fragment of the PN profile one centimeter less than the height of the ceiling and insert it into a guide element fixed to the floor near one of the walls. We expose it vertically and fix it to the surface. We do the same on the other side. Using paint thread, we beat off a straight line on the ceiling corresponding to the outer shelves of the vertically installed profiles. Similarly to the floor, we fix the ceiling section of the PN profile. The result is a guide perimeter installed in a vertical plane. The further process looks like this.
- 1. Install the supporting racks. We cut the PP profile to its height and insert it into the lower and upper guide elements of the sheathing. We set them at equal distances, taking one of the walls as a reference point. If you need a reinforced frame, choose a strut pitch of 40 cm; the standard design assumes a distance between the supporting profiles of 60 cm. Another step is impossible, since it must be a multiple of the width of the gypsum board. There is no point in installing racks after 30 cm - firstly, it is redundant, and secondly, there will be difficulties with screwing the profiles to the hangers.
- 2. We fix the “pawns” to the wall opposite each rack. With a ceiling height of about 2.5 m, the height of the suspensions should be positioned like this: the first - 55-60 cm from the floor, the second - 110-120 cm, the third - half the distance from the second “pawn” to the ceiling. The hangers are fixed straight and bent before connecting them to the racks.
- 3. Having secured the hangers to the wall, we stretch the guide thread between the outer flanges of the vertical guide profiles, first slightly bending the posts towards the base wall. Guided by the thread, PP profiles are alternately aligned along the thread and fixed with “fleas” to the bent hangers. The protruding ends of the mounting plates are bent towards the wall (there is no need to cut them off).
- 4. The last step is to install the cross bars. According to the technology, they are installed approximately at the level of a meter from the floor, although nothing prevents the installation of additional stiffeners. To further increase the strength of the structure, each cross member can be strengthened by installing a direct suspension.
The sheathing on the adjacent wall is done in the same way, with the difference that one of the vertical guides will be attached not to the base wall surface, but to the elements of the frame assembled before. You can do this: first sheathe the finished area, and then begin assembling the structure on the adjacent wall. There will be no mistake in this and such a move will not affect the strength of the mounted metal structure in any way.
Making a frame for drywall is a large part of the work in the technology of creating a rough finish from gypsum plasterboard. Sheathing a finished structure is easier and faster than assembling it. But in installation plasterboard sheets There are also nuances that you will learn about in the next section.
Metal sheathing - one or two layers?
In most cases, battens one gypsum board thick are used. This is quite justified if the finishing cladding is supposed to be another similar material that gives the wall additional strength. When there is wallpaper, paint or a thin layer of decorative plaster on the wall, accidental mechanical damage to the plasterboard sheathing is quite likely, which can lead to the reworking of the entire wall, including the dismantling of the gypsum board. If activity is expected in the room (gym, billiard room), it is better to sheathe the metal profile frame with two sheets of plasterboard. It is very difficult to break through a double layer of cladding even if desired.
But first, let's look at installing one (or the first) layer of drywall. Installation begins from the angle from which the pitch of the supporting profile was calculated. The first sheet is usually laid without the need for a side pattern - the gypsum board is adjusted only in height. After taking measurements, the excess is cut off with a construction knife - first a shallow cut is made in the face cardboard, after which the gypsum core is broken and the back “paper” is cut off.
The sheet is made 1-1.5 cm shorter than the distance from floor to ceiling. Before attaching the drywall to the frame, place about 0.5 cm of supports under it, which are removed after screwing the plasterboard. This is how deformation gaps are formed between the finishing material and the building surfaces. The sheet is screwed with a screw pitch of about 20 cm to each profile. The heads of the screws should not be deeply recessed, nor should they be left protruding above the front surface. A correctly screwed self-tapping screw should be recessed into the cardboard by approximately 1.5 mm. A special bit with a travel limiter helps speed up the process of tightening screws and regulate the degree of their immersion in drywall.
The remaining sheets are installed in the same way, close to the previous ones. The last KGL on the wall is cut out from the side according to the distance to the adjacent wall. To screw the first layer of plasterboard sheets, self-tapping screws 25 mm long are used. If a second layer of drywall is intended, longer screws (45 mm) will be needed. There is nothing complicated in installing gypsum plasterboard with a second layer - everything is done exactly the same way, only the sheets are shifted by one profile so that the seams do not coincide.
The strength of any structure or building depends on the supporting structure, consisting of linear elements and called the skeleton or frame. Plasterboard structures are no exception.
Drywall is used everywhere. Partitions are made from it, ceilings and walls are sheathed with it. With the help of this material, it is easy to do with your own hands what was previously available to craftsmen - hide irregularities, perform redevelopment, etc. But most importantly, they love it for the speed and ease of installation due to the frame structure.
Apartment renovation using gypsum boards
If the structure of the frame is done correctly, the technology and sequence are followed, the elements are used High Quality, a gypsum plasterboard structure will last for many years.
The basis of the frame is the profile. It is divided into carrier and guide. The latter forms planes and is attached to load-bearing surfaces. The carrier is used to secure drywall or other sheet material.
The main material from which frame elements are made is galvanized steel. This contributes to the durability of the frame in any operating conditions. Due to differences in purpose, profiles differ in geometric characteristics and shape:
- Load-bearing (CD) or ceiling/rack-mounted (PP). The current type for ceilings and walls is CD-60 (PP-60). It has high strength, low weight and bends easily, which is important for assembling multi-level ceilings. Available with rail lengths from 2.75 m to 4.5 m and a cross section of 60 by 27 mm.
Metal profiles with a length of 3 and 4 m are popular.
- Arched, which bends by hand, with the same functions and dimensions. This profile is expensive and is used to create shaped structures.
- Guide made of UD or PN metal. Experience has shown that it is optimal for drywall UD-27 (PN27), the cross-sectional dimensions of which are 28 by 27 mm. Just enough to fit the CD-60. The length of the standard rail is 3 m.
 Profile types
 - Load-bearing or rack-mount metal, arches and partitions CW. It is also labeled PS. Rarely used due to lack of rigidity. For gypsum plasterboards, we recommend CW-50 with cross-sectional dimensions of 50 by 50 mm. There are similar elements with a larger cross-section - CW-75, CW-100 (50 by 75 mm and 50 by 100 mm, respectively).
- The UW (or PN) guide is used in conjunction with the CW. The most suitable for working with gypsum boards is UW-50. Used to form external corners. Section size – 50 by 40 mm. Parts with larger sizes - UW-75, UW-100 - are used to assemble frames with CW-75, CW-100.
The thickness of the metal from which the profile is made varies, but the optimal one is 0.55 - 0.6 mm.
Additional frame elements
There are many elements on the market that simplify assembly and increase the strength of frames. The most commonly used standard ones are:
- Suspensions. There are straight and anchor. The direct suspension for the supporting profile is a perforated metal strip with a length of 7.5 to 30 cm, which is bent in the shape of a P before installation. The most common length is 12.5 cm. The suspension is attached to the supporting surface with a dowel and is designed for a load of up to 40 kg.
An anchor or spring suspension with traction is used if the straight length is not enough. The length of the rod-spoke is from 25 to 100 cm. This suspension is designed for a 25 kg load. It is also called a quick suspension - it simplifies the installation of the ceiling in a horizontal plane.
- Connectors of supporting profiles - longitudinal, cross-shaped, two-level and corner. Longitudinal is used to increase the length of the supporting profile. Cross-shaped or single-level is called a “crab”.
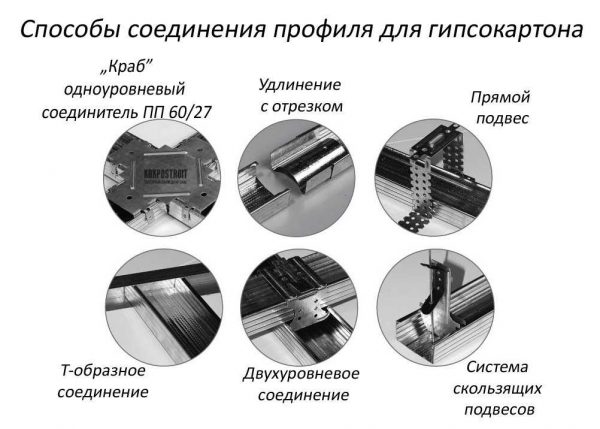 Types of connectors for gypsum boards
 It is used to fasten metal slats of the same level crosswise. Capable of supporting up to 20 kg of weight per square meter. meter of surface on only latches without fixing with screws. Two-level is designed for connecting load-bearing profiles of different levels.
Installation of a metal frame is unthinkable without fasteners. The most commonly used types are:
- Dowels. For assembly, plastic dowels measuring 6 by 40 mm and 6 by 60 mm are used. The latter are mainly used - with their help the guides are attached. The frame of the second level is attached first.
- Self-tapping screws. To connect the frame elements to each other, drilling screws (with a gimlet head - LB) or piercing screws (with a sharp head - LN) with a length of 9 to 16 mm and a diameter of 3.5 mm are used. But it is better to use universal ones with a press washer and a sharp head or tex with a size of 9.5 by 3.5 mm. Drywall sheets are screwed with TN25 metal self-tapping screws, 25 mm long and 3.5 mm in diameter, with frequent threads. If there are several layers of gypsum, use self-tapping screws 35 mm long.
To fix anchor suspensions to the ceiling, a wedge anchor is chosen instead of a dowel.
Assembly principle
Before assembly, determine the dimensions of the sheathed surfaces. If a major renovation is being carried out, then they begin to mount the frame on the ceiling, and then on the walls. The work begins with marking.
Marking the ceiling begins from its lowest corner, and the walls - from the room filled inside or from the slopes of the windows. Calculations are also performed. The profile is attached in increments that are a multiple of the size of the gypsum board sheet, 60 or 40 cm.
 Types of fasteners for drywall
 Each wall is brought to full readiness (with cladding) and then proceed to the next one. During installation, the installation of sound and heat insulation, lamps and the laying of communications are taken into account. Typically, 10 cm is left between the frame and the load-bearing surface.
Place sealing tape under the guides.
The installation of “bugs” is accompanied by coating with sealant so that there is no squeaking when the building shrinks. It is better to cut the profile with a grinder. A laser level or a two-meter construction level is used - they are more accurate. Instead of arched frame elements, regular gypsum plasterboard is also used. To do this, cut it into pieces and cut the sides in increments of 5 cm - this is how it bends by hand.
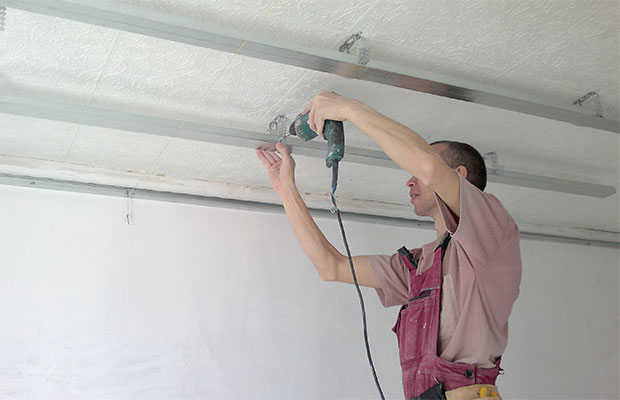
Metal ceiling frame assembly technology
Installation begins with drawing the position lines of the guide profile. Make this more convenient using a laser level. The curvature of the ceiling, the thickness of the profile, gypsum board sheet and insulation are taken into account. Lines are applied around the entire perimeter of the room.
The next stage is cutting and installing the guides. They are fastened with dowel-nails in increments of 50 cm. Next, the attachment points of direct suspensions - the supporting profile - are marked on the ceiling. The distance from the wall to the first one is 20 cm. The rest are placed in increments of 40-60 mm, but not less than one meter.
Then the supporting profile is prepared. If necessary, it is extended using a longitudinal connector.
The carriers are installed in the following order: the first is placed 10 cm from the wall, the second is 40 cm from it, and all the rest are placed in increments of 50 cm. If you plan to hang heavy chandeliers, then the spacing is reduced by 5 cm. At this stage, it is important to make sure that the lamps did not hit the frame. After checking for flatness, the hangers are screwed to the profiles.
 Gypsum board ceiling frame
 Jumpers (bearing in the opposite direction) are installed less frequently. They connect with “crabs”. The actual position of the supporting profile is marked on the walls so as not to miss the next installation of drywall sheets.
Metal wall frame assembly technology
The first step is to determine the littered side - marking the wall begins with it. Along the marked lines, a guide profile is laid and secured around the entire perimeter or only on the ceiling and floor. Fastened with dowels.
Now we begin to install the carriers:
- They are pre-cut into pieces 1 cm shorter than the distance between the guides - this makes it easier to insert. It is advisable to place the first one 10 cm from the edge of the wall or in a corner. The installation step is 40 or 60 cm. It depends on the required rigidity.
- Connect with self-tapping screws to a press washer.
- Next, attach the hangers to the wall using dowels.
Before attaching the hangers to the racks, several control threads are pulled - they allow you to align the profile in the plane.
- When everything is smooth, connect the hangers and profiles.
- In the corner, the profile is attached to the wall with a corner made from a piece of the profile. It is cut along the side, bent at 90 degrees, one end is attached to the wall, and the other is screwed to the supporting profile with self-tapping screws. This device provides a stronger connection than conventional hangers.
You can do this differently: attach a profile rail across the entire length of the room, and then screw the hangers to the profile. This will keep the supporting profile from twisting when connecting to the hangers. First, the central hangers are attached, moving to the edges. But this method requires suspensions with additional holes in the ears.
 Wall frame made of gypsum plasterboard
 If the height of the walls is greater than the length of the plasterboard, then the installation of crossbars is required at the junction of the sheets. They are made from a supporting profile and attached without special connectors. It is enough to cut off the sides from the ends, insert them into the guides and secure them with self-tapping screws and a press washer. Take into account that the sheets are installed in a checkerboard pattern, so the jumpers are placed at the top or bottom along the width of the sheet.
Technology for assembling a metal partition frame
On the walls, ceiling and floor, markings are made for guides, taking into account the width of the partition. Next, cut or extend the profile to the required dimensions and begin its installation. Fastening is carried out with dowels. Step – 60 cm.
The video shows the process of assembling the partition frame using the Knauf system:
After installing the guides, proceed to the installation of vertical posts from the supporting profile. It is also installed in increments of 40 or 60 cm, depending on the required structural rigidity. They are connected to the supporting profile of the rack with self-tapping screws on each side in four places or with a cutter.
Cross members from the supporting profile are mounted with the same spacing. The carriers are connected using side cutouts on the crossbars. Fastened with self-tapping screws.
It is important to consider the presence of wiring and communications. Special fasteners are made for them. Attention is also paid to doorways and niches, if they are planned. For greater strength, jumpers are installed between the walls of the partition, which are made from pieces of profile.
If corrugated PS is selected, it is not secured with a cutter. Due to the corrugated surface, they stand securely. This saves installation time.
In contact with