Hi all! Meet the next guest lesson. This time Rusana shares her experience with us. Everyone knows that Adobe Illustrator is a vector editor. But if you suddenly want to draw Pixel Art in it, then advice from Rusana will come in handy. Using the technique from her lesson, you can play with vector pixels to your heart's content :)
In this tutorial we will look at a very simple and fast way to create pixel images.
So, open a new document of size 1000x1000px. Next, select a tool Rectangular Grid Tool.
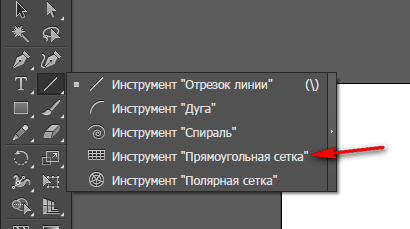
Double-click on the tool and a window with options pops up.
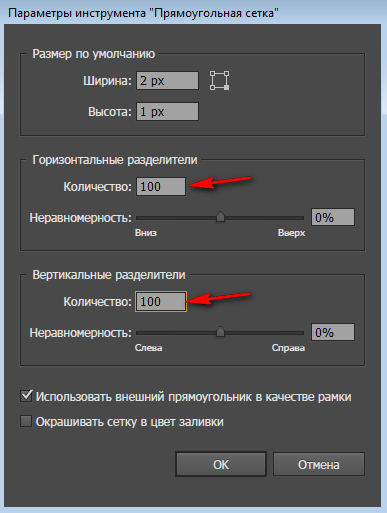
We are interested in the number of horizontal and vertical separators; the size of our “pixels” depends on them. We'll exhibit 100 on 100 And OK. Now with the clamped Shift(so that the pixels are square and not rectangular) stretch the grid over the work area. I recommend making the grid size according to the size of the work area, in our case 1000x1000px, it will be easier to navigate if you later want to add more elements.

Now select a tool Live Paint - "Quick Fill" (hotkey K).
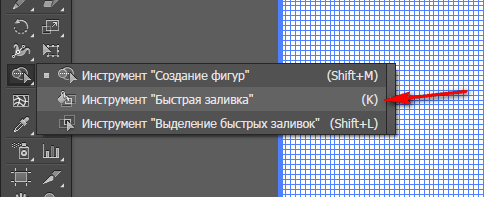
Take the color we need (fill only, no stroke) and start drawing along the grid. Click Quick Fill on the squares and they will be filled in.
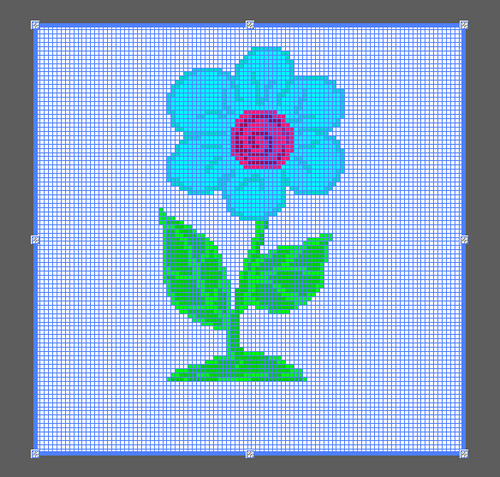
If you go beyond the outline of the drawing, or draw where there should be an empty space, simply draw this place with a color without fill and without stroke.
When the drawing is finished, select a tool Selection Tool (V), and go to the menu Object > Expand.
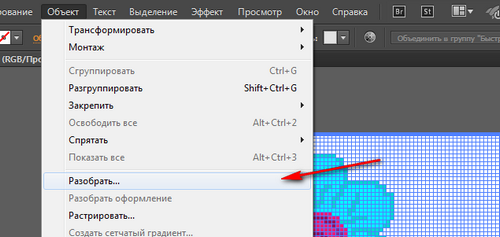
We don’t change anything in the pop-up sign - click OK. This is what we got.
2D sprites are graphical objects used in almost all mobile games Oh. Despite the proliferation of 3D games, such sprites are still very popular among application developers for mobile platforms. Thanks to these elements, you can revive game objects and create a dynamic, attractive picture for players.
Sprite skills are a must for anyone who wants to become a mobile game developer. And we will tell you where to look for these graphic elements and how to work with them correctly. Nowadays you can find many free and paid tools online that take into account all the needs of pixel art creators.
What is pixel art?
Pixel art is relative the new kind digital art that uses editing at the individual pixel level to create an image. The term “Pixel Art” first appeared in 1982, although by that time the concept of such creativity had already existed for at least 10 years.
Pixel graphics are saved in file formats that use lossless compression - GIF or PNG. The JPEG format is not recommended for this purpose because it uses lossy compression. As a result, artifacts remain in the images. Pictures may be significantly distorted, and the colors of individual pixels may change. Moreover, JPEG files are larger in size than PNG and GIF.
Pixel graphics can be divided into two main forms: isometric and non-isometric (flat). Isometric graphics allow you to create 3D images. In this case, 3D processing is not required. Similar examples can be seen in some older games.
Non-isometric graphics show an object from only one side, such as the top or front.
Sprites
Sprites are animated graphic objects that are widely used in the creation of mobile games. Sprites can be made from any drawing or animated object. It is one of the most used visual components for creating games on mobile platforms.
Why use sprites?
Easy scene creation
With sprites, you can quickly add and remove visual elements without editing other graphics in the scene. For example, you can quickly add fighter figures to the map in a turn-based strategy game. This simplifies the design of complex game scenes, the introduction of new characters and items for players.
Improved performance
Sprites allow you to use the same image over and over again, displaying it on the screen at a certain point in time. Instead of several files, only one is uploaded. This reduces the size of the game and reduces performance requirements. For animation, a sprite sheet is created - a file containing frame-by-frame images for creating animation.
10 Pixel Art Tools
We've already figured out how sprites work. Now it's time to move from theory to practice. To work, you can use one of the tools described below. All these graphic editors for pixel images are downloaded for free and will help you draw pixel art online.
A free online editor with a focus on creating sprites. Allows you to import created pixel art. The program has a simple user-friendly interface. Great choice for those who want to quickly start creating a sprite sheet.
Pixie
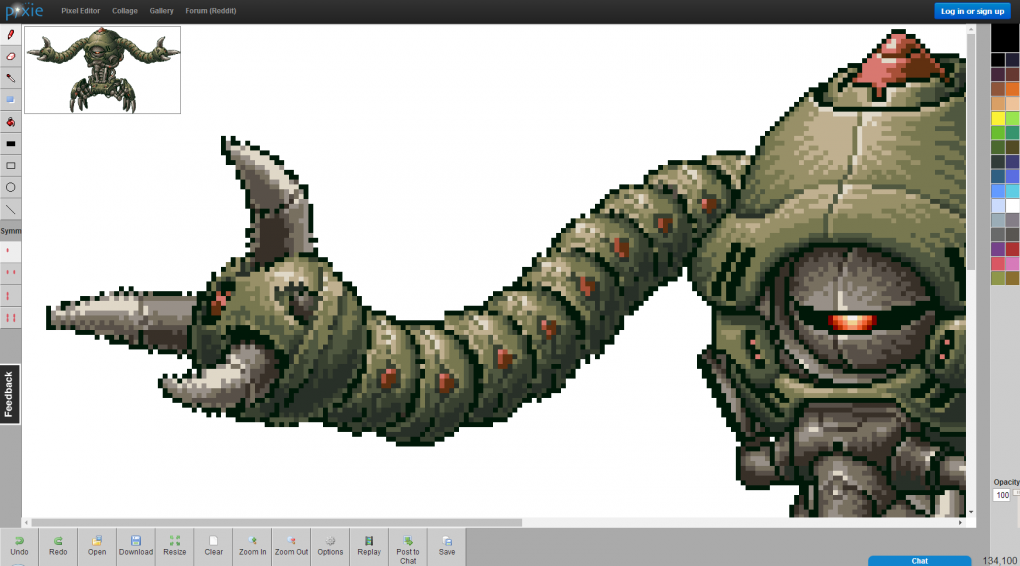
Another fully functional online editor. It is not as good at working with sprite sheets as PiskelApp. But the editor is easy to use and allows you to use your imagination 100%. You can draw the image freehand on a white canvas.

Raster editor. Includes a number of tools and effects that make it especially useful when creating game graphics, sprite sheets, and pixel art. Can be downloaded for all major OS. In particular, it supports KolibriOS.
GIMP
GIMP is graphics editor for desktop with open source code. Work with raster images, partially supports vector graphics. Supports photo manipulation: changing the background, retouching, color balancing and much more. Also used for pixel art and creating sprite sheets.
It has a slightly ill-conceived training system for beginners. However, it is a powerful multi-functional tool that can satisfy almost all your image editing needs. Supports working with PDF format.
PyxleOS
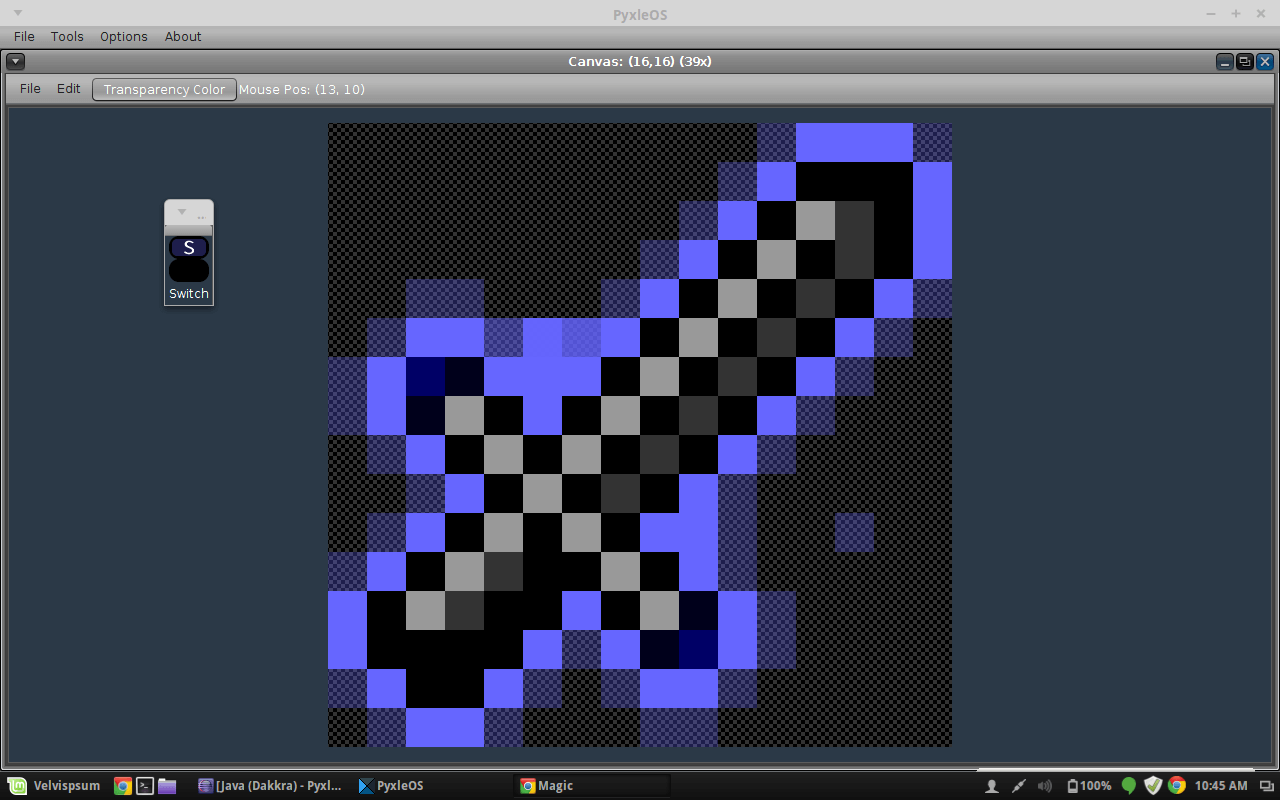
An open source editor created in the Java programming language. This made it possible to make the program cross-platform. You can run PyxleOS on any device that supports Java. If you are looking for a tool to create graphics from large pixels, this is exactly what you need.
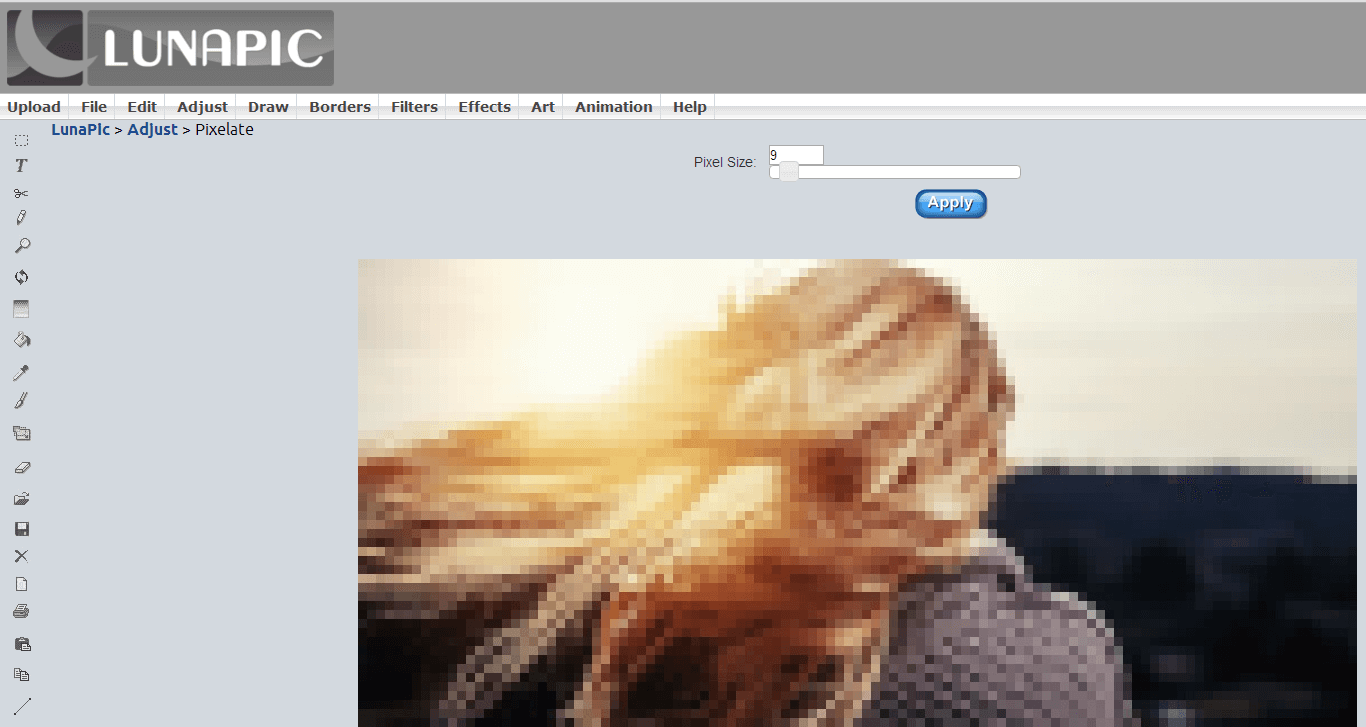
LunaPic is an online tool with a range of image editing features. One of the most interesting features– pixelation of any image, including photographs. To do this, simply upload an image and click Adjust, then select Pixelate.
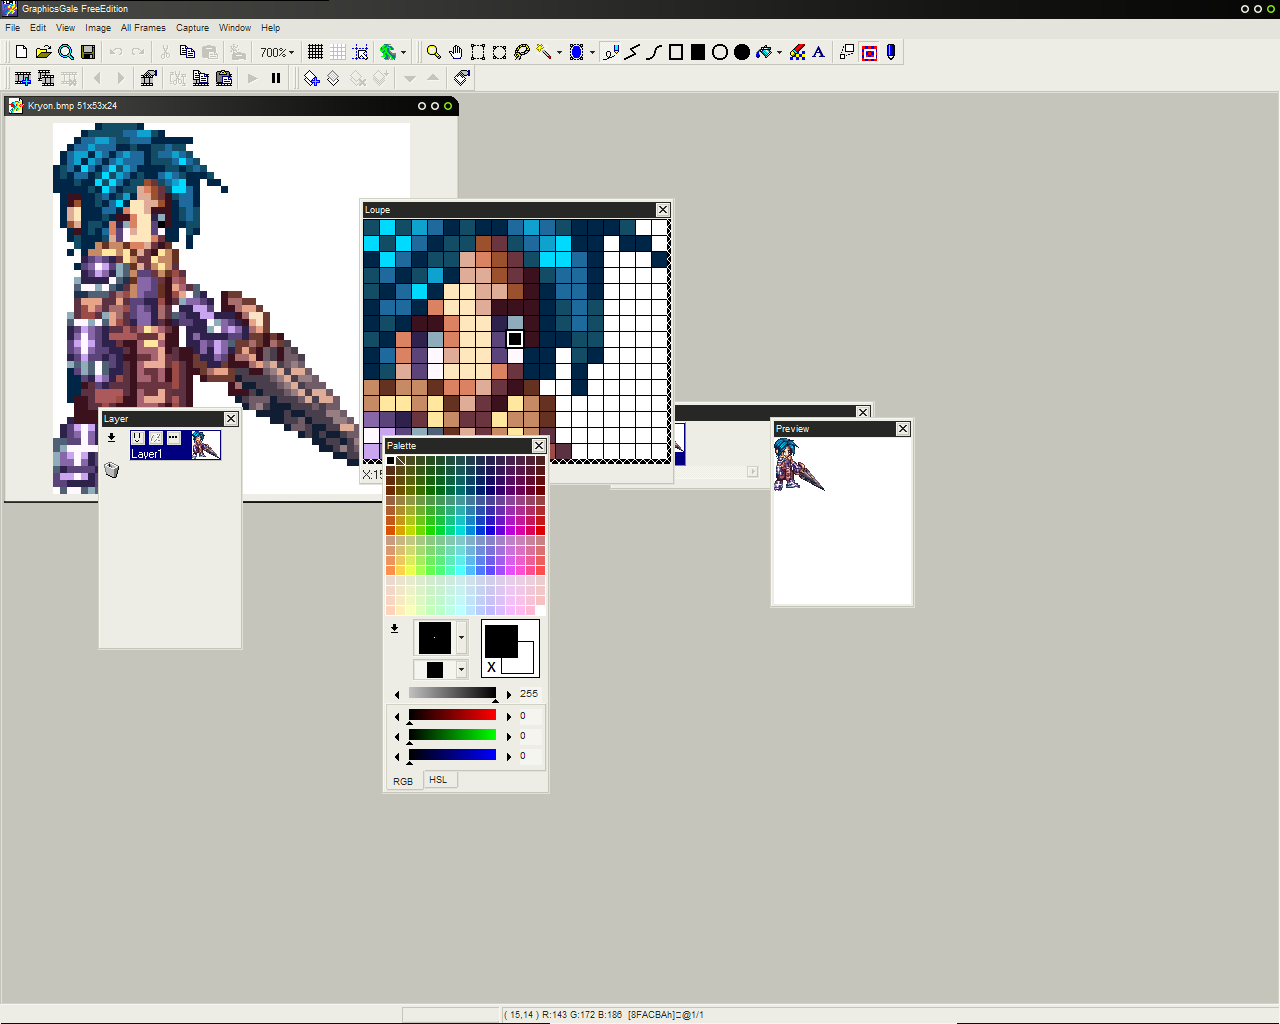
GraphicsGale
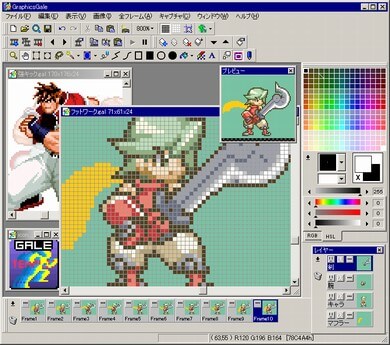
GraphicsGale is an animated graphics editor available in paid and free versions. IN free version provides the ability to work with pixel graphics. The results are saved in PNG files. The set of tools is quite sufficient to create a full sprite sheet. GraphicsGale is an easy to use tool with a wide range of features for creating sprites.
Make Pixel Art

An interesting interactive tool that allows you to create pixel art immediately after visiting the site. It can be considered a bit simplistic compared to some other services. But Make Pixel Art could be for you best choice, if you need to quickly draw a new game character or implement another idea.
Created on a computer using a raster graphics editor, where the image is edited at the pixel level. Older (or less than fully functional) computers, Game Boy games, games for older video game consoles, and many mobile phone games primarily use pixel graphics.
Distinctive features of pixel graphics
It is a common misconception that any drawing or sketch made using raster editors is pixel art. This is incorrect, a “pixel” image differs from a “non-pixel” image by technology - manual editing of the image pixel by pixel. Therefore, pixel art differs from other types of computer art in the following features:
- small size of the final drawing,
- a small number of flowers,
- lack of anti-aliasing (usually).
Pixel graphics use only the simplest tools of graphic editors, such as “pencil”, “straight” or “fill”. Therefore, there are masterpieces of pixel graphics made in Microsoft Paint and other non-full-featured editors.
In any case, the use of tools that do not operate on individual pixels (such as the Brush) and automatic filters (such as anti-aliasing) are considered unacceptable in "real" pixel art - such tools add new pixels automatically, violating careful manual placement. The “rule of good form” is to use a minimum number of colors; ideally, standard 16 colors, available on the vast majority of video subsystems, even the earliest ones: three bits are encoded in them R,G,B signals and the fourth bit encodes the brightness.
Some classic fine arts, such as cross stitch, mosaic, and beadwork, resemble pixel art because the design is composed of small colored elements, similar to the pixels of modern monitors.
Advantages
- One of the easiest styles of computer art to learn (a simple pixel picture can be drawn even without any special artistic abilities).
- Requires little memory due to the use of palette formats with a small number of colors.
- Even with very poor color rendering, the pixel art does not lose its expressiveness.
- The most beautiful graphic style available on systems with a limited color palette.
- Looks good on screens with clear pixel boundaries (like LCD).
Flaws
- Doesn't handle automatic scaling well (when the resolution changes, the picture needs to be redrawn).
- Virtually inaccessible to automatic rendering systems.
Drawing Techniques
Pixel art made in Paint
Drawing usually begins with a sketch, which consists of basic lines and defines the nature of what the artist intends to depict. These can be created by tracing a scanned drawing, and are quite often shared by other artists. There are other methods, some of which resemble regular drawing.
The limited palette requires the use of blur to achieve different colors and shades, but due to the nature of pixel art, this must only be done manually. Sometimes you can even find “handmade” anti-aliasing - including with the alpha channel of the PNG format, which allows you to overlay the image on any background.
Here are some examples of using the above techniques:
1. The basic form of blur is two colors in a “checkerboard” of 2x2 pixels. Changing the density of each color produces halftones. 2. Stylized blur with randomly scattered 2x2 pixel squares allows you to achieve unusual effects. Small circles can also be used. 3. Hand-drawn anti-aliasing.
Storage
GIF file (318 bytes).
PNG file (258 bytes).
JPEG file (706 bytes).
Pixel graphics are usually saved in “lossless” formats, that is, those that can preserve every pixel of the image without losing fidelity. Since there are few individual colors in a pixel art, palette formats are often used. PNG and
They try not to save pixel graphics in a lossy compression format that is not suitable for elements of a pixel art, even if the compression is minimal. The JPEG compression algorithm can cause serious distortion of the original appearance of the pixel art due to the fact that it can change the colors of individual pixels. In terms of size, JPEG files with such pictures are even larger than those saved in GIF or PNG. Lossless compression (GIF, PNG-8) gives a smaller file size without leading to loss of quality.
Classification
Isometric
Flat pixel graphics implies a front, top or side view.
Isometric pixel graphics drawn in a projection close to isometric. Examples can be seen in games that display three-dimensional space without using 3D processing. Technically, in isometrics, the angles should be 30° from horizontal, but this makes the lines look jagged in pixel art. To eliminate this effect, lines are selected with a pixel ratio of 1:2, and the angle is 26.565° (arc tangent of 0.5).
Less common other projections- dimetric or perspective.
Story
Term pixel art was first used by Adele Goldbert and Robert Flegal of the Palo Alto Research Center Corporation in 1982. Although the graphics themselves were used 10 years earlier in the “SuperPaint” program by Richard Shoup, in Xerox PARC, etc.
Pixel graphics were widely used in the 1980s on computers and consoles with limited palettes. The advent of variable 256-color palettes put an end to the dominance of pixel art in games; with total spread
Part 7: Textures and Blur
Part 8: Tile World
Preface
There are many definitions of pixel art, but here we will use this: an image is pixel art if it is created entirely by hand, and there is control over the color and position of each pixel that is drawn. Of course, in pixel art, the inclusion or use of brushes or blur tools or degraded machines (not sure), and other software options that are “modern” are not used by us (actually put at our disposal means “at our disposal” , but logically it seems more correct this way). It is limited to the pencil and fill tools.However, you can’t say that pixel art or non-pixel art graphics are more or less beautiful. It's fairer to say that pixel art is different and better suited for retro style games (like Super Nintendo or Game Boy). You can also combine the techniques learned here with effects from non-pixel art to create a hybrid style.
So, here you will learn the technical part of pixel art. However, I will never make you an artist... for the simple reason that I am not an artist either. I will teach you neither human anatomy nor the structure of the arts, and I will say little about perspective. In this tutorial, you can find a lot of information about pixel art techniques. In the end, you should be able to create characters and scenery for your games, provided you pay attention, practice regularly, and apply the tips given.
- I also want to point out that only some of the images used in this tutorial are enlarged. For images that are not enlarged, it would be good if you took the time to copy these images so that you can study them in detail. Pixel art is the essence of pixels; studying them from afar is useless.
In the end, I have to thank all the artists who joined me in creating this guide in one way or another: Shin, for his dirty work and line art, Xenohydrogen, for his genius with colors, Lunn, for his knowledge of perspective, and Panda, the stern Ahruon, Dayo, and Kryon for their generous contributions to illustrate these pages.
So, let me get back to the point.
Part 1: The Right Tools
Bad news: you won't draw a single pixel in this part! (And that's no reason to skip it, right?) If there's a saying I hate, it's "there are no bad tools, only bad workers." I actually thought that nothing could be further from the truth (except maybe "what doesn't kill you makes you stronger"), and the pixel art is a very good confirmation. This guide aims to introduce you to various software, used to create pixel art, and help you choose the right program.1.Some old things
When choosing software to create pixel art, people often think: “Choice of software? This is madness! All we need to create pixel art is paint! (apparently a play on words, drawing and a program)” Tragic mistake: I talked about bad tools, this is the first one. Paint has one advantage (and only one): you already have it if you're running Windows. On the other hand, it has a lot of shortcomings. This is a (incomplete) list:*You cannot open more than one file at the same time
* No palette control.
*No layers or transparency
* No non-rectangular selections
* Few hotkeys
* Terribly inconvenient
In short, you can forget about Paint. Now we will look at the real software.
2. In the end...
People then think: "Okay, Paint is too limited for me, so I'll use my friend Photoshop (or Gimp or PaintShopPro, they're the same thing), which have thousands of features." This can be good or bad: if you already know one of these programs, you can make pixel art (with all options for automatic anti-aliasing turned off, and many of the advanced features turned off). If you don't already know these programs, then you will spend a lot of time learning them, even though you don't need all of their functionality, which will be a waste of time. In short, if you've been using them for a long time, you can create pixel art (I personally use Photoshop out of habit), but otherwise, it's much better to use programs that specialize in pixel art. Yes, they exist.3. Cream
There are many more programs designed for pixel art than one might think, but here we will consider only the best. They all have very similar characteristics (palette control, repeating tile previews, transparency, layers, etc.). Their differences are in convenience... and price.Charamaker 1999 - good program, but distribution appears to have stalled.
Graphics Gale is much more fun and easy to use, and it retails for around $20, which isn't too bad. I'll add, trial version There is no time limit, and it comes with enough kit to make good enough graphics. It just doesn't work with .gif, which isn't such a problem since .png is better anyway.
The software more commonly used by pixel artists is ProMotion, which is (obviously) more convenient and faster than Graphics Gale. Oh yes, she is dear! you can buy full version for a modest amount... 50 euros ($78).
Let's not forget our Mac friends! Pixen is a good program available for the Macintosh, and it's free. Unfortunately I can't tell you more because I don't have a Mac. Translator's note (from French): Linux users (and others) should try , and GrafX2. I urge you to try them all in demo versions and see which suits your convenience. In the end it's a matter of taste. Just know that once you start using a program, it can be very difficult to switch to something else.
To be continued…
Translator's notes from French to English
This is a great tutorial on pixel art, written by Phil Razorbak from LesForges.org. Many thanks to Phil Razorback for allowing OpenGameArt.org to translate these guides and post them here. (From the translator into Russian: I didn’t ask permission, if anyone wants, you can help, I don’t have enough experience communicating in English, much less French).Translator's note from English to Russian
I’m a programmer, not an artist or a translator, I translate for my artist friends, but whatever good is wasted, let it be here.The original in French is somewhere here www.lesforges.org gamedev Add tags Pixel art for beginners. | Introduction.
Pixel art(written without a hyphen) or pixel graphics- a direction of digital art that involves creating images at the pixel level (i.e., the minimum logical unit that makes up an image). Not all raster images are pixel art, although they all consist of pixels. Why? Because ultimately, the concept of pixel art encompasses not so much the result as the process of creating an illustration. Pixel by pixel, and that's it. If you take a digital photo, greatly reduce it (so that the pixels become visible) and claim that you drew it from scratch, this will be a real forgery. Although there will probably be naive simpletons who will praise you for your painstaking work.
It is currently unknown when exactly this technique originated; the roots are lost somewhere in the early 1970s. However, the technique of composing images from small elements goes back to much more ancient forms of art, such as mosaics, cross-stitching, carpet weaving and beading. The very phrase “pixel art” as a definition of pixel art was first used in an article by Adele Goldberg and Robert Flegal in the journal Communications of the ACM (December 1982).
Oddly enough, it was Mr. Scientific and technological progress, who pushed pixel graphics to the last positions in the mid-90s, and later returned it to the game - showing the world mobile devices in the form cell phones and PDA. After all, no matter how useful a newfangled device may be, you and I know that if you can’t at least play solitaire on it, it’s worthless. Well, where there is a low-resolution screen, there is pixel art. As they say, welcome back.
2. Tools.
What do you need to create pixel art? As I said above, a computer and any graphics editor capable of working at the pixel level are enough. You can draw anywhere, even on a Game Boy, even on a Nintendo DS, even in Microsoft Paint (another thing is that drawing in the latter is extremely inconvenient). There are a great variety of raster editors, many of them are free and quite functional, so that everyone can decide on the software themselves.
I draw in Adobe Photoshop, because it’s convenient and because it’s been around for a long time. I won’t lie and tell you, muttering my dentures, that “I remember Photoshop was still very small, it was on a Macintosh, and it was numbered 1.0.” This did not happen. But I remember Photoshop 4.0 (and also on Mac). Therefore, for me the question of choice has never been a question. And therefore, no, no, but I will give recommendations regarding Photoshop, especially where its capabilities will help significantly simplify creativity.So, you need any graphic editor that allows you to draw with a tool of one square pixel (there are also non-square pixels, for example round ones, but they this moment not interested). If your editor supports any set of colors, great. If it also allows you to save files, that’s great. It would be nice if he knew how to work with layers, because when working on a fairly complex picture, it is more convenient to arrange its elements into different layers, but by and large this is a matter of habit and convenience.
Shall we start? Are you probably waiting for a list of some secret techniques, recommendations that will teach you how to draw pixel art? But the truth is that, by and large, there is nothing like that. The only way to learn how to draw pixel art is to draw it yourself, try, try, don’t be afraid and experiment. Feel free to repeat other people's work, don't be afraid to seem unoriginal (just don't pass off someone else's work as your own, hehe). Carefully and thoughtfully analyze the works of masters (not mine) and draw, draw, draw. Several useful links await you at the end of the article.3. General principles.
Still, there are several general principles that can’t hurt to know. There are really few of them, I call them “principles” and not laws, because they are more of a recommendatory nature. In the end, if you manage to draw a brilliant pixel art bypassing all the rules - who cares about them?
The most basic principle can be formulated as follows: the minimum unit of an image is a pixel, and, if possible, all elements of the composition should be proportionate to it. Let me break it down: everything you draw consists of pixels, and the pixel must be readable in everything. This does not mean that the picture cannot contain elements at all, for example, 2x2 pixels, or 3x3. But it is still preferable to construct an image from individual pixels.
The stroke and generally all lines of the drawing should be one pixel thick (with rare exceptions).
Fractures deprive the drawing of its natural smoothness and beauty. And if fragments 3, 4 and 5 are obvious and can be easily corrected, with the others the situation is more complicated - there the length of a single piece in the chain is broken, it would seem a trifle, but the trifle is noticeable. It takes a little practice to learn to see these places and avoid them. Kink 1 is knocked out of the line because it is a single pixel - while in the area where it was inserted, the line consists of segments of 2 pixels. To get rid of it, I softened the entry of the curve into the bend, lengthening the top segment to 3 pixels, and redrew the entire line in 2 pixel segments. Breaks 2 and 6 are identical to each other - these are already fragments 2 pixels long in areas constructed by single pixels.
An elementary set of examples of inclined straight lines, which can be found in almost every pixel art manual (mine is no exception), will help you avoid such kinks when drawing:
As you can see, a straight line is made up of segments of the same length, shifted by one pixel as it is drawn - only in this way is the effect of linearity achieved. The most common construction methods are with segment lengths of 1, 2 and 4 pixels (there are others, but the presented options should be enough to implement almost any artistic idea). Of these three, the most popular can confidently be called a segment length of 2 pixels: draw a segment, move the pen by 1 pixel, draw another segment, move the pen by 1 pixel, draw another segment:
Not difficult, right? All you need is a habit. The ability to draw inclined straight lines in 2-pixel increments will help in isometry, so we’ll look at it in more detail next time. In general, straight lines are great - but only until the task arises of drawing something miraculous. Here we need curves, and many different curves. And we take into account a simple rule for rounding curved lines: the length of the curve elements should decrease/increase gradually.
The exit from the straight line to the rounding is carried out smoothly, I indicated the length of each segment: 5 pixels, 3, 2, 2, 1, 1, again 2 (already vertical), 3, 5 and so on. Your case will not necessarily use the same sequence, it all depends on the smoothness that is required. Another example of rounding:
Again, we avoid kinks that spoil the picture so much. If you want to check the material you have learned, here I have a skin for Winamp drawn by an unknown author, a blank:
There are gross errors in the drawing, and simply unsuccessful roundings, and there are kinks - try to correct the picture based on what you already know. That's all I have with the lines, I suggest you draw a little. And don’t let the simplicity of the examples confuse you, you can only learn to draw by drawing – even the simplest things.
4.1. Draw a bottle of living water.
1. The shape of the object, you don’t have to use color for now.
2. Red liquid.
3. Change the color of the glass to blue, add shaded areas inside the bubble and a light area on the intended surface of the liquid.
4. Add white highlights on the bubble, and a 1 pixel wide dark red shadow on the areas of the liquid bordering the walls of the bubble. Looks pretty good, huh?
5. Similarly, we draw a bottle with blue liquid - here the same color of glass, plus three shades of blue for the liquid.
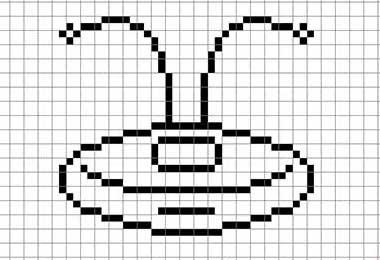
4.2. Drawing a watermelon.
Let's draw a circle and a semicircle - this will be a watermelon and a cut out slice.
2. Let’s mark the cutout on the watermelon itself, and on the slice – the border between the rind and the pulp.
3. Filling. Colors from the palette, medium green is the color of the rind, medium red is the color of the pulp.
4. Let us mark the transition area from the crust to the pulp.
5. Light stripes on the watermelon (finally it looks like itself). And of course – seeds! If you cross a watermelon with cockroaches, they will crawl away on their own.
6. We bring it to mind. We use a pale pink color to indicate the highlights above the seeds in the section, and by laying out the pixels in a checkerboard pattern, we achieve some semblance of volume from the cut out segment (the method is called dithering, more on that later). We use a dark red tint to indicate the shaded areas in the section of the watermelon, and a dark green tint (again, pixels in a checkerboard pattern) to give volume to the watermelon itself.
5. Dithering.
Dithering, or blending, is a technique of mixing pixels in two adjacent areas of different colors in a definitely ordered (not always) way. The simplest, most common and effective method– alternate pixels in a checkerboard pattern:
The technique was born thanks to (or rather in spite of) technical limitations - on platforms with limited palettes, dithering made it possible, by mixing pixels of two different colors, to obtain a third one that was not in the palette:
Now, in an era of limitless technical capabilities, many say that the need for dithering has disappeared by itself. However, its proper use can give your work a characteristic retro style, recognizable to all fans of old video games. Personally, I like to use dithering. I’m not very good at it, but I still love it.Two more dither options:
What you need to know about dithering to be able to use it. The minimum width of the blending zone must be at least 2 pixels (those checkered lines). More is possible. It's better not to do less.Below is an example of unsuccessful dithering. Although this technique can often be found on video game sprites, you need to be aware that television screen significantly smoothed the image, and such a comb, and even in motion, was not detected by the eye:
Well, enough theory. I suggest you practice a little more.
Pixel art can be drawn in any program for working with raster graphics; it is a matter of personal preference and experience (as well as financial capabilities, of course). Some people use the simplest Paint, I do it in Photoshop - because, firstly, I’ve been working in it for a long time, and secondly, I’m more comfortable there. Once I decided to try the free Paint.NET, I didn’t like it - it’s like with a car; if you recognize a foreign car with an automatic transmission, you’re unlikely to get into a Zaporozhets. My employer provides me with licensed software, so my conscience is clear before the Adobe corporation... Although they charge unimaginable prices for their programs, and they will burn in hell for this.
1. Preparation for work.
Create a new document with any settings (let the width be 60, height 100 pixels). The main tool of a pixel artist is a pencil ( Pencil Tool, called hotkey B). If the brush (and the brush icon) is enabled in the toolbar, hover over it, click and hold L.M.B.– a small drop-down menu will appear in which you should select a pencil. Set the pen size to 1 pixel (in the top panel on the left there is a drop-down menu Brush):
Pixel art for beginners. | Introduction.
 Pixel art for beginners. | Introduction.
A few more useful combinations. " Ctrl+" and " Ctrl-"zoom the image in and out. It is also useful to know that pressing Ctrl and " (herringbone quotes, or Russian key " E") turns the grid on and off, which is a great help when drawing pixel art. The grid spacing should also be adjusted to suit you; some find it more convenient when it is 1 pixel; I’m used to the cell width being 2 pixels. Click Ctrl+K(or go to Edit->Preferences), go to the point Guides, Grid & Slices and install Gridline every 1 pixels(I repeat, 2 is more convenient for me).
2. Drawing.
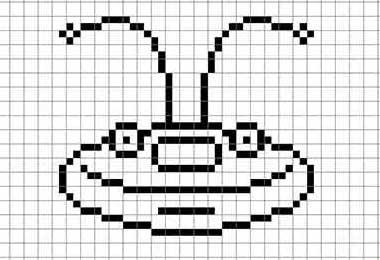
Finally we start drawing. Why create a new layer ( Ctrl+Shift+N), switch to black pen color (press D sets the default colors, black and white) and draw the character’s head, in my case it’s this symmetrical ellipse:
Pixel art for beginners. | Introduction.
 Pixel art for beginners. | Introduction.
Its bottom and top bases are 10 pixels long, then there are segments of 4 pixels, three, three, one, one and a vertical line 4 pixels high. Straight lines in Photoshop are convenient to draw with the Shift, although the scale of the image in pixel art is minimal, this technique sometimes saves a lot of time. If you made a mistake and drew too much, you went wrong – don’t be upset, switch to the eraser tool ( Eraser Too l or "" key E") and delete what you don't need. Yes, be sure to set the eraser to also the pen size to 1 pixel so that it erases pixel by pixel, and the pencil mode ( Mode:Pencil), otherwise it will wash the wrong thing. Switching back to a pencil, let me remind you, via “ B»
In general, this ellipse is not drawn strictly according to the rules of pixel art, but the artistic concept requires it. Because this is the future head, it will have eyes, a nose, a mouth - enough details that will ultimately attract the viewer’s attention and discourage the desire to ask why the head is such an irregular shape.
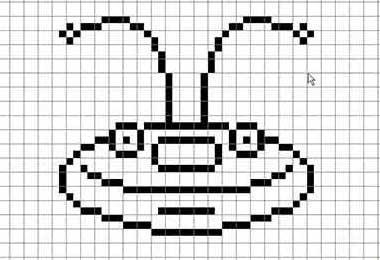
We continue drawing, adding a nose, mustache and mouth:
Pixel art for beginners. | Introduction.
 Pixel art for beginners. | Introduction.
Now the eyes:
Pixel art for beginners. | Introduction.
 Pixel art for beginners. | Introduction.
Please note that at such a small scale the eyes do not have to be round - in my case they are squares with a side length of 5 pixels, with corner points not drawn in. When returned to the original scale, they will look quite round, plus the impression of sphericity can be enhanced with the help of shadows (more on this later, see the 3rd section of the lesson). For now, I’ll slightly adjust the shape of the head by erasing a couple of pixels in one place and adding them in another:
Pixel art for beginners. | Introduction.
 Pixel art for beginners. | Introduction.
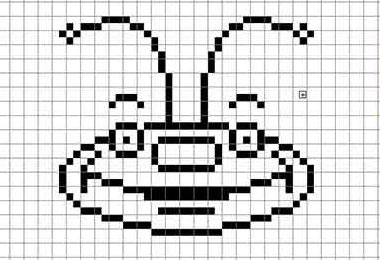
We draw eyebrows (it’s okay that they hang in the air - that’s my style) and facial folds in the corners of the mouth, making the smile more expressive:
Pixel art for beginners. | Introduction.
 Pixel art for beginners. | Introduction.
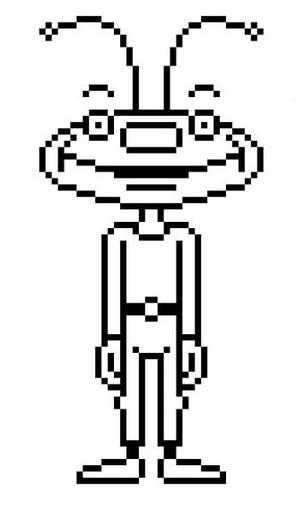
The corners don't look very good yet; one of the rules of pixel art states that each pixel of the stroke and elements can come into contact with no more than two neighboring pixels. But if you carefully study sprites from games of the late 80s and early 90s, this error can be found there quite often. Conclusion - if you can’t, but really want to, then you can. This detail can be played up later during filling with the help of shadows, so for now let’s continue drawing. Torso:
Pixel art for beginners. | Introduction.
 Pixel art for beginners. | Introduction.
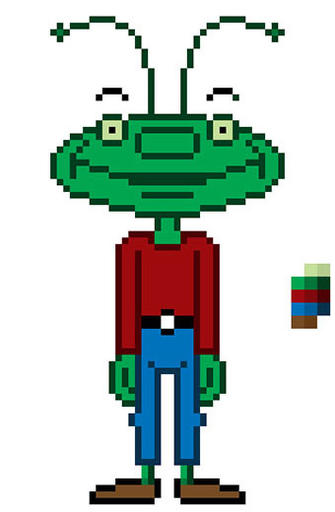
Don't pay attention to the ankles for now, it looks awkward, we'll fix that when we start filling. A small correction: add a belt and folds in the groin area, and also highlight the knee joints (using small 2 pixel fragments protruding from the leg line):
Pixel art for beginners. | Introduction.
 Pixel art for beginners. | Introduction.
3. Filling.
For each element of the character, three colors will be enough for us for now - the main fill color, the shadow color and the stroke color. In general, you can advise a lot on color theory in pixel art; at the initial stage, do not hesitate to spy on the works of masters and analyze exactly how they select colors. The stroke of each element can, of course, be left black, but in this case the elements will certainly merge; I prefer to use independent colors that are similar to the main color of the element, but with low saturation. The most convenient way is to draw a small palette somewhere near your character and then take colors from it using the eyedropper tool ( Eyedropper Tool, I
Having selected the desired color, activate the bucket tool ( Paint Bucket, G). Also, be sure to disable the Anti-alias function in the settings; we need the fill to work clearly within the drawn contours and not go beyond them:
Pixel art for beginners. | Introduction.
 Pixel art for beginners. | Introduction.
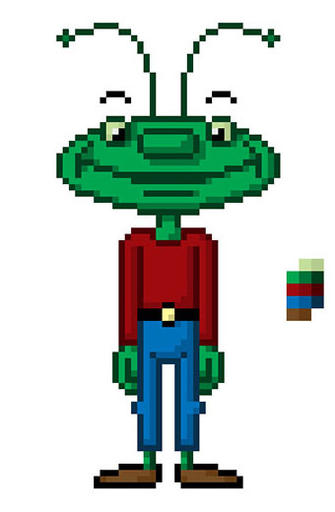
We fill in our character; if we can’t fill in, we draw it by hand with a pencil.
Pixel art for beginners. | Introduction.
 Pixel art for beginners. | Introduction.
Pay attention to the ankles - due to the fact that these areas are only 2 pixels thick, I had to abandon the stroke on both sides and only drew it on the intended shadow side, leaving a line of the main color one pixel thick. Also note that I left the eyebrows black, although this doesn't really matter.
Photoshop has a handy color selection feature ( Select->Color range, by poking the eyedropper into the desired color, we will get the selection of all areas of similar color and the ability to instantly fill them, but for this you need the elements of your character to be on different layers, so for now we will consider this function useful for advanced Photoshop users):
Pixel art for beginners. | Introduction.
 Pixel art for beginners. | Introduction.
4. Shadow and dithering.
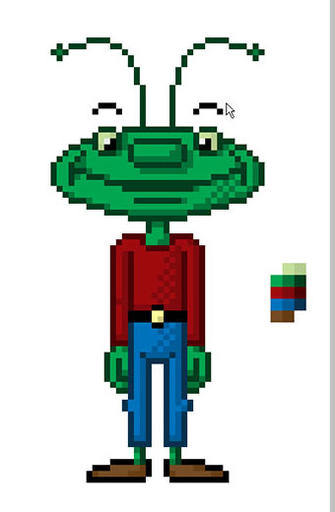
Now select the shadow colors and, switching to the pencil ( B) carefully lay out the shady places. In my case, the light source is somewhere to the left and above, in front of the character - therefore we indicate the right sides with a shadow with an emphasis towards the bottom. The face will be the richest in shadow, since there are many small elements located there that stand out in relief with the help of a shadow on one side, and on the other they themselves cast a shadow (eyes, nose, facial folds):
Pixel art for beginners. | Introduction.
 Pixel art for beginners. | Introduction.
Shadow is a very powerful visual tool; a well-designed shadow will have a beneficial effect on appearance character - and the impression it will have on the viewer. In pixel art, a single pixel placed in the wrong place can destroy the entire work, while at the same time, seemingly such minor adjustments can make the image much prettier.
As for dithering’and in an image with such miniature dimensions, in my opinion, he is completely superfluous. The method itself consists of “mixing” two adjacent colors, which is achieved by staggering the pixels. However, to give you an idea of the technique, I will still introduce small areas of blending, on the trousers, on the shirt and a little on the face:
Pixel art for beginners. | Introduction.
 Pixel art for beginners. | Introduction.
In general, as you can see, nothing particularly complicated. Pixel art What makes it so attractive is that having mastered some patterns, anyone can draw well themselves - simply by carefully studying the works of the masters. Although yes, some knowledge of the basics of drawing and color theory still won’t hurt. Go for it!
While browsing the Internet this morning, I wanted to write a post about Pixel Art, and while searching for material I found these two articles.