Dead pixels on digital screens are not uncommon these days. And the point here is not that the manufacturers are slacking. Defects occur for a number of reasons in production. The production process of screen matrices is very labor-intensive, and quality can only be checked after production. It is then that it becomes clear how many dead pixels have appeared. Typically, manufacturers do not reject products, but classify them into different quality categories depending on the number of faulty pixels. Therefore, the price of such goods is different.
But who wants to have a phone, TV, monitor or camera with faulty pixels that will irritate the eye? That is why it is necessary to have knowledge of how to check defective pixels directly in the store or immediately after purchase.
How to check dead pixels on a TV
Dead pixels on an LCD TV screen appear for two reasons - when a transistor fails or when a subpixel is stuck in one shade.
In the first case, it is believed that it will not be possible to cure the dead pixel. If the transistor burns out, then they can only replace it, and this is still a hassle. Usually it is simply burned out with a laser so that it is less noticeable to the human eye. This pixel is black in color and is clearly visible in light tones of the image.
The second option can be corrected using programs or manipulations at home. Such a pixel looks like a colored dot, which appears if there is a failure in image processing and the pixel is simply stuck on one color.
Each manufacturer has regulations that clearly indicate the number of dead pixels per million and the product class depending on this. The standard is 2 white and black pixels and 5 color pixels per million workers. Such screens are found on the market all the time. It is very rare to see screens with less. But to determine whether you were deceived in a store, you need to know how to check your TV for dead pixels.
If you have already bought a TV, then at home you can check the pixels using programs that are installed on a computer or laptop, and then they are connected to the TV. You can download one of these programs.
If you haven’t bought a TV yet, you can record the same program on a flash drive and bring it to the store. However, to do this, you will need to ask the sellers for a laptop to check, which can be inconvenient and is not always met with enthusiasm.
Another way is to pay a technician at the store to check for you. But why pay when you can check everything yourself? It is enough to display certain colors in order on the screen. White will show black pixels, black will show white, different colors will show other variations of dead pixels. To do this, you just need to write these colors onto a flash drive and insert the drive into the TV. After this it will not be difficult to check. You can also run video and audio tests on your new TV before purchasing.
Dead camera pixels
In cameras, anyone always tries to check the matrix for dead pixels. In the end, it depends on this whether there will be black or colored dots in the pictures or not. This is especially true for professional photographers. The quality of their images should always be at their best. So, how can you check your camera for dead pixels?
For a DSLR camera, you must first turn off noise reduction. automatic focusing, install manual mode exposure, and also reduce the sensitivity of the matrix to almost a minimum. All this can be found in the instructions for the camera.
Without turning off noise reduction, there is no guarantee that the test will be successful. To check the matrix, you need to take pictures with the lens cap at different shutter speeds - 1/30, 1/60, 3 sec. After this, you will need to transfer the pictures to your computer and examine them under high magnification. If there are no dots of other colors, then the first stage of checking the camera was successful.
If there are still dots, then by looking at the frame with a shutter speed of 1/60 of a second, you can determine the number of hot pixels. If they are not there, then everything is fine.
There should be no more than 5-6 hot pixels on a frame with maximum shutter speed. This is due to the fact that making a matrix without them is modern technologies impossible, but such a quantity is not a defect.
Well, if the number of pixels is more than five at all levels, then this is a message to think about choosing a different camera.
Dead monitor pixels
It is easier to check a monitor for dead pixels than a TV because it is initially connected to the computer. It is enough to bring the same flash drive and download a verification program like this one or download it from the Internet.
In any case, the monitor can be checked at home with these in simple ways. Also, for those who do not want to do the test themselves or do not understand anything about it, many digital equipment stores have a technical department that will do all the necessary monitor tests for a small fee.
Dead smartphone pixels
You can check your smartphone for dead pixels in a store if it has Internet access. Usually in branded or large hardware stores Cell phones always have an Internet connection, which will allow you to check not only the performance of the model, but also the speed of the Internet.
To see dead pixels, you can download a simple utility on a smartphone, with which the test is carried out. It's easy to find. The manufacturer's stores always have free version For this purpose, like the Android Screen Test program. Sometimes even the program is already installed on the smartphone from a previous visitor who was interested in the same thing.
Every salesman Every day I face the need to check LCD (liquid crystal) TVs and monitors. Many stores charge money for checking monitors and TVs, I welcome such initiatives, every job should be paid for, and since salesman As a rule, he receives more for checking a TV than for selling a TV, then the check must be carried out efficiently and with an understanding of what you are doing. Below I will explain the algorithm for checking LCD panels and provide the necessary tools - fills for checking TVs and program TFT-Test which is suitable for checking both monitors and TVs, but it is natural for the program to work TFTTest 1.52 You need a computer or laptop with Windows OS installed. In order for more of your colleagues to be able to find this material on the vast expanses of the Internet, do not be lazy to use it.
Tools for checking LCD TVs and monitors.
First you need to write the required complex onto a flash drive. software including - archive with colored fills and gradients with a resolution of 1920x1080 and the program TFTTest. It is also very useful to have a set of test videos with you with which you can demonstrate to the client the capabilities of his TV - 3D support, the quality of drawing dynamic scenes (100, 200, 400, 800 Hz), sound quality, the ability of the player built into the TV to play certain formats .
1. Download fills to check TVs
2. Download the TFTTest program to check monitors for dead pixels you can click on one of the links:
Algorithm for checking TVs (briefly)
A brief description of how to check the TV using previously downloaded fills. To identify (aka) pixels, we use monochromatic fills, adjust the sharpness (of vision) and carefully look at the screen, it is especially difficult to notice a “dead” pixel because it is not visible on every color. The situation is more complicated with the identification of pixels; to identify them, a “checkerboard” or “mesh” fill (also known as moiré) is used.
Moire and focusing. Filling the screen with intricate details, small text or patterns determines whether the screen provides a clear image of various small details. Another test will be able to “catch” the presence of moire - unpleasant shadow effects that “blur” the image, depriving the picture of brightness and clarity.
Algorithm for checking monitors using TFTTest 1.52
TFTTest 1.52 is not just a banal screen fill, but a complex of tests designed to comprehensively test your monitor or TV. You will check everything most Important Features, according to which the monitor is actually selected. After you download the latest version TFTTest 1.52, you can start testing your monitor, if you don't know how to use the program TFTTest 1.52 to identify those harmful dead pixels , then below are instructions for using the program TFTTest 1.52.
Important!
It is advisable to carry out all monitor/TV tests, except for interpolation testing, at the monitor’s “native” resolution. Color depth is 24 or 32 bits. With 8 and 16 bit colors, color gradient tests will show obvious bands not related to the resolution of the monitor's matrix. The frame rate is used in tests to evaluate the performance of the matrix. It is advisable to set the maximum frequency for a given video mode and method of connecting the monitor.
When testing several monitors simultaneously, it is advisable to set the same settings for brightness, contrast and color temperature.
All tests are run in full screen mode according to the selected resolution. When you select Default mode, the currently set video mode is used.
For operating systems Windows 95/98/ME sets the screen resolution and frame rate separately. However, not all frame rates for this permission may be supported by the monitor.
- A set of tests for checking interpolation of “non-native” resolutions
- Color gradient to check matrix linearity and discreteness
- Colored wedges to check the synchronicity of increasing color brightness
- Step gradient to check matrix linearity and discreteness
- Circles for checking interpolation of “non-native” resolutions
- Ring gradient to check matrix linearity and discreteness
- Patterns for checking interpolation of “non-native” resolutions
- Checking font readability
- Grid for checking the legibility of parts
- Moving square
- Moving square with grid
1. Test of matrix backlight uniformity and absence
2. Test set from points, located in a checkerboard pattern, vertical lines and horizontal lines, to check the interpolation of “non-native” resolutions. It is recommended that you configure your monitor for each video mode before performing the test. Tests reveal image heterogeneity in the form of horizontal and (or) vertical stripes, compared to the image in the “native” resolution. The change in average screen brightness when moving from vertical to horizontal lines at native resolution serves as a qualitative assessment of the video channel bandwidth when connected via D- Sub.
3.
Color gradient test. The uniformity of brightness increase from the upper left corner to the lower right corner is checked. On matrices with low color resolution, a step-like change in brightness is observed. On a number of matrices, characteristic diagonal stripes of increased or decreased brightness are observed, due to nonlinear characteristic matrices. When starting, you should pay attention to the installation of 24 or 32 bit colors.
4.
The test is similar to the previous one, but displays several horizontal or vertical color wedges at the same time. The test checks the synchronism of the increase in the brightness of the wedges and the balance of colors.
Change brightness – Plus, Minus
Exit test – Esc RightMouse click
5.
Step color gradient test. The uniformity of the increase in brightness and the resolution of the transition through gradations of brightness are checked. When starting, you should pay attention to the installation of 24 or 32 bit colors.
Changing mode – Left, Right, LeftMouse click
Exit test – Esc RightMouse click
6.
Concentric circle test, to check the interpolation of “non-native” resolutions. It is recommended that you configure your monitor for each video mode before performing the test. Tests reveal image inhomogeneity compared to the image in the “native” resolution.
Changing mode – Left, Right, LeftMouse click
Exit test – Esc RightMouse click
7.
Color Gradient Test. The uniformity of brightness increase along the radius of the circle is checked. On matrices with low color resolution, a step-like change in brightness is observed. When starting, you should pay attention to the installation of 24 or 32 bit colors.
Changing the direction of the gradient – Up, Down
Change color – Left, Right, LeftMouse click
Change brightness – Plus, Minus
Exit test – Esc RightMouse click
8.
A set of patterns for checking interpolation of “non-native” resolutions. It is recommended that you configure your monitor for each video mode before performing the test. Tests reveal image heterogeneity in the form of horizontal and/or vertical stripes, compared to the image in the “native” resolution.
Changing mode – Left, Right, LeftMouse click
Exit test – Esc RightMouse click
9.
A test to check the readability of fonts of various sizes and weights at “native” and “non-native” resolutions.
Changing fonts – Left, Right, LeftMouse click
Change brightness – Plus, Minus
Exit test – Esc RightMouse click
10.
Test to check blurriness and line thickness. Like the previous test, it characterizes the readability of fonts and small details.
Changing mode – Left, Right, LeftMouse click
Change brightness – Plus, Minus
Exit test – Esc RightMouse click
11.
Test for visual assessment of matrix performance. Most obvious when simultaneously testing multiple monitors on matrices different types, and when compared with CRT monitors. Parameters for comparison are the brightness of the moving square, the length of the “tail,” the blurring of the border, the color and geometry of the square.
Information on the left top corner screen:
Cur 1280x1024 32 bit 60 hz - current video mode
60hz 16.6ms - screen refresh rate and interval
Vh=5 p/c Vv=5 p/c - square displacement speed (points/frame)
Change brightness – Plus, Minus
Exit test – Esc RightMouse click
12.
The test is similar to the previous one, but the square moves horizontally or vertically, and a scale grid is applied.
Change speed – Up, Down
Changing mode – Left, Right, LeftMouse click
Change brightness – Plus, Minus
Exit test – Esc RightMouse click
Answers to the most common questions about the TFTTest 1.52 program
Question: There is no moving square in the matrix performance test,
but there are only glitches flickering all over the screen - stripes.
The indicator in the upper right corner shows 0.00 ms.
The same situation with a colored stripe running vertically in the following
section of the test.
Answer: In the video card driver settings, you must enable vertical
synchronization.
Question: When selecting the matrix speed measurement mode, TFTTest shows 16 ms, and in
The documentation for the monitor says 25 ms. And who is lying?
Answer: The program _CANNOT_ measure the speed of the matrix. 16ms is the update time
pictures on the screen, inversely proportional to the frame rate.
Question: After starting the matrix speed measurement on some monitors, there remains
light stripe.
Answer: Indeed, on monitors made on IPS matrices LG-Philips remains
light stripe. The mechanism by which the stripe occurs is unknown. In a few
minutes it disappears and does not have any negative consequences.
Question: Why does the program show 50hz 20ms in matrix speed tests?
although the video card settings are set to 60Hz or 75Hz.
Answer: 50Hz appears when installed in the video card settings as a second
PAL TV devices. If you install an NTSC TV, then the frequency
updates will be 60Hz. And if you disable it in the video card settings
TV output, the screen refresh rate will again become 60Hz
or 75Hz. Let me emphasize once again that this is the refresh rate (drawing)
screen. Even when the program shows 50Hz, the scan frequency
The monitor will still be 60Hz or 75Hz depending on the settings
video cards.
Question: Why does the square “run” across the screen in matrix speed tests?
jerkily.
Answer: Due to non-multiple screen refresh rates and monitor scan rates.
For example, when the PAL TV is enabled in the video card settings
The screen drawing frequency will be 50Hz, and the output to the monitor will be DVI output 60Hz.
Question: I select video mode, but nothing happens.
Answer: The video mode changes only during the test when working in full screen mode.
Instructions for using the Dead pixel tester program
Basic principles:
1) Make sure your screen is free of dirt and fingerprints, if possible clean it with .
2) Make sure your screen resolution for your monitor is set correctly, for example if your screen is 1680x1050, make sure your monitor resolution is set to 1680x1050.
3) Use right button mouse to switch to the main menu and turns off so that you can see the entire screen without any interference.
4) Use the left mouse button to switch between primary colors and fill colors: Black (Check for dead blue pixels), Blue (Check for dead blue pixels), Red (Check for dead red pixels), Green (Check for dead green pixels), White (Check for dead green pixels) dead group of pixels)
5) Every time you choose a new color, carefully inspect the screen for defects (black dots - dead pixels will be visible on the screen of any color)
6) Use [M] to turn on the marker on any suspicious points on the screen. This allows you to inspect the rest of the screen and return to that area / Check if the screen is clean.
[X] in the upper right corner of the screen hides the program dialog box, you can also use the right mouse button or
Left mouse button: scrolls through the primary colors red, green, blue, black and white
Pressing the scroll wheel: Turns the mouse cursor on and off, the scroll wheel changes the display view
Right mouse button: shows and hides the main menu
Pattern selection: Switch between the color on the screen and various models(for example gradients).
Markers: Press the [M] button and a small circle will be drawn at that point. This allows you to further examine the screen for dead pixels, and then return to the marked areas. You can remove a marker by simply placing the mouse back in that position and pressing [M] again, or use [R] to remove all markers on the screen.
Auto Cycle: Automatically cycles color changes without clicking a mouse button. Nearby you can change the speed at which this happens, in milliseconds (1000ms = 1 second)
Main color: Shows the currently selected color
Pattern color: Shows the secondary colors you have selected (use right mouse button to toggle)
Information: Basic information about your current screen resolution.
When buying a monitor, laptop or TV, there is an indicator that is not advertised by the seller, and most buyers do not pay attention to it. And only after purchase they may wonder what these colored or black dots are on the screen. As you know, the screen consists of dots - crystals, each of which is capable of changing color depending on the signal applied to it. This is how the picture is formed on the screen. There are situations when a crystal either cannot change color from its original black color, or, having received one color, is not able to change it to another. It's time to figure out what checking for dead pixels is, how to identify them and how to deal with them.
Visual inspection - nothing is easier
The simplest and quick check matrices for dead pixels on a monitor or TV screen - this is a visual inspection when turning on the device and playing color, dynamic video. If the screen matrix has a dead pixel, it is easy to detect, just look closely at the screen. Pay attention to the dots that do not change color during video playback. The color of such dots can be white, black, red, blue or green. Many stores whose main focus is the sale of television and audio equipment have special generators whose task is to check for dead pixels. The test consists of submitting a sequence of color fills over a certain period of time, which makes it possible to detect a defect in the matrix.
Built-in testing program - a step towards the buyer
Over the past few years, well-known manufacturers, trying to please the buyer, have added specialized functionality to their TVs. Checking for dead pixels on a TV is done using one button. When the program starts, a certain sequence of colors is displayed on the screen; when each color is changed, you can see the dots on the screen that did not have time to change their color. For TVs that do not have a function for checking the screen for dead pixels, you can use other checking methods. For example, launching a special video with external media information or connecting the TV to personal computer or a laptop as a second monitor in order to perform a software test.

Specialized pictures and videos will help
Buying a TV, laptop or monitor is often a pre-planned purchase. Reviews on the Internet and popular publications are studied and a list of necessary items is determined. technical characteristics- it takes more than one day. Checking for dead pixels of the screen matrix can also be planned by the buyer in advance. When buying such an expensive device, you can always find an hour of time to record a set of special pictures or testing videos on a portable memory module, which are stored in huge volumes on the Internet. For example, a video testing the quality of changes in dynamic scenes, called “Japanese woman on a rope.” If watching a video causes discomfort - the image doubles, the image of trees and the girl’s clothes is blurred, then the TV has failed the test. It is important to remember that testing and checking for dead pixels on a TV, monitor or laptop is not comparable in time to what will be spent on warranty repair or exchange of goods.

Programs for testing
Checking your monitor for dead pixels can be done using third-party software. Do not forget that thanks to the presence of additional video inputs on the TV, you can connect it as a monitor to a computer or laptop, performing testing that is no different from testing a monitor. There are a lot of such programs today. There is a complex test that detects dynamic video distortion, determines the response time of the matrix, and a regular check for dead pixels. The program for any testing does not take up much space and can fit on any storage medium. Among the applications for testing the screen matrix, TFTTest, DeadPixelTester, Nokia Monitor Test and the popular online test tft.vanity.dk have proven themselves. The test of any device is carried out only when the screen resolution is set to the manufacturer’s recommended one.
![]()
Pitfalls that few people know about
Checking your monitor for dead pixels is fundamental, but does not address some of the other pitfalls that a user may encounter when purchasing a device. Most LCD screens have factory defects, which the average user is not even aware of, attributing it to poor-quality video recording.
- Tint - white balance. To identify this defect, you need to display a static white sheet on the device screen. Stripes, spots of different shapes and shades will indicate the presence of a defect.
- Banding - appears on a static background of any color in the form of light and dark stripes.
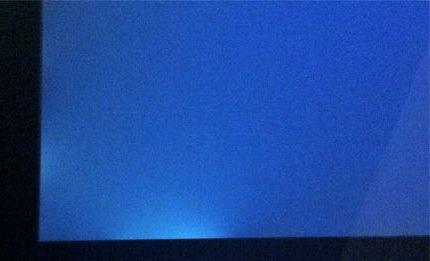
- Lights that are typical only for LED TVs. They are detected in a dark room when either a black picture or white text on a black background is presented on the screen. The light on a black background has white blurs. If the background is black with text, then the text itself blurs.
What about the guarantee?
Yes, you can exchange equipment under warranty, but there are some requirements that you need to know.
- If, within fourteen days from the date of purchase of the device, dead pixels are found, you can, without a twinge of conscience, if you have a purchase receipt, return the equipment to the seller, under the guise of the law “On the Protection of Consumer Rights.”
- Using the manufacturer's warranty, you can exchange equipment in the store, according to the classification. For first-class devices, such as Pioneer and DreamVison brands, one dead pixel is enough. For Class 2 devices such as Panasonic, Sharp or Hitachi, the dead pixel test should show 5 to 10 defects. The most popular third class with famous brands LG, Samsung, Philips, Sony require a minimum of 50 dead pixels.
Don't despair - massage can solve the problem
If you were unable to exchange your device under warranty, you can try “artisanal” methods for eliminating dead pixels. There are two ways to solve the problem.
- Having previously determined the location of the broken pixel and disconnected the device from the network, you can try to restore the operation of the crystal using a physical massage of the defective area with a cotton swab. The probability of restoration is low, but sometimes it eliminates manufacturing defects.
- Using special program, if checking for dead pixels shows a defect, you need to connect the monitor or TV to the computer and try to restore the operation of the crystal using a hardware massage. Manufacturers of massage programs claim that there is a high probability of solving problems. As an example: such programs include Bad crystal, JScreenFix, Pixel Repair.
Dead pixels are sometimes found even on new screens, especially on Chinese counterparts. In this article, I will explain what pixels are and why they can fail, how you can identify dead pixels on an LCD screen, and what you can do to try to fix the problem yourself.
What is a pixel
A pixel (“picture element”) is the basic unit of programmable color on a computer display or in a computer image. The physical size of a pixel depends on what resolution you have set for your display screen. The specific color that a pixel describes is a mixture of three components of the color spectrum - RGB. Up to three bytes of data are allocated to specify the color of a pixel, one byte for each primary color component. True color, or 24-bit color system, uses all three bytes. However, many color display systems use only one byte (limiting the display to 256 different colors).
Screen clarity is sometimes expressed as dpi (dots per inch). (In this usage, dot means pixel.) Dots per inch are determined by both the physical screen size and the resolution.
The reason pixels fail?
If you've never had to deal with stuck pixels, you should know that these small screen defects are usually caused by faulty transistors or uneven distribution of LCD liquid inside the display. Fortunately, this problem can usually be fixed.
Dark spots are usually caused by dead transistors. Can't be fixed. Pixel ports are the wrong color or are otherwise displayed incorrectly: an incomplete subpixel defect from an RGB film layer that is cut incorrectly cannot be corrected.
Bright spots: This is caused by an unstable transistor that passes light through all or none of the sub-pixels.
Dead pixels
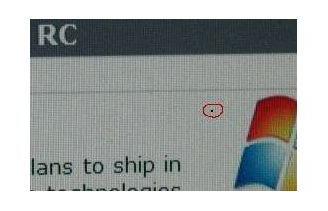
Dead pixels on a liquid crystal display (LCD) that are not working properly appear as dark dots, bright dots, and partial sub-pixel defects. In the picture below you can see examples of dead pixels.
How to check the screen for dead pixels
Video for checking for dead pixels
How to remove dead pixels
Important: None of these methods are guaranteed to work, so you use them at your own risk.
Two methods that will help you get those stuck pixels back into working order.
- Software method.
There are several software solutions, which will try to reactivate stuck pixels. Here are some free ones:
1.UDPixel: free application, which quickly changes all the pixels located around the stuck one. Just keep running for a few hours and see if it fixes your problem.
2.JScreenFix: A web application that turns all pixels on and off approximately 60 times per second.
- Screen massage method.
First, display a completely black image on the screen. The display must be turned on for this to work. Use a small pointed object (you can use an ear stick) with a dull rounded end and gently press on the stuck pixel until it starts working again. Typically, it will take you 10 to 30 minutes to fix this problem. If the pixel stubbornly does not want to work after 30 minutes of massage, you can try a combination of massage with the inclusion of programs for checking dead pixels, described above.
Video for repairing dead pixels
How to check the TV matrix for functionality, check the pixels on the TV?
LCD panel technologies for electronic devices are constantly being improved. Modern monitor, phone and TV screens amaze with their color reproduction, brightness and contrast, but the problem of so-called dead pixels is still relevant today.
The image on a television panel is formed from a huge number of colored dots called pixels. Each pixel consists of three subpixels (blue, green and red) with which the LCD display is capable of displaying millions of colors and shades. Each individual pixel is controlled by its own transistor. If a transistor fails, the corresponding pixel stops functioning.
Depending on the nature of the malfunction, the external manifestation of a defective pixel may look like:
- Type 1 - black dot on a white background;
- Type 2 - white dot on a black background;
- Type 3 - colored dot (red, blue or green).
You must understand that the initial presence of “dead pixels” on the surface of an LCD monitor or TV is a manufacturing defect. In store TVs produce bright images, so it is almost impossible to detect a pixel defect anywhere on the matrix by eye. Often a defective point makes itself known already at home, when the device has been paid for. You need to understand that there is an ISO 13406-2 standard that regulates the permissible number of “dead pixels” in the matrix, at which the device is not considered a defect. That is, returning the TV to the store under warranty or as a defect will not work. Therefore, excessive attention to detail in the store will help you save your money and nerves.
How to check an LCD TV when purchasing?
Since it is possible to see a defective point only against a monotonous contrasting background, we recommend that you download a test to check your TV (you can ), write it to a USB flash drive and go with it to the store for your treasured purchase. The test contains a set of images with colored fills and gradients, a color palette and a fragment of a movie in Full HD quality.
The test displays one-color colors on the screen one by one. background images. When performing the test, carefully and without haste, look through all areas of the screen for the absence of dots of a different color. It can be a continuously glowing pixel or, on the contrary, a dim pixel. It is more difficult to notice the so-called “dependent” pixels, the state of which depends on the state of neighboring ones. To find “dependent” pixels, you need to use “checkerboard” or “grid” fills. Test fills will also help you evaluate such matrix parameters as: contrast, focusing, geometry accuracy, brightness, color rendition and much more. If you perform the test carefully, you will definitely see defective pixel. Playing a test video will help you evaluate the sound quality and capabilities of the built-in player.
For additions or objections, please leave a comment.