
Infrared remote controls remote control have firmly taken their place in consumer electronics. Whatever equipment is not equipped with this very convenient device, these include televisions, stereo systems, microwaves, car CD/MP players, chandeliers and many many other things familiar to us.
Such a widespread use of remote controls could not help but affect their frequent breakdowns. Since it is sometimes difficult to purchase a new remote control needed for a specific device, they are sent in for repair.
How to quickly check the remote control?
The simplest and most effective method is to check remote controls using digital cameras. Nowadays, almost every cell phone has a digital camera.
Many laptops have a built-in webcam. For netbooks, a digital web camera is generally a mandatory attribute. Digital photo and video cameras are also suitable for testing remote controls. In general, any device that has even the simplest digital camera is suitable for testing the remote control.
To check the remote control, you only need to point the emitting infrared LED at the camera lens. On the digital display, when you press buttons on the remote control, periodic flashes of purple light will be visible. This indicates that the remote control is working properly.
Photo shows infrared LED flashes captured by camera mobile phone Sony Ericsson K810i.

If you don’t have devices with digital camera, then you can use the following method.
Instead of an infrared LED, it is necessary to temporarily solder in a regular light-emitting diode. The LED can be of any color: red, green, yellow, white, in general, it doesn’t matter, the main thing is that the LED is 3 volts.
When you press the buttons on the remote control, a temporarily soldered ordinary LED will emit flashes of light. It should be noted that the brightness of the radiation will be low.
In the photo - a regular white LED, soldered in instead of an infrared one.

The remote control can be tested using an infrared photodiode and an oscilloscope.
IN in this case an infrared photodiode is connected to the input of the oscilloscope. When the remote control is operating, pulses of short bursts will be visible on the oscilloscope screen. It is important that the photodiode is connected to the open input of the oscilloscope.
This is how simple and easy it is to check the functionality of any infrared remote control. To do this, it is not at all necessary to collect any sample circuits and clutter up the resulting overloaded workshop, because all the necessary tools are already at hand, especially a mobile phone with a camera
Remote controls fail for various reasons: contact contamination, damage to the resonator, or LED. Successful repair of the remote control is only possible if the location of the fault is determined correctly.
Posting sponsor P&G Articles on the topic "How to check the TV remote control" How to set up Philips remote control for TV How to set up a universal remote control How to set up a Panasonic TV
Instructions
Take a mobile phone with a camera function. Turn on the appropriate mode, and then point the remote control LED at the camera lens. Press all the keys on it one by one. The flashes of the remote control's infrared LED are not perceived by the human eye, but are recorded by the phone's camera. If it turns out that the LED flashes when you press some keys, but does not respond to others, look for a problem with the keyboard. Chaotic slow switching on and off of the diode without responding to pressing any keys indicates a failure of the resonator. Finally, a complete lack of light may be due to a malfunction of both the resonator, the batteries, or the LED. In the latter case, before opening and repairing the remote control, change the batteries in it, observing the polarity, and check the device again. You may not need to repair it after this. If it turns out that the reason is not the batteries, remove them and then disassemble the remote control. If the keyboard malfunctions, clean it by placing all parts of the device, except batteries, in a bowl of water with a little dishwashing detergent added. After keeping them there for about two hours, remove and dry at room temperature for a few more hours. Do not try to speed up the process with a hair dryer - this will cause the board to warp and eventually fail. Reassemble the remote control, install batteries and test. If after this not all keys work, the reason is the depletion of the conductive layer on the contact pads of the rubber pushers. Restoring it is a troublesome task. If the LED or resonator is faulty, unsolder it. Please note that the LED is a polar element, so before desoldering, sketch which pin was soldered to where. Also keep in mind that resonators are sensitive to shock and therefore fail much more often than LEDs. Take the faulty part with you to an electronic components store, where you show it to the seller - he will select another one that matches the parameters. Be sure to say that you need an infrared LED, and a resonator at exactly the same frequency as the sample. Having soldered in a new diode or resonator, assemble the remote control and check again using your phone. After that, test it with your TV. It very rarely happens that the remote control, which perfectly generates infrared flashes when pressing keys, does not work clearly with the TV. This means that the photodetector in the latter is faulty or dirt has accumulated between it and the window in the front panel. Only qualified persons should clean or repair the TV due to high voltage circuits. How simple
Other news on the topic:
A few decades ago, a remote control appeared on the market. Today it is difficult to imagine a TV that has to be switched using panel keys. Philips also began producing remote controls for TVs, DVD players and other equipment. Remains
The Thomson universal remote control is good alternative using personal remote controls for each device. In order to start working with it, you need to configure it. Posting sponsor P&G Articles on the topic "How to set up a thomson universal remote control" How to set up a remote control for
It happens that the instructions from universal remote control The remote control is lost. In this case, you should not give in to panic. The programming procedure for most inexpensive remote controls of this type (not equipped with a display) is the same. Sponsored by P&G Articles on the topic "How to program a universal remote control"
Many people believe that all remotes are the same and are suitable for any TV. But, unfortunately, they are wrong, because almost every model of TV or DVD device has its own specialized remote control. Of course, you can choose a remote control of the same brand that you had before, but
The job of an electrical appliance repairman, for the most part, is to repair not some complex equipment, but “light combat” equipment - remote controls for TVs or radios. These devices become unusable much more often than the devices themselves.
If the remote control is lost or broken, the Vivanco universal remote control comes to the rescue, which will fit almost any device. For the universal remote control to work correctly, you just need to configure the device properly. You will need: suitable batteries; -
It happens that you press the buttons on the remote control, but the TV does not listen. This is especially annoying (if not simply infuriating!) when you are already perfectly seated on your sofa or in your favorite chair, but the remote control doesn’t work, and you really don’t want to get up.
But, nevertheless, you will have to get up from the sofa, because you need to find out what the reason might be, the remote control is faulty, or maybe something suddenly happened to the IR receiver on the TV itself. You can check whether the remote control is working very simply and you don’t need any complex devices for this.
We will do all this using the usual cell phone.
We check the remote control using the phone. How to do it?
In general, this method works not only for TV remote controls, but also for other devices. Here everything depends not on the device for which this remote control is used, but on the operating principle of the remote control itself.I’ll say right away that this method only works for remote controls that operate on infrared radiation. The majority of these still remain, although now there are also radio remote controls for TVs and other devices. You won't be able to check them this way.
What do we need for verification? An ordinary cell phone of any model. Nowadays there are probably no phones left that do not have a camera. It is the camera of your mobile phone that we will need to test the remote control.
The same can be done with any digital camera. But, holding it is not very convenient, and it is especially problematic if it is quite bulky and you have no one to help you. So, the ideal option is to use your phone for this.
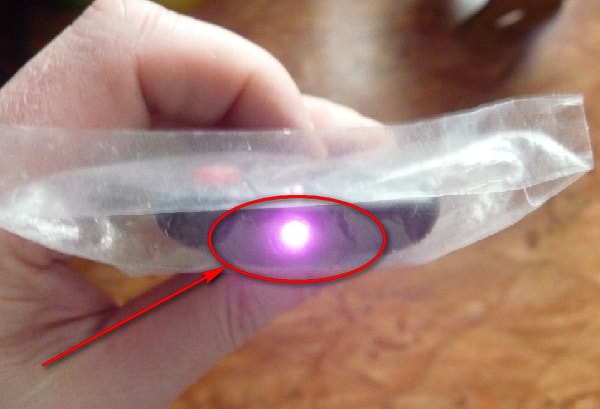
What are we doing? You just need to place the remote control from your TV under the phone’s camera (the camera is turned on and the picture from it should be displayed on the display). This must be done in such a way that you can see the infrared LED in the camera, which is located on all infrared remote controls in their upper part.
Next, you simply press any button on your remote control and at the same time see what your phone’s camera shows you. If the remote control is working, then it should send an infrared signal, and you will see it on the phone.
The infrared LED will flash purple on your phone's screen. This means that the batteries are “alive” and your remote control is working. Although, if the batteries are a little low, the brightness of the signal drops. But, you will still understand that your remote control is working. To be completely confident that it is fully operational, you just need to replace the batteries with fresh ones.
If this helps and your TV starts listening to the remote control again, then very good. Well, if not, then look for the problem in the TV itself. It is quite possible that the infrared signal receiver on it is faulty, or something else happened. Here the problem is more complicated than checking the remote control at home.
It happens that you press the buttons on the remote control, but the TV does not listen. This is especially annoying (if not simply infuriating!) when you are already ideally positioned in your or your favorite chair, but the remote control does not work, and you really don’t want to get up. But, nevertheless, you will have to get up from the sofa, because you need to find out what the reason might be, the remote control is faulty, or maybe something suddenly happened to the IR receiver on the TV itself. You can check whether the remote control is working very simply and you don’t need any complex devices for this. We will do all this using a regular cell phone.
We check the remote control using the phone. How to do it?
In general, this method works not only for remote controls, but also for other devices. Here everything depends not on the device for which this remote control is used, but on the operating principle of the remote control itself. I’ll say right away that this method only works for remote controls that operate on infrared radiation. The majority of these still remain, although now there are also radio remote controls for TVs and other devices. You won't be able to check them this way.
What do we need for verification? Ordinary any model. Nowadays there are probably no phones left that do not have a camera. It is the camera of your mobile phone that we will need to test the remote control. The same can be done with any digital device. But holding it is not very convenient, and it is especially problematic if it is quite bulky and there is no one to help you. So, the ideal option is to use your phone for this.
What are we doing? You just need to place the remote control from your TV under the camera (the camera is turned on and the picture from it should be displayed on the display). This must be done in such a way that you can see the infrared LED in the camera, which is located on all infrared remote controls in their upper part.
Next, you simply press any button on your remote control and at the same time see what your phone’s camera shows you. If the remote control is working, then it should send an infrared signal, and you will see it on the phone. The infrared LED will flash purple on your phone's screen. This means that the batteries are “alive” and your remote control is working. Although, if the batteries are a little low, the brightness of the signal drops. But, you will still understand that your remote control is working. To be completely confident that it is fully operational, you just need to replace the batteries with fresh ones.
If this helps and your TV starts listening to the remote control again, then very good. Well, if not, then look for the problem in the TV itself. It is quite possible that the infrared signal receiver on it is faulty, or something else happened. Here the problem is more complicated than checking the remote control at home.
And here is also a short video on the same topic. Where will all this be demonstrated to you? Let's see. You can then check your remote control in this way.
I. Ivanov
You can check the operation of the remote control in the absence of a TV using an infrared photodiode (PD). For example, the domestic FD-8K would be suitable. The PD leads are connected to the ground and signal probes of the oscilloscope. The remote control is placed coaxially with the FD close to its window. Press any of the buttons on the remote control. In this case, a PWM signal with an amplitude of 0.2...0.5 V should appear on the oscilloscope screen.
The circuits of most television remote controls are the same and include:
- a command generator microcircuit with a quartz resonator;
- an amplifier consisting of one or two transistors;
- LED (or two);
- keyboard and contact field.
In addition, some remote controls have an indicator LED that registers the command.
Let's consider possible malfunctions Remote control systems, methods for their detection and elimination.
1. No signal from the remote control
Check the condition of the batteries. If the supply voltage is less than 2.5 V, the batteries must be replaced. If the voltage is greater than 2.5 V, check the current with a multimeter short circuit Ikz. For serviceable elements it should be equal to 1...3 A. If IsThen open the remote control. This operation requires certain skills and accuracy. The main task in this case is not to leave scratches on the remote control body and not to break the latches. To open the remote control, use a regular screwdriver with a thin blade (currently there are special screwdrivers on sale with a blade 10...20 mm wide and 0.5 mm thick with a short handle).
They begin to open the remote control from the side where the batteries are located, and first disconnect one side of the bottom cover to the entrance window, and then the other in the same way, after which the cover is easily removed.
Conduct visual inspection state of the printed circuit board and keyboard contacts.
Traces of dried liquid on the contact field are removed using a cotton swab moistened with alcohol. Conductor breaks are eliminated by soldering jumpers made of thin wire.
Check for contact between the graphite jumpers and the printed conductors.
By closing any pair of contacts on the printed circuit board, use an oscilloscope to check the presence of a PWM signal at the cathode of the LED.
If there is no signal and constant pressure equals zero, check the continuity of the LED. A working LED should have a resistance in the forward direction of several tens of ohms, and in the reverse direction - several hundred kilo-ohms. A faulty LED must be replaced.
A fairly common defect is a break in the LED output as a result of mechanical impact, for example, after the remote control is dropped.
Check the passage of the PWM signal from the output of the microcircuit to the LED.
2. There is no signal at the output of the remote control chip
lack of supply voltage to the microcircuit;
malfunction of the quartz resonator;
the presence of two or more pairs of closed contacts on the printed circuit board;
breakage of conductors between the microcircuit and the contacts of the printed circuit board;
microcircuit malfunction.
First, check the supply voltage of the microcircuit: it must be at least 2.5 V.
The performance of the quartz resonator is checked by closing any of the pairs of contacts on the printed circuit board. If there is no generation, then most likely the microcircuit is faulty.
3. There is no signal from the remote control. There is a signal at the output of the microcircuit
Possible causes of the malfunction:lack of amplifier supply voltage;
malfunction of amplifier elements;
LED malfunction.
Using an oscilloscope, check the presence of a signal at the cathode of the LED. If there is no signal here, check its passage from the output of the microcircuit to the LED.
The most common defects in this case are failure of the transistor in the output stage of the amplifier, violation of the soldering connections, and the terminals of the amplifier elements.
4. There is no signal from the remote control. The photodiode indicates the presence of a constant voltage level. Batteries drain quickly. The LED is constantly open and a significant current flows through it
Possible reasons:breakdown of one of the amplifier transistors;
the presence of two or more pairs of closed keyboard contacts;
microcircuit malfunction.
The serviceability of the transistors and the presence of closed contacts are checked by dialing. The serviceability of the microcircuit is checked by replacement.
5. Some command is constantly sent from the remote control when the keyboard buttons are not pressed. Batteries drain quickly
Possible causes of the malfunction:reducing the insulation resistance between the terminals of the microcircuit or the contacts of the printed circuit board;
reducing the insulation resistance between the graphite jumper and the printed conductor passing under it;
microcircuit malfunction.
Thoroughly wash the microcircuit terminals with alcohol, removing traces of rosin, dust, and dirt. On printed circuit board Use a cotton swab moistened with alcohol to wipe the contacts. Solder the corresponding pins of the microcircuit from the board. If after this commands from the remote control continue to arrive, the chip is changed. If the signal disappears, look for a current leak from the graphite jumper to the printed conductor. The conductor is cut off on both sides and a jumper made of insulated wire is installed (unsoldered) instead.
6. One or more remote control buttons do not work
Possible causes of the malfunction:increasing the resistance of the keyboard's closing contacts;
crack on the board.
Use a multimeter to measure the resistance of the contacts. For working buttons it is 2...5 kOhm. If the resistance is more than 10 kOhm, the button is faulty. In this case, either change the entire rubber band or repair the contact. Special repair kits for remote controls are available for sale. They consist of contacts made of conductive rubber, which are glued to the faulty keyboard contacts with silicone glue included in the repair kit.
The presence of cracks is determined visually. Damaged printed conductors are restored using thin wire jumpers.
Most modern remote controls provide the ability to convert them into a service remote control. The essence of the modification is to install a new or rearrange an existing jumper on the printed circuit board, and the installation location on the board is indicated.
As an example, the figure shows the RM-836 remote control for SONY TVs with the top cover removed. After installing the jumper in pos. 1
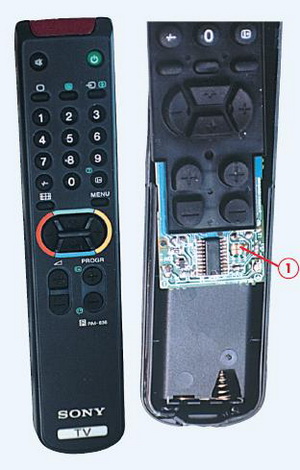
The functionality of the image format change button changes.
Now, after pressing this button twice, the TV is switched from operating mode to service mode.
Repair of remote controls.
M.KireevAfter several years of operation, the functioning of remote controls for televisions and other equipment often malfunctions. This is possible for several reasons: violation of the integrity of the soldering of electronic components, oxidation of the spring contacts in the battery compartment, complete or partial abrasion of the conductive layer applied to the ends of the buttons (Fig. 1),

Which are the most commonly used.
To eliminate the last defect, a simple method is proposed that has been tested for several years and does not require large expenses. On the end of the button, cleaned and degreased, for example with alcohol, the functionality of which needs to be restored, apply one layer of quick-drying glue, for example, “Secunda”, and then stick on a piece of aluminum foil slightly larger than the area of the end of the button. After the glue has hardened, the protruding foil is carefully crimped with tweezers (Fig. 2).
Practice has shown high reliability and trouble-free operation of remote controls repaired in this way.
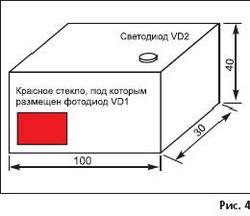
If you have to repair remote controls frequently, you can make a device for monitoring their performance, assembled from available parts (Fig. 3).
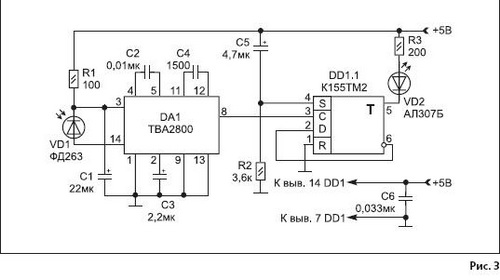
The DA1 chip serves to amplify the signal coming from the infrared photodiode VD1 and generate a sequence of output pulses that goes to the divider DD1.1. When you press any button on a working remote control, the VD2 LED will blink at a frequency of several hertz. The device is conveniently mounted in a housing measuring 100 x 40 x 30 mm (Fig. 4).
The DA1 chip can be replaced with domestic analogues KR1054UI1, KR1054ХА3, KR1056UP1, KR1084UI1, taking into account the difference in pinouts.
Repair & Service