The Explorer program described above is one of the so-called standard programs. These programs are installed along with the operating system, and the list of them is quite wide: Calculator, Notepad, WordPad, Paint and many others. Let's give short description some standard programs.
The calculator, like its desktop counterpart, is used to perform arithmetic and functional calculations. There are two options for the calculator: standard and scientific (Fig. 5.13), switching is done by selecting the appropriate command in the View menu. Help about the purpose of a particular Calculator button can be obtained using the context help.
The mouse cursor is used as a device for selecting one or another “key” of the calculator. For arithmetic calculations, you can type numbers and operation signs on the numeric field of the keyboard.

Rice. 5.13.
Using the engineering view of the calculator, you can additionally perform calculations in various systems Numbers (binary, octal and hexadecimal); functional, statistical and logical calculations.
The use of number systems is convenient when performing some auxiliary operations. For example, when writing a Web page in HTML color basically given in the form hexadecimal number, which can be obtained by entering the decimal color value in the Calculator and changing the number system with the Hex key.
The function keys of an engineering calculator are used to find the values of forward and inverse functions. The inverse function is called by setting the 1pu flag, for example:
Arguments to trigonometric functions can be specified in degrees, radians, and grads.
The need to allocate special buttons for statistical calculations is caused by their widespread use. The statistics window is called up by button 81a. Data for calculations is entered into it using the button Oa. The remaining buttons are used to calculate the sum, arithmetic mean, standard deviation, etc.
The MC, MI, MB, M+ buttons are used to work with the memory register.
The Notepad program (Fig. 5.14) is a simple text editor. It allows you to process only one at a time Text Document small size; does not support paragraph and font formatting; in general, it only allows you to type some text. Compared to the current word processing programs, Notepad looks extremely primitive, but that is why it is indispensable, for example, when writing a Web page in HTML code (other editors add to the document a large number of service information, which significantly affects the file size).
A special place among standard programs is occupied by utility programs, in particular disk maintenance programs.
While working on a computer, the structure of information on the disk may be damaged. The most common file structure errors occur. Thus, sections of files remain on the disk that

Rice. 5.14.
The system considers them occupied with information, but at the same time does not assign them to any file (the so-called lost clusters). Another error is when the same section of the disk is recorded as belonging to two files at the same time (crossed files). Finally, the third type of error is when the file size does not match the value recorded in the file allocation table.
Often the disk itself fails at the physical level. This is common with floppy disks, especially if they have not been used with proper precautions. In this situation, it is necessary to mark the damaged areas of the disk accordingly so that they are not used in the future for recording information.
To correct these and many other errors, use the disk check program BsapsLzk (Fig. 5.15). It is designed to restore the structure of computer disks. It is recommended to run the program after any emergency situations, for example, during an emergency shutdown of the computer. For preventive reasons, it is recommended to check the disk regularly,
Automatically fix system errors Scan and repair bad sectors

Disk check Local disk(B:)
Check Disk Options
? ..............................????......
Rice. 5.15. View of the BsapsPzk program window
approximately once a month (this period depends on the intensity of work with the disk).
The program is launched using the command START Programs -» Accessories -> System Tools -» Disk Check. In the Check Disk window, you need to specify the name of the disk to be checked and define the parameters. With the Standard option, only the file structure of the disk is checked; with the Full option, the disk surface is checked for the presence of bad sectors. The program can run in background.
It is also recommended to run a program to check the surface quality of the floppy disk after each formatting. As a result, you can mark all bad sectors on the disk and reduce the likelihood of losing information.
A file written to disk is saved as a set of several minimal “pieces”, the size of which is determined by the physical and logical parameters of the disk. Typically, a file is written to sequentially located sectors, but during intensive work with the disk, when some files are deleted, others are written (including in place of deleted files), a situation arises when a file is written to sectors located in different parts of the disk.
When working with such a file, naturally, additional time is spent (for example, moving the heads that read information from the disk to another position, which is always slower than reading sectors). A situation may arise when the proportion of such fragmented files becomes significant (up to 10% or more) and the computer slows down. Exist special programs, which are capable of rewriting files on disk so that they are stored in sequentially readable sections. This process is called disk defragmentation.
The Defrag program allows you to defragment both regular and compressed disks.

Rice. 5.16. Defrag window
The program is launched using the command START -» Programs -» Accessories -» System Tools -> Disk Defragmentation. A window opens on the screen (Fig. 5.16), where you need to specify the name of the disk to be scanned and its type.
This program can run in the background. In practice, defragmentation occurs during pauses in the application program. However, if the application program writes to the disk, the defragmentation process will be restarted.
Help system №п(1о№ ХР
The yindows help system contains a huge amount of information about working operating system and computer and is designed to obtain quick information on an emerging issue. The help system starts with the operating system. One of the components of the help system is constantly located in the computer’s memory and displays “pop-up” tips on the screen that appear when you point at one of the desktop objects or any button in the application. They contain information about the actions associated with an object or button.
To call the Help window (Fig. 5.17), you need to select the corresponding command in the main menu or in program windows press the “P1” key or the “?” in the window title.
The Windows XP help system is integrated with MegaSec. Even the structure of the help itself is an HTM file organized as a page with frames (the window consists of two parts). The creation of a help system based on Verb technology has greatly simplified the use of the help system and obtaining help. Topics in Help are divided into topics, sections, and subsections. Each Help topic is located in the left frame of the Help window, making it easy to find the topic you're looking for. The names of sections and subsections are hyperlinks that lead you to the desired section.
The left frame has two more tabs: Index and Search. The Index tab provides a general full list Help system topics arranged in alphabetical order. At the top there is an input field in which you can enter keywords for
© Help and Support Center
O -3> U Index Favorites Magazine?E Support
Help section
Request for support
New features of U/ts1osh$ XP
Music, videos, games and photos
Basics of working in
Protecting Your Computer: Security Basics
Networking and Internet
Working remotely
administration
Settings
computer
Special
possibilities
Printing and fax
Performance and Maintenance
Equipment
Elimination
problems
Ptsh>-msh->dt-i aya”t.zh”
And Connection Invitation for Remote Assistance
Request support or search for information in newsgroups
Job selection
Updating your system using the Windows Update website
in Searching for compatible equipment and programs for
And Undoing changes using System Restore
c Use utilities to view computer information and diagnose problems
Did you know?
If you are connected to the Internet, this area displays links to Help and Support Center information. If you want to connect to the Internet right now, run the New Connection Wizard and create a connection through your Internet Service Provider.
Rice. 5.17. Help Window
search. As you type, the cursor in the list of topics moves; this circumstance is convenient to use to quickly jump to the desired element. On the Search tab, an advanced search option is implemented; topics can be found by keywords in the text of the certificate itself.
The right frame displays the help itself on the topic or section. It can contain text and graphic hyperlinks, pictures, text, animation, and a background picture can be embedded under the help text.
Above the two help frames is a toolbar that makes working with the help system easier. Back and Forward buttons make it easy to move from one section to another. L/e-help is used to launch the “online support service”. The Settings button is used to configure the interface and move from one section or topic to another. The Hide button removes the left frame from the screen and at the same time transforms into the Show button. The Hide Tabs command from the menu called up by the Options button works similarly.
The help system can be called not only by the user, but also by the operating system or application in cases where it is necessary to explain further actions or along with a message about the error of the command.
Some applications only partially use the help system to display help, or do not use it at all. One example of partial use of a help system is the MS Office application. He has additional features obtaining help, for example, calling an interactive assistant, which, in the event of an error situation, displays the necessary help.
Practical work No. 3
Techniques for working in Windows OS. Standard Windows programs and utilities.
Purpose of the lesson: explore the elements of the desktop, taskbar, Main menu; explore the capabilities of standard Windows OS programs and additional features of the operating system.
Theoretical foundations of the work:
Desktop elements.
Desktop is a graphical environment that displays Windows objects and elements Windows management. Task bar– is also a very important control element.
On the desktop are shortcuts(icons, pictograms), which are divided into two groups: systemic And custom.
System are part of the operating system and are necessarily located on the Desktop. These icons are: My Computer, My Documents, Trash, network, Internet Explorer. As a rule, they cannot be renamed or their icon changed.
Custom shortcuts are created by PC users for quick access to files, folders and quick opening of programs. Most often, a custom shortcut is distinguished by a black arrow in the corner.
1. My computer. Using this icon, you can view any disks (including CDs, DVDs, floppy disks, flash cards and other equipment), find the necessary folders and files on them and work with them.
2. Basket – a special Windows object that performs the function of a container. It serves for temporary storage of deleted objects. Any object can be restored from the Recycle Bin, and it will be restored to the folder from which it was deleted. If you click on the Trash icon right click mice and in context menu select a team Properties, then you can configure various parameters. For example, the “Destroy files immediately after deletion, without putting them in the Recycle Bin” checkbox means that files and folders will be deleted immediately, without going into the Recycle Bin, and cannot be restored.
3. My Documents - this is the user's personal folder. It contains two specialized personal folders: “My Pictures” and “My Music”. You can open access to personal folders to all users who have account on this computer, or make these folders private; in this case, the files in them will be accessible only to given user. Windows creates personal folders for each computer user. Windows also provides a Shared Documents folder for storing files that other users can access.
4. Network environment. If several computers are combined into local network, then this icon will help you view information on neighboring computers and work with it. If the computer is standalone, then this icon is not needed.
5. Internet Explorer. This browser program, designed for surfing the Internet and viewing Web pages. It is convenient because it is already included in the Windows program package. There are more convenient programs - browsers, but they need to be installed additionally.
On the taskbar there must be a button Start, with which it opens Main menu, indicators for sound, keyboard, time, date and other icons that can be configured by the user. Buttons appear on the taskbar open documents and programs, which is why Windows OS is called multitasking OS.
Main menu contains two parts: mandatory and optional. The optional part is located above the gray line and is added to it. needed by the user teams. The required part contains the following commands:
- Programs . You can open any program installed on your computer.
- Documentation . A list of recently opened documents, from where you can quickly open a document or view the most recently opened documents.
- Find .(Search) Most often, this command is used to search for desired files and folders.
- Help and support. Calling the built-in help system of Windows OS.
- Execute. Using this command, you can start any program if you know the name of its startup file.
- Setup. Allows you to configure the screen, mouse, keyboard, printers, scanners, enter passwords for system users, etc.
Working with windows.
Comment:
1. Windows minimized to buttons on the taskbar are not displayed on the screen.
2. To restore windows to their previous sizes and positions, right-click an empty space on the taskbar and select Undo Cascade or Undo Windows Side by Side.
3. To minimize all windows into buttons on the control panel, right-click on the taskbar and select Collapse All.
To resize an open window, hover over its left or right border or corner. When the pointer changes to a horizontal, double-headed arrow, drag the border left or right.
Comment: dimensions of the maximized window (in full screen mode) cannot be changed.
Taking a screenshot . To create a copy of the active window, press the keys ALT+PRINT SCREEN . To copy the entire screen as it appears on your monitor, press PRINT SCREEN . To insert the resulting image into a document, open the menu Edit in the document window and select the command Insert.
File attributes.
Besides the name and extensions file, the operating system stores for each file the date of its creation (change) and several values called attributes file. Attributes are Extra options, defining the properties of files. The operating system allows you to control and change them; the state of the attributes is taken into account when performing operations with files. Windows OS has the following types of attributes: :
1. read-only file attribute ( read- only) protects the file from changes: to change or delete a file with this attribute, you must first remove this attribute. Files on CDs also have a read-only attribute to indicate that these files cannot be modified;
2. attributes "hidden" ( hidden) and/or “system” ( system) used by some system files(for example, the main files of the MS DOS operating system - IO. SYS and MSDOS. SYS - have both of these attributes). Files with the “system” attribute are not moved by programs that optimize the location of files on the disk (such as Speed Disk), and are also usually not copied to a compressed disk when created compressed disk from regular programs like DriveSpace;
3. file attribute "archive" ( archive) set when creating a file and reset by programs Reserve copy to indicate that a copy of the file has been archived. Therefore, the presence of the "archive" attribute usually means that the file has not been backed up.
Thus, most files only have the "archive" attribute set. The remaining attributes (“read-only”, “hidden” or “system”) are usually not set.
Standard programs.
The Windows operating system includes a limited set application programs, with which you can solve simple problems if more powerful tools are not installed on your PC. This Standard programs. Let's list some of them:
- Notebook . A simple text editor that can be used as a convenient means of viewing text files;
- Graphics editor Paint . This simplest program for creating and editing images. It does not meet modern requirements graphics programs, but is very simple and accessible, allowing you to master the basic techniques of working with graphics;
- WordPad word processor . Like the text editor Notepad, it is used to create, edit and view text documents, but it performs another important function - formatting document. Formatting refers to the use of several font sets, methods of text alignment, embedding pictures and other objects into a document, wrapping text around them, etc.;
- Calculator . Convenient program for mathematical calculations.
Comment: we have reviewed the most popular standard programs, consider the rest yourself using the help system!
Utilities.
Utility applications are designed to serve personal computer and the operating system itself. They allow you to find and eliminate defects file system, optimize software settings and hardware and also automate some routine operations related to computer maintenance.
These applications are opened with the command Start/Programs/Accessories/Services. They are supplied as part of the operating system and are installed with it.
Comment: Study the purpose of utility programs on your own, using lecture material and additional literature!

PROCEDURE FOR PERFORMANCE OF THE WORK
1. Explore your desktop shortcuts .
2. Explore the taskbar elements.
3. Display and hide Quick Launch Toolbar.
4. Open several windows at the same time. For example: My Documents, Trash and My Computer.
5. Try moving them around the screen, collapsing, expanding, resizing them with the mouse and achieving approximately the same size.
6. Arrange open windows in a cascade, from top to bottom, from left to right. Close all windows.
7. Move shortcuts on your desktop, then arrange them automatically.
8. Open the standard program Notebook and print some quatrain in it. Save it in your folder under the name Poem
9. Copy the text of the poem into the WordPad program window and see what options are available in this program. Save it in your folder under the name Copy and note what icon the document is saved with.
10. Open the standard program Paint and draw a Christmas tree in it. Save it in your folder under the name Christmas tree. Pay attention to which icon the document was saved with.
11. Right-click on the Poem and Christmas tree file icons. Select from the context menu Properties command and examine the contents of the dialog box that opens. What attributes are set for these files?
12. Explore what other Standard programs are on your PC.
13. Open the Address Book in Standard Programs and create two folders in it: Friends and Colleagues.
14. Create two contacts in each folder.
15. Try it in search on the Toolbar in the Address Book, find the friend you added to Contacts.
16. Study the rest of the Standard Programs.
17. In the Windows OS Help system, look at the purpose of programs unknown to you.
Report requirements:
1. Write down what icons and indicators are on the Taskbar?
2. Write down which shortcuts on the Desktop are user and which are system shortcuts?
3. Describe what needs to be done if folders and files are deleted into the Recycle Bin, but it is empty?
4. Write down the properties of the Poem and Christmas tree files. (point 10)
5. Write down what text formatting options are available in Notepad.
6. Write down the differences between Notepad and WordPad.
7. Search Help and write down the answer to the question, What does disk defragmentation do?
8. Calculate the following expression in the Calculator program and write down the complete answer in the report: (23456+()*2-2345)/3.
9. Write down which programs are presented in the Standard Programs Accessibility section.
Control questions.
1. What elements are located on the Desktop ?
2. What shortcuts are called system and user?
3. What is the Taskbar for?
4. What elements are located on the Taskbar?
5. Is it possible to customize the Taskbar?
6. What operations can be performed with windows?
7. How to change the location of several open windows on the screen?
8. What is the My Computer icon for?
9. What is the Basket for?
10. Why is the Network Neighborhood icon needed?
11. Why is the program needed? InternetExplorer?
12. What are File Attributes?
13. What Standard Programs do you know?
14. Why are Standard Programs needed?
15. What are Windows utilities used for?
Standard Windows programs 7
Along with the Windows 7 operating system, you get a set of applications that are useful for everyday work. Although their capabilities are weaker than specialized software packages, they will most likely be sufficient for most cases.
At your disposal there is a graphic editor Paint, a text editor WordPad, an editor for working with simple text files Notepad, a Calculator, a program for recording sound from a microphone and some others (see Fig. 2.54).
Rice. 2.54. Group of programs Standard All of them are located in the Standard folder. To get to it, you need to enter the Main
menu (click the Start button), click All Programs, and then find the folder named Standard among the folders that appear and click on it.

A. N. Lebedev. “Windows 7 and Office 2010. Computer for beginners. I have to go to work tomorrow"
Graphic editor Paint
The Paint graphic editor allows you to create simple color and black and white drawings, as well as perform some image processing operations. Compared with previous versions Windows, which also included Paint, its appearance changed a lot. In Fig. Figure 2.55 shows the view of the Paint graphic editor window.
Rice. 2.55. Paint window view
To launch it, you need to enter the Main Menu, find the Standard folder (see Fig. 2.54) and click on the Paint item in it.
There is a Paint icon at the top of the window
Next to it is a button to save the image to a file.
The moment you click on this button, the current state of the picture will be written to a file. If you finish drawing something else, and at this time the computer's power is turned off, all changes since the last write to the file will be lost. For this reason, do not forget to periodically click on the save button, even if you have not yet completed the drawing. When you first click on this button, Paint does not yet know in which folder and with what name you should save your drawing. For this reason, a standard file saving window will open, shown in Fig. 2.56.

A. N. Lebedev. “Windows 7 and Office 2010. Computer for beginners. I have to go to work tomorrow"
Rice. 2.56. Standard window for saving a file Find the folder in which you want to save the file with the picture, enter the File name in the field
name for the file (instead of the default name Untitled), select the format in which the image will be stored in the File type drop-down list, then click the Save button.
When you subsequently save changes to the image by clicking the button
the standard file saving window will not appear, since Paint already knows which file to save the image into.
Following the save button there are two buttons responsible for undoing and repeating actions -
What are we talking about? The fact is that in many programs several of your recent actions can be cancelled. For example, you drew a beautiful image, and then added a detail that looks completely unnecessary. What to do? Redraw everything again? For such cases, there is a cancel button.
![]()
A. N. Lebedev. “Windows 7 and Office 2010. Computer for beginners. I have to go to work tomorrow"
Click on it with the mouse, and the last change you made will disappear as if it never happened. But what to do if you suddenly decide that you got carried away and unnecessarily canceled the last changes? The redo button will help you
Click on it with the mouse and the undone changes will reappear.
Below the window title is the ribbon area. What is this? The ribbon is a strip made in the form of tabs with buttons and other control elements on them. At the top you can see tab shortcuts (Home, View), by clicking on which you can switch from one tab to another. The Home tab is initially visible. But you can click on the name of another tab, View, and you will see its elements. And then you can return to the Home tab again by clicking on the word Home.
At the bottom of the window there is a status bar. It displays various auxiliary information. To the right of the icon
shows the location of the mouse pointer in the picture. It is shown in dots, starting from the upper left corner of the image. The horizontal coordinate is shown first, and then the vertical coordinate. To the right of the icon
The total size of the image is displayed.
There is a scale in the lower right corner of the Paint window.
It is used to change the image scale. The current scale value itself is shown to the left of this scale. By default it is set to 100%. To change the scale, you can either drag the slider with the mouse
left (decrease) or right (increase), or click on the round buttons - (decrease) and + (increase). What does "drag and drop" mean? This means that you need to move the mouse pointer over the slider, press the left mouse button and, without releasing it, move the mouse in the desired direction. When you move the slider to the desired value, release the mouse button.
It must be noted that, By changing the scale, you do not change the size of the image.
nia. It only seems to approach you or move away from you. Usually they change the scale when they want to examine or edit some small detail.
We all beat around the bush, but how do we start drawing? The Pencil tool is enabled by default. You can draw with your mouse the same way you would draw on a piece of paper with a pencil. To draw a line, place your mouse pointer

A. N. Lebedev. “Windows 7 and Office 2010. Computer for beginners. I have to go to work tomorrow"
V Right place white sheet in the central part of the Paint window, press the left mouse button and, without releasing it, move the mouse pointer where the line should go.
Of course, you can choose the line color. To do this, there is a color palette on the right side of the Home tab. By left-clicking on the corresponding colored square, you can select the current line color. If the set of colors in the palette does not suit you, you can click on the Change colors button and in the dialog box that opens, add a color from a wider range to the palette.
In addition to color, we can also change the line thickness. To do this, click on the Size button. A list with example lines will open. Click on the desired sample.
You can set not only the width of the line, but also the way it is drawn. To do this, click on the Brushes button (on the word itself). A list of brush types will open (Fig. 2.57).
Rice. 2.57. Types of brushes The pictures show the principle of each brush, but it’s better to experiment
on one's own.
You can not only draw lines by hand, but also use ready-made shapes. To do this, click on the Shapes button. This will display a list of available shapes

A. N. Lebedev. “Windows 7 and Office 2010. Computer for beginners. I have to go to work tomorrow"
Rice. 2.58. List of available shapes Let's look at some shapes.
Line – draws a straight segment. To do this, place the mouse pointer at the place where the line should begin, press the left mouse button and move the mouse pointer to the place where the line should end, then release the mouse button.
You can choose the line thickness as we discussed earlier.
Drawing a line while holding down the Shift key creates vertical, horizontal, or 45° angled lines.
Drawing with the right mouse button colors the line with the background color.
Curve – designed for drawing curves with smooth bends. Drawing is done as follows:
A straight line is drawn.
An inflection point is selected on the straight line and “dragged” to the side. The straight line turns into a curve passing through the inflection point from the starting point to the ending point.
Another inflection point on the curve is selected and “dragged” to the side. The curve bends again.
Rectangle – draws a rectangle. To do this, place the mouse pointer in the place where the upper left corner of the rectangle should be, press the left mouse button and move the mouse pointer to the place where the lower right corner of the rectangle should be, then release the mouse button. The rectangle is painted in accordance with the selected scheme:
outline only;
contour and background;
only background.
Drawing a shape while holding down the Shift key results in a square appearing.

A. N. Lebedev. “Windows 7 and Office 2010. Computer for beginners. I have to go to work tomorrow"
Polygon - used to draw a sequence of line segments in which the beginning of the next segment is at the end of the previous one, and the end of the last one falls at the beginning of the first. This sequence forms a polygon, which, upon completion of construction, is painted over as a rectangle.
Ellipse – draws an ellipse. To draw, imagine that the future ellipse will be inscribed in a rectangle. Next, proceed as described for the Rectangle tool.
Drawing a shape while holding down the Shift key results in a circle appearing.
Rounded Rectangle – Draws a rectangle with rounded corners. Additional shapes can be seen by clicking on the button
In addition to the tools we mentioned, there are others. For example, you can fill a limited area of a drawing with the selected color.
Fill – paints a closed area with the line color when working with the left mouse button and the background color when working with the right mouse button. If the area is not closed, then all areas up to the closed boundary will be painted. If you see unexpected coloring of another area, cancel the action using the button
and find the boundary break. Zooming in (the scale in the lower right corner of the Paint window) can help with this.
If you need to erase some of the lines, you can use the Eraser tool.
Eraser – erases objects in the path of the mouse pointer, filling the trace with the current background color. The width of the trace is determined by the selection in the Size drop-down list. When working with the right mouse button, the eraser will replace the background color with the color of only those points for which it coincides with the current line color.
In addition to lines and shapes, the image can be decorated with text. To do this, click on the button
After selecting this tool, click the mouse in the place on the sheet where you want to place the text. A rectangular fragment will appear, defining the area where the text will be placed.

A. N. Lebedev. “Windows 7 and Office 2010. Computer for beginners. I have to go to work tomorrow"
This will open the text attributes panel (Font), in which you can select the font, size and style (change boldness, italic and underline).
Once you've set your text attributes, click inside your selection and type your text. As long as the text area selection frame exists, you can make any changes to the text: choose a different color, position, size, style and font.
Clicking outside the selection turns the text into part of the drawing.
In addition to choosing a color to draw from the palette, you can specify desired color right in the picture. To do this, click on the button
and then move the mouse pointer to the element of the picture whose color you want to make the current color and left-click.
You can do some work on areas of the image. useful actions. To do this, the fragment must first be selected. To select a rectangular fragment of the image, click on the button
In the menu that appears, click on the Select item, and in the submenu that opens, click Rectangular Area. Then position the mouse pointer where you want the top left corner of the selection to be, press the left mouse button and move the mouse pointer to where you want the bottom right corner of the selection to be, then release the mouse button. In this case, a dotted frame appears, in the corners of which and in the middle of each side there are squares that allow you to change the size of the selection in the same way as resizing a window (by dragging the squares).
The selected fragment can be dragged to another place in the picture. In this case, the previous location of the fragment is filled with the background color. If you drag while pressing the Ctrl key on the keyboard, a copy of the fragment is created.
The selected fragment can be placed in the Clipboard using buttons, a list of which appears when you click on the Clipboard button (Fig. 2.59).

A. N. Lebedev. “Windows 7 and Office 2010. Computer for beginners. I have to go to work tomorrow"
Rice. 2.59. Buttons for working with the Clipboard Cut – moves the selected fragment of the picture to the Clipboard.
Copy – creates a copy of the selected fragment of the picture in the Clipboard. Paste – inserts a fragment located in the Clipboard into the picture. Fragment
appears in the drawing as if on top of it and must be moved to the right place. A fragment pasted from the Clipboard appears in the left top corner drawing and
remains selected, allowing you to drag it to the desired location in the drawing. Clicking outside the selection deselects it.
We mentioned the Clipboard. What is this? This is a “pocket” in Windows where you can temporarily put part of an image or text. This "pocket" is common to all applications. This way, you can put something in the Clipboard in one application and retrieve it in another. For example, you can put a fragment of an image that you drew in Paint on the Clipboard, and remove this fragment from the Clipboard when working with a word processor Microsoft Word(we'll talk about it later) and place it as an illustration to the text.
So, we can select a fragment. What additional actions can we do with it? For example, you can rotate a fragment by a certain angle. To do this, click on the Image button. In the menu that appears, select Rotate. A submenu will open where you can choose exactly how to rotate the selected fragment.
For more accurate and convenient creation images, you can include some additional elements of the Paint window. To do this, go to the View tab. There are check boxes for Rulers and Grid Lines. When you enable the Rulers checkbox, horizontal and vertical rulers appear, along which you can precisely position the mouse pointer.
Turning on grid lines will help you draw fine designs. To do this, it is convenient to turn on the Grid lines checkbox and zoom in on the drawing using the scale in the lower right corner of the Paint window.
We've covered various tools for creating images. We also know how to save a drawn picture in a file. But how can you open a previously saved image?

A. N. Lebedev. “Windows 7 and Office 2010. Computer for beginners. I have to go to work tomorrow"
To open a file with a picture, click on the button
located to the left of the Home tab shortcut. This will open a menu. Select Open from this menu. A standard file opening window will appear, familiar to you from the section where we discussed setting background images for the Desktop. Find the folder where the file with your drawing is located, click on the file name, and then click on the Open button.
If you need to start the drawing again with clean slate, click on the button
and in the menu that appears, select the Create command.
And the fact that the next time you click on this button, the file saving window will no longer appear, but what if you needed to save the image with some changes in a file with a different name? To do this, click on the button
And In the menu that appears, select Save As. The standard save file window will appear again, where you can specify a different name for the image file.
The commands responsible for setting up image printing are collected in a submenu that appears when you click on the button
And selecting Print (Fig. 2.60).

A. N. Lebedev. “Windows 7 and Office 2010. Computer for beginners. I have to go to work tomorrow"
Rice. 2.60. Commands for printing an image When you select the Page Setup command, a dialog box appears where you can
adjust print settings such as the size of the paper used, its orientation, and the margins from the edges of the sheet to the drawing. When you select portrait orientation, the sheet is positioned vertically, and when you select landscape orientation, it is horizontal.
The Centering group checkboxes allow you to automatically align the image to the center of the sheet.
When all parameters are set, click OK.
Before printing a drawing on a printer, you can see on the screen how it will look on a sheet of paper. To do this, click on the button
and select Print, and in the submenu that appears, the Preview command. Your drawing will be displayed in the main part of the window as it will then be printed. You can zoom in or out by clicking on the buttons

A. N. Lebedev. “Windows 7 and Office 2010. Computer for beginners. I have to go to work tomorrow"
When you need to exit the preview mode, click the Close Preview Window button.
When you decide to print the image on the printer, click on the button
In the menu that appears, select Print, and in the submenu that opens, select Print. A window similar to the one shown in Fig. will open. 2.61.
Rice. 2.61. Print pattern window
IN In the Select a printer list, you need to click on the name of the printer on which you want to print your picture.
IN The Page Range group lets you choose which pages to print if your image is too large to fit on one sheet of paper. If you want to print not the entire image, but only part of it, you must first select a fragment and select Select in the print window.
To start the printing process, click on the Print button.
To finish working with the Paint graphic editor, you need to click on the standard window close button
Updated: 07/17/2018 Published: 2016 or earlier
IN this list presented a set of the most necessary programs for Windows, which will simplify your work and make the system safer.
- Browser. Required to view site pages on the Internet.
- Google Chrome. Fast and convenient browser based on chromium from Google.
- Yandex browser . Fast and convenient based on chromium from Yandex.
- Mozilla Firefox. WITH big amount additions.
- Opera. A good browser for browsing websites.
- Antivirus. Protects against unwanted software, spam, hacker attacks. You cannot install several antiviruses, as this will lead to a conflict between them and will greatly slow down your computer. I recommend:
- 360 Total Security. An antivirus that can be used for free in commercial organizations (with advertising).
- AVG. Free antivirus. Good virus protection, easy to use;
- Nod. Good protection and productivity. Paid versions only;
- Kaspersky Anti-Virus. Great protection, but poor performance. Only paid versions.
- Codecs. Required for watching video and listening to audio files. I recommend
- K-Lite Codec Pack - free set of codecs + fast player.
- VLC media player - free set of codecs + functional player.
- Archiver. Used for unpacking and creating archives. I recommend:
- 7-Zip. Free archiver. Works with all archives + 7z archive;
- WinRar. Paid archiver. Works with all archives.
- PDF Reader. Allows you to open documents pdf format. I recommend:
- Adobe Reader. Free PDF reader;
- Foxit Reader. Free PDF reader;
- Adobe Acrobat. Paid program. In addition to viewing, it allows you to edit PDF files.
- Adobe Flash Player. Needed to display flash elements on websites (video, audio, games, menus, video chats). In chromium based browsers ( Google Chrome, Yandex browser, Amigo, Vivaldi and others) are already built-in and require separate installation.
- Office package. Designed for working with documents and work data. I recommend:
- Microsoft Office. Easy to use and world famous office. Includes programs for editing texts, tables, presentations, databases and much more. Paid;
- OpenOffice. Free office suite. Comfortable enough for home use. Includes programs for editing texts, tables, presentations, databases and much more.
- CD recorder. For working with CDs (burning, creating and burning images). I recommend:
- Infra Recorder. Free program for recording discs. Convenient to use. Does not work with BlueRay discs;
- Nero. A powerful program that includes many tools for working with disks. Paid.
- Means of communication. For unlimited communication, I recommend installing the following programs:
- Skype. Free calls from Skype to Skype. Cheap international calls.
- Viber. Convenient messenger and free calls.
- QIP. Old program for sending instant messages based on the ICQ protocol.
- View images. The program built into Windows is not always convenient and functionally limited. To view images you can select:
- FastStone. Free functional program.
- IrfanView. Free and very fast program.
- Useful utilities. Help in setting up, diagnosing and maintaining the functionality of the computer. I recommend:
- CCleaner. Cleans the computer from “garbage”;
- Defraggler. Performs disk defragmentation;
To view the list of standard programs you need to enter the menu "Start", select item "All programs", and find the group in it "Standard". If the operating system has just been installed on the computer, but no programs have been installed yet, then standard programs can help the user out for the first time, because they are always present in the system from the moment Windows is installed. Standard text editors.
Windows has two standard text editors: Notepad and WordPad. In a programme "Notebook" simple text files are created. The text is typed in the workspace of the program, and then saved to any desired address on the hard drive with the command File->Save.
Picture 1.
Notepad files have the extension .txt. In addition to simple text files, Notepad can be used to view and edit configuration files various programs ( .ini, .inf), and also to view the code of web pages ( .html). To open a file "Notepad" In the file’s context menu, select “Open with”. If the submenu that opens contains an item "Notebook", then just specify it. If this item is not present, then you should indicate the item "Select program". Next, in the window that appears, you need to open the drop-down list "Other programs" and choose "Notebook".

Figure 2.
If Notepad is not in this list, then you need to click the button "Review". In order to select a program using a review, you need to know exactly where the file with the file is located on your hard drive. the desired program. All standard programs are located at the same address: C:\Windows. Program file "Notebook" called notepad.exe. After these steps required file will open in the workspace "Notepad".

Figure 3.
Despite the simplicity, "Notebook" has a number useful functions. For example, the text search function. To find the desired word or part of a word in a large array of text, you must select it from the menu "Edit" team "Find". In the window that opens, enter the search word or part of a word and click the button "Find Next". "Notebook" will find in turn all cases of matches with the search pattern in the text and highlight them with a blue background. You can search in a case-sensitive manner (that is, distinguishing between large and small letters) and in a case-insensitive manner.

Figure 4.
U text editor WordPad has more possibilities. It allows you to use different fonts and insert pictures. WordPad can work with the following types of files:
- .txt - a simple text document;
- .rtf – universal text format for exchanging data between various text editors;
- .docx – MS Office document;
- .odt is a text document from Open Office or Libre Office (often used under Linux).
To change the file format you need to specify the command File->Save As and in the window that opens, select the desired file type in the combo box "File type".
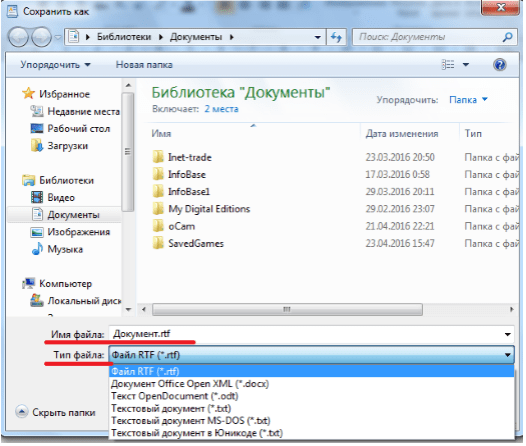
Figure 5.
Graphic editor Paint
The graphic editor Paint allows you to easily edit existing graphic images and create new drawings. Paint has a modest set of tools that cannot be compared with the tool sets in such professional design programs as Phptoshop, InkScape, CorelDraw. However, it quite allows you to draw quite complex objects. Paint supports several different graphics extensions:
- .png – graphic format, supporting lossless compression;
- .jpeg is a graphic format that supports lossy compression. When we repeatedly save files in this format, we inevitably degrade their quality;
- .tiff – graphic format for storing images with high color depth;
- .gif is a graphic format that supports compression without loss of quality and a palette of no more than $256$ colors.
If you have a scanner connected to your computer, Paint can be used to obtain a scanned image.

Figure 6.
Other standard programs
In addition to the editors listed above, there are many more useful applications among the standard programs.


Figure 8.
- Connecting to a projector and a remote projector will allow you to display your computer screen on a wall screen for a large audience.
- Connecting to a remote desktop allows you to control a computer, which can be located any distance from the user, without leaving your seat. For example, you can control your computer at work from home. This is possible provided that remote computer access is open for connection and the computer is turned on.