Not all computer users are aware of the presence of hidden services that allow you to perform various operations without using special software. In operating rooms Windows systems and Linux there is a Telnet service. This material will discuss in detail the purpose of the service, commands, capabilities and how to work with it correctly.
What is Telnet
Telnet is a means of communication that is established between terminal devices. An example of such a connection is quite simple: a personal computer and a server that supports a similar type of connection. Telnet is not any software, it is communication protocol. But it should be noted that there are some utilities that work via the “terminalnetwork” protocol.
In the recent past, Telnet was one of the main ways to connect to the network. Now the utility practically not used. Today, operating systems have more advanced protocols installed, eliminating any additional actions from the user.
This communication protocol is used in some operations:
- connection to a remote desktop;
- examination ports for connectivity;
- usage software that is only available on remote machines;
- application system directories, which can only be opened using this type of protocol;
- sending Email without using additional software;
- users using this protocol allows other users gain access to your personal computer.
Installation and launch
There is no need to download the utility; Telnet is built into Windows 7/8/10 by default.
Installation and startup instructions:
In order to start the client you need to open the command line:

We invite you to watch the video on installing Telnet in Windows:
Port check
Checking a network port to see if it can be accessed personal computer to Telnet:
- in the window you need to enter the telnetip command;
- followed by enterIP address computer, for example, 192.168.1.1. You can view the address in the settings of your network router;
- At the end, enter the FTP port “21”. Thus the command will look like this: telnet 192.168.0.1 21;
- after that it will appear error message if the port is unavailable or asking you to enter additional data if the port is open.
Telnet Commands
Utility commands are a way to interact with it. To display list of all commands, you must enter “help”. Next, we will look at the main commands in detail:
- “open” - the request allows connect to a remote server;
- "close" - process interruption connecting to a remote server;
- "set" - setting server connection parameters;
- "term" - the request is intended for terminal type indications;
- "escape" - sets control character;
- "mode" - choice operating mode;
- "unset" - reset previously entered parameters;
- "start" - launch servers;
- "pause" - temporary stop server operation;
- "continue" - continuation of work servers after a pause;
- "stop" - complete work stoppage server.
Telnet on Linux
Like Windows, Telnet is built into the operating system. Linux system. Previously it was used as the standard Telnet protocol, now it has been replaced by the more improved SSH. As with the previous OS, the utility in Linux is used to check ports, routers, etc.
Let's look at the main operating modes:
- « line by line». This mode work is recommended. In this case, editing the request is carried out on the local PC and is sent to the server only when it is ready;
- « character-by-character" Every character typed in the console window is sent to the remote server. You cannot edit the text here. When you delete a character using “Backspace”, it will also be sent to the server.
Basic commands in Linux:
- “close” — interrupt the connection;
- “encrypt” — enable encryption;
- “logout”—turn off the utility and close the connection;
- “mode” — selection of operating mode;
- “status” — connection status;
- “send” — sending a telnet request;
- “set” — setting server parameters;
- “open” — connection to a remote server;
- “display” — display of special characters.
- in the console window enter a request for server availability checks, for example, "telnet 192.168.1.243";
- Next, let’s check access to the port by entering the request “telnet localhost 122” and “telnet localhost 21”. A message will appear on the console screen indicating whether any of the ports are accepting the connection;
- example remote control using telnet. To do this, enter the request “telnet localhost 23” in the main window. "23" is the default port. To perform remote control, you must install on local computer"telnet-server". After this, a message will appear asking you to enter your login and password.
Disadvantages of Telnet
The main disadvantage of this protocol is the remote connection without using encryption. The only security point is the authorization of users in the telnet session. But nevertheless, the login and password are also transmitted in unencrypted form, so access to them can be obtained one way or another. It is strongly recommended not to transmit any important data over local networks.
Telnet is a network protocol that is used to control various equipment by entering text commands. Telnet is most often used by IT professionals. But the average user can also sometimes find it useful. For example, to control a router or remote computer. Now how to enable this protocol in operating system. If in Windows XP the telnet client is enabled by default, then starting with Vista this component is missing and must be enabled manually. If you need telnet in Windows 10, 8 and 7, read the instructions.
How to enable telnet in Windows 10 and 8.1
In Windows 10, right-click on the button Start and select Programs and components:
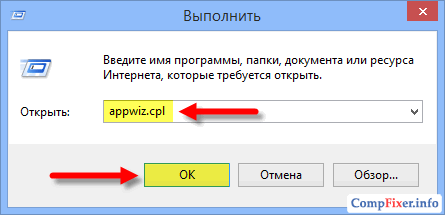
Also, in any OS version you can press the key combination Win+R, enter and press Enter:
In the window Programs and components click on the link Turn Windows features on or off :

Place a checkmark next to the item Telnet client and press OK :

Wait for the component to install:

Ready. Now you can open the console and use it. By default, the utility uses port 23, but you can specify the port explicitly and try to connect to any port. Example, telnet 192.168.1.1 21. After the command the IP address is indicated remote device and through a space the desired port. If the port is not specified, an attempt will be made to establish a connection to the default port - 23.
It's also worth saying that if you don't want to enable telnet on Windows, you can download a utility online called Putty. She can do the same and much more. Search for information online.
Client Telnet, being a tool for remote system management, is at the same time a simple and reliable tool for diagnosing network problems and allows you to quickly check the availability of a particular service (more precisely, the port that the service listens to) on a remote server using TCP protocol(diagnose UDP services with using telnet will not work). And for most administrators telnet command so familiar and natural that it is typed without thinking, immediately after checking the availability of the remote system using ping (ICMP protocol).
In Windows 8 client telnet by default disabled. This was done for security reasons (Microsoft developers follow this principle by not installing a telnet client by default, starting with Windows Vista/2008). This does not mean that the telnet client is missing in Windows 8, it just needs to be activated.
You can activate the Telnet client in Windows 8 using GUI, or command line. Below we will analyze both options.
Note: To perform these operations, you must have local administrator rights (be a member of the administrators group).
Installing the Telnet client using the Windows 8 Control Panel
The easiest way for an average user to install a telnet client in Windows 8 is graphically using the panel Windows management. To do this, open the control panel and go to the following path: Control Panel -> Uninstall or Change a Program > Turn Windows Features On or Off.
The window that appears will display a list of all available Windows 8 components. Find the item Telnet Client and check the box, then click OK and the installation of this component will start.

Note. Unnecessarily installing the Windows 8 Telnet Server component is not recommended for security reasons.
After the installation is complete, you can open the command line and try to launch the telnet client
Installing Telnet in Windows 8 from the command line
There is an even simpler and more elegant way to install a telnet client in Windows 8, for this we will need the Windows command line capabilities.
The same operation can be performed using the Window image maintenance utility - Dism:
Dism /online /Enable-Feature /FeatureName:TelnetClient

You can remove the telnet client in Windows 8 using the following commands:
Dism /online /Disable-Feature /FeatureName:TelnetClient
Start /w pkgmgr /uu:"TelnetClient"
If you need to activate telnet on many computers in a domain at once, you can use the startup script in group policies executing one of the above commands.
Any System Administrator enjoys system utility built into Windows – telnet.exe. This program allows you to connect to local and remote servers at the address and port specified in the launch parameters. A useful thing for checking the possibility of connecting to the server via port and executing commands. Also, this utility is often indicated in help various programs and services. However, it often turns out that telnet is not installed by default.
How to install telnet.exe via command line
The easiest way is with Administrator rights and execute the following command:
dism /online /Enable-Feature /FeatureName:TelnetClient
Press “Enter” and wait a little, the message “Operation completed successfully” should appear. This completes the installation.
Installing the Telnet client on Windows components
The second method is for those who do not want to use command line or the first method did not work. Let's go to “Control Panel -> Programs and Features -> Turn Windows features on or off” and check the box for “Telnet Client”.

Installation may be required Windows disk. If the list of components is empty, then you need to correct one value in Windows registry. To do this, launch the registry editor with the command:
regedit
and follow the path:
HKEY_LOCAL_MACHINE\SYSTEM\CurrentControlSet\Control\Windows
In the “CSDVersion” parameter you need to replace the value with 100 or 0 . Reboot.
By default the telnet client in Microsoft's Windows operating systems is disabled, this is unfortunate as it is an extremely useful tool which can be used for testing TCP connectivity to external hosts on a specified port.
This is great when you're trying to troubleshoot network connectivity problems, for example, say we have a web server which should be listening on port 80 to serve HTTP traffic but we are not able to load a web page, by using telnet to connect to the web server on port 80 we can verify the connectivity.
It may be that the connectivity is fine but there is a problem with the web server, or that the web server is stopped and the port is not listening at all, for instance. With telnet we can get a better understanding of what’s going on.
Enabling the telnet client
Firstly you need to enable the telnet client, if you don’t enable it you’ll get a result similar to the below message when trying to use it.
C:\>telnet google.com 80 "telnet" is not recognized as an internal or external command, operable program or batch file. C:\>
You can enable the client both by command line or through the graphical interface.
Enabling the telnet client through command line
Run the below command in command prompt with administrator permissions.
Pkgmgr /iu:"TelnetClient"
That’s it, after a few seconds telnet should be ready to use.
Enabling the telnet client through the graphical user interface
Verifying that the telnet client is enabled
Simply open command prompt or powershell, type ‘telnet’ and press enter. If this was successful you should have a prompt similar to the below:
Welcome to Microsoft Telnet Client Escape Character is "CTRL+]" Microsoft Telnet>
Already have telnet installed but still failing?
In some cases you must run command prompt or powershell as administrator in order to issue the telnet command, otherwise it will give the same error as if it was not enabled at all.