Telnet is a network protocol that is used to control various equipment by entering text commands. Telnet is most often used by IT professionals. But the average user can also sometimes find it useful. For example, to control a router or remote computer. Now how to enable this protocol in operating system. If in Windows XP the telnet client is enabled by default, then starting with Vista this component is missing and must be enabled manually. If you need telnet in Windows 10, 8 and 7, read the instructions.
How to enable telnet in Windows 10 and 8.1
In Windows 10, right-click on the button Start and select Programs and components:
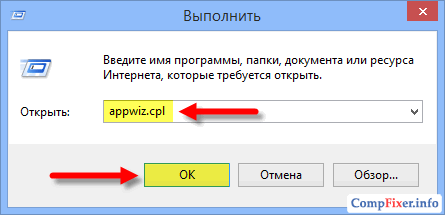
Also, in any OS version you can press the key combination Win+R, enter and press Enter:
In the window Programs and components click on the link Turn Windows features on or off :

Place a checkmark next to the item Telnet client and press OK :

Wait for the component to install:

Ready. Now you can open the console and use it. By default, the utility uses port 23, but you can specify the port explicitly and try to connect to any port. Example, telnet 192.168.1.1 21. After the command the IP address is indicated remote device and through a space the desired port. If the port is not specified, an attempt will be made to establish a connection to the default port - 23.
It's also worth saying that if you don't want to enable telnet on Windows, you can download a utility online called Putty. She can do the same and much more. Search for information online.
Client Telnet, being a means remote control systems, at the same time it is a simple and reliable tool for diagnosing network problems and allows you to quickly check the availability of a particular service (more precisely, the port that the service listens to) on a remote server using TCP protocol(diagnose UDP services with using telnet will not work). Moreover, for most administrators, the telnet command is so familiar and natural that they type it without thinking, immediately after checking the availability of the remote system using ping (ICMP protocol).
In Windows 8 client telnet by default disabled. This was done for security reasons (Microsoft developers follow this principle by not installing a telnet client by default, starting with Windows Vista/2008). This does not mean that the telnet client is missing in Windows 8, it just needs to be activated.
You can activate the Telnet client in Windows 8 using GUI, or command line. Below we will analyze both options.
Note: To perform these operations, you must have local administrator rights (be a member of the administrators group).
Installing the Telnet client using the Windows 8 Control Panel
The easiest way for an average user to install a telnet client in Windows 8 is graphically using the panel Windows management. To do this, open the control panel and go to the following path: Control Panel -> Uninstall or Change a Program > Turn Windows Features On or Off.
The window that appears will display a list of all available Windows 8 components. Find the item Telnet Client and check the box, then click OK and the installation of this component will begin.

Note. Unnecessarily installing the Windows 8 Telnet Server component is not recommended for security reasons.
After the installation is complete, you can open the command line and try to launch the telnet client
Installing Telnet in Windows 8 from the command line
There is an even simpler and more elegant way to install a telnet client in Windows 8, for this we will need the Windows command line capabilities.
The same operation can be performed using the Window image maintenance utility - Dism:
Dism /online /Enable-Feature /FeatureName:TelnetClient

You can remove the telnet client in Windows 8 using the following commands:
Dism /online /Disable-Feature /FeatureName:TelnetClient
Start /w pkgmgr /uu:"TelnetClient"
If you need to activate telnet on many computers in a domain at once, you can use the startup script in group policies executing one of the above commands.
Any System Administrator enjoys system utility built into Windows – telnet.exe. This program allows you to connect to local and remote servers at the address and port specified in the launch parameters. A useful thing for checking the possibility of connecting to the server via port and executing commands. Also, this utility is often indicated in help various programs and services. However, it often turns out that telnet is not installed by default.
How to install telnet.exe via command line
The easiest way is with Administrator rights and execute the following command:
dism /online /Enable-Feature /FeatureName:TelnetClient
Press “Enter” and wait a little, the message “Operation completed successfully” should appear. This completes the installation.
Installing the Telnet client on Windows components
The second method is for those who do not want to use the command line or the first method did not work. Let's go to “Control Panel -> Programs and Features -> Turn Windows features on or off” and check the box for “Telnet Client”.

May be required installation disk Windows. If the list of components is empty, then you need to correct one value in Windows registry. To do this, launch the registry editor with the command:
regedit
and follow the path:
HKEY_LOCAL_MACHINE\SYSTEM\CurrentControlSet\Control\Windows
In the “CSDVersion” parameter you need to replace the value with 100 or 0 . Reboot.
Few computer users today are aware of the existence of various special protocols on the computer that allow, without the use of a graphical interface, third party programs perform various actions. Therefore, the desire to learn how to use the TELNET service immediately arises when they learn about the corresponding protocol.
Next, we will outline a little theory about what TELNET is, what many people strive to master it for: the capabilities of the service, as well as a list of basic commands that allow these capabilities to be implemented on Windows.
TELNET is a communication tool that establishes a transport connection between terminal devices, clients, that is, your computer and someone else’s machine, a server that supports this connection standard. This is not a special program, but just a network protocol, but the word TELNET (terminal network) also refers to various utilities that also use this protocol. Today Telnet is present almost everywhere, all operating systems, one way or another, use it, in
TELNET implements a text interface, which differs from the graphical interface familiar to the average user in that all commands must be entered manually.
What does all this give us?
Previously, this service was one of the few ways to connect to the network, but over time it has lost its relevance. Today there is much more convenient programs, which do all the work for the user and do not force him to memorize various commands in order to perform the simplest actions. However, some things can still be done using Telnet.

Network connections
With Telnet you can:
- connect to remote computers;
- check the port for access;
- use applications that are only available on remote machines;
- use various directories that can only be accessed in this way;
- send emails without use special programs(clients);
- understand the essence of the work of many protocols used today, and derive certain benefits from this;
- provide other users with access to data located on their computer.
Let's start using it
Launch
Launching TELNET on Windows 7 and any other Windows is quite simple. To do this, you first need a client, if it is not already installed:
- Go to the Control Panel.

- Select “Programs”.
- Select the “Turn Windows features on or off” tab.

- Find the Telnet client and put a marker next to it if it is not already installed.
Then click “OK” and wait a minute while the client is installed.
The terminal is launched in Windows via the command line, if you do not have any special utilities installed for working with Telnet. But since you are reading this article, it means that you are just starting to get acquainted with this topic, and first it would be nice to master the basics of management using the command line.
- Launch the command line as administrator.
- Enter "telnet".
The command line will reboot, and the TELNET command line will now open, in which we will work.
Checking the port
One of the simplest actions performed in TELNET is port checking. You can check the port to see if it can be accessed from your computer. To do this you need to do the following:
IN command line, opened using the method above, enter: telnetip address port number

For example, if your IP address is 192.168.0.1 and the port number is 21 (FTP port), then enter:
telnet 192.168.0.1 21
If the command produces an error message, it means the port is unavailable. If a blank window appears or a request to enter additional data, then the port is open. For Windows, this method of checking the port can be quite convenient.
Teams
TELNET commands are the basis for using the terminal. With their help, you can control a computer that uses this protocol, if access is allowed for you, as well as perform various other actions. As mentioned above, on Windows they are entered in the command line of the Telnet application.
To see the main list of commands, enter in the line help and press "Enter". Basic commands:
- Open- connection to a remote server. You must enter this command along with the managed server name and port number, for example: openredmond 44. If the parameters are not specified, then they are used local server and default port.
- Close- disconnect from a remote server. Similar parameters are used.
- Set- setting up a remote server, used with the name of the managed server. Together with Set The following commands are used:
- - used to specify a terminal of the specified type.
- - sets the control character.
- - sets the operating mode.
- Unset [option]- disables a previously specified parameter.
- Start- starts the Telnet server.
- Pause- pauses the server.
- Continue- resumes work.
- Stop- stops the server.
TELNET is one of the oldest protocols, but it is still used today. This means that you can start using it for your own purposes. To do this, you just need to learn the syntax and list of commands and start practicing. You can learn a lot of new things, and at the same time begin to look at the Internet and your previously familiar online activities in a completely different way.
By default the telnet client in Microsoft's Windows operating systems is disabled, this is unfortunate as it is an extremely useful tool which can be used for testing TCP connectivity to external hosts on a specified port.
This is great when you're trying to troubleshoot network connectivity problems, for example, say we have a web server which should be listening on port 80 to serve HTTP traffic but we are not able to load a web page, by using telnet to connect to the web server on port 80 we can verify the connectivity.
It may be that the connectivity is fine but there is a problem with the web server, or that the web server is stopped and the port is not listening at all, for instance. With telnet we can get a better understanding of what’s going on.
Enabling the telnet client
Firstly you need to enable the telnet client, if you don’t enable it you’ll get a result similar to the below message when trying to use it.
C:\>telnet google.com 80 "telnet" is not recognized as an internal or external command, operable program or batch file. C:\>
You can enable the client both by command line or through the graphical interface.
Enabling the telnet client through command line
Run the below command in command prompt with administrator permissions.
Pkgmgr /iu:"TelnetClient"
That’s it, after a few seconds telnet should be ready to use.
Enabling the telnet client through the graphical user interface
Verifying that the telnet client is enabled
Simply open command prompt or powershell, type ‘telnet’ and press enter. If this was successful you should have a prompt similar to the below:
Welcome to Microsoft Telnet Client Escape Character is "CTRL+]" Microsoft Telnet>
Already have telnet installed but still failing?
In some cases you must run command prompt or powershell as administrator in order to issue the telnet command, otherwise it will give the same error as if it was not enabled at all.