A situation often arises when correct connection router or modem to the PC there is no “wireless network” icon in the lower corner of the computer monitor windows connection 7". And no matter how much the user switches the wires, stubborn “network connections” never appear. In this case, you need to put off “cable work” for a while and check (possibly reset) the connection parameters according to local network.
- 1. Click with the left mouse button (hereinafter left all the time, unless otherwise indicated) on the “Start” menu button.
- 2. Select the “Control Panel” icon.
- 3. In the “Control Panel”, click “Network and Internet” - “View network status and tasks” (if you don’t see it, switch the viewing mode to “Category” view).
4. Go to the “Change adapter settings” menu.

5. Click right click mouse on the “Local Network Connection” icon, from context menu select “Properties”.

6. Double click Expand the properties “Internet Protocol Version 4 (TCP/IPv4)”.
7. Switch the first checkbox to the position: “Obtain an IP address automatically”, the second to “Obtain the DNS address of the north automatically”.
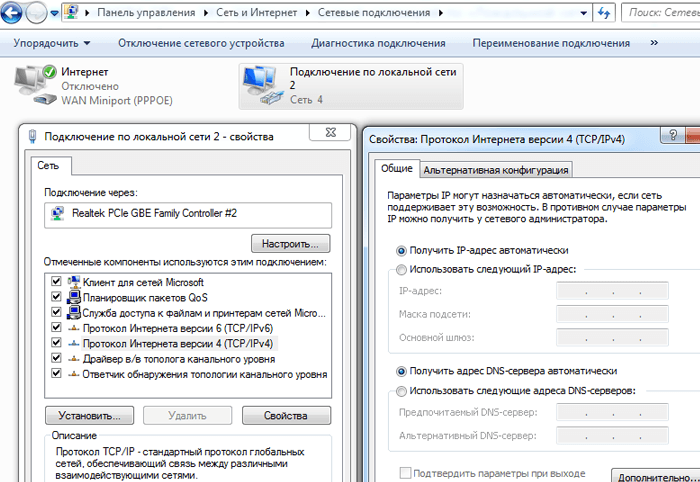
8. If the checkboxes were already in the specified position, then change the first one to the position: “Use the following IP address.”
Set the following values: “IP address”: 192.168.1.2, “Subnet mask” 255.255.255.0, “Default gateway”: 192.168.1.1; "Preferred DNS server": 192.168.1.1.
Don’t forget to click “OK” in all settings when you are finished. open windows to save the settings.
Setting up a network connection in Windows 8:
In general, setting connection parameters here is carried out similarly to the previous version of the OS. The only caveat: many users do not know how to open network connections in Windows 8. Therefore, at this stage we will dwell in more detail:
1. Right-click on the “Start” menu and in the menu that appears, select “All applications”
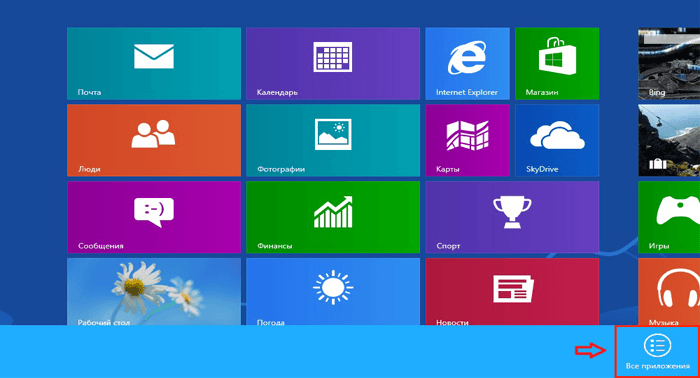
2. In the “Applications” menu, click the “Control Panel” icon.

3. Click on the “Network and Internet” icon.
5. Find and click “Change adapter settings” (top left).
Further setup is carried out similarly to the “seven”: follow steps 5 to 8 and check the network connection - the corresponding icon should appear in the lower corner of the monitor.
Categories:
2016-11-05 17:58:59
Thank you very much for your help in setting up DHCP, which was not enabled on the Enthernet network adapter. Please help me figure out the following question - before setting up, not a single social networking site was opened, or any other sites on the Internet. Except for the YouTube site, where you could find and watch films, concerts and more. How can this be?

2016-11-12 10:42:57
DHCP is a network protocol of the client-server model, which allows you to automatically obtain IP addresses and other parameters that are required to work on a TCP/IP network..html">DNS server. This is a kind of “warehouse” of domain name data by IP addresses. When trying to open a website, the device first requests its IP from the DNS, but in the absence of a registered server, the request, accordingly, does not respond (or in slang Domain name will not resolve). Accordingly, the device cannot open the site - since its address is not confirmed. To put it simply in simple language, the browser does not know where this site is located, that is, you see and enter the name of the site, but the browser requires it physical adress, and not a shell to bring out the content. This is exactly the problem that the DHCP protocol solves, namely its main option DNS server..jpg" alt="why dhcp does not respond" />!}
Application area: Windows Server 2016
You can use this section to tune the performance of network adapters installed on computers running Windows control Server 2016.
Definition correct settings for the network adapter depends on the following factors:
Network adapter and its set of functions
Type of workload running by the server
Server hardware and software resources
Server tasks
If your network adapter provides configuration capabilities, you can optimize the use of network bandwidth and resources to achieve optimal throughput based on the settings described above.
The following sections describe some of the performance tuning options.
Enabling Offload Features
Enabling network adapter offload features usually has a positive effect. Sometimes, however, the network adapter is not powerful enough to handle high load offload functions. throughput.
Important!
Do not use offload functions IPsec task offloading or TCP Chimney offloading. These technologies are deprecated in Windows Server 2016 and may negatively impact server and network performance. Additionally, these technologies may not be supported by Microsoft in the future.
For example, enabling segmentation offload may reduce the maximum sustained throughput of some network adapters due to limited hardware resources. However, if reduced throughput is not a limitation, you should enable offload features even for this type of network adapter.
Note
On some network adapters, offloading features must be enabled separately for send and receive paths.
Enabling scaling (RSS) for web servers on the receiving side
RSS can improve web scalability and performance when the number of network adapters is fewer than the logical processors on the server. When web traffic passes through RSS-enabled network adapters, incoming web requests from different connections can be processed simultaneously by different CPUs.
Please note that due to RSS and HyperText Transfer Protocol (HTTP) load balancing, performance can be significantly reduced if the network adapter does not support RSS, web traffic on the server does not support RSS adapters. In this case, you must use network adapters that support RSS, or disable RSS in the network adapter properties window additional properties tab. To determine whether an adapter is RSS enabled, you can view the RSS information on the network adapter properties additional properties tab.
RSS Profiles and RSS Queues
The default predefined RSS profile is NUMA Static, which changes the default behavior previous versions operating system. To get started with RSS profiles, you can review the available profiles to understand when they are useful and how they apply to your network or equipment.
For example, if you open Task Manager and look at the logical processors on the server, they are not busy enough to receive traffic, you can try increasing the number of RSS queues from the default value of 2 to the maximum that is supported by the network adapter. The network adapter may have settings to change the number of RSS queues in the driver.
Increasing resources for network adapters
For network adapters that allow you to manually configure resources, such as receive and send buffers, you should increase your resource allocation.
Some network adapters have small receive buffers to save allocated memory from the host. This leads to packet loss and poor performance. Therefore, for intensive reception scenarios, it is recommended to increase the receive buffer value to the maximum.
Note
If the network adapter does not provide it manually, it either configures them dynamically or the resources are given a fixed value that cannot be changed.
Enabling interrupt management
To manage interrupts, some network adapters offer different interrupt levels, buffer pooling options (sometimes separate for the receive and transmit buffers), or both.
It is recommended to control interrupts for CPU-bound workloads and consider the balance between saving host CPU and latency and increasing host CPU savings due to more interrupts and lower latency. If the network adapter does not handle interrupt management, but it does provide buffer pooling, increasing the number of pooled buffers allows buffers to be pooled for sending or receiving, which improves performance.
Performance tuning for low latency packet processing
Many network adapters allow settings to optimize latency caused by the operating system. Latency is the time between the network driver processing an incoming packet and sending that packet back network drivers. Typically this time is measured in microseconds. For comparison, the time to transmit packets over long distances is usually measured in milliseconds (larger\ order). This setting does not reduce the time spent per packet during transmission.
Below are some performance tuning suggestions for microsecond networks.
Computer BIOS set value high performance, disable C-states. However, note that these are systems and BIOS dependent systems, and some systems provide better performance if the operating system manages power. You can check and change power management settings from options or using powercfg teams. For more information, see Powercfg Command Line Options
Install the OS power management profile high system performance. Please note that this will not work correctly if the computer's BIOS has been configured to turn off operating system power management.
Enable static offloads such as UDP checksums, TCP checksums, and large send offloads (LSO).
Enable RSS if traffic is sent in multiple streams, such as large-scale multicast.
Disable interruptions Setting the network adapter drivers that require the lowest latency. Remember, this may use more CPU time and is a trade-off.
Handle NIC and DPC interrupts on the main processor, which shares a processor cache with the kernel that is used by the program (user thread) processing the packet. To assign the process to specific logical processors, along with setting up RSS to perform this task, you can use the CPU latch setting. Using a single core for interrupts, DPCs, and a user thread will result in a performance penalty for increasing load as the ISR, DPC, and thread will compete for the core.
System Control Interrupts
In many hardware systems, System Management Interrupts (SMIs) are used for various maintenance functions, including memory error code (ECC) reporting, legacy USB compatibility, fan control, and BIOS through power management.
The SMI interrupt has the highest priority in the system and puts the CPU into control mode, which blocks all other actions while the service interrupt routine, usually found in the BIOS, is executed.
Unfortunately, this can lead to latency spikes of up to 100 microseconds and much more.
If you need the lowest possible latency, you should request a BIOS version from your hardware vendor that has the lowest possible priority for SMI interrupts. They are often called "low latency BIOS" or "non-SMI BIOS". In some cases, it is not possible for the hardware platform to completely eliminate SMI operations because it is used to control critical functions (such as fans).
Note
The operating system may not have control over SMI because the logical processor operates in a special maintenance mode that blocks operating system intervention.
TCP Performance Tuning
You can tune TCP performance using the following items.
Auto-configuring TCP receive window
Prior to Windows Server 2008, the networking stack used a fixed-size window on the receive side, which limited the overall throughput for connections. One of the most significant changes in the implementation of the TCP stack is the introduction of TCP auto-tuning of the receive window.
Using the default fixed size, how can you calculate the total throughput of a single connection:
Total achievable throughput in bytes = TCP window * (1 / connection latency)
For example, the total achievable throughput is only 51 Mbps on a 1 GB connection with 10 ms latency (a reasonable infrastructure value for a large corporate network).
With auto-tuning, however, with auto-tuning the receiving window is adjustable and can grow to suit the sender's requirements. It is possible for a connection to achieve a speed of a full connection string of 1 GB. Network usage scenarios that may have been limited in the past by the total achievable throughput of a TCP connection can now fully utilize the network.
Deprecated TCP options
The following registry settings from Windows Server 2003 are no longer supported and are ignored in later versions.
All of these settings were in the following registry key:
``` HKEY_LOCAL_MACHINE\System\CurrentControlSet\Services\Tcpip\Parameters ```
NumTcbTablePartitions
MaxHashTableSize
Windows Filtering Platform
Windows Filtering Platform (WFP) introduced in Windows Vista and Windows Server 2008 provides APIs for third-party independent software vendors (ISV products) to create packet processing filters. Examples of firewall and antivirus programs.
Note
A bad WFP filter can significantly reduce server network performance. For more information, see Handling the migration of driver and application packages for the Windows Filtering Platform in the Windows Dev Center.
Note: In most cases manual setting A network adapter is not required, since our network provides automatic distribution of TCP/IP parameters for computers. Follow these instructions only if there are problems with the computer network.
1. Go to "Control Panel": open the menu "Start" and select "Control Panel".
2. If the window does not look like the one shown in the picture below, then switch the view to "Small Icons" by selecting the appropriate item in the menu "View". Go to "Network and Sharing Center."

3. On the quick access panel, click on the item "Change adapter settings".

4. Right-click on the icon and select the item in the menu that appears "Properties". If there is no connection, go back a step and select "Connect to the network" and follow the instructions of the settings wizard.

5. Select in the list "Internet Protocol Version 4 (TCP/IPv4)" and press the button "Properties".
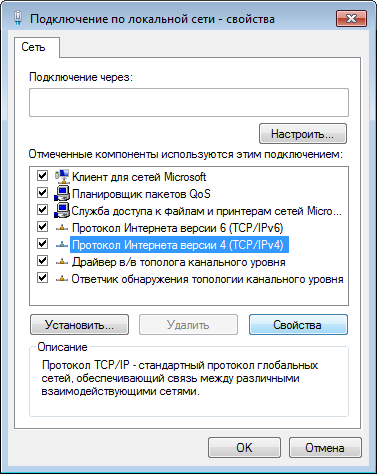
6. Set options to automatically obtain an IP address and DNS servers.

7. Check that the entered data is correct and click the button "OK" in both windows. Right click on the icon again "LAN connection" and select "Turn on"(if there is no such item, skip this step). If necessary, restart your computer.