A disk drive is a special computer component whose main function is to read and write disks.
Although optical drives are gradually losing their former popularity, you still cannot do without them, first of all this concerns the operation of a stationary PC.
The cost of the service is 290 RUR.
How to connect a disk drive to a computer- a task that should be entrusted to professionals! We will complete it with a guarantee and in the shortest possible time!
Algorithm of actions
- For starters, it's worth prepare PC to such a connection. Therefore, before starting the process itself, you need to complete a whole list of preliminary procedures. The first thing to do is completely turn off the power to the PC. You need to not only turn it off, but also remove the power supply cable from the power supply. Compliance with safety rules is a must when repairing equipment. Therefore, you should work extremely carefully and carefully. If you do not have sufficient experience or do not know how and in what sequence to act, then it is recommended to entrust this task to professional craftsmen.
Next, when the computer is de-energized, you need to remove the side covers from its system unit. This is necessary to gain two-way access to the device. Typically, the side covers are secured to the rear of the unit using four screws. They must be unscrewed and slightly moved back, and then completely removed.
- Followed by disconnect the old drive from personal computer and remove it. This is done by unscrewing the screws that secure it. As a rule, there are only 4 of them - two on one and the other side.
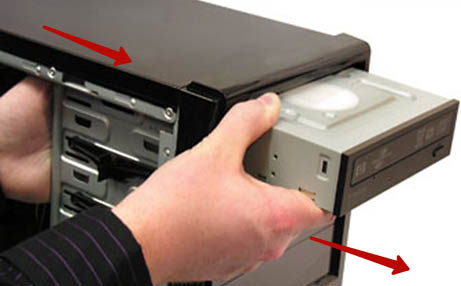 After that optical drive carefully pulled out of system unit. To make this work, it is recommended to push the device slightly from the inside of the device and then pull it out.
It is important to know that installation and removal of the drive is carried out exclusively from the outside of the system unit.
This means that attempts to push the device inside the computer case will be futile.
- Connecting the drive to the PC. This point is the most important in the whole process. First, the drive is inserted from the front of the case into a free hole and pushed inward as much as possible. When the device is finally in its proper place, it must be secured there with screws. It is necessary to emphasize that there is no need to skimp on screws, and it is best to tighten two things on both sides. Otherwise, if the fixation is poor, the drive will vibrate and make a lot of noise during operation.
- After installing the drive directly into the computer, you must connect it. Latest models are connected according to the same principle as hard disks– via SATA cables. All that needs to be done is to plug such a narrow cable into any free port located on the motherboard, and into the drive too. Plus, you need to connect a cable with SATA power supply, which comes directly from the power supply. This cable is much wider and includes four conductors.
Be careful!
This advice can harm your computer if used improperly. If you are not a specialist, we advise you to contact our specialists, leave a request below or call
We are ready to help you
However, if you are not confident in your own abilities and doubt that you can cope with connecting the drive yourself, then it is better not to risk it, but to immediately call a qualified technician.
Our specialists are ready to provide you with repair work of any complexity at a professional level and in the shortest possible time.
Entrust problems with your PC to knowledgeable people so as not to let the situation get worse and prevent the breakdown from getting worse. The cost of our services is quite affordable and you will be pleased with the excellent quality.
Page 8 of 11
Installation of drives, hard drive, floppy drive
Now is the time to install and connect the hard drive, CD-ROM, and floppy drive. On modern computers The disk drive becomes optional and you don’t have to install it, because The amount of information stored on a floppy disk is negligible, and in case of problems with the system, it will be possible to boot from a CD for diagnostics and recovery. However, if the drive has already been purchased, then there is little point in storing it on a shelf and it is better to install it.
Next, we need to clarify the terms used that characterize the dimensions of devices. There are five-inch devices, there are three-inch ones. In fact, these parameters do not limit the size of absolutely all devices, but this is the standard. So. Five-inch devices are installed in the upper slots of the case. As a rule, with rare exceptions, five-inch devices have a front panel on which the device controls are located. The most common example of a five-inch device is a CD-ROM. The case can be designed to accommodate both 2 and 6 five-inch devices. It all depends on the case model.
The most common representatives of three-inch devices are hard drives and disk drives. Typically, cases do not have many slots for installing 3-inch bezel-mounted devices (such as a floppy drive). Usually this is two or three slots. There can be one or more slots for installing hard drives, depending on the case model. In ordinary cases aimed at home and office use, two to four slots are allocated for hard drives. There may be more of them on servers (see below). The slots for installing hard drives are located below the other slots and do not have holes on the front panel.
Let's look at examples of what is installed where in typical case models.
So, let's look at them one by one. In Figure 1 there is a non-name case, in which the manufacturer has provided installation spaces for (top down, circled in red) 3 five-inch devices and three three-inch ones. Two seats for three-inch devices have plugs on the front panel, i.e. Devices such as disk drive, jaz, zip, etc. can be placed there. Please note that in photo 1, a hard drive is installed in the third five-inch bay from the top. This is a necessary measure, since the distances between the three-inch bays in this case are so small that two hard drives fit right next to each other and even powerful additional cooling will be ineffective due to the fact that one of the hard drives “lies” with the electronics board on the other.
Figure 2 shows the expensive Chieftec TA-10BD case, a complete tower, for file servers. The weight of this case without any filling is 18 kilograms, the iron is very thick, a large number of slots, a well-thought-out system for mounting hard drives and cooling them. The case is very good, it has space for installing 6 five-inch devices, two three-inch devices with a front panel and six hard drives. The baskets for installing hard drives are removed along the guides (move out) inward after opening the latch. Each basket has space for installing a fan that cools the hard drives.
Picture 3 shows the InWin 508. An excellent, well designed and manufactured case. Weight 10 kilograms, positioned as a universal-purpose PC case. Thick sheet metal, space for installing 3 five-inch devices, two three-inch devices with a front panel and two hard drives. The hard drives, by analogy with Chieftec, are mounted in a basket, which is removed forward after unscrewing the screw shown in Figure 3 with an arrow.
And in Figure 4 the Venus body. The case is also made of high quality. Four slots for installing five-inch devices, two for three-inch devices with a front panel, and 6 for installing hard drives.
Now let's see how hard drives and CD-ROMs are configured and connected.
Figure 5 shows the connectors for IDE connections devices and disk drive on the motherboard.
In the figure, number 1 indicates the first port for connecting IDE devices. The first channel or primary channel are different names for this port. On almost all modern motherboards this port is blue, as in the picture. The number 2 indicates the secondary or second channel (port). The number 3 indicates the port for connecting the disk drive. If the ports do not differ in color, then the motherboard must be marked (IDE1, IDE2).
Now about the devices themselves.
Each of the hard drives or CD-ROMs can be a Master or a Slave. It is possible not to strictly assign a Master/Slave to the device, but to set Cable Select. In this case, when connected by a cable, the devices themselves will “decide” which of them is the Master and which is the Slave. This will happen by connecting the device to one or another connector on the cable. The Master/Slave/Select_Loop parameter is set by installing a jumper (switch made of jumpers and pins).
In Figure 7, the CD-ROM is configured as a master. Figures 8, 9 and 10 show the main jumper positions for configuring the hard drive. Comparing them with the table in Figure 6, we can say which position of the jumpers corresponds to a particular operating mode.
Now we need to decide how we will connect and, accordingly, configure the devices. It is imperative to remember that one loop can only have one master and one slave. So here are some of the most common combinations:
The system contains a hard drive and CD-ROM. In this case, we will connect the hard drive to the first channel on the motherboard with one cable and set the hard drive to Master. We connect the CD-ROM with a second cable to the second channel on the motherboard and set it to the CD master. This way, there will be one device on each IDE controller channel on the motherboard.
The system contains a hard drive, CD-ROM and CD-RW. In this case, we will connect the hard drive to the first channel on the motherboard with one cable and set the hard drive to Master. Let's connect the CD-RW with a second cable to the second channel on the motherboard and set it to Master. We will connect the CD-ROM using the same cable as the CD-RW, but we will set the Slave on it. In this case, there is one device on the first controller channel, and two on the second.
The system has two hard drives and a CD-ROM. In this case, we will connect the first hard drive to the first channel on the motherboard with one cable and set the hard drive to Master. We will connect the second hard drive using the same cable, but set it to Slave. We will connect the CD-ROM with a second cable to the second channel on the motherboard and set it to Master. It turned out that on the first channel there are two hard drives, and on the second there is only a CD-ROM.
And the last option is that the system has two hard drives, CD-ROM and CD-RW. In this case, we will connect the hard drive to the first channel on the motherboard with one cable and set the hard drive to Master. The second screw is the same cable, but as a Slave. Let's connect the CD-RW with a second cable to the second channel on the motherboard and set it to Master. We will connect the CD-ROM using the same cable as the CD-RW, but we will set the Slave on it. In this case, there are two devices on each controller channel.
This list is not limited to the set of combinations. The ones given here are the most common, but, as with any rule, there are exceptions when you need to combine, for example, a hard drive and a CD-ROM on the first channel, and a second hard drive and a CD-RW on the second. This option will be most optimal if the computer is often used to copy CDs on the fly, and the second hard drive is used to store archives and other information that is accessed relatively rarely.
Sometimes you can find systems that require more than 4 IDE devices (hard drives, CDs and other drives). To solve this problem, additional IDE controllers are sold that are installed in PCI slot, the same as sound or LAN card. I would like to immediately draw your attention to the fact that to connect additional devices you need IDE controller, not RAID. I won’t bore you with a story about what RAID is, just keep in mind that if you don’t need to organize RAID, but need to connect, for example, 6 IDE devices, then buy an IDE controller, without RAID. The savings in some cases will be in the order of hundreds of bucks, which can certainly be put to better use than investing in an unused RAID controller.
Now a little about the trains.
New, 80-wire cables have multi-colored blocks. One is blue, the second is black and the third is gray. The 80-core loop is shown in Figure 11.
Please note that there is more distance between the blue and black blocks than between the black and gray blocks. The same thing can be seen on the 40-core cable, but with the only exception that the pads on it are all black. Remember that the cable is always connected to the connector on the motherboard (either to the first or second channel, it doesn’t matter) with the long end or the blue block. The Master device is connected with a black block, and the Slave with a gray one. For a 40-wire cable, the Master device is connected to the middle block, and the Slave is connected to the one farthest from the motherboard. Please note that there is a key on each header and in each connector of the device or motherboard that makes it impossible incorrect connection plume. In Figure 12, the key is clearly visible and the arrow points to it (U-shaped protrusion on the connector). Unfortunately, until recently, keys were not made on all cables and therefore they could be connected incorrectly. By connecting the device with an inverted cable, no harm will be done to the motherboard or the device, but it is better to assemble everything correctly right away. If you noticed, the outermost core on the cable is marked in red. This is the first contact on the cable and on the connector. If you received a cable without a key, then carefully inspect the markings on the motherboard, next to the connector. There will definitely be a number 1. This is the first pin. Align the labeled wire of the cable with the first pin of the connector. On devices (hard drives, CD-ROMs), the first pin is usually located closer to the power connector.
If you think that dealing with jumpers and cables is too long, then set the jumpers on all devices to the Cable Select position, plug the long end of the cable into the motherboard, and connect the remaining connectors of the cable to the device connectors. The devices will be configured “automatically”.
So, let’s connect the drives step by step:
Set jumpers on the devices so that they correspond to the selected operating modes (Master, Slave or Cable Select)
Install the devices into the slots and secure them with screws. A common mistake is not to screw them in at all or to screw them with just one screw. Remember that by tightly screwing the device (hard drive in particular) with all the screws to the case, you ensure better heat dissipation by using the case as a radiator. The hard drive will heat up less and the likelihood of losing all data will be reduced.
Insert the cable with the long end (blue block) into the motherboard. Connect the middle (black) connector to the device previously configured as Master. Connect the last one (gray) to the Slave (if there is one).
Do the same steps with the second cable, connect it to the remaining devices.
Connect the cable from the drive to the motherboard. Connect it to the drive.
Now you need to connect the power. More on this in the next chapter.
After installing the drive (drive) and turning on the computer, the Windows 98/ME/2000/XP operating system will detect the devices Plug and Play and install the necessary software. Otherwise, you will have to install all the required drivers yourself.
CD and DVD-ROM drives with an IDE or SCSI interface are installed in the usual way. And decoder cards, sometimes needed to play MPEG-2 video, are inserted into a PCI slot and require the appropriate software.
Regardless of the type of drive you are connecting to (built-in or external), you must check the IDE or SCSI adapter for the drive before installation. Most drives connect to just such an adapter. It must be installed on the system and must not conflict with other devices.
Most computers have an IDE adapter integrated into the motherboard. And when using a SCSI drive, you need to install the SCSI adapter into a free slot on the system board and configure it, i.e. define the following parameters:
If you are running Windows 98-XP and using Plug devices and Play, their parameters will be configured automatically.
The configuration of a new drive is the key to its proper operation. Inspect the drive and find all jumpers and connectors. For a drive with an IDE interface, you can set the jumpers to the following positions:
If you install the drive on a secondary EIDE interface, its jumpers will be set correctly. Check the documentation that came with your CD-ROM drive.
When using a CD or DVD-ROM drive as a secondary device, check that the jumper on the drive is installed correctly and the cable cable is connected to the system board. In most cases, the drive you install will be assigned the next available drive letter.
If possible, do not connect a CD or DVD-ROM drive and HDD to one IDE channel. This will cause both devices to slow down. If your computer has a free secondary IDE channel, connect a CD or DVD-ROM drive to it and leave the hard drive on the primary.
A SCSI drive is a little easier to configure because it only needs to be set to a SCSI device identification number (SCSI ID). Default boot disk ID number 0 is assigned, while most adapters are assigned ID number 7. Make sure the drive is set to a different ID number that is not currently being used by another SCSI peripheral.
Connecting an external SCSI drive
Carefully unpack the device. Typically, the kit includes a CD or DVD-ROM drive and a cable for connecting to a SCSI adapter. This is the minimum required to connect and operate the device. You may also find a CD case, an instruction manual for the adapter, and a couple of demo CDs. SCSI devices almost always come without a SCSI adapter. Because each SCSI adapter supports up to seven devices (Ultra2 SCSI supports up to 15 devices), you don't have to buy a separate adapter card for each device. Some motherboards have an integrated SCSI adapter, but most likely you will still need to purchase a separate SCSI adapter card.
Inspect your workplace and estimate (taking into account the length of the connecting cable) where the drive can be installed. Once you have found a suitable location, connect the power cable to the drive (usually the connector is located on the back of the computer). Naturally, there should be a free power socket nearby, or better yet, a free socket in the power filter (stabilizer, unit uninterruptible power supply and so on.).
Connect one end of the connecting cable to the drive connector, and the other to the connector installed on the adapter board. On rear panels Most portable CD-ROM drives have two connectors, and you can use either of them to connect to your computer. Secure the cable connectors using locking clips, if available. Some newer 16-bit controllers use special, small connectors to make connections easier.
There should be a SCSI device identification (SCSI ID) switch on the back of the portable drive. Typically, adapters are assigned a default identification number of 7. Check to see if the drive is set to something else, such as 6, 5, or 4. Of course, you should not set a value that is already in use for another card or any SCSI peripheral .
Installing the built-in CD-ROM drive
Unpack the built-in device kit. It should include:
Sometimes the device comes with a double extension cord for connecting power, consisting of three interconnected pieces of cable with connectors at the ends, a container for a CD, and a user manual. Make sure the computer is turned off and the cover is removed. Before installing a SCSI card into the expansion slot, connect a ribbon cable to it.
Both ends of the flat cable must be the same. There is a red stripe along the edge of the cable that corresponds to the conductor and pin of the connector numbered 1. Sometimes, if you are lucky, you may come across a cable connector with cutouts or keys that prevent you from connecting it incorrectly. If the connectors are ordinary, then you need to connect them, guided by the first contact mark on the cable.
Along the edge of the SCSI adapter board there are 50 yellow pin contacts - the board connector. Next to the contacts on the board are their numbers, or at least the designations of the first and last contacts. Rotate the ribbon cable so that the colored mark lines up with the first pin, and then carefully slide the connector onto the pins.
Insert the board into the connector, ignoring the free end of the ribbon cable.
Select a bay on the front of your computer to install the drive. Access to it must be free.
Remove the drive bay cover. If the side walls of the drive have holes for mounting screws, and the drive itself fits tightly into the bay, then additional guides are not needed. If the device is smaller than the bay, screw the guides to the sides of the bay and place the device back into the bay. Secure it with four screws - two on each side. If the holes in the guides do not immediately coincide with the four holes in the compartment, you will have to make do with attaching two screws - one on each side. Since you will be inserting and removing CDs for many years, you need to approach the mounting of the drive with the utmost responsibility. Locate the labeled side of the ribbon cable and align it with the first pin of the drive connector, which can be identified by the marking on the connector itself or by the picture in the owner's manual.
On the back of the drive there is a 4-pin power connector. Inside the system unit, power is supplied to various components, such as disk drives or a hard drive, through a cable consisting of intertwined yellow and red wires. If one of the connectors of such a cable is free, then connect it to a CD or DVD-ROM drive. If there is no free connector, you will have to use a double extension cord.
Disconnect the power cable from the drive and connect the dual to it. Connect one end to the CD or DVD-ROM drive, and the other to the drive.
It is better to connect a double extension cable to the drive, since hard drives usually consume quite a lot of power and are more demanding on the quality of the supply voltage. If there is no way out (for example, the length of the double is not enough), then “split” the cable connector that has not yet been subjected to this procedure.
Take your time to close the computer lid. First make sure the device is working. Now you can turn on the computer, but in order for the drive to work, you need to install driver programs.
SCSI Device Chain
Let us recall that one of the main advantages of using a SCSI controller is the ability to daisy chain connect several peripheral devices. At the same time, the number of free connectors in the computer increases and the need for strict accounting of IRQ interrupts, DMA channels and I/O addresses is eliminated.
The chain can include scanners, tape drives, and other SCSI devices. But at the same time, you need to remember about the limitations, the most important of which is the load on the chain of SCSI devices.
External SCSI devices only.
Let's assume you installed a CD-ROM drive and connected it to the second connector on its back wall also a magnetic tape drive. The first device in this chain is the adapter itself. On almost all SCSI boards you can find a group of three socket-mounted elements in long, reddish ceramic housings. These are sets of load resistors for the board.
In our case, the cable coming from the adapter board is connected to the CD-ROM drive, and the cable from the CD-ROM is connected to the magnetic tape drive. Therefore, the second set of load resistors must be installed on it. Majority external devices usually uses SCSI plugs for the load - special devices that are connected to an unused connector of the SCSI device. They come in two types: plugs and through loads. The plugs are inserted into the free connector and completely cover it. The pass-through loads look like plugs, but have two connectors, one of which plugs into a connector on the back of the device, and the second of which can be connected to a SCSI interface cable. Such a load may be necessary if the device has only one SCSI connector.
Onboard SCSI devices only.
For this case the rule is valid: identification numbers must be unique for all devices, and load resistors must be installed in the first and last devices. However, keep in mind that many embedded devices have pullup resistor sets installed in the same way as those on the adapter board. For example, if a magnetic tape drive is the last one in the chain, then its printed circuit board Load resistors must be installed. And if the CD-ROM drive is connected in the middle of the chain, then the load resistors from its board must be removed. The resistors are left on the SCSI adapter board, since it is at the end of the chain.
Most embedded SCSI device cards have one to three pull-up resistors or DIP switches. Their location is usually indicated in the operating instructions.
Built-in and external SCSI devices.
When simultaneously connecting built-in and external devices, you must also adhere to the rules outlined above. The SCSI adapter itself is assigned number 7, and, what is especially important, load resistors are removed from it, but not from drives.
The adapter board, like any other board, must be handled with care. First of all, remove any electrostatic charge from yourself.
Remove the side walls of the computer.
Naturally, the computer must be turned off.
Find a free 5.25 bay (or empty it) and insert a CD (DVD) drive there (outside -> inside).
Then use the supplied screws to secure it.
Before installation, check the position of the Master/Slave jumper; two identical modes are not allowed.
Then connect the cable, power and, if necessary, an audio cable (Audiocable).
Then close the computer and start it.
The system itself will find new equipment and install the driver.
If this does not happen, then there is a conflict between PnP devices (CD (DVD) drive, sound card, modem, etc.) at the level of interrupt requests and I/O ranges, and this can also happen implicitly (the device is simply not detected by the system).
In this case, you need to install the drive manually using the “Add Hardware Wizard”, and after installing the equipment, you need to configure the interrupt request and I/O range manually by clearing the automatic configuration flag.
Answers on questions
Nvidia has released a Game Ready driver for PlayerUnknown's Battlegrounds
Nvidia announced the availability of this year's latest Game Ready package for download GeForce drivers 388.71, certified by the Microsoft WHQL laboratory.
This release is timed to coincide with the exit from early access popular game PlayerUnknown's Battlegrounds, where it should provide maximum performance.
Nvidia has also compiled a list of optimal video cards for gaming at high and ultra graphics settings with a frame rate of about 60 fps in resolutions from 1080p to 4K.
Other innovations in the GeForce 388.71 (WHQL) release include a new SLI profile for the shooter Warframe, as well as 3D Vision profiles for the following games:
Black Desert, ELEX, Forza Motorsport 7, JX3 Online and PlayerUnknown's Battlegrounds.
You can download a set of drivers and GeForce 388.71 (WHQL) software by using the search on the official Nvidia website or through the GeForce Experience application.
Radeon Software Adrenalin Edition 17.12.2 driver available
Radeon Technologies Group has prepared a new update for the driver and software package Radeon Software Adrenalin Edition with the index 17.12.2.
The second December issue does not contain any game optimizations and is called upon to correct big number problems seen in previous releases.
The list of fixes for the Radeon Software Adrenalin Edition 17.12.2 driver includes the following items:
The Video tab in the Radeon Settigns app may disappear on some Hybrid Graphics configurations after a system reboot;
- the system freezes when connecting an external video card running on AMD XConnect technology;
- low screen resolution may not allow you to scale the image;
- recording of the selected area via Radeon ReLive can continue even after the recording window is closed;
- problems during the game or when creating an Eyefinity configuration of three monitors;
- artifacts or flickering in the game Ark Survival Evolved when displaying performance information via Radeon Overlay in operating system Windows 7;
- blank screen on the FreeSync monitor Samsung CF791 when launching games in full screen mode;
- video stuttering in Netflix when playing through a browser or using the Windows 10 application;
- Radeon Overlay may disappear and appear during data updates;
- resetting color temperature settings may change the colors on the wrong display;
- possible artifacts in the game Star Wars: Battlefront II.
Intel introduced Gemini Lake generation processors
These are CPUs with very low power consumption, aimed at compact PCs, relatively budget models, hybrid solutions and various devices, where the TDP level is critical.
Gemini Lake processors replaced the Apollo Lake generation, which filled the niche of cheap laptops due to the almost complete absence of budget CPUs from older Intel families.
Gemini Lake is a successor to the Atom family, Intel just doesn't use this brand right now.
There are currently six processors in the new generation: a pair of Pentium Silvers and four Celeron models.
At the same time, three models conditionally belong to the desktop segment, and three to the mobile segment.
Models with the N index belong to the mobile segment, and those with the J index belong to the desktop segment.
All processors received a dual-channel memory controller with support for DDR4/LPDDR4.
The UHD Graphics 600 GPU contains 12 execution units, while the UHD Graphics 605 has 18 units.
The CPUs are produced using a 14-nanometer process technology and have the FCBGA1090 design, regardless of the platform.
Local Adaptive Contrast Enhancement (LACE) technology debuts in the processors.
Judging by the description, it is designed to adjust the image on the screen depending on the external lighting.
In addition, Intel claims that Gemini Lake processors are the first among the company's solutions to receive support for Gigabit Wi-Fi.
More precisely, the 2x2 802.11ac standard is used with channels with a frequency of 160 MHz.
You can also note support for HDMI 2.0 and image output in 4K at 60 fps.
The first PCs based on the new CPUs will appear in the first quarter of 2018.
ABOUT AMD processors Ryzen second generation
AMD plans to release successors to Ryzen desktop processors in the foreseeable future.
According to the leaked roadmap, the second generation Ryzen chips, also known under the codename Pinnacle Ridge, will debut at the end of February.
According to reports, the new processors will be manufactured according to 12-nanometer FinFET technical standards at GlobalFoundries facilities.
The older Ryzen 7 chips will hit store shelves first, and then in March AMD will release more affordable solutions for the Ryzen 5 and Ryzen 3 lines.
These “stones” will have an AM4 design and will be compatible with commercially available motherboards on the base AMD chipsets 300 series.
It should be borne in mind that with the mentioned CPUs, new boards based on AMD 400 series logic will go on sale, relevant for those who are assembling a system from scratch or moving from older platforms.
The line of desktop processors for the mass AM4 platform may be headed by 12-core solutions operating at significantly higher frequencies than their predecessors.
In particular, the flagship Ryzen 7 2800X will operate at frequencies from 4.6 to 5.1 GHz in boost mode, while for the Ryzen 7 1800X they range from 3.6 to 4 GHz.
What’s important is that increasing the number of cores will not in any way affect the recommended cost of the new CPUs, which will be identical to the 8-core analogues already available for sale.