Why create backups and do I need them?
If your life or work activity is closely connected with working at a computer, if you create or edit documents, images, photographs, diagrams, price lists, letters, etc., you just need to think about the constant or at least daily backup copies important files, because the time and effort spent on creating documents can be quite significant, and the loss of important files will lead to unplanned work and additional costs.
Daily file backups it will protect them from accidental modification or deletion, from virus damage, file system failure, PC hardware failure, for example, a hard drive, etc. and will allow you to quickly restore them in case of loss.
Another important plus of periodic backups, for example once an hour, is the preservation of the history of document changes. In case of accidental change of the document, you can always see what your file was like an hour ago, 2 hours ago, etc. (for any date in the past) and it is easy to return to it ("roll back") and continue working.
What are the backup tools?
All instruments Reserve copy can be divided into 3 parts: manual, semi-automatic and automatic.
Manual copying of files (from window to window)
This method includes regular copying without using any programs.
Pros:
No software required, no installation required. Just open two Windows windows(with a source folder and a destination folder), select necessary files and folders and drag them with the mouse from window to window.
Minuses:
- You need to often be distracted by copying files.
- You can always forget to make backup copies of the necessary files on time (the human factor is present).
- Difficulty managing backups.
- It is impossible to strictly adhere to the backup schedule.
Backup using bat files
Files with the .bat extension are operating system executable files. Windows systems, have a text form and can sequentially execute a number of operating system commands, including copying files from one place to another. This method backup can be called semi-automatic, because in terms of capabilities it is quite inferior to automatic backup programs.
Pros:
You do not need any software, just create bat files yourself, set up the Task Scheduler in the Windows Control Panel to run these bat files at a specific time.
Minuses:
- It takes some knowledge and time to develop bat files that will create backups.
- Bat-files are much inferior to backup programs in terms of convenience, functions and flexibility of settings.
Automatic backups
To automatically create backups, they usually use special backup programs that are easy to set up and use, have rich functionality, but, as a rule, are paid, although their cost is not high. Such programs usually take care of all the backup work and are completely automatic. You only need to set them up once.
Pros:
- Convenient and intuitive backup management interface.
- Flexible backup schedule setting.
- Easy to set up complex backup schemes.
- Detailed logging (journal) of work, notification by e-mail or mobile phone in case of problems.
Minuses:
A small disadvantage of using such programs can be called their payment. Although if you think about it, the fact that the program is paid can even be considered a plus, and here's why:
- a paid program is usually developed by developers, new versions are released, updates that take into account the wishes of users, errors and shortcomings are fixed;
- good technical support;
- the cost of backup programs is usually not high;
Free software, as a rule, does not oblige the developer to anything, and the project can be abandoned at any time simply because the developer is tired of wasting time on free support and improvement of the program.
The easy way to automate backups with Exiland Backup
Exiland Backup- simple utility automatically creating backup copies of files on a schedule, which has a well-thought-out Russian-language interface that allows you to easily set up backup even for an inexperienced user.
Let's look at an example of how to quickly set up Exiland Backup to back up work documents and photos to an external HDD connected to USB port, as well as set up duplication of backups on another PC local network for added reliability.
07.04.2017
The safety of information and the possibility of its quick recovery in case of failures, critical errors and breakdowns of hardware components of computers is extremely worrying for many users. In this regard, data backup comes to one of the first places in the list of knowledge and skills of anyone who works with modern computer technology.
Many users experience annoyance and outrage when operating system starts to work intermittently due to various factors - accumulated program errors, action computer viruses, hardware problems ... I really want, and sometimes it's just necessary to return everything to its former state. An invaluable help at this moment will be provided by a timely created image of the operating system.
Windows backup tools
Fortunately, today there are special means which make it easy to create backups individual files, folders, partitions, or entire drives. With the help of such software You can restore your computer's performance without losing important data at any time. Let's figure out how to work with Windows archiving tools, including installed programs, settings, users, files and other important information.
Method 1: Acronis True Image


Method 3: AOMEI Backupper
A backup solution from Chinese programmers will delight lovers of simplicity and minimalism. The AOMEI Backupper program has a small distribution size, is not overloaded with "extra" functions, has a very pleasant and intuitive clear interface. At the same time, it has gained popularity among users due to its effectiveness. In general, it can be recommended for novice users and people who do not want to understand the settings and intricacies of the process. Only the lack of official support for the Russian language of the interface can upset, although a localizer has been created by enthusiasts.


Method 4: Windows built-in tools
Microsoft offers users of its operating systems its own backup tools. These tools are integrated into the OS, move from one Windows versions in subsequent ones and are used by a certain circle of users.
The utilities in question in Windows 7, 8, 8.1 and 10 work identically, only their name and method of calling differ slightly. In the "seven" - you need a tool called "Backup and Restore" in "Control Panels", which has the function "Creating a system image". In later versions, the ability to create an image of the system, for some reason, is not so obvious.

As we can see, the creation backup Windows is a fairly simple task to perform and there are a lot of methods for solving it. Whichever method of the above is chosen, it is important to do the archiving procedure regularly and ensure that the resulting files are stored on reliable media and in a safe place.
Now any computer user is primarily worried about the safety of their data. There are a huge number of factors that in the process of work can lead to damage or deletion of any files. malware, system and hardware failures, incompetent or accidental user intervention. Not only personal data is at stake, but also the performance of the operating system, which, following the law of meanness, “falls” at the moment when it is most needed.
Data backup is literally a panacea that solves 100% of problems with lost or corrupted files(of course, provided that the backup was created in accordance with all the rules). This article will present several options for creating a full backup of the current operating system with all its settings and data stored on the system partition.
You can copy documents in the old fashioned way for safety to flash drives or parallel partitions hard drive, worry about the darkness of settings in the operating system, shake over each system file while installing third-party themes and icons. But manual labor is now a thing of the past - there is enough software on the network that has proven itself to be a reliable tool for complete redundancy of the entire system. A little something is wrong after the next experiments - at any time you can return to the saved version.
The Windows 7 operating system also has a built-in function for creating a copy of itself, and we will also talk about it in this article.
Method 1: AOMEI Backupper
Rightfully considered one of the the best programs for backup. She has only one drawback - the lack of a Russian interface, only English. However, with the instruction below even a novice user can create a backup copy.
The program has a free and paid version, but for the needs regular user head first. It contains all the necessary tools to create, compress and verify a system partition backup. The number of copies is limited only free space on the computer.
AOMEI Backupper has a number of minor settings that are sure to come in handy for a user who is seriously worried about his system. Here you can find the setting of deferred and periodic backup tasks, splitting created file into pieces of a certain size for loading into cloud storage and entries on removable media, encrypting the copy with a password for privacy, as well as copying individual folders and files (great for saving critical system objects).
Method 2: restore point
Now let's move on to the built-in functions of the operating system itself. The most popular and fastest way to create a system backup is a restore point. It takes up relatively little space and is created almost instantly. A restore point has the ability to return a computer to a checkpoint by restoring critical system files without affecting user data.

Method 3: archiving data
Windows 7 has another way to back up data from the system drive - archiving. At correct setting this tool will save all system files for later recovery. There is one global drawback - it is impossible to archive those executable files and some drivers that are in this moment are used. However, this is an option from the developers themselves, so it must also be taken into account.
Despite the fact that the operating system has built-in functionality for creating backups, it does not inspire sufficient confidence. If recovery points very often help out experimental users, then there are often problems with restoring archived data. The use of third-party software greatly improves the reliability of copying, eliminates manual labor by automating the process, and provides fine-grained settings for maximum convenience.
Backup copies should preferably be stored on other partitions, ideally on third-party physically disconnectable media. AT cloud services download backups only encrypted with a strong password for safe storage personal data. Create new copies of the system regularly to avoid losing valuable data and settings.
With the Windows Control Panel features, you can:
- backup specified folders on a schedule and restore them from a backup
- create a full system image
- create boot disk for Windows recovery
Background
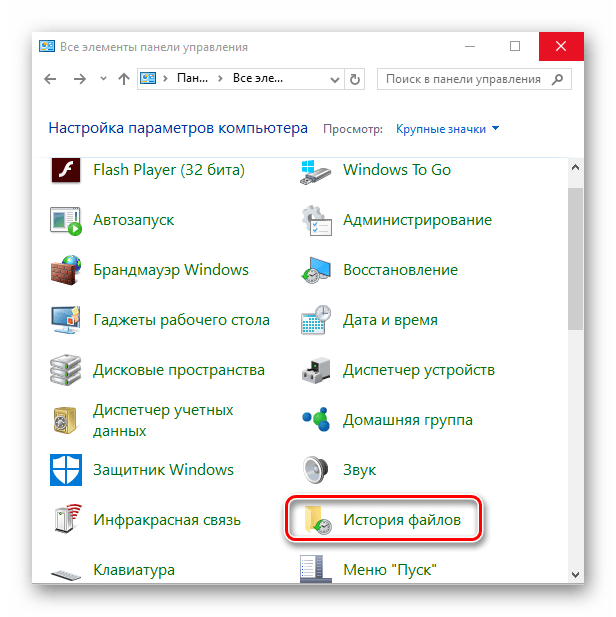
The information in this article applies to Windows 7, 8, 8.1, and 10. Initially, this article was about backup capabilities. Windows copy 7 - creating file archives and disk images. In Windows 8, they were replaced by File History and Restore Windows without deleting files (Refresh Your PC), respectively.
However, everything written applies to Windows 8 and 8.1, as it retains the features of the previous system. You can find them by searching the control panel.

Enlarge picture
In Windows 10, the Refresh Your PC feature from Windows 8 is dead, but the old features of Windows 7 have survived. You can find them by searching for the word backup in the start menu or old control panel.

On this page:
Backup features in Windows 7
Windows 7 allows you to create both backup copies of folders and a full image of hard drive partitions.
| Backup type | Technology and Opportunities |
| User Files |
|
| Partition image |
|
These features, combined with the ability to boot into a recovery environment without installation disk able to meet the needs of most home users. Now they can do without third party programs Reserve copy.
User interface changes
Changes in the Windows 7 backup capabilities have affected not only technology, but also the user interface. In particular:
- redesigned interface of the main window of the control panel element
- a new user interface has been created to manage the space occupied by backups
- simplified file recovery using the wizard
- Implemented integration with the support center for timely notification of users about the need to create a backup
The archiving user interface elements are described in the action below.
Configuring Regular Backup Options
By default, backup is not configured. Click the link Set up backup in the main control panel item window to set archiving options.

Options for placing a backup copy of files are given in the table.
| Accommodation | Comments |
| Internal hard drive | You can place archive files on:
|
| External hard drive | If scheduled backup is configured, external hard the disk must be connected at the time of the backup. Note. Windows 7 does not support creating images flash systems. |
| The local network | Archiving is supported only on network computers running under Windows control 7. Of course, you will need credentials to access the computer hosting the backup. |
You can place file archives on partitions formatted as file NTFS system, and in FAT32. When archiving to a hard disk, the files are placed at the root of the partition. You cannot specify a subfolder for the archive, but nothing prevents you from placing other files and folders on this disk.
The rest of the article discusses how to save a backup to an internal hard drive partition. Having decided on the location of the archive, you must set the archiving parameters. You can provide this solution to the operating system, or you can choose the folders yourself.
With your own choice, you can create backups:
- user files, including libraries
- local drive folders
- full system image

At the end, Windows 7 displays a summary of the backup options.

The schedule parameters you set are saved in the task scheduler, which is responsible for the timely start of archiving.
When you finish configuring archiving options, you return to the main window of the Control Panel item.
Backing up files
Now the main window displays all archiving options. Click the button Archive to start the backup process.
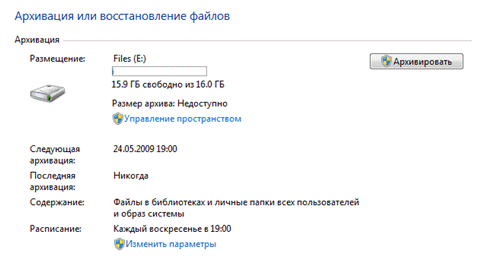
The progress of archiving is displayed using a progress bar, but you can view the details by clicking the button View details.

After completing the backup, you can view information about the used disk space and proceed to managing archives.
Creating a system image
This function has a number of limitations that are useful to know so that it does not hurt excruciatingly later.
- Only NTFS-formatted drives can be included in the image.
- The image cannot include the drive or partition on which the image is saved.
- All system and boot drives or partitions (see the Disk Management snap-in) are forcibly included in the image.
- The image can only be saved on a disc formatted in file system NTFS.
- The image can only be saved to a network location in Windows 7 Professional, Ultimate, and Enterprise.
- You cannot restore a 64-bit Windows image to a 32-bit system.
- The bit depth of the recovery disk or installation disk must match Windows bit depth in a backup image. You cannot restore a 64-bit Windows image using a 32-bit Windows installation or recovery disc, and vice versa.
- An image saved on a UEFI PC cannot be restored on a BIOS PC.
- When restoring a system image from dynamic disk, you cannot restore the disk and partition configuration saved in the image. Therefore, the image must be stored on the base disk.
- The image is stored in the root target disk in folder Windows Image Backup. If the folder is moved from the root of the drive or renamed, the image cannot be restored.
- Storing a system image on another disk partition is not a backup. In the event of a disk failure, you lose everything.
The first system image is a complete snapshot of the partition, and subsequent ones are incremental, that is, they include only changes compared to the previous image. This opportunity to save disk space, implemented using shadow copies. This principle of creating images is applied when saving them on internal, external and optical drives.
For internal and external drives this principle is valid as long as there is enough space on the disk. When space runs out, a full image is created and all previous ones are deleted. As for network drives, a full image is always created on them, and the old image is overwritten with a new one.
Let's look at creating the first image.
- In Windows 7, in the left pane of the Control Panel item, click the link Creating a system image.
- In Windows 10, in the left pane of the Control Panel item File history click the link below System image backup, then Creating a system image.
A window will open with image placement options.

In the next step, you will be able to select partitions to archive.

If there are other partitions in the system, you can select them at this step. Once you've made your selection, click the button Archive to start the backup process.
The image is automatically included system partition and the section on which the necessary downloads are located Windows files(it may differ from the system one in multi-boot configurations). The solution to problems with the inclusion of unwanted partitions in the image is in this article.
All the following images are created in exactly the same way. As I said above, they contain only changed blocks. In order to create a full system image again, you need to delete the existing images or move them to another partition.
You can also move them from the root of the drive to subfolders, but please note that in this case, the system recovery program from the image will not see them. The location and contents of the backups will be discussed further.
Space Management
In the control panel item's main window, click the link Space Management. A window will open that displays information about the location of the archive, a summary of disk space usage, and links and buttons for viewing and managing archives.

Backup locations
Beyond watching details about the space used, you can open the backup storage location - click the link Review, and the files will open in File Explorer.
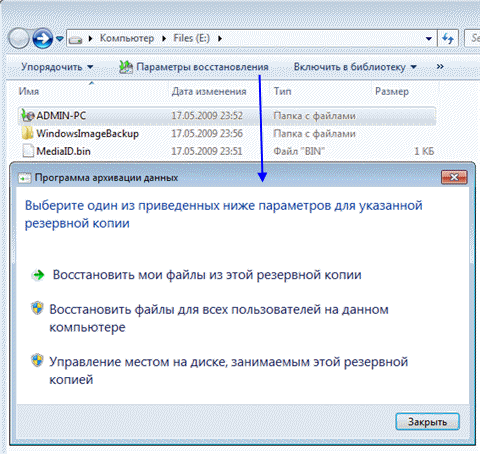
Windows 7 recognizes the archive folder and provides easy access to recovery options that can also be opened double click by folder.
Of interest, of course, are the folders:
- %COMPUTERNAME% (in this case ADMIN-PC) - file archive
- WindowsImageBackup - folder with partition image
The contents of the file archive
You can open the archive folder using the context menu. The contents of the archive are transparent to the user - inside are ZIP archives, and if desired, files can be extracted from there directly from Explorer.
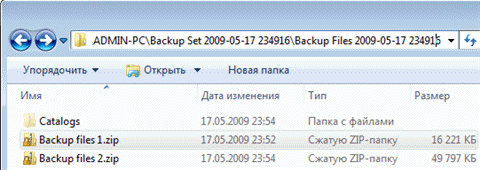
However, it is more convenient to restore files from the control panel, for example, thanks to the built-in search.
Image content
The backup image of the system is created in VHD format and stored in the folder Windows Image Backup along with supporting files.
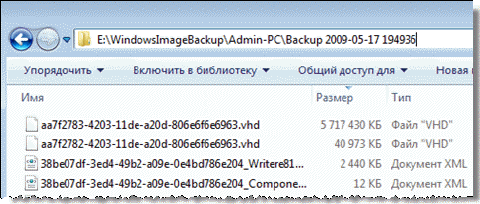
You can see its contents using new opportunity Windows 7 - Connecting virtual hard drives in the Disk Management snap-in ( Start - Search - diskmgmt.msc — Action — Attach virtual hard disk).

You might be wondering if you can add files to a virtual hard disk. Technically it is possible, but in terms of recovery Windows tools it won't do anything. It is better to make a new image - changed blocks are added incrementally based on shadow copies, which saves disk space.
Viewing and deleting backups
From the space management window, you can delete file archives and backup images.

Click the button View archives in the space management window to see the list of archives.
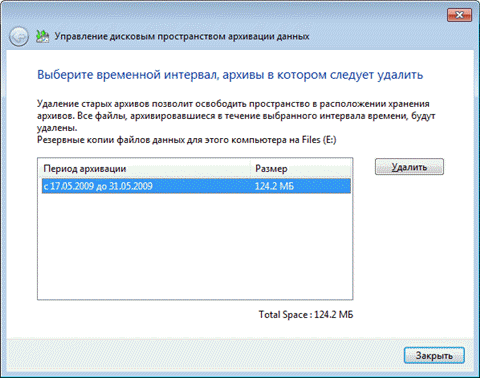
Windows 7 finds all archives and displays the backup period and disk space used. In this window, you can delete unnecessary archives.
To delete backup images, click the button Change settings in the space management window. The image storage options will open.
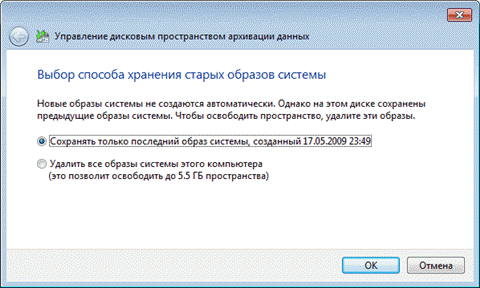
The system prompts you to delete absolutely all images, or all images except the last one.
Everyone knows that you need to regularly back up, but not everyone does it. Given the rich backup options in Windows 7, the only time you'll regret losing important data is if you don't set up regular backups.
A separate hard drive is ideal for storing backups - internal or external, connected via USB or FireWire. If you have at your disposal network drive, it can also be used. Storing backups on a different partition on the same disk where the OS is installed is not a good idea. In the event of a disk failure, you will lose both your system and your backups.
Since backups take up a lot of space, I can only give general recommendations that you need to adjust depending on the free disk space you have.
System partition images
- First image. Install Windows 7, then all updates and drivers. Convinced of normal operation OS and devices, create the first backup image. If you "kill" the system during further configuration and software installation, you can return to initial state faster than a reinstall.
- Second image. Install all applications and customize the system as you wish. Because more fine tuning The OS is usually built as you go, run Windows 7 for a couple of weeks. After making sure that the OS is working properly, create a second backup image. If you delete the first image first, you will have a complete image of a fully updated and customized system with your favorite set of applications.
- Subsequent images. Depending on the free disk space you have, create follow-up images monthly/quarterly. If a problem occurs that requires recovery from an image, you can revert to a relatively recent system state.
User File Archives
How often you archive your files is determined by how valuable they are to you and how often you add or create new files. AT general case I recommend backing up your data weekly or twice a month. Combined with monthly system imaging manually you will have an excellent backup set that allows you not only to return the system to a recent working state, but also to restore all your data and files acquired by overwork. You can always free up disk space by deleting old archives if you need disk space for other purposes.
AT GUI impossible to set different schedules for creating images and archiving data. So if you want at different times automatically create an image and archive files, use the utility command line wbadmin and task scheduler.
Questions and answers
Why is another disk or partition forced to be included when creating a system image, and how to avoid this?
The Windows 7 operating system has built-in backup tools that allow you to back up the Windows operating system and user data. Archiving will allow you to create a backup image of the system and other user data, with which you can restore the system after serious problems.
This article will give an overview of using the built-in backup tools in Windows 7. The built-in backup tools of the operating system, in terms of their capabilities, can satisfy most computer users.
How to make a backup? There are quite a few backup programs, among them are such popular programs, like , Nero BackItUp, Norton Ghost, Paragon Drive Backup Professional, . You can also back up the system without the help of third-party programs using the Windows backup and backup tools.
Why is backup desirable? Because, in case of reinstalling the Windows operating system, for any reason, all the data that is on the computer will be lost on your computer. system drive. You will have to reinstall all programs, make other settings for the operating system.
Suddenly, due to hard drive failure or exposure to viruses, you can lose all your data, and not always lost data can be recovered by recovery specialists.
The way out of this situation is to create a backup copy of the system and other files you need. After a sudden system or hardware failure, you can restore all data from a backup. The operating system, drivers, programs and other files that you backed up will be restored to your computer.
Now we can move on to an overview of how archiving works in Windows 7.
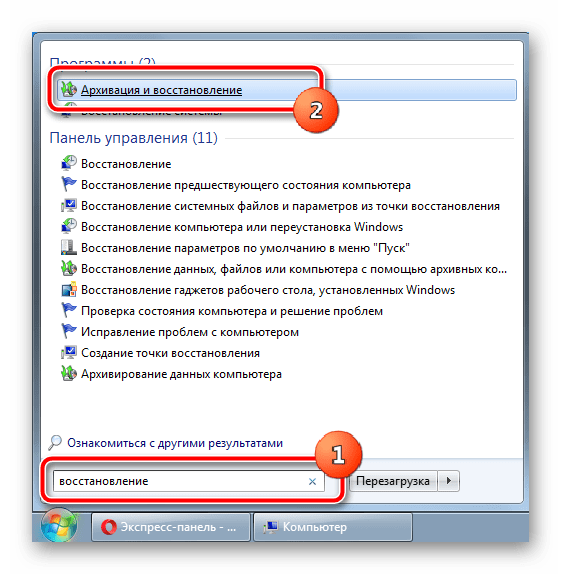
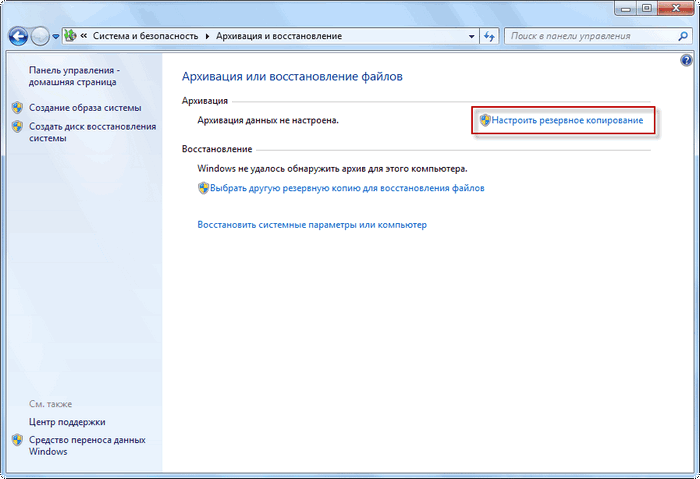
In order to start a system backup, go to the Start menu => All Programs => Maintenance => Backup and Restore. You can also launch the built-in Windows backup and backup tools from the Start menu => Control Panel => File Backup and Restore.
It may happen that in case of serious problems with the operating system, you will not be able to boot the operating system in normal or in safe mode. Then you will have to use the Windows 7 installation disk, or a bootable USB flash drive, with the image of the operating system recorded on it to restore the system.
Boot Windows flash drive can be created using specialized programs, reviews of which you can read on my website in the "Programs" section.
If you do not have a Windows 7 installation disc, you should create a system repair disc. The recovery disc, which contains the recovery environment, can be used to boot the computer.
This system recovery disc contains Windows operating system recovery tools that can be used to restore the operating system after a serious error, or restore the system from a created system image.
Create a System Recovery Disc
For those users who have pre-installed operating systems on their computer, creating a bootable system recovery disk is a must. Computer manufacturers now often do not bundle them with a Windows installation disc. In this case, the system recovery rescue disk will help you boot your computer to restore it if it is not possible to boot in another way.
In the "Backup and Restore" window, you must click on the item "Create a system recovery disc" to create an emergency system recovery disc. In this case, you will have a rescue CD for system recovery in case of serious problems with the operating system.
After clicking on the item "Create a system recovery disk", the window "Create a recovery disk" opens. To create a system recovery disc, you need to insert an empty CD or DVD disc into the optical disc drive, and then click on the "Create disc" button.

Next comes the process of creating a system recovery disk. After completing the creation of the emergency recovery disk, you need to click on the "OK" button. The Windows 7 Rescue Disk is about 150 MB in size.

You will now be able to access system recovery options using a bootable recovery disk if it is not possible to boot your computer using other methods.
To boot the computer from a rescue or installation disk, you will need to select in the BIOS the boot priority from a CD / DVD drive, and in case of using bootable flash drive With USB disk, to which such a bootable USB flash drive is connected.
If, when creating a recovery disc, you are prompted to insert an installation disc with the Windows 7 operating system, this means that the necessary files to create a system recovery disc were not found. In this case, you will need to insert optical drive computer installation DVD disc with Windows 7 operating system.
With the help of the installation Windows disk 7 or the System Recovery Disk, you will be able to boot into your computer and have access to all operating system recovery options.
Creating a system image
If you select "Create a system image" in the "Backup and restore" window, then a system image will be created for restoring it, which includes copies of the disks necessary for the operation of the Windows operating system. The system image can include additional disks and use it for recovery, in case of problems. However, you cannot use individual items for recovery.
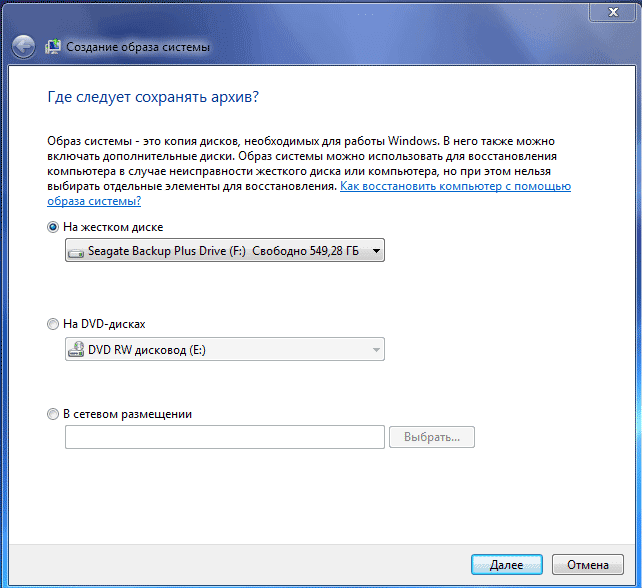
In the System Image Creation window, you will need to select a location to store the backup.
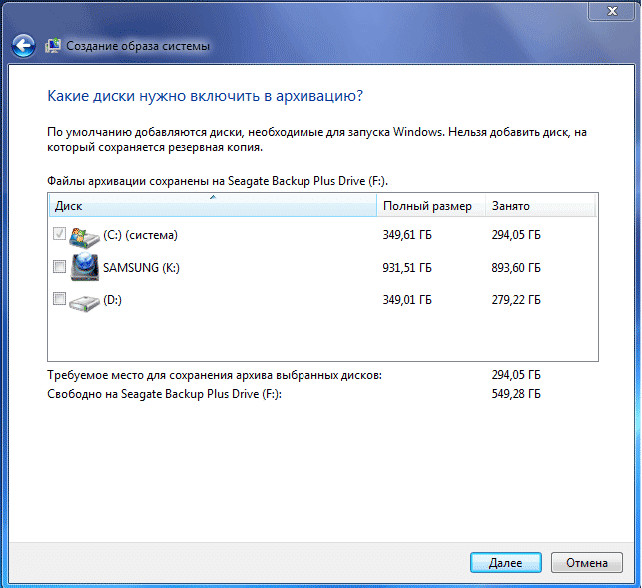
In the System Image Creation window, you will need to select the drives that you want to include in the backup. In this case, it will not be possible to add the disk on which the backup will be saved. Then click on the "Next" button.
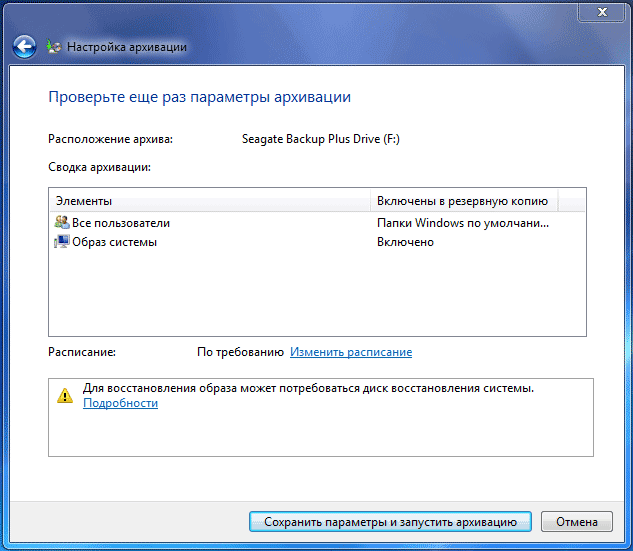
In the new System Image Creation window, you will need to confirm the backup options and backup location. After that, click on the "Archive" button.

Archiving in Windows 7
Now let's move on to the archiving and backup settings. In the "Backup and restore files" window, you need to click on the "Set up backup" item.
Next, the Backup Settings window opens. You will have to wait for some time while the data backup starts. You will see the inscription “Starting data archiving” in the window, while archiving itself is not yet taking place.

Then the Backup Settings window opens. In this window, you must select a location to store the backup copy of the archive.
The best option for storing the system backup you create is an external hard drive. Because if you save backups on another section of the hard disk of your computer, if the hard drive fails, then the operating system, your data and the created backups for recovery will be forever lost. The data, at the same time, is physically located on the same hard disk, they are only located on different logical disks.
In this image, you can see that the system itself prompted me for a storage location - an external hard drive, with enough space to create a backup.

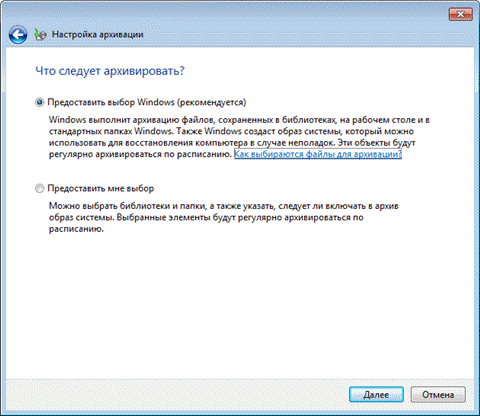
In the Backup Settings window, you will need to select what should be archived.
In case of providing Windows selection, the operating system will back up files saved in standard folders, libraries, on the desktop, and also create a system image that will allow you to restore your computer in case of problems. All your data and settings will be backed up, and you can restore your system from a backup if necessary.
![]()
In this case, it will be possible to select specific drives, select individual folders located on the selected drive. Be sure to check the box next to "Include disk system image: (C:)", so that you have the opportunity, if necessary, to restore the system from the created backup.
The data you select will be backed up according to the schedule unless you start archiving manually. After completing the selection of objects for archiving, you should click on the "Next" button.

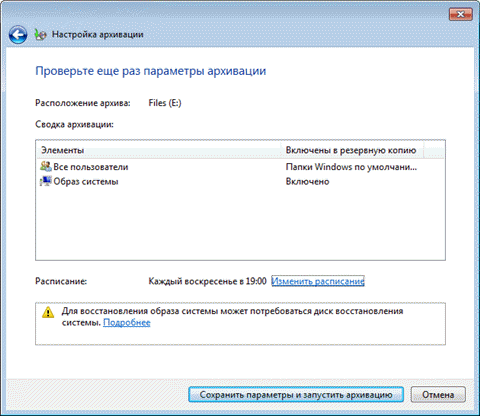
In the archiving settings window, you need to check the archiving settings again, and then click on the "Save settings and start archiving" button.
Before starting the backup, you can click on the "Change schedule" link to select your schedule or perform an on-demand backup.
If you do not perform backups on a schedule, but manually when you need it, then you will need to uncheck the box next to the item "Perform backups on a schedule (recommended)", and then click on the "OK" button.

Next, you will need to start archiving. The time it takes to create a backup will depend on the size of the disks and files to be backed up, as well as the power of your computer. A backup that is run again will be faster because only files that have changed since the previous backup will be overwritten.
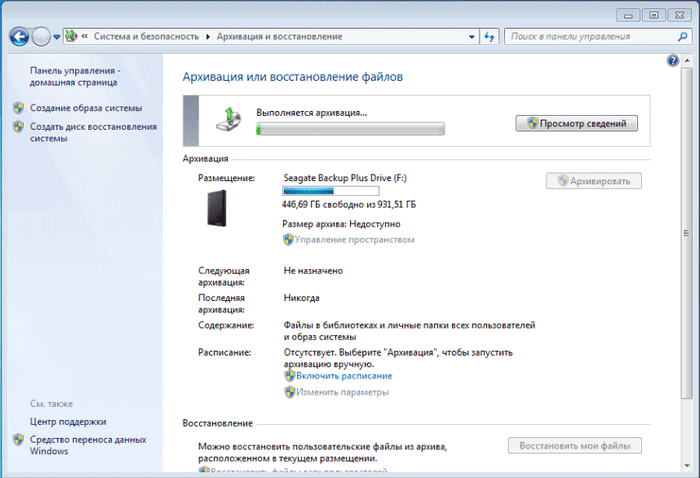
Keep in mind that if you set up a scheduled backup, the external hard drive must be connected to your computer at that time. If you do backups without a specific schedule, then the best option there will be archiving about once a month. In this case, you will save the system settings that you made relatively recently.
Important data that you change frequently will need to be backed up more than once a month to always have an up-to-date backup for recovery.
How to disable archiving in Windows 7
Sometimes, it may be necessary to disable archiving, if you have configured scheduled backups, and the drive where you save the backups runs out of free place. In this case, you will need to disable scheduled backups.
To do this, you will need to enter the Start menu => Control Panel => Administrative Tools => Services. In the "Services" window, you need to find the item "Backup Engine Service (WBENGINE Service is used to perform backup and restore operations)".
To disable automatic archiving, you need to change the startup type of the service from "Automatic" to "Manual". For this, you need to click right click click on the item "Automatically and select in context menu item "Properties".
In the "Properties: Block Level Backup Service" window that opens, in the "General" tab, in the "Startup type" item, select "Manual" and click the "OK" button. Next, you will need to restart your computer. Now you can start the backup manually at your discretion.
If you are annoyed from time to time by messages about the need to configure archiving from the Notification Panel (tray), then such messages can be turned off. To do this, go to the Start menu => Control Panel => Action Center. In the "Action Center" window, in the "Maintenance" field, in the "Archiving settings" item, click on the link "Do not receive more messages on the topic: "about Windows archiving"".