UAC is a write control feature designed to provide an additional layer of security when performing risky computer operations. But not all users consider such protection justified and want to disable it. Let's figure out how to do it on a PC under Windows control 7.
Operations controlled by UAC include running some system utilities (registry editor, etc.), third party applications, installation of new software, as well as any action on behalf of the administrator. In this case, User Account Control initiates the activation of a window in which it is required that the user confirm the completion of a specific operation by clicking the "Yes" button. This allows you to protect your PC from uncontrolled actions of viruses or intruders. But some users find these precautions redundant and the verification steps tedious. That's why they want to turn off the security warning. Let's define different ways of accomplishing this task.

There are several methods for disabling UAC, but it must be understood that each of them is effective only when the user performs them by logging into the system under account with administrative rights.
Method 1: Set up accounts
The simplest option to turn off UAC alerts is done by manipulating the user account settings window. At the same time, there are a number of options for opening this tool.

Also, the parameter window necessary for disabling can be opened through "Control Panel".
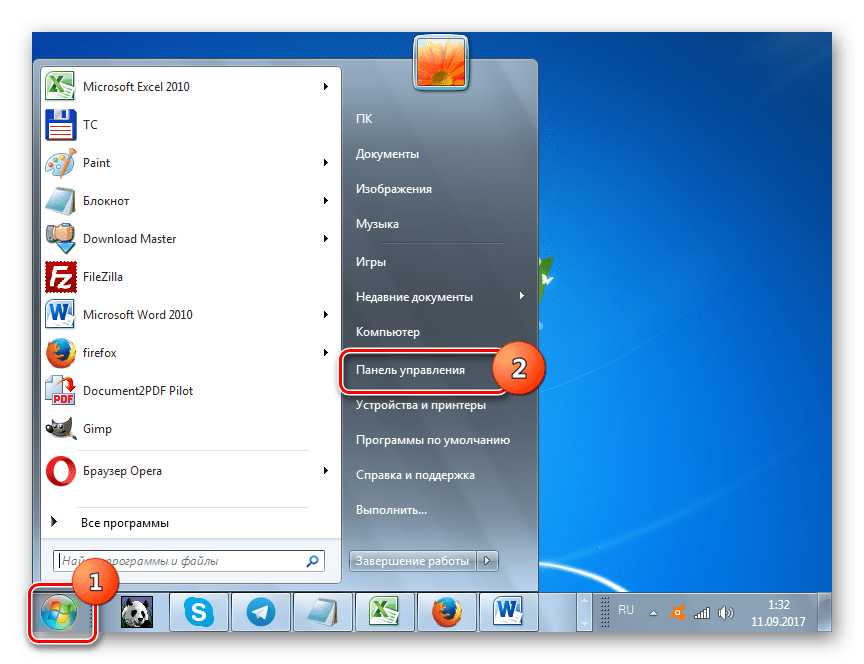

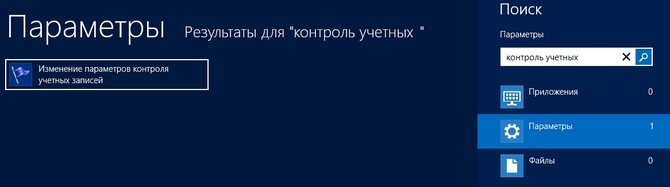
The next option to go to the settings window is through the search area in the menu "Start".
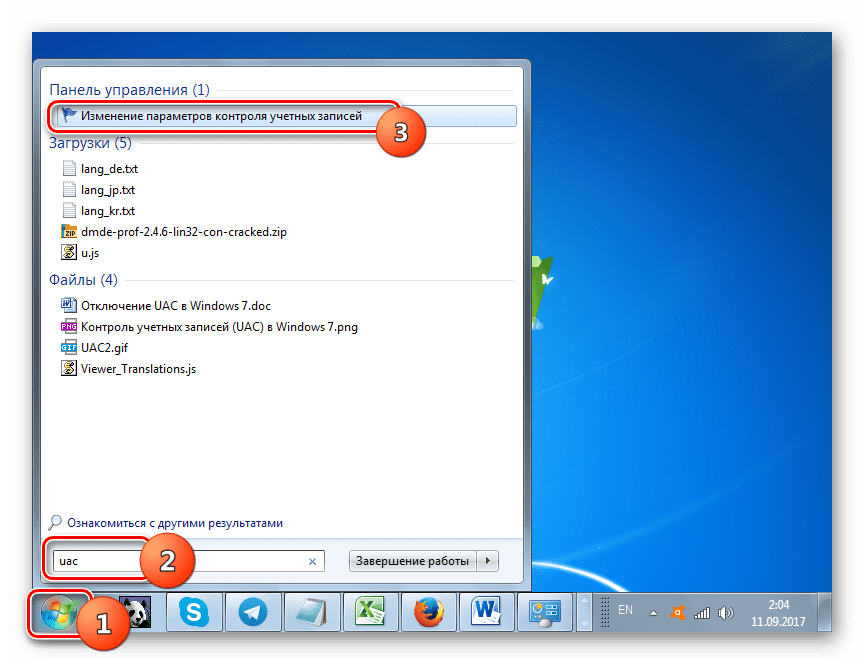

Another option for switching to the settings of the element studied in this article is through the window "System configuration".
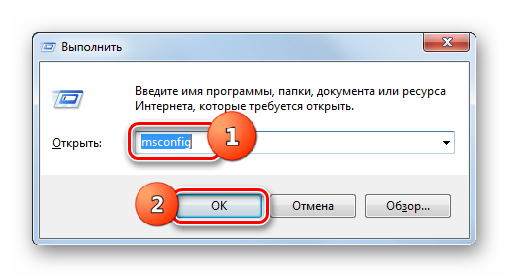
Finally, you can also move to the tool directly by typing the command in the window "Run".

Method 2: "Command line"
You can turn off the user account control tool by entering the command in "Command line", which was run with administrative rights.
Method 3: "Registry Editor"
You can also turn off UAC by making adjustments to the registry using its editor.
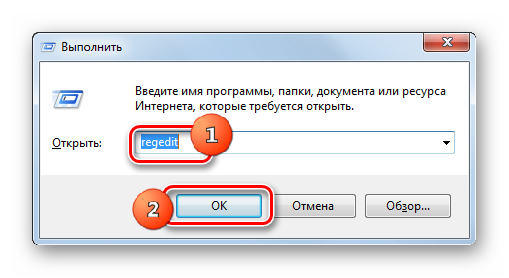
- To activate a window "Registry Editor" apply the tool "Run". Call it using Win+R. Enter:
Click OK.
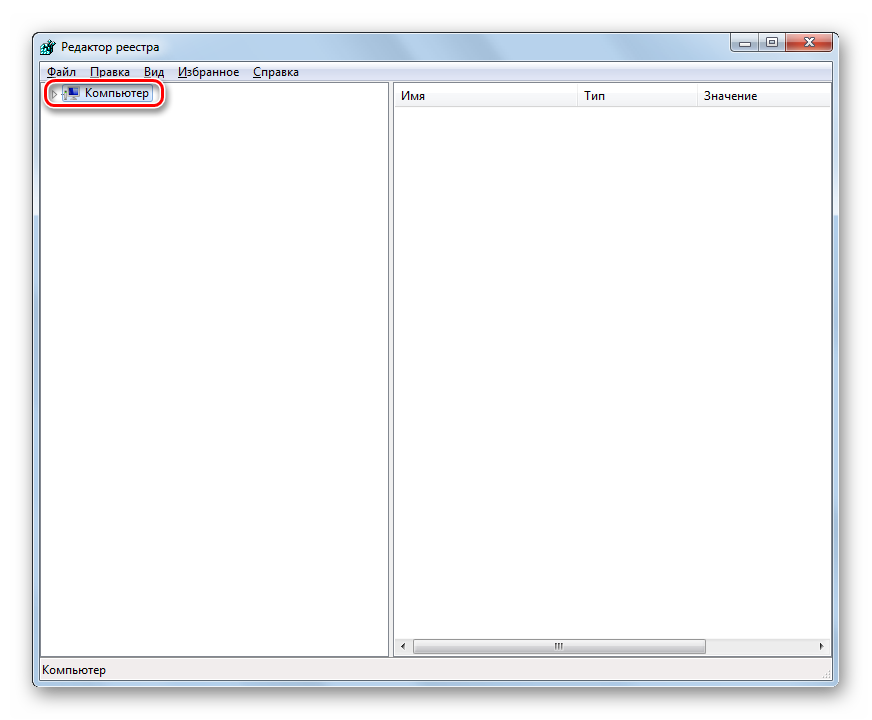
- "Registry Editor" open. In its left area are tools for navigating through the registry keys, presented in the form of directories. If these directories are hidden, click on the inscription "A computer".
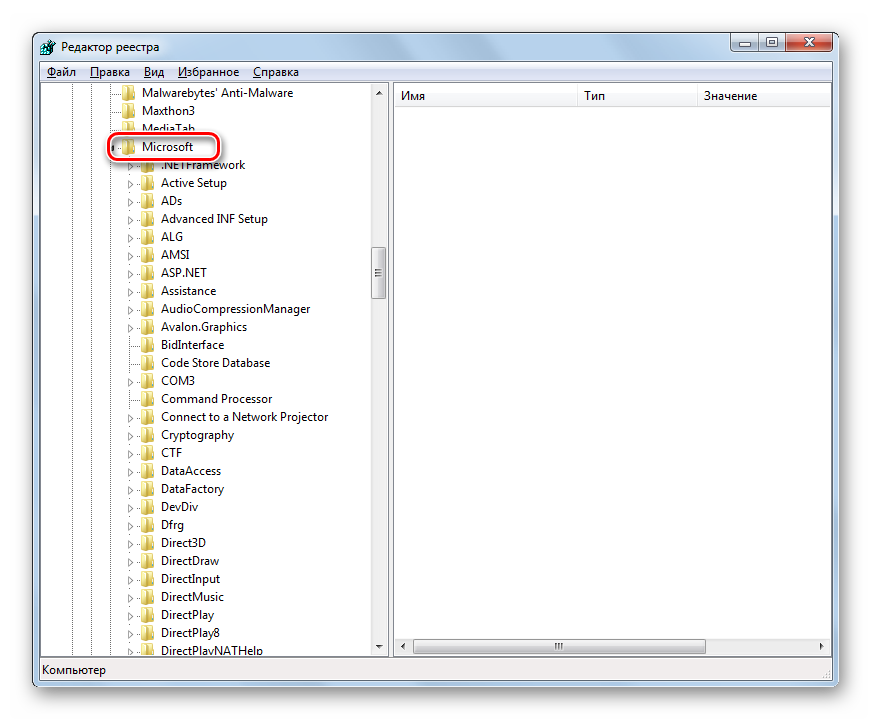
- After the sections are displayed, click on the folders "HKEY_LOCAL_MACHINE" And SOFTWARE.
- Then go to section Microsoft.
- After that, alternately click Windows And "CurrentVersion".
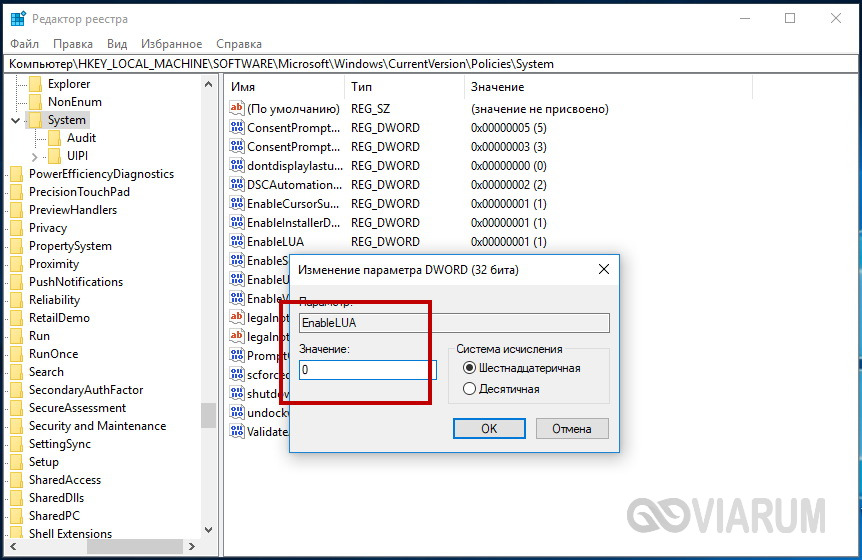
- Finally, go through the branches sequentially Policies And System. Having selected the last section, move to the right side "Editor". Look for an option called "EnableLUA". If in the field "Meaning", which refers to it, the number is set "one", it means that UAC is enabled. We need to change this value to «0» .
- To edit a parameter, click on the name "EnableLUA" PKM. Choose from the list "Change".


UAC (User account control) is a security system that was first used on Windows 7. It is necessary in order to prevent changes to the operating system. When a file tries to somehow change the state of the system, a message is displayed in which you must either prohibit or allow this operation. According to the developers, this protection is able to ensure the safety of the computer, so disabling UAC is not recommended.
But it's all nonsense. UAC on Windows 7 is an annoying feature that should be disabled as soon as you install this OS.
Disadvantages of UAC in Windows 7
The efforts of Windows developers to protect our computers are, of course, encouraging. But UAC has acquired a whole bunch of shortcomings that are obvious in the practice of users.
Disabling UAC is desirable for everyone who performs a lot of administrative actions on Windows 7, for example, installs programs, as it is annoying with its messages.
The second terrible drawback is that when warning messages appear, it is not at all clear what changes will be made to the system. And so the user allows or prohibits who knows what.
So, after reading the above, we are happy to go to disable UAC on Windows 7.
Before disabling UAC in Windows, I would like to warn you that if you are a “below average” computer user, then you should not do this, since this protection system was created specifically for you, and in this case it will be effective (even though I scolded it at the very beginning).
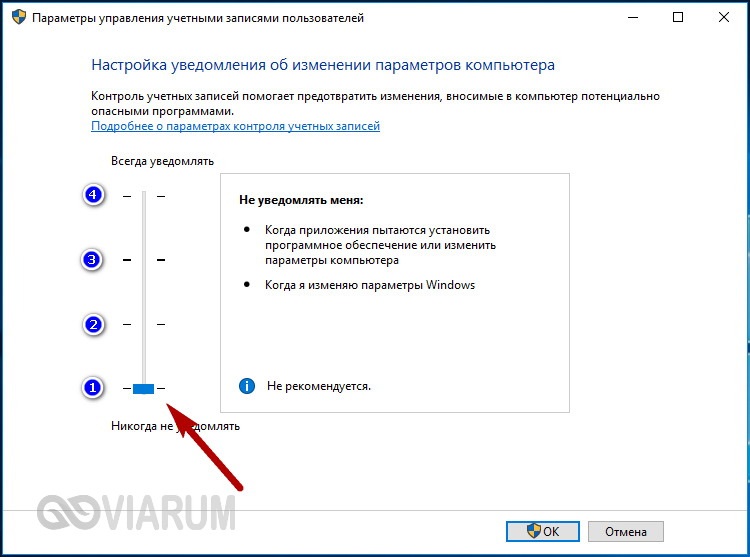
And if you are confident, then to disable UAC in Windows 7, go to the "Control Panel". And in it, for convenience, we set up the “Small Icons” view in the “View” option. If such a view is already installed, then it's good. Then it will be possible to return the view back to how it was.
Click on the link "User Accounts", then on "Change User Account Control Settings". If prompted, click "Yes".
Then, in the account management settings, the slider on the left should be placed at the very bottom of the scale, and click on "OK". And then, if prompted, agree again by clicking on the "Yes" button.

Since disabling UAC control is a task that requires restarting the computer, you will see the result only after the restart. Therefore, we restart Windows 7 and enjoy using it without any warnings.
Any operating system should be not only convenient, functional and productive, but also well protected. Built-in protection was present in early Windows versions, but compared to what we have now, the mechanisms she used were not as effective. For example, users working in XP had administrator rights by default, which could well serve as a backdoor for malicious software, which also uses elevated permissions.
This is the reason why it was strongly recommended in XP and earlier to use a normal account, but this method created all sorts of difficulties, for example, constantly prompting the administrator to perform some innocent action like changing the system time. Of course, such work could not be called productive. However, the solution to the pressing issue was soon found.
What is UAC
Starting with Vista, Windows introduces a new security mechanism called UAC or User Account Control. Why is UAC needed and how does it work? In essence, this is a feature that allows you to prevent spontaneous execution of executable files on the system by asking the administrator for permission to perform operations that can make more or less significant changes to the operation of the system, programs or other user accounts. IN this moment This protection mechanism is used in all latest versions Windows.
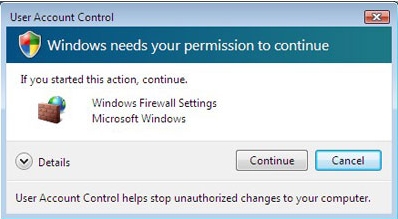
Externally, the operation of user account control in Windows 7/10 is manifested in the fact that at the time the process starts, a window appears asking you to confirm the action that requires administrator rights.
This switches the desktop to protected mode, preventing the user from interacting with other applications. An exception is made only for the built-in Administrator account, which is not restricted by UAC, but it is disabled by default.
The benefits of UAC are obvious - if it weren't there, any virus could start with higher rights when a user works in an administrator account. Of course, UAC is not a panacea, but it is quite capable of stopping such an unauthorized launch of an executable file. However, many users do not like UAC, and the main thing the reason is his arrogance. Therefore, it is not surprising that ordinary users often have the question of how to disable User Account Control in Windows 7/10.
Principle of operation
We'll talk about ways to disable control later, but for now let's look a little deeper into the mechanism of UAC. When a user logs into an account, they are given two tokens or an easier list of permissions. The first token is user, the second is administrator. From this we can conclude that the PC administrator uses the permissions of the second list, but this is not entirely true. It just works with it, but the token itself is "owned" by the UAC mechanism, so even if you're running applications as administrator, you'll still need User Account Control permission.
This may not be the most accurate way to describe how UAC works. Control, rather, can be thought of as a kind of intermediate link between the user and administrator lists of rights. Let's take a closer look at what happens during the installation/launch of the application with UAC enabled. When the user starts the installer, the ShellExecute function calls another CreateProcess function, which in turn starts the AppCompat, Fusion, and Installer Detection systems to check if the program needs elevated privileges. If needed, the CreateProcess function returns an ERROR_ELEVATION_REQUIRED error, and the ShellExecute function launches a UAC dialog box.
This is how the chain goes. But the powers of UAC do not end there. It also participates in other mechanisms, for example, in virtualization file system and the registry, redirecting the writing of non-administrative programs to designated places, instead of writing their data directly to protected directories and registry branches.
All ways to disable UAC
Well, now back to how to disable UAC in Windows 7/10. The most obvious way is through the interface. You can access the necessary settings through the User Accounts applet in the Control Panel, but in order not to go far, you can execute the command in the Run window (Win + R) UserAccountControlSettings(it works on Windows 7, 8, 8.1 and 10).

There are four UAC modes available:
- The first mode disables user account control, prompts do not appear when performing any actions.
- When working in the second mode, the system asks for permission to run programs, but the desktop is not dimmed.
- The third mode is set by default. It asks for permission to run programs with the transfer of the desktop to safe mode.
- The fourth mode includes maximum level protection, the mechanism is triggered not only when programs are launched, but also when an administrator tries to make changes to the settings.
To disable UAC, drag the slider to the very bottom and click OK. If the system so requires, restart the computer.
Open the registry editor with the command regedit and deploy this branch:
HKEY_LOCAL_MACHINE/SOFTWARE/Microsoft/Windows/CurrentVersion/Policies/System
Find the parameter in the right column EnableLUA and change its value from 1 to 0, save the settings and reboot.
Also pay attention to the parameters PromptOnSecureDesktop(0 disables dimming only) and ConsentPromptBehaviorAdmin(1 includes the maximum level of protection with a password requirement).
Using the command line
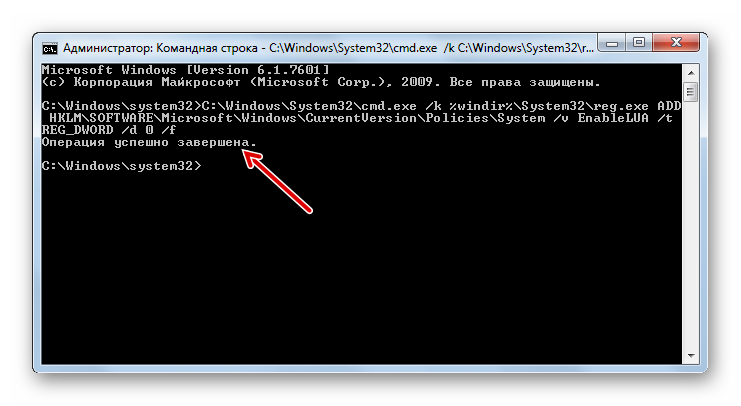
The same steps can be performed by running as administrator command line. In this example, the command complete shutdown UAC will be like this:
C:/Windows/System32/cmd.exe /k %windir%/System32/reg.exe ADD HKLM/SOFTWARE/Microsoft/Windows/CurrentVersion/Policies/System /v EnableLUA /t REG_DWORD /d 0 /f
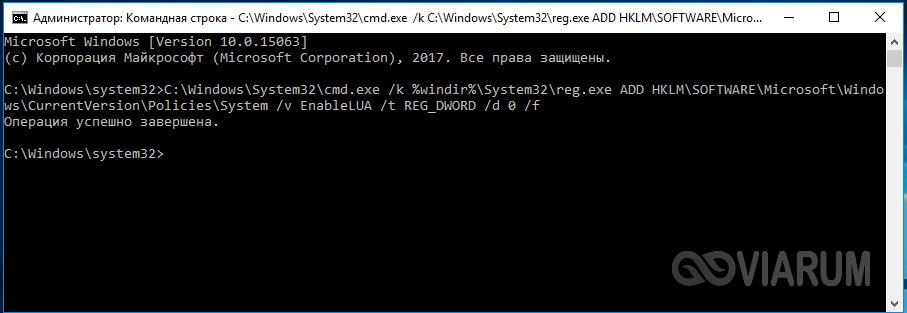
The first part of the command is the path to the registry control file, the second is the editable key, EnableLUA is the parameter responsible for disabling UAC, 0 is its new value. By substituting other data for the parameter and its value, you can change the settings of other UAC modes (see above). As in the case of making changes through the registry, you will need to restart the computer.
Local group policies
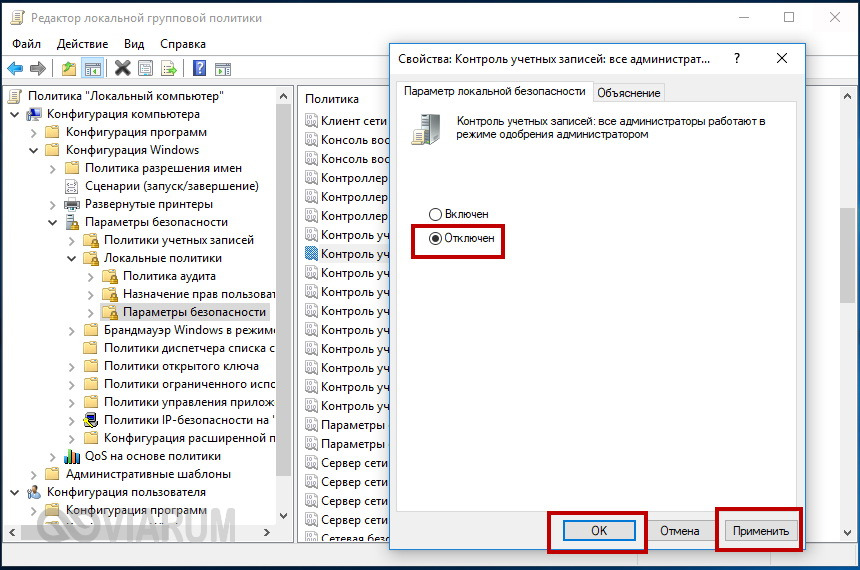
You can also disable UAC using the local editor. group policies. Run it with the command gpedit.msc and follow the path Computer Configuration - Windows Settings - Security Options - Local Policies– Security options.

There are many user account control settings policies in the right column, but you only need one to disable UAC - all administrators run in Admin Approval Mode. Double-click on it and set the radio button in the dialog box to Disabled, and then restart your computer.
Disabling control for a specific application
And finally, let's look at another interesting point, namely disabling UAC in Windows 7/10 for specific programs. There are several ways to do this, but not all of them are convenient. If you consider yourself an advanced user, you can tinker with the Application Compatibility Toolkit, which allows you to do some interesting things. We will offer more a simple utility Winaero Tweaker from a local developer. Run it, scroll down the list of options almost to the very bottom and find there Elevated Shortcut.
In the right part of the utility window, in the Target field, specify the path to the executable file of the application that you want to run bypassing UAC, and in the Shortcut location field, specify the path to its launch shortcut.

Click the "Create Elevated Shortcut" button and the shortcut will be created. Simple, fast and convenient, but this method has a small drawback. When you launch the application through the created shortcut, a command line window will appear on the screen for a moment.
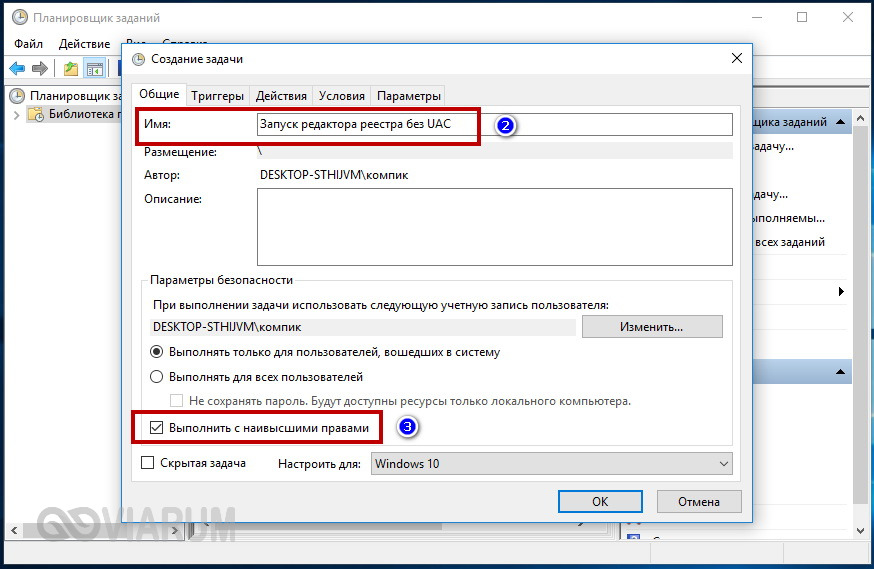
You can also try this method. Create a new task in Task Scheduler.
![]()
On the "General" tab, give it a name, for example, "Start Registry Editor without UAC", and then check the "Run with highest privileges" checkbox at the bottom.

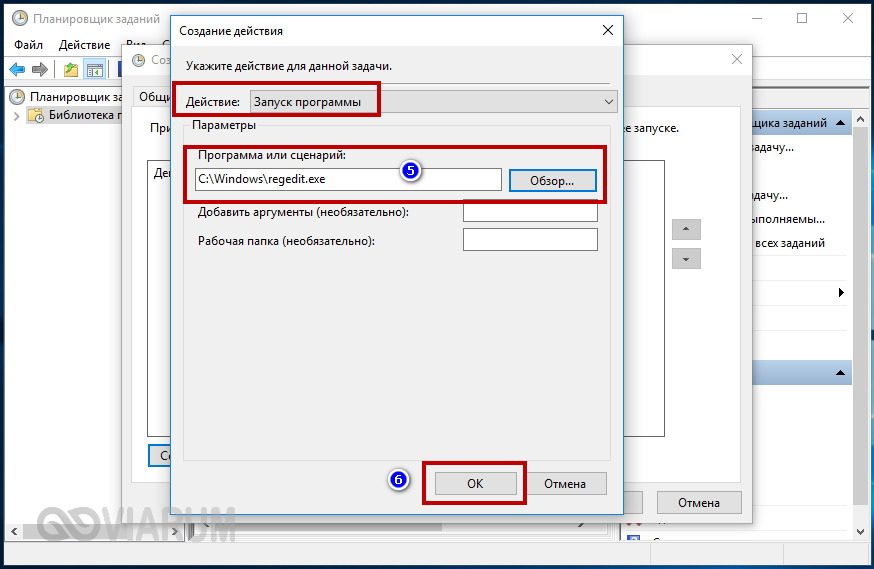
In the window that opens, specify the full path to the executable file of the program.
Switch to the "Conditions" tab and uncheck the "Start only when on mains power" and "Stop when switching to battery power" checkboxes.

We save the task and check it in action by clicking "Run".
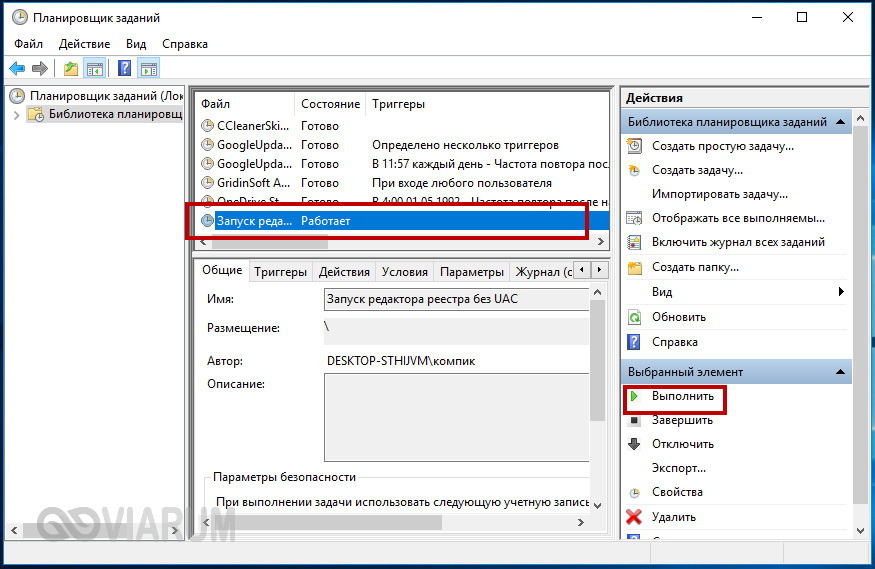
If the program started as expected, without a UAC prompt, all that remains is to create a shortcut. Create it on the desktop and write the command in the object location field schtasks /run /tn "task name", where "task name" is the name of your task.
![]()

That's all there is to it.
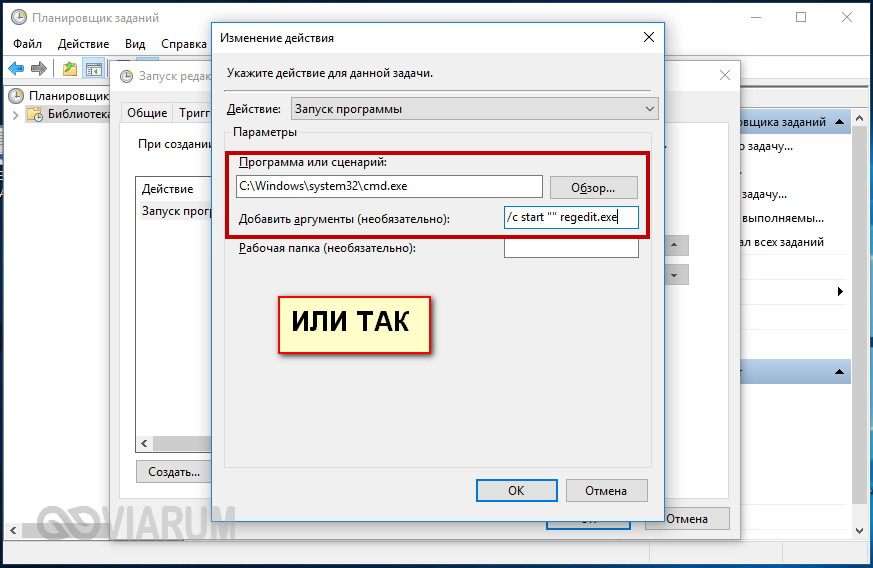
Alas, this method also has its drawback - applications will be launched in background, more precisely, without focusing, but this can be fixed by entering in the Task Scheduler field instead of the path to your program the path C:/Windows/system32/cmd.exe, and in the field for adding arguments /c start ""program.exe, where program.exe is the name of the executable file of the program that is launched bypassing user account control.
Perhaps this is all we wanted to talk about User Account Control in Windows 7/10. Submit your comments and comments using the form below.
The purpose of the User Account Control (UAC) service is to control and prevent unauthorized changes to the system. When trying to run some programs, the service provides a notification to the user about an attempt to perform an action that requires administrative rights. It may look like this.
That is, in order to produce certain changes, the system asks for the user's consent. In Windows XP this feature was missing, and any virus software could take control of the administrator account by making any entries in the system. Therefore, starting from Vista OS and higher, the developers decided to use this service. But due to too frequent triggering, it mostly received a negative review.
In Windows 7, its mechanism was essentially enhanced, a manual adjustment mode is provided. However, not all users are satisfied with constantly appearing warning messages, although in general they increase the level of overall protection. Consider how disable this function.
Disable UAC in Windows 7 and 8
Through the control panel
The easiest way to turn it off is if in the search menu bar Start(Win + F) enter " User Account Control» 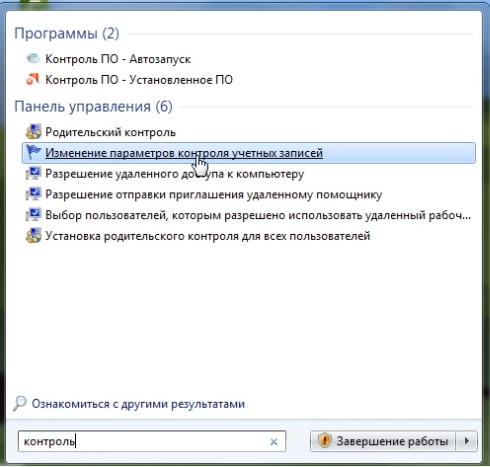
The link " Changing User Account Control Settings". Click it and this window will open. 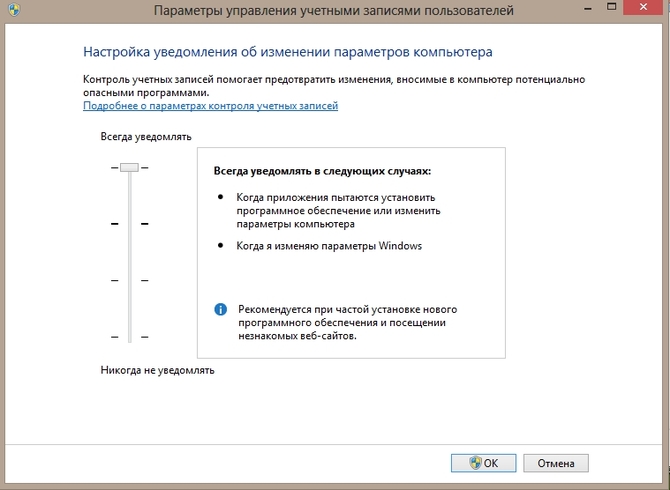
The same window can be opened in a longer way: Start / Control Panel, view in the mode - Category.
Then system and safety, Support Center and already there we will find the point we need. 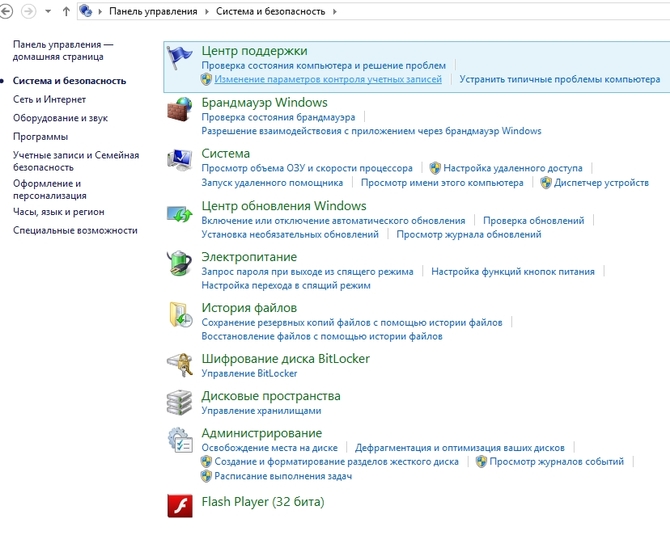
In the window that opens, drag the slider to the very bottom - Don't notify me.![]()
We confirm OK for the settings to take effect - reboot.
The command interpreter should be launched from administrator(right click on the button Start)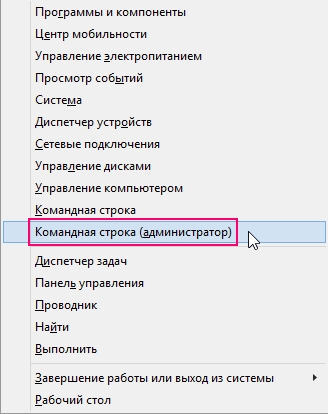
Enter one long command below for the changes to take effect.

Disable control in Windows 10
Through the control panel
Button search bar Start(Win + F) enter UAC And Enter. A window will appear in which you can tune account management. Pull the slider down, click OK And restart a computer. 