A watch is one of the oldest inventions of mankind.
In addition to its main function - to show the time - a wristwatch is a reflection of the character and status of its owner, and a wall clock must necessarily serve as a decoration for the room.
A collection of the most interesting and obscenely expensive wristwatch Bright Side has already demonstrated it. This selection contains samples of original design solutions for wall clock. Some examples pleasantly surprise with the simplicity of the idea and low cost of execution. Others, on the contrary, are complex kinetic sculptures.
Clock player
Made from a recycled Sanyo turntable. The plates can be changed.
Watch "Random Factor"
The peculiarity of the watch is that, at the request of its owner, the numbers are chaotically attached to the wall in any order and direction.
Math clock board
They will make you use your brain, remembering the school algebra course.
Wheel clock
A clock made from a bicycle wheel is not attached to the wall and can be rotated.
Domino clock
The designer used dominoes to represent time. The number of dots on the tiles corresponds to the hours and minutes.
Watch “What a Difference!”
Tree clock
It’s hard to calculate the time from them, but they definitely diversify the interior.
Melting clock
A reminder of the transience of time and the crazy creativity of the great Salvador Dali.
Sundial
The numbers are positioned perpendicular to the dial, and the time can be seen by the shadow they cast.
Fan clock
The original volumetric clock shows time in three dimensions.
Colorblind watch
The dial is a test for color blindness. A person with normal vision will see the numbers 12, 3, 6, 9.
Clock "Infinity of time"
The minute hand spins on the tip of the hour hand, and the second hand spins on its tip. Everything together creates interesting geometric shapes, but at the same time regularly shows the time.
Clock "Little Time"
At the ends of the hands there are magnifying glasses, with the help of which you can see the microscopic numbers on the dial.
Clock "It's about time"
The message "Now is the time to do something to prevent global warming" is printed on the transparent hands.
Clock “Make a proposal”
An empty plastic dial invites you to write words around the perimeter, which, with the help of the linking verb is, turn into a new sentence every hour.
Clock-book
An original table clock disguised as a stack of books.
Clock-eyes
The time is shown by rotating pupils.
Linear clock
The Mhin silent linear watch is made of metal, ceramic and rubber.
Bobbin watch
Successful use of old tapes.
"Excess" hours
150 small clock mechanisms work simultaneously, each hour displaying the name of the hour with their hands. Now they show four.
Clock "Meaning of Time"
Any material that fits into the holes of the clock mechanism can be used as hands.
Clock-plate
You can hang it on the wall or put it on the table.
Watch "UOMINO"
Wall clocks from Diamantini&Domeniconi remind us of how quickly time runs away from us.
Hours in hours
Hook clock
And just fun hours
From the Zoo Timers wall clock collection created by designer George Nelson.
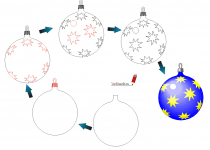
On New Year's Eve, we all wait with bated breath for the chimes to strike and the coming of the New Year. Clocks are one of the main symbols of the holiday, and it’s not for nothing that they are painted on New Year’s Eve. greeting cards and posters. Pick up the New Year's issue of any magazine, and there with high degree Chances are you will find a beautiful clock with hands frozen at almost midnight. In this article we want to talk about how to draw a New Year's clock correctly. And if you decide to make a New Year’s poster with a clock, or draw a beautiful card to give it to a loved one, then this drawing lesson is just for you.
Example No. 1
You can try the simplest method first. To do this, draw a circle using a compass. Then you need to draw neat numbers on them. It is advisable to create a New Year's drawing on their surface. Santa Claus sitting on the moon will look beautiful.
When everything is ready, it is advisable to decorate the numbers with one color, and the surface with others. Wonderful New Year's watch is ready. The design can be cut out or left as is.
Example No. 2

Another way is to create a New Year's cuckoo clock. Previously, such an element was in every home, although now it is found in some. If there are none, then you can easily draw them.
First you should draw a small village house on which a round dial is placed. At the top you need to make a cuckoo and a small place for it. After this, you need to decorate your work with any chosen colors of paint.
Example No. 3

This method produces unusual New Year's watches. They are similar to homemade ones, only they have some additions. First you need to draw a circle using a compass. Then semicircles should be drawn along the edges of the entire surface. In each petal you need to place numbers and separate them from each other.
After this, you need to draw arrows with a pencil, which can also be of unusual shape. All that remains is to add color to the product, and it is ready. You can decorate them with any details, it all depends on your desire.
Example No. 4

You can create a clock not only in the shape of a circle, but also in the shape of a square. By decorating them with unusual decoration, they may well become New Year's. First of all, you need to create an even square. It is advisable to leave a space at the edges that will be the field of the product. Numbers will be placed next to it. Moreover, they can be both Arabic and Roman.
Then you will need standard arrows. It is advisable that they show the time closer to twelve. It is recommended to decorate the resulting drawing with any colors.
Example No. 5


Using this master class, you can make another festive drawing, since a New Year's wreath will be placed around them. First you need to draw a round clock, decorating it with arrows and numbers. In a circle you need to draw a wreath of spruce branches. Then you will need Christmas tree decorations to decorate it.
When the drawing is ready, it is advisable to transform it using paints of different colors. The result is a festive clock that can be hung on the wall. He'll make a great New Year card or poster. Gift wrapping will be no less beautiful. You can make a beautiful New Year's alarm clock.
Video master class on drawing a clock
Clocks can be made different ways. They are decorated with various ornaments and relief figures. Snowflakes, stars, a month, a Christmas tree will look beautiful; they can be cut out and hung on the wall or on the Christmas tree. While working, you should make the lines smooth and neat. The clock making activity is very interesting and therefore perfect for children and adults.
Good afternoon Today it's time for a drawing lesson in which we will tell you how to draw a clock! Clocks, as you know, can be wall clocks, wrist clocks, giant clocks installed on architectural buildings, and, of course, soft clocks. Alas, we will not be considering the work of the brilliant Salvador Dali today, but the clocks that we will draw will be quite realistic. Let's start a drawing lesson and find out!
It is quite possible that someone will consider wall clocks a thing from the past, because now everyone has a clock on their cell phone and other devices. However, every interior will become much cozier and more pleasant if there are well-chosen wall clocks on the wall. Actually, let's start drawing!
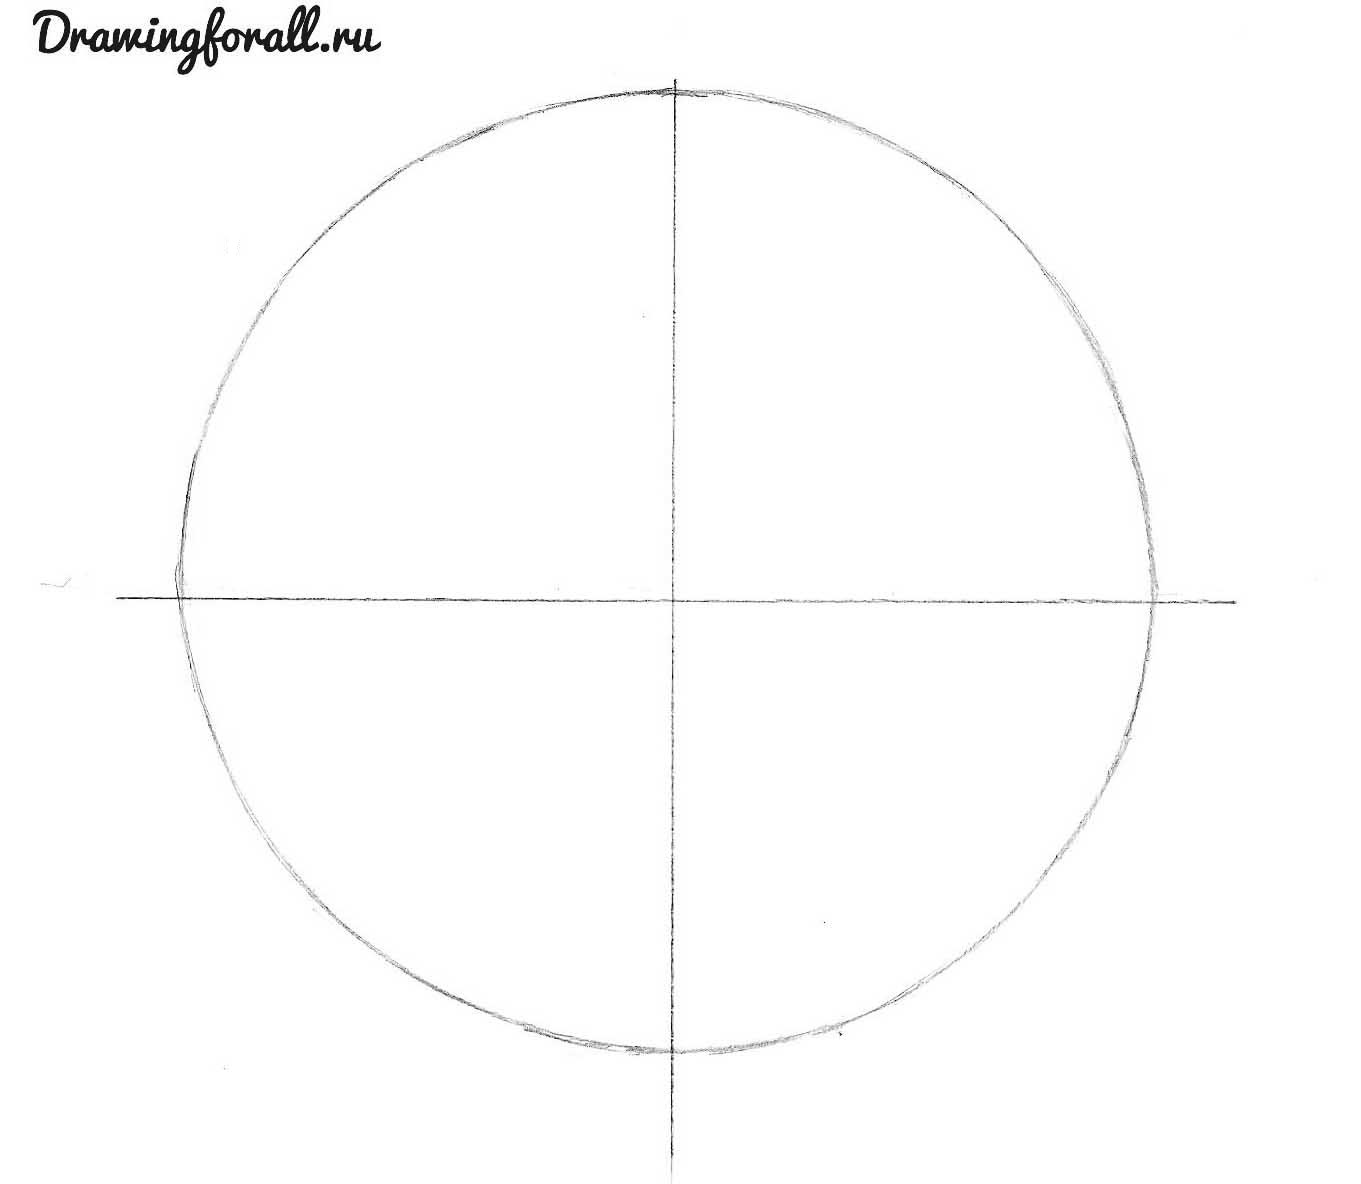
Step 1
First, let's mark out our workspace with these perpendicular (that is, intersecting at right angles) lines. Of course, it’s very cool to draw this without a ruler, but if you’re not entirely sure, use a ruler. 
Step 2
Then let's draw a circle like this. You can use a compass or some round object, but it’s best, of course, to try to draw by hand.
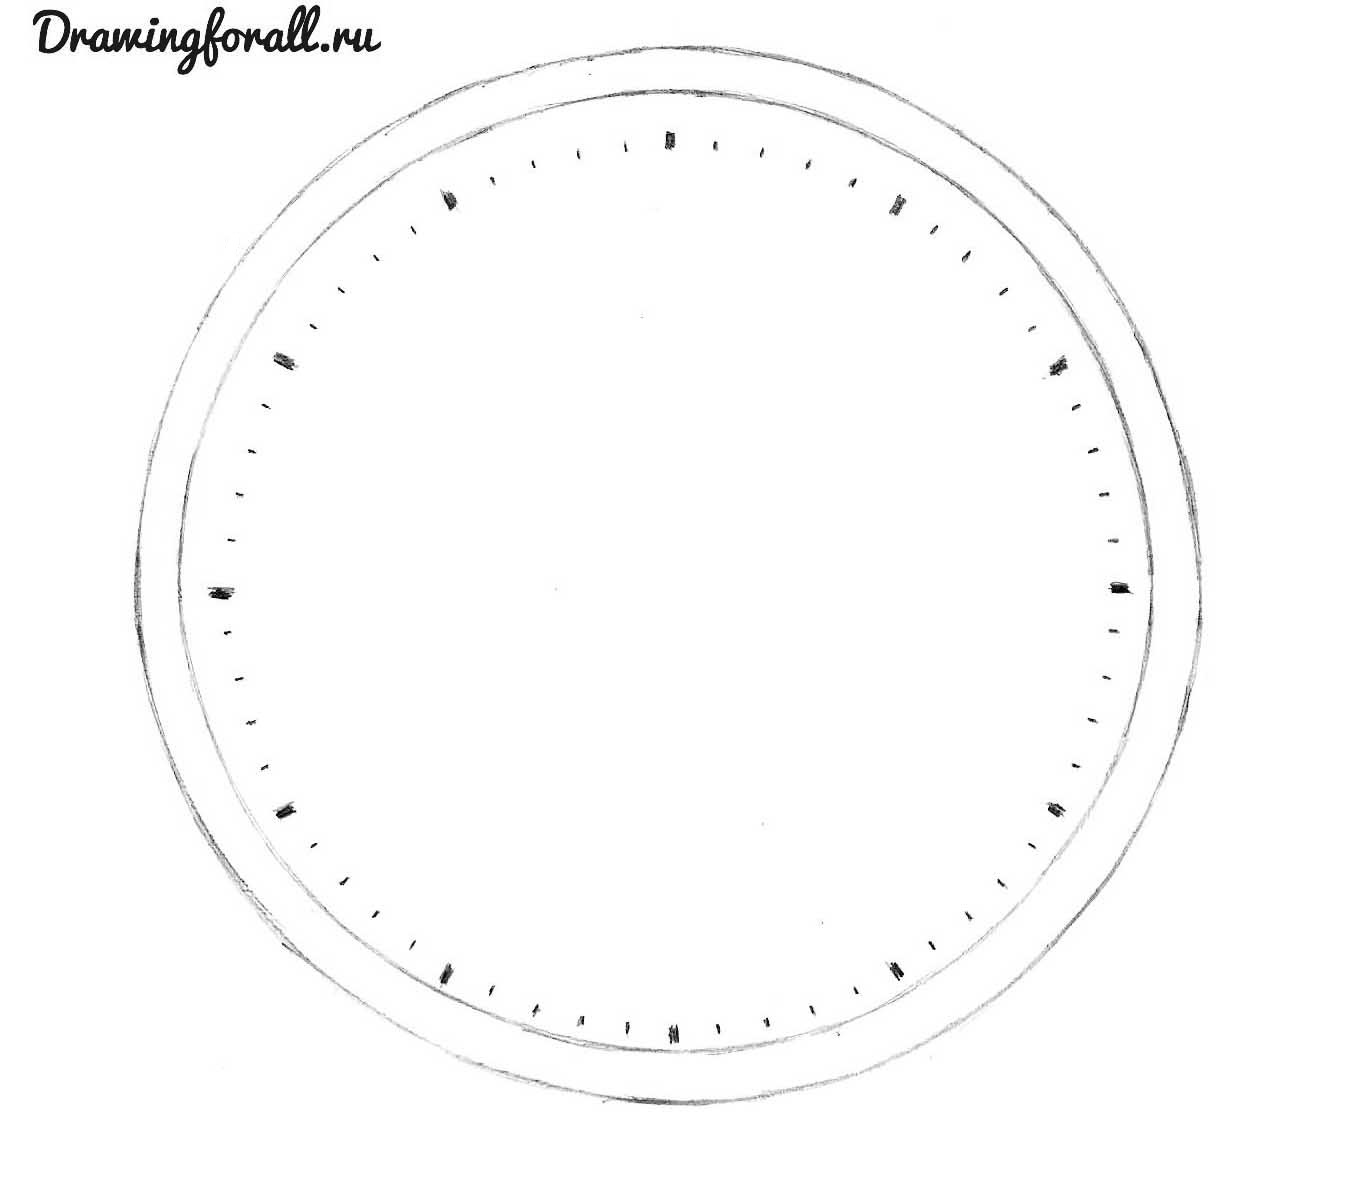
Step 3
On top of the circle from the previous step, draw another one, slightly larger in diameter.

Step 4
Using the markings from the first step, we will apply the strokes of each hour along the entire circumference of the dial. We draw 12, 3, 6 and 9 o'clock first, and mark the rest at equal distances between them.

Step 5
We mark the second divisions with very small strokes. Watch the distance, it should be strictly the same between all divisions.
Step 6
Great, now let's put numbers near each hour mark. Try to have the same numbers drawn the same way on each hour.

Step 7
We put even arrows - in our case they intersect and show seven o'clock. You can set any time, the main thing is to correctly convey the size and shape of the hands

→ Drawing a clock
This is an average difficulty lesson. It can be difficult for adults to repeat this lesson, so I don’t recommend drawing a clock using this lesson for young children, but if you have a strong desire, you can try. I also want to note the lesson “” - be sure to try to repeat it if you still have time and desire to draw today.
What you will need
In order to draw a clock we may need:
- Graphic GIMP editor. You need to download a new GIMP and install it.
- Download brushes for GIMP, they may come in handy.
- Some add-ons may be needed (instructions on how to install them).
- A little patience.
- Good mood.
Step by step lesson
Ordinary household things are the easiest to draw, because you can always look at the clock, it’s always at hand and you can see every detail. You have to draw not from your head, but from nature, and this is much more pleasant and easier. If you do not have the opportunity to look at what you are drawing, it is better to turn to a search engine and look at the photos before taking the lesson.
By the way, in addition to this lesson, I advise you to pay attention to the lesson “”. It will help improve your skill or just give you a little fun.
Tip: Perform different actions on different layers. The more layers you make, the easier it will be for you to manage the drawing. So the sketch can be made on the bottom layer, and the white version on the top, and when the sketch is not needed, you can simply turn off the visibility of this layer.
As you complete this tutorial, please note that due to differences in software versions, some menu items and tools may have different names or be missing altogether. This may make the tutorial a little difficult, but I think you can do it.
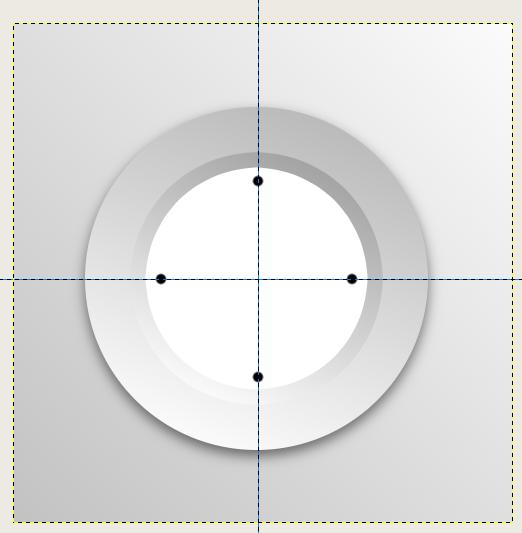
Create a new document 500x500 px. Foreground color: c2c2c2.
Activate the Gradient Tool, Main to Background and apply from the bottom left to the top right.
After that, create a new layer. Take the Elliptical Marquee Tool and hold Shift to create a selection:

Activate the Gradient Tool, Foreground color b8b8b8.
Apply it on the circle:

Create a new layer, without removing the selection from the circle, go to the menu “Selection - Shrink” by 45 pixels:

Change the Foreground color to 9d9d9d, activate Gradient. Fill the selection like this:

Menu “Select-Reduce” by 15 pixels. Fill the selection with white:
![]()
Go to the layer below (the first circle) and apply to it “Filters - Light and Shadow - Cast Shadow” with the following parameters:

Result:

Let's create a dial.
Go to the topmost layer, take the black Brush tool and add 4 small dots (to make it smoother, use the guides).
Decrease the brush scale and add 8 more small dots:
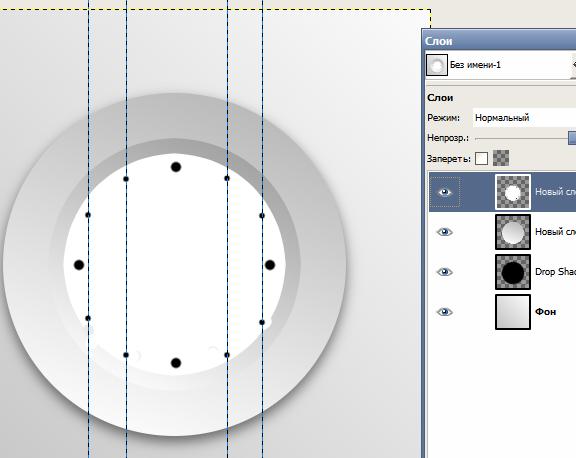
Use the “Text” tool to add numbers for the watch face:

Open the image on a new layer: http://s1.ipicture.ru/uploads/20120427/3UB114sj.jpg (or another).
Use the “Scale” tool to change the size of the image, and the “Select adjacent areas” tool ( Magic wand) (or other convenient tool) cut out the cutlery from the background and place it like the hands of a clock:

Apply “Filters – Light and shadow – cast shadow” with the following parameters:

Result:
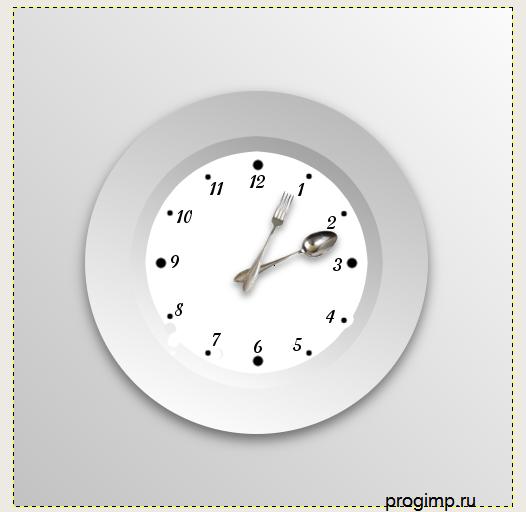
Adding an inscription.
Take the “Text” tool with the color 930d0d. We write “Time to visit our restaraunt!” Place the text under the “clock”
Final result:

I sincerely hope that you enjoyed the tutorial on how to draw a clock. If you put in the effort, I believe you will achieve everything you set your mind to. Now you can pay attention to the lesson “” - it is just as interesting and exciting. Share this lesson with your friends on social media. networks.