A local network is a collection of computers connected to the same network (subnet). First of all, members local network can exchange data (often these are films, games, music, books and other text information, computer programs etc.) at a fairly high speed, which is much more convenient than downloading all of the above directly from the Internet.
1. Wired network
2. Wireless network (wi-fi)
3. Wi-fi network via router
4. Network Bridge
5. Open general access to resources
Wired network
We will connect two computers to each other. For this we need a cable" twisted pair"4- or 8-core (differ in speed), which must be crimped with 8p8c connectors (erroneously called rj-45). There are two types of crimping for this cable: Type A and B:
Which one to use is up to you. But this is basically nonsense, you can connect everything in series and it will work.
We connect different ends to the network cards of computers. Next, we decide which subnet we will work on. It just so happened that for local networks it is customary to use networks: 10.0.0.0 or 192.168.0.0, and also 127.0.0.0
Let's choose the subnet 192.168.0.0
Range 192.168.0.0 - 192.168.0.255 (that is, computers can be assigned any of 254 addresses).
192.168.0.0 is the subnet, and 192.168.0.255 is the broadcast address of this network.
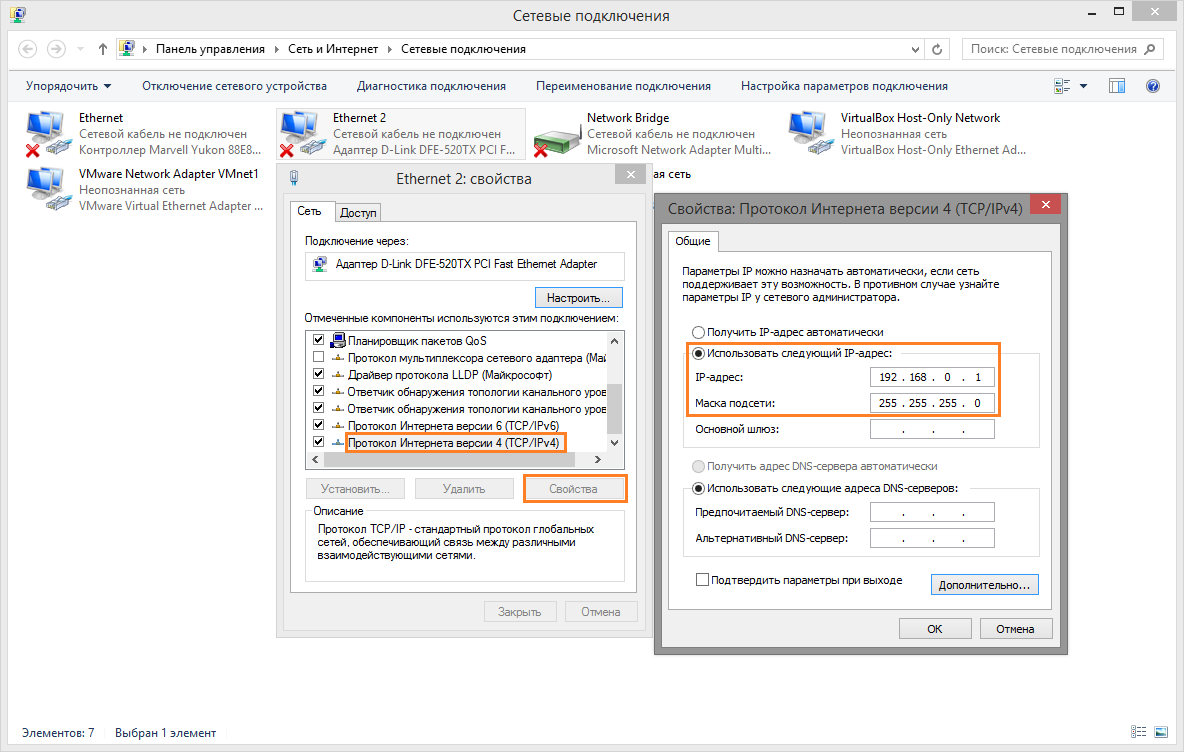
In properties local network connections we assign addresses, for example, to the first computer: 192.168.0.1, and to the second 192.168.0.2. Subnet mask for both computers 255.255.255.0 Path to settings: Control Panel\Network and Internet\Network and Sharing Center, Change adapter settings.
That's it, the computers are connected, they should be displayed in network environment. If you just want to play with each other online, then this will most likely be enough.
Wireless local network (wi-fi)
In this case, you will need to create an access point on any computer and connect all computers to this access point. If in Windows 7 it was possible to create an access point from under the system, then in Windows 8, through command line or third party programs.
Press Win+X and launch Command Prompt as administrator and enter the command: netsh wlan show drivers
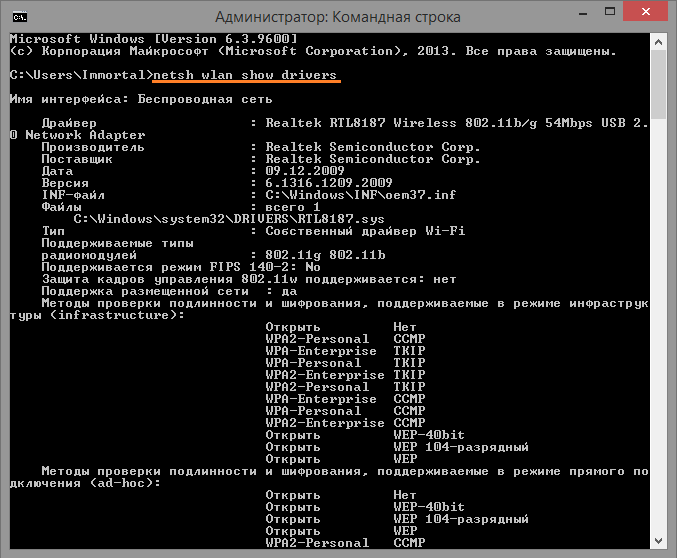
If there is a recording Hosted network support: yes, so we continue further.
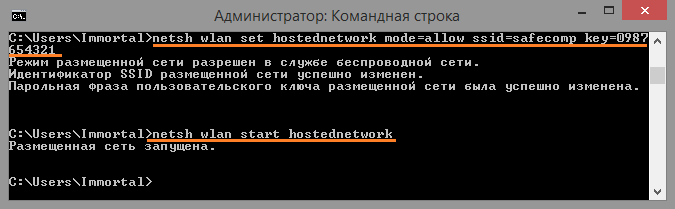
The next command creates a point wi-fi access: netsh wlan set hostednetwork mode=allow ssid=NETWORK key=PASSWORD Replace NETWORK and PASSWORD with your data (in Latin letters). The following command starts the network: netsh wlan start hostednetwork
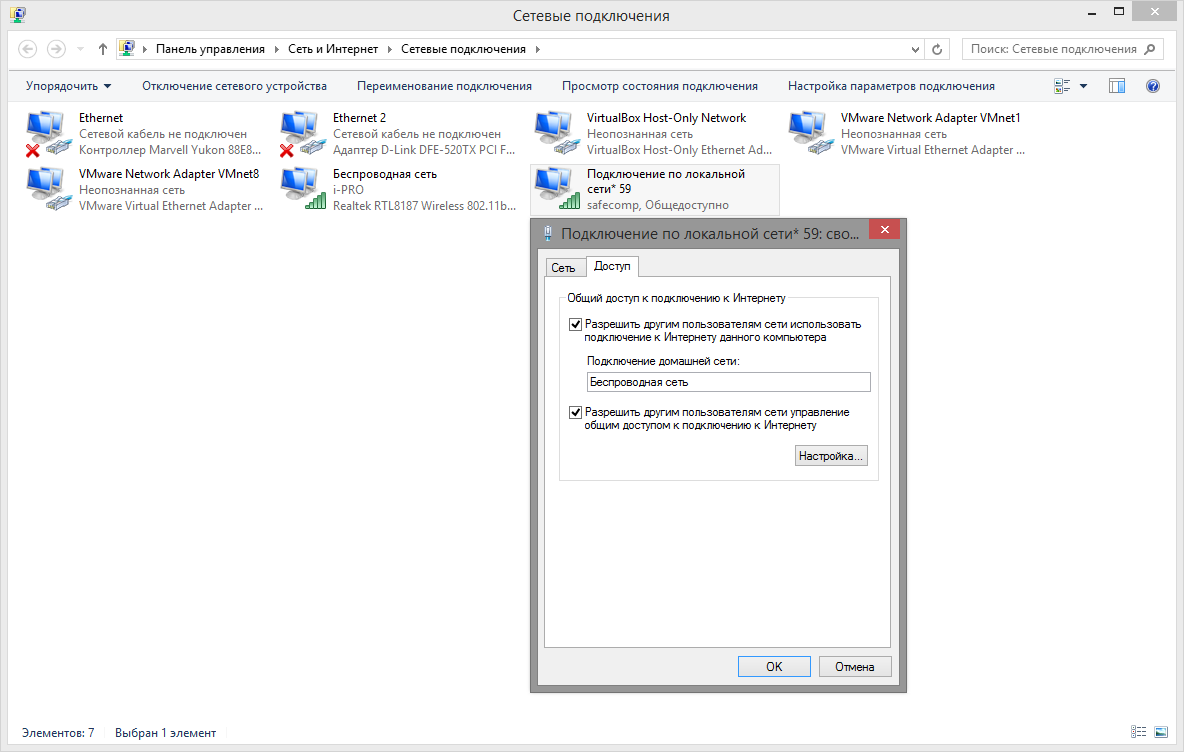
Next in network connections a virtual adapter is created, in properties on the tab access tick Allow other users to use this connection. And select from the list the connection through which you have Internet access.
But it’s better not to suffer from nonsense and download the Connectify-me program with ease step-by-step creation access points and network connection.
Local network via wi-fi router
Everything is simple here. Connect to wireless network router. But so that computers can interact with each other, read point 5.
And when you are already online, sometimes it is useful to know what addresses the router has allocated to you. You can look in the router settings, but it shows there the MAC address of the network card and what IP address it was given. Or look in the connection information to see which address is allocated to you. Right-click on wireless connection and select the item State. And then as in the picture.
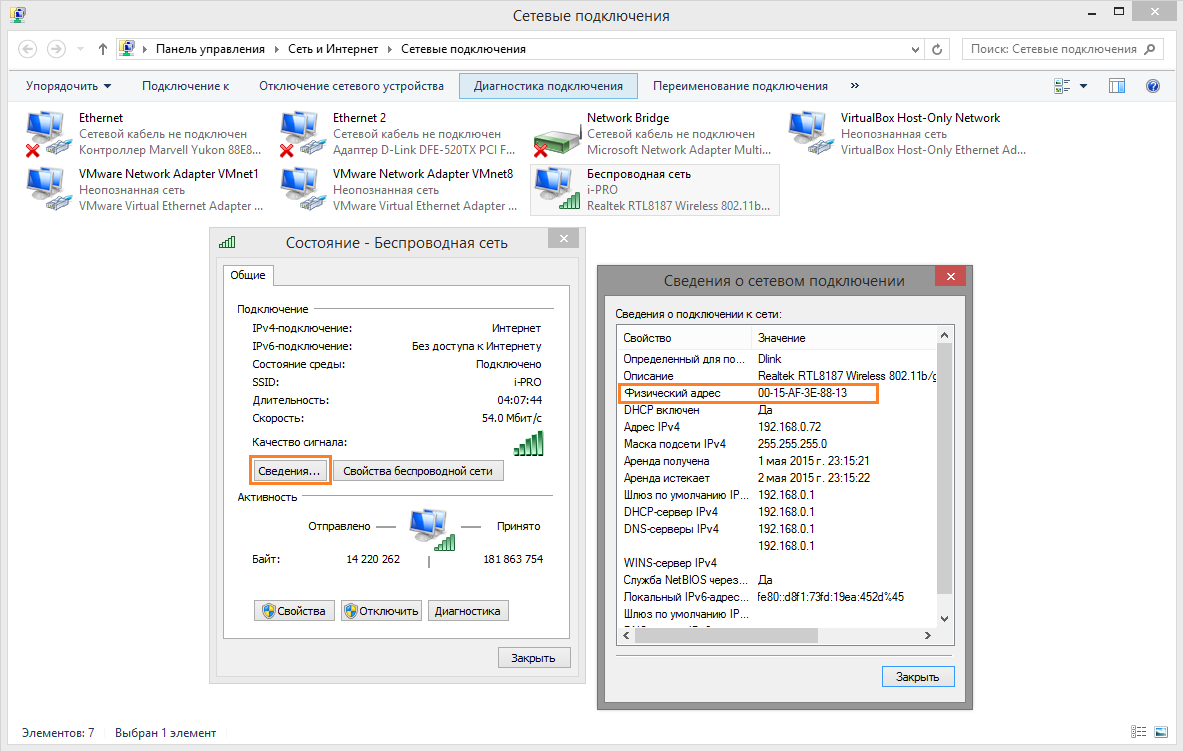
Physical adress this is the MAC address of the network card.
So why know him? The fact is that some games force you to explicitly indicate the IP address of your opponent’s computer; you need to register it in order to connect. And if there are several of you gamers, how will everyone know who to connect to. I repeat this for those games where simply addresses are used. In other cases, the letter name will most likely be used and there will be no problems there.
Network Bridge
A network bridge is a repeater through which you can connect another computer, thereby giving it access to this network or the Internet. A network bridge requires two network cards or wifi adapter and a network card.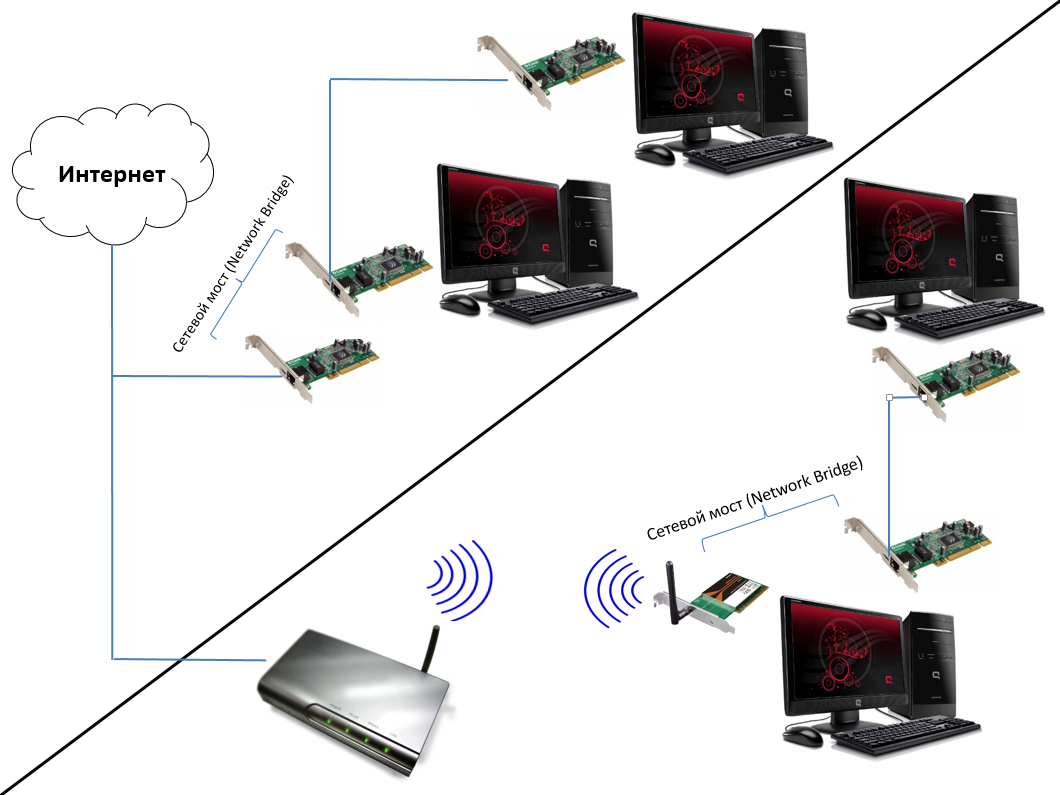
For example, I often use the second scheme. My roommate and I share the same Internet connection between us. He got cable, we chip in and pay once a month for the Internet. Wi-fi router is with him. Naturally, I can only connect via wi-fi. And when they bring me a computer for repair or install some programs, I almost always use the Internet. For this I combine wireless connection with a local network connection to a network bridge. We go to the adapter parameters, select our connections, click right button mouse and select the item Network bridge.

We are creating a new connection Network Bridge. I connect my network port with the port of the brought computer using one cable. The Internet works automatically.

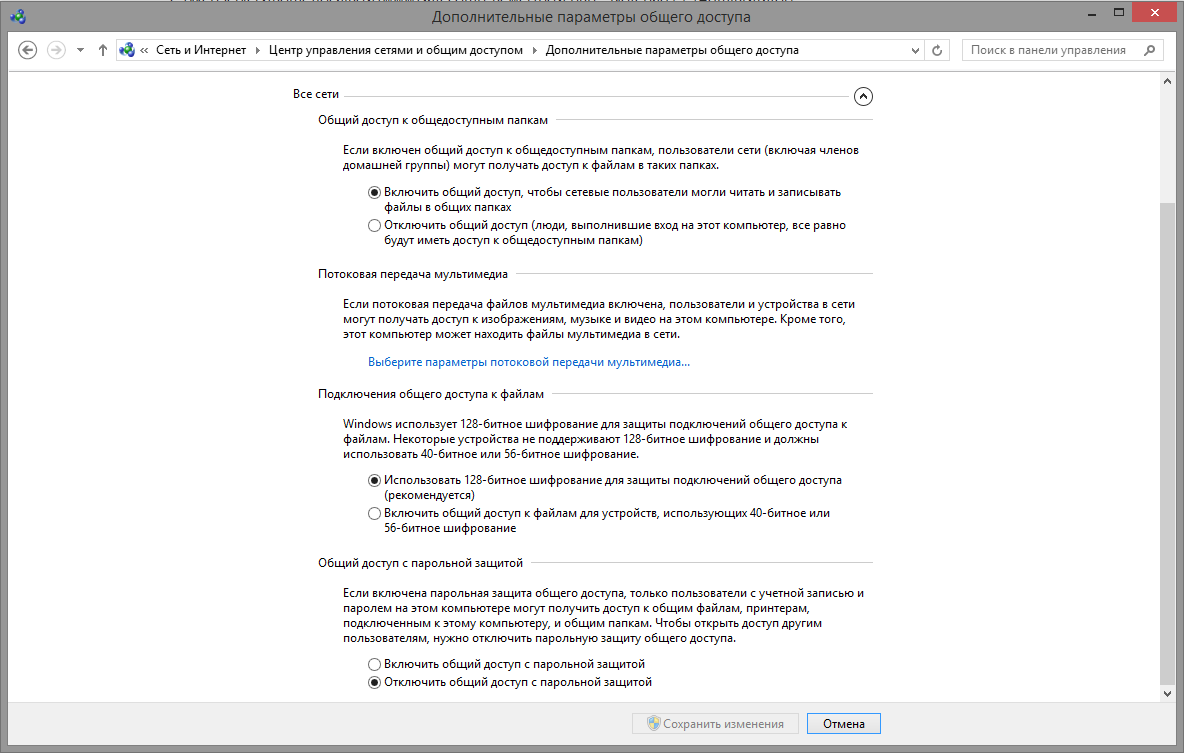
Opening shared access to resources
Remembering the common times, when there was no mass Internet yet and everything that was obtained (music, films, software) turned out to be the property of our local network. Everyone rushed to download everything from each other and enjoy watching movies or new music. Well, in order to be able to exchange files, you need to enable sharing of the folders that you want to make available to the network.
First we change Extra options general access.
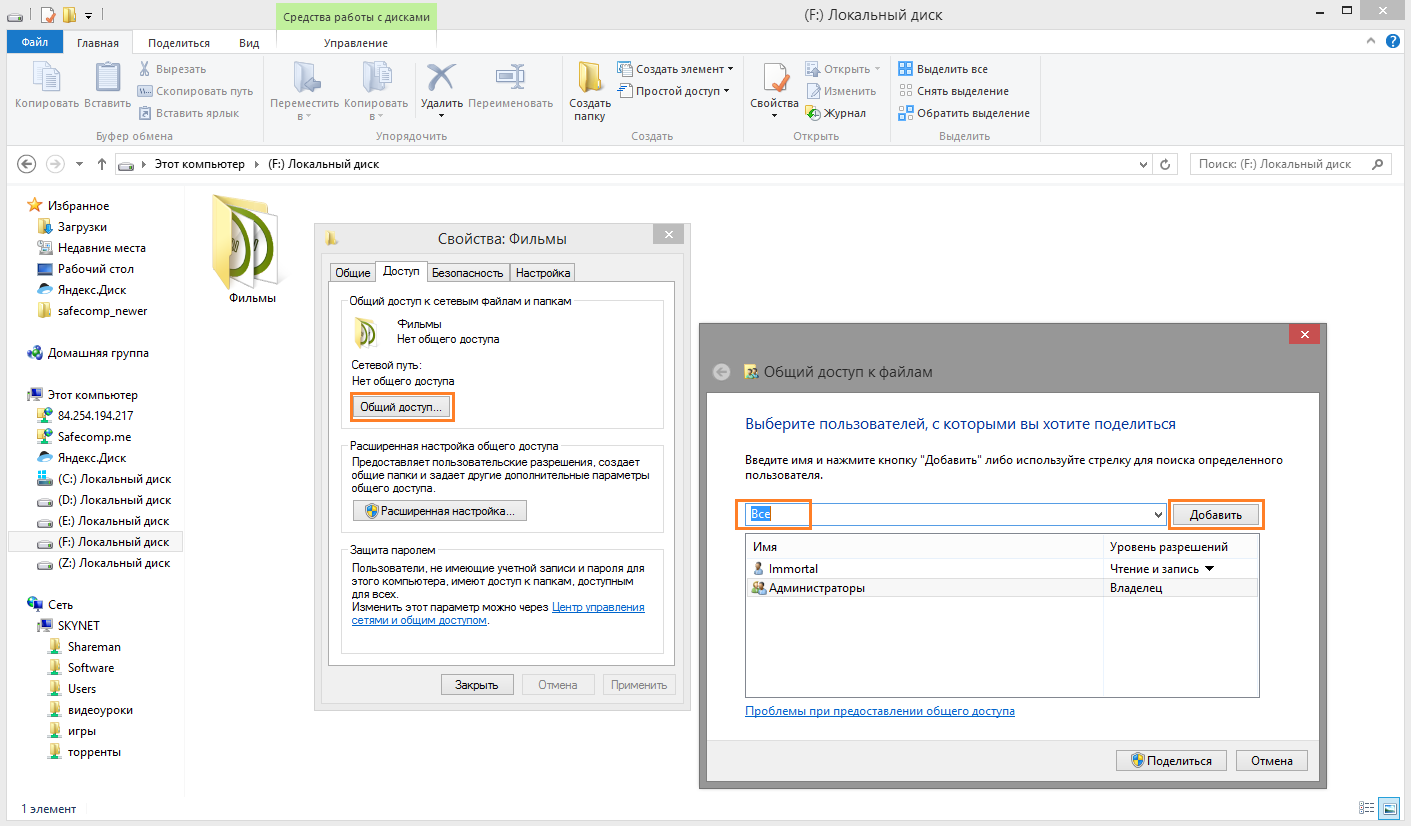
Then select the folder to which we want to share, select Properties, tab General access, in the drop-down list of the new window, select the option All and press the button Add.
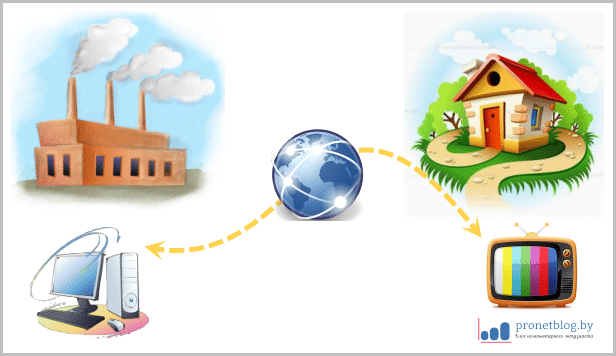
Hello my dears! Today in the article we will continue construction home media network. But this time, our tasks will be more global. Together with you, we will connect devices located far from each other into a network.
Yes, yes, guys, we have become cramped within the walls of one room and therefore the main topic of the article will sound like this - local network via Hamachi. And there is no need to be afraid of unclear words and names. Everything here is much simpler than it seems.
But so as not to bore you, let's get to the heart of the matter.
So, I’ll tell you right away what was the reason for writing this post.
There were many and different photos: against the backdrop of the city’s attractions, on the then calm Maidan, on the bus while traveling, etc. And if you consider that the road is long (about 850 km) and it’s difficult to drive “dry”, then it was very cool to look at some of the faces: :)

But at work, you know what happens, sometimes you get distracted, and sometimes your boss suddenly bursts into the office with blazing eyes. In general, in a war it’s like in a war. Therefore, the question arose: how can this matter be viewed in a more comfortable environment?
Of course, the easiest way is to take and copy photos to a flash drive, and then view them at home. But at that moment I didn’t have it at hand, and I didn’t want to bother with lengthy file copying. We need some original solution.
And it was found using a little program called Hamachi. It allows you to connect computers via the Internet as if they were on the same local network. That is, within one room or office.
Such a local network via Hamachi is scientifically called a VPN connection (Virtual Private Network). A significant advantage of connections of this type is the fact that all data is transmitted in encrypted form. So no one will know anything.
Of course, if you have a permanent dedicated IP address, then you can do without this utility. It’s enough just to set up the necessary settings on the router. But in my case, not everything is so simple - all addresses are dynamic (gray).
You may now think that this is completely impossible. But this is not so, everything is solvable and very simple. Look what the author did to implement this idea without special knowledge and complex settings.
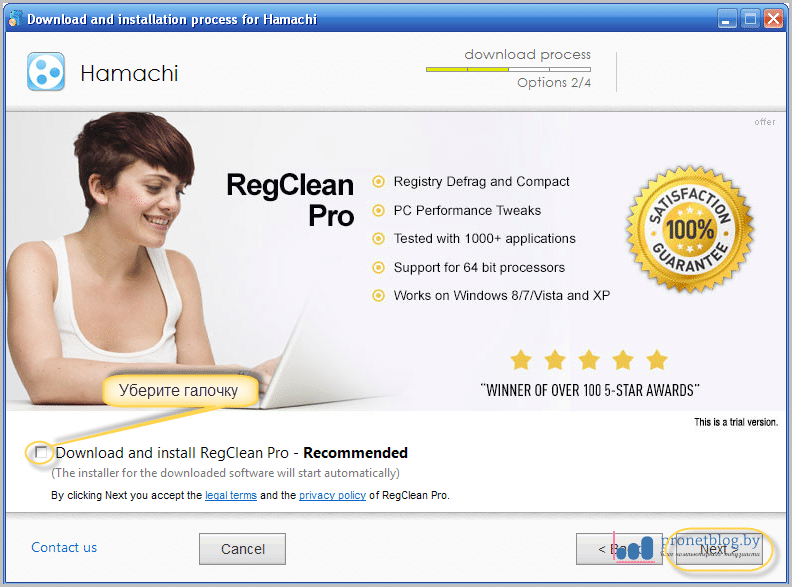
So, the first thing you need to do is create a virtual local network between your work and home computers using the Hamachi utility. Download it from the link here. It must be installed on both computers - home and work.
The installation process itself is quite simple, everything is as usual. You just need to uncheck the box in two places, as shown in the screenshot below:
After completion, run the program and click on the “On” button, and then “Create”:
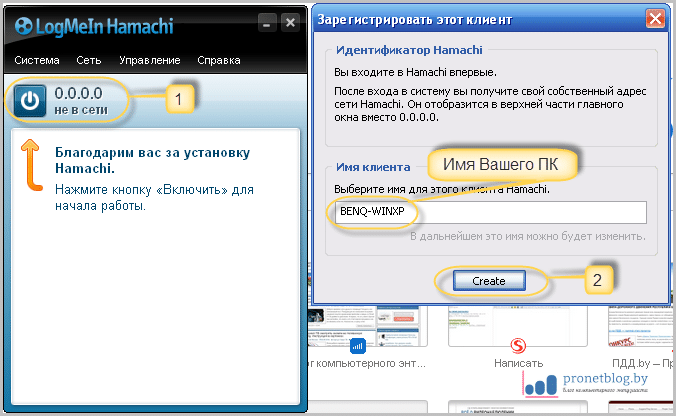
Now on one of the computers we do the following simple steps. Click on the item "Create a new network":
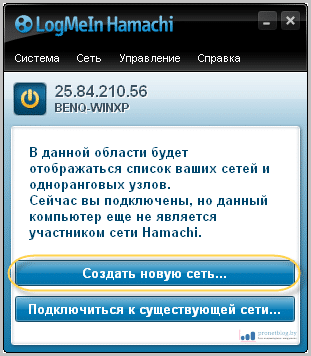
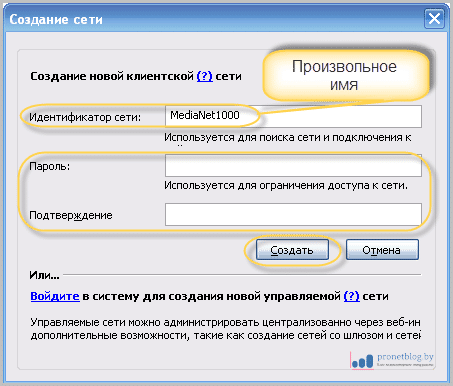
In the window that opens, in the “Network ID” field, enter any name for the future network and come up with a password. After that, don’t forget to click the “Create” button:
At this step, on the first computer, all settings are completed. Now let's move on to the second. In order for the virtual local network via Hamachi to work, you need to make the following settings on it.
In the main program window, select "Connect to existing network". Then, in the “Identifier” column, enter the previously invented name. Remember, we already talked about it earlier in the article. We also indicate the password and click on “Connect”:

If everything was done correctly, then on both computers in the main window Hamachi programs, the created network with the computers included in it will be displayed. Hurray, comrades:
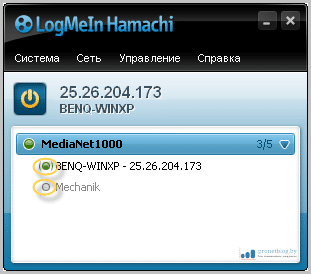
A green icon next to the name means that there is a connection with the computer. If the circle is gray (second line in the screenshot), then there is no access to the machine. In this case, you need to double-check that the settings you have made are correct.
Now, on the remote (working) computer, you need to open shared access to the folder or partition that we want to access over the network. How to do this in Windows XP and 7 is shown in great detail in the video below:
Well, that's all, preparatory work completed. Let's move directly to our plan - viewing content on TV. In this article, we will consider two ways how this can be done.
Option #1. The simplest and most convenient. With the help of what we already know. With this option, the settings will be minimal. Let's start.
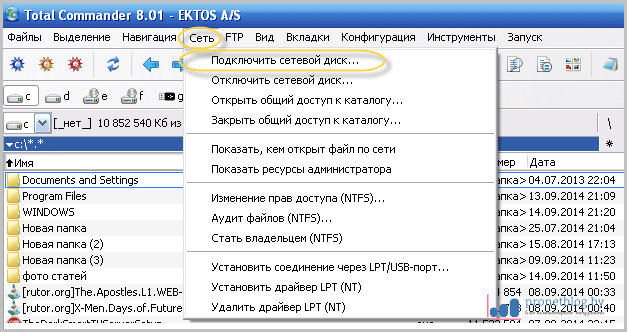
In order for the program to see the contents of the remote computer and display it on the TV screen, you need to connect it network drives to your home computer. This is done as follows.
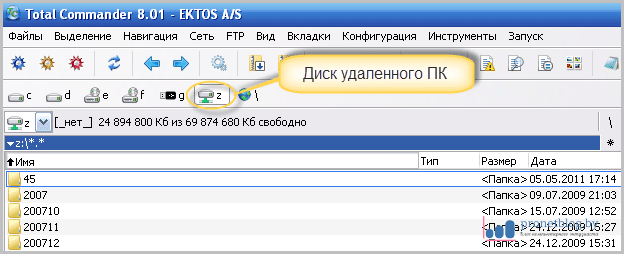
Opening file manager Total Commander ( I think everyone has it) and follow the path “Network - Map network drive”:
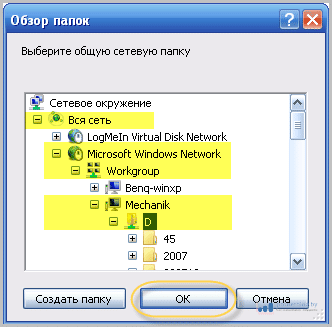
Then in the "Browse Folder" window, you need to find remote computer and select the drive we are interested in:
 The result of our successful actions should be displayed on home computer connecting a remote partition:
Now let's go to Samsung TV Smart TV, launch the NstreamLmod widget and select the “My Computer” folder. Next, click on the red “A” button, then the “Network Drives” section:
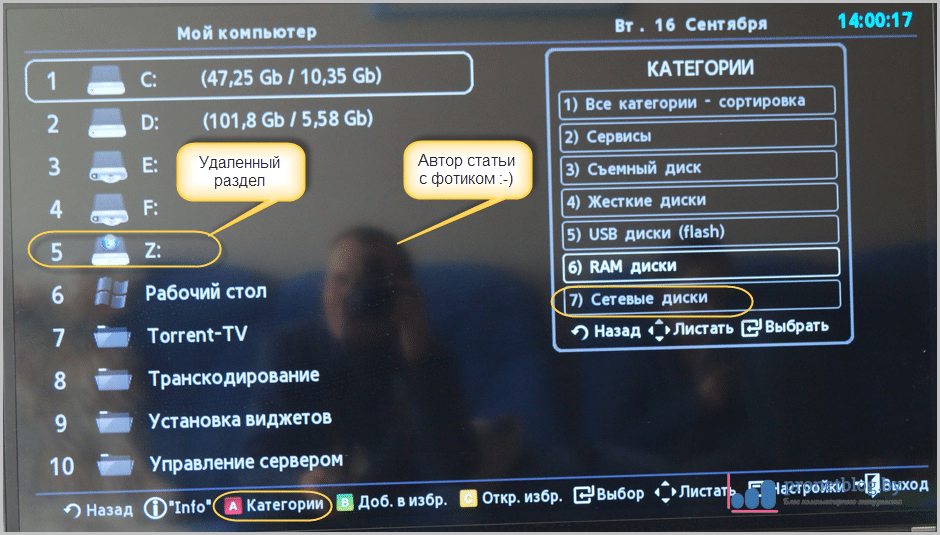
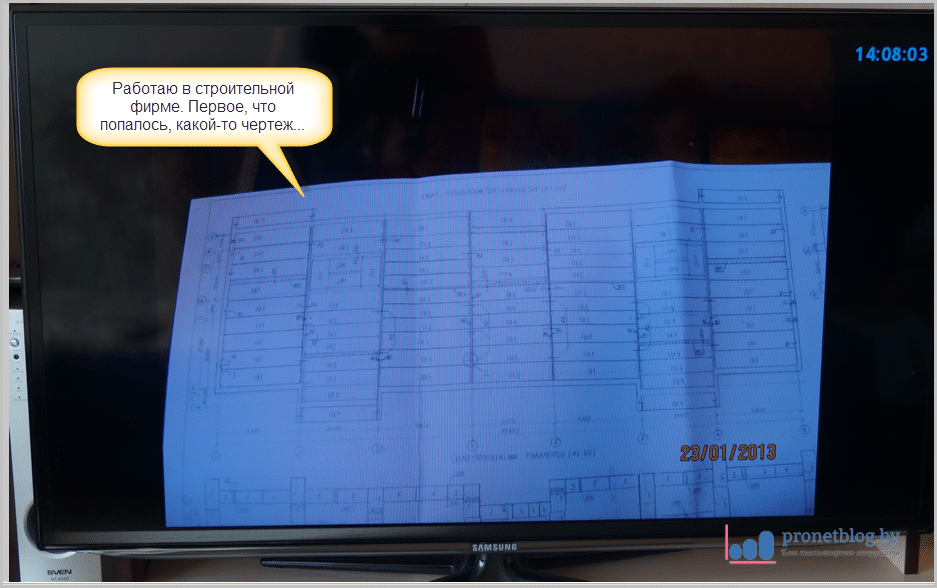
Basically, at this step it's all in the bag. You can view content on a remote (work) computer. Here's the first picture I came across:
As you can see, VLAN via Hamachi works great. Thus, you can view any media content. I tried listening to music, it also started without problems.
The only nuance that was noticed on the author’s equipment is that the folders with big amount For some reason the files were not opened. For example, if there are 20-30 songs in the catalog, access is no problem. If it’s 100-120, you get an error when opening.
Well, in general, the system works without problems. Everything is limited only by the speed of the Internet. By the way, the author’s connection using the good old ADSL technology gives a return of as much as 512 Kbps. So you won't speed up much.
Direct Connect networks are designed for sharing files between users. Their peculiarity is that the user’s computer (more precisely, the program installed on it) directly connects to the computer of another user, wherever he is.
Usually on the Internet we look for a specific file (be it a music track, a movie or some kind of program). We find a link to this file, follow it, and the download begins. In Direct Connect networks, things look a little different. We can connect to the computer of some network participant and see the contents of the folder that he has shared (just like you see the contents of your disk folder in Explorer). This way, we can literally dig through the folders that the user has shared, looking for something interesting. That is, you may not even know what you want to download. You simply connect to the computer of one of the network participants, see the contents of the folder on his computer and look for something necessary and interesting for yourself. In turn, you will also have to open access to one of your folders (or several), which other network participants will look into. Of course, there should be something in this folder that might be interesting and useful to other users.
Programs for sharing files over a local network
Downloading the DC++ program
As already noted, DC++ is free. Her installation file can be obtained from various sources, but it is best to download the installation file from the program manufacturer’s website.
- Launch your web browser and load dcplusplus.sourceforge.net.
- On the page of the downloaded site, go to the Download section.
Sharing folders
Sharing (from the English share - share, allocate) means allocating some resource (in our case, a folder) for public access. This term is used not only in the DC++ program, but in general in all aspects related to computer networks. A shared folder is a folder given for public use. IN computer networks such a folder can be located on a specific computer, but users of other computers connected to the network can also access it. IN corporate networks Such folders can be used for internal document flow; they may contain some files needed by all network users. In order not to create copies of such folders on each computer on the network, select a folder on one of them, give it shared access, and all network users can access it as if they were a regular local folder. For approximately the same reason, a shared folder is created in the DC++ program.
A prerequisite for using the Direct Connect network is that you must provide something to the other participants in the network. You connect to the network to download something you need. And you are obliged to provide other network participants with the opportunity to download something from your computer. To do this, you must share the folder and write something in it that may be of interest to other network participants. For example, music, films, electronic magazine files, in a word, everything that may be of interest. If you wish, you can share not one, but several folders. There may be other folders inside a shared folder, and they automatically become public.
Setting up the DC++ program
Now let's move on to the most important category of DC++ program settings. Connection settings determine how DC++ will connect to the Direct Connect network and hubs. The settings in this category depend on how your computer is connected to the Internet. The luckiest users are those who use direct cable connection or simple modems (including 3G). But a large number of computers are connected to the Internet via local networks or using modems, which are gateways. In this case, there may be problems connecting to the Direct Connect network, but they can be solved.
There are two network connection modes: active and passive. Active mode is preferable, while passive mode, although it has some limitations, allows you to connect to the Direct Connect network on any Internet connection.
Connection settings are located in the Connectivity category.
Connecting a hub to DC++
So, the program is launched, configured, now we can connect to some hub, select a user on it and see the contents of his shared folder. The first question that will arise is: “Where can I get this hub?” Indeed, when loading a site, for example Google, we enter address bar browser website address www.google.ru. Where can I get hub addresses? There are several ways.
The first and easiest way is to use the list of hubs already supplied with the DC++ program. This list contains the addresses of the most popular and visited hubs. The lists of hubs can be replenished.
The second way is to find the address of the desired hub on the Internet and connect to this hub manually. How to search for hub addresses on the Internet? Yes, just like other information. Let's say we want to find a hub in our hometown so that the download speed is higher. We enter a query like “DC hub Murmansk” into the search engine. As a result, we get links, following which we will certainly find the information we need.
Downloading files in DC++
The moment of the most interesting has come. Until now, we have only connected to hubs, which does not yet give us the opportunity to download files. As you already know, the files are located in shared folders of network participants. By connecting to the hub, we only receive a list of users connected to the hub and some general information, for example, the volumes of files available for downloading. But in order to download a file, you need to connect to a specific user’s computer, get a list of his shared files, find the file you need, and only then set it for download. Files can be found different ways. You can simply view the contents of the user’s shared folders in search of something interesting, or you can use search engine, if you are looking for something specific. In the latter case, the search will be carried out across the entire hub, that is, through the shared folders of all users connected to the hub.
Getting a list of files (movies, music, etc.)
You already know how to connect to the hub. As a result of connecting to the hub, on the hub tab you will see a list of users connected to it. It's on the right side of the list. Almost every one of them offers something for download.
Bugs in DC++
Even if you have connected to the hub and to a specific user, this does not guarantee that you will be able to download the file you are interested in. There can be many reasons, but the most common is the lack of a free slot. Slot, in in this case, is called permission for one connection per user.
Each user can independently determine maximum amount slots For example, if a user has installed 5 slots, this means that no more than five people can download files from his shared folders at the same time. If five people are already downloading files from this user, you will not be able to start downloading until at least one slot is free. And even in this case, there is no guarantee that the vacant slot will not be taken by someone before you. This situation usually occurs when trying to download from a popular resource, that is, from the user’s computer, where there is a lot of interesting stuff.
Searching files in DC++
Until now, we have considered the option when the user views the contents of shared folders and looks for interesting and necessary files. However, sometimes you need to find something specific. When looking through other people's folders, you can endlessly search for the desired movie, music file or program and still not find anything. Therefore, the DC++ program provides a search for files and folders.
The search is carried out among shared folders on user computers that are located on the hubs you have connected. Thus, if you have this moment three hubs are connected, the search will be carried out across all three hubs.
It is worth noting that some hubs impose certain conditions for searching. The most common of them is sharing a certain amount of information. For example, you can connect to some hubs if you have shared folders with a total volume of 5 GB, but to perform a search you need to share at least 10 GB. Typically, such information is displayed among other conditions and rules when connecting to the hub.
List of DC++ hubs
| Hub | Address | Users | Shara, TB |
| AllAvtovo.ru | dchub://allavtovo.ru | 10 334 | 2067 |
| Ozerki | dchub://dc.cifracom.ru | 8366 | 2019 |
| DC·Filimania·COM | dchub://dc.filimania.com | 7712 | 1630 |
| Andromeda Galaxy | dchub://dc.a-galaxy.com | 7528 | 1725 |
| http://DCMagnets.ru - Lots of films! (Sum Telecom) | dchub://dc.dcmagnets.ru | 7352 | 1505 |
| Picnic | dchub://piknik-dc.ru | 6860 | 1369 |
| MSIDE | dchub://dc.mside.net | 6470 | 1140 |
| FAVORITE Group | dchub://favorite-hub.ru | 5639 | 1165 |
| TiERA DC++hub | dchub://dc.tiera.ru | 5580 | 1157 |
| ProMusic Hub | dchub://promusic.interzet.ru | 5487 | 907 |
| Maxnet_Hub | dchub://dc.maxnet.ua | 4553 | 818 |
| Unformal Hub | dchub://unformal.interzet.ru | 4519 | 638 |
| Superstorm.ru | dchub://superstorm.ru | 4209 | 935 |
| ArtCool.ORG | dchub://artcool.org | 3572 | 827 |
| 4local.ru | dchub://4local.ru | 2621 | 512 |
| Rutrack DC.Hub | dchub://dc.rutrack.net | 2391 | 528 |
| SPB-HUB.RU | dchub://spb-hub.ru | 2271 | 536 |
| STAR HUB SPB | dchub://starshub.ru | 2195 | 825 |
| -====- | dchub://dc-net.fttbkhv.ru | 1577 | 297 |
| dchub://dc.krasdc.ru | 1570 | 324 | |
| COMSTAR-R Komsomolsk-na-Amure | dchub://dc.kmsnet.ru | 1538 | 352 |
| Verlihub.ORG | dchub://verlihub.org:4111 | 1278 | 444 |
| Pervak | dchub://onamur.ru:412 | 1229 | 285 |
| Pasha Hub | dchub://dc.pashahub.ru | 1198 | 375 |