How to connect a digital receiver?


If you need to connect and configure a digital receiver on your own, then use our instructions, which we will outline in this article.
There are various types of receivers that differ in both input/output types and signal transmission. In this article we will look at instructions for connecting the set-top box to a TV and its further configuration using the example of a DVB-T2 digital receiver. This device receives free terrestrial TV channels using a regular antenna. Please note that the sequence of actions when connecting and setting up any set-top box is the same.
Instructions for connecting and setting up the receiver
- First you need to connect the set-top box to the TV. To do this, you need to connect the necessary cables to back wall receiver. Please note that the panel contains both an HDMI connector for modern TV models and bell connectors. To connect the set-top box to an old TV, you need to purchase an adapter that works for both input and output. So, to connect the set-top box to the TV, you need to connect three wires - yellow, red and white or an HDMI cable.
- After connecting the receiver to the TV, the red lamp on the device will light up.
- Next, you need to connect a regular antenna to the receiver.
- Then take the remote control from the set-top box and press the power button. When the receiver is turned on, the red light will change to green.
- When loading the receiver, a window will appear on the TV screen in which you need to select the desired settings. Next, click the "Ok" button.
- After this, the set-top box will begin automatically searching for channels. However, it is unlikely that the receiver will catch the programs, so press the "Exit" button and exit auto-tuning.
- Then go to the "Main Menu", select the "Settings" section and click the "Ok" button.
- Next, select “Search for channels” and change the settings: search mode - “By channel”, search band - “UHF”, frequency channel “CH30 546000 kHz”.
- After changing the settings, you will see at the bottom of the screen that the signal quality and intensity characteristics have appeared.
- Click on the "Search for channels" button.
Check out our articles.
The modern world can no longer be imagined without digital TV. This signal transmission has been used for quite some time to broadcast television and radio channels in many countries in Europe, America and Asia. In Russia, the process of transition from analogue to digital TV has been delayed.
The digital signal arriving through the receiver antenna allows you to watch more TV channels throughout the country without loss of quality or interference. In this case, the signal itself can arrive either to an antenna that is attached to set-top box, and directly to the TV. It all depends on how modern model of this device you have.
With devices that support DVB-T2, everything is simple. In order to connect to digital TV, just insert the cable into the appropriate connector and perform a simple channel setup. If your TV is outdated and does not support receiving this type of signal, then in order to view digital channels you should purchase a special set-top box. It is inexpensive, but some people may have problems connecting and setting it up, so today we will talk about how to do this.
What is needed for this
To connect digital TV you will need:
- TV;
- Set-top box (receiver);
- Antenna.
Your TV should have an input into which you can insert an antenna, a tulip-type connector, and an input with video output (scart). If you have an HDMI input along with the scart connector, then don’t worry. It is also suitable for connecting a receiver. It's just that your model is newer.

Before buying a receiver, you should figure out which one is better and find out what parameters you should pay attention to in order to choose the most optimal model. If you don’t understand much about technology, and don’t want to spend your free time studying all these nuances, then you can contact a company that provides television broadcasting services in your city and get advice from their specialists. In addition, you can take advantage of promotional offers from the service provider. Often, if you connect to their services, you can receive a receiver as a gift.
A receiver is essentially an adapter that allows you to receive and transmit a signal to your device. He can receive it through the following sources:
- Satellite dish;
- Antenna;
- Through the Internet;
- Using other sources.
Connecting a digital set-top box
The receiver can be connected either to the TV directly or via a DVD or monitor, but for the latter two options you will most likely need to purchase a special adapter.
To connect the receiver directly, you should follow these steps:
- Take the TV box out of the box and remove it from protective film. It is necessary to remove the film. Otherwise, the receiver may overheat and break.
- Take the TV cable and cut off the protective sheath, thus exposing 1-15 millimeters of the cable on both sides. The sheath should be stripped very carefully so as not to damage the shielding film, which is designed to protect the center conductor.
- Carefully peel back the shiny protective film and screw the f-connectors to the wires.
- Connect the TV to the set-top box using a cable.
- Insert the wires into the tulip-type connectors on the TV and set-top box.
- Connect the antenna to the TV. The antenna itself should be installed on the external wall of the house or on your balcony, if it is not glazed. At the same time, make sure that it is not touched by tree branches or power cables.
This completes the process of connecting the TV set-top box. Next, to watch the TV channels available in your region, you should configure it.
In our country, many people still use televisions that were produced back in the Soviet years or in the early 90s. Connecting a receiver to such devices is not so easy - they do not have tulip-type connectors. Additionally, some models have scart outputs, but these only accept component signals.
These problems can be solved in two ways:
- Find a circuit for an adapter from the A/V input to scart and solder it yourself;
- Purchase a special adapter from the store to which you can attach an RCA cable from the set-top box or an adapter cable.
There are even more ancient models of TVs of the “Electron” type that do not provide any inputs at all, except for an antenna connector. A modulated signal enters the TV through this connector. high frequency, therefore, in order to watch digital TV on a device of this type, you will need to additionally purchase a modulator that will be equipped with RCA connectors.
Receiver setup
In order to set up digital channels on your TV, after connecting the set-top box to it, you will need to perform the following steps:
- On the remote remote control press the "Menu" button.
- In the window that opens, go to the settings menu.
- You need to select Russia as the country if it is not the default.
- Now you need to select the signal standard. By default, DTV-T/DTV-T2 is installed, that is, analog and digital TV, respectively. If you leave it this way, the TV will search for both channels.
- You will be prompted to perform automatic or manual setup. Select Automatic and press the “OK” button on the remote control.
- Now you need to wait a while until all available free and pay TV channels are detected. When you complete your search, click “Save.”
This is one of the most simple ways set up digital TV at home. If the TV finds few channels or does not find them at all, then you should use manual tuning.
To do this, you need to delete all the channels that were found for this. After the channels are deleted, you should repeat the same steps as for automatic search, but instead of auto-tuning, choose manual search. A window will appear in front of you in which you should set the frequency on which digital channels are broadcast in your city. You can find out this frequency on the Internet or by contacting your service provider. You may also need to change the search range for the search to begin.
After the TV channels of the first multiplex have been found, you will need to find out the frequency for the second multiplex in your city and start the manual search again. Thanks to this, you will be able to watch more channels.
Checking the signal quality
To make sure that you did everything correctly and everything is working well, you should check the quality of signal reception. This is not difficult to do. The receiver must have a button called INFO. By clicking on it three times, a window will appear on the screen with information about signal quality, channel number, frequency and encoding. If the two existing indicators are above 60%, then everything is fine and the signal level is quite acceptable.
Perhaps in your model of TV set-top box this button will be called something else. To find out what this button is called for you, look at the instructions and read the purpose of the buttons.
If your TV receives several multiplexes, be sure to check the signal quality on each of them. This is due to the fact that each of them is transmitted and received using different transmitters, so it is quite possible that the signal will be good in one multiplex, but not in the second.
Note.
The rapid development of technical progress in the field of television broadcasting provides great opportunities for digital television for better reception of television programs in comparison with outdated analogue. But in order to be able to watch digital TV broadcasts, you need to connect a receiver (special set-top box) to the TV. Before you connect digital set-top box to the TV, you will need to decide on the choice of receiving device - antenna. So, in order to watch digital terrestrial television (DTTV) without any problems, you will need:
- antenna;
- receiver (set-top box);
- setting up channels.
The type of antenna is selected depending on the distance to the transmitting TV tower. Therefore, you should install an indoor or outdoor antenna. But, regardless of the type of location, it must operate in the decimeter range, namely, receive frequencies from 470 to 860 MHz. will work well within the city where the transmission tower is located.
If the distance from the TV receiver to the TV tower is more than 15 km, you need to use outdoor antenna.
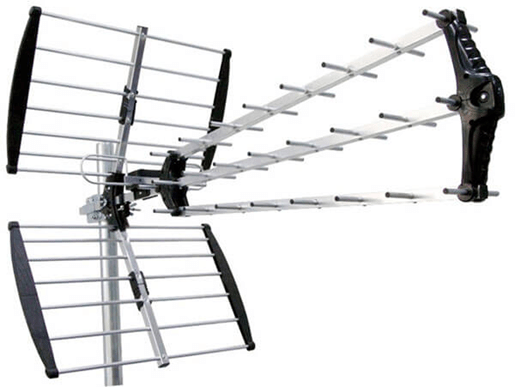
Antenna for dvb t2 set-top box can be purchased at the same retail outlets where the tuners themselves are sold. IN in this case High-quality TV signal reception is guaranteed, since the receiving device is designed specifically for the digital tuner.
If you are going to install a TV and set up a digital television, then before connecting the set-top box, it is recommended that you first consult with your neighbors. They can tell you what type of antenna you should choose for the area.
Set-top box (receiver)
As already mentioned, in order to be able to view DTTV, you will need to buy a TV set-top box, which is also called a tuner or dvb receiver. There are so many devices of this kind on the electronics market that it’s easy to get confused and overpay for functions you don’t need in the device. It is recommended to choose a tuner model based on your needs, since they all pick up a TV signal, in principle, the same way. The difference may be, perhaps, in the established additional options.
For example, if the set-top box will be used not only as a CETV receiver, but also to watch video from a flash drive, then this is the model that needs to be purchased. But if you don't need it, buy more simple model. The figure, for example, shows a model of an inexpensive bbk receiver.
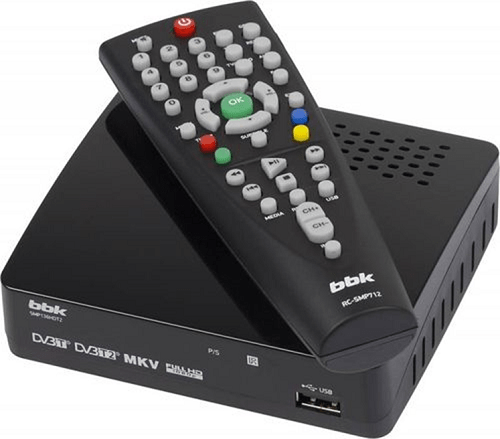
More expensive models of digital TV tuners have “Scheduler” and TimeShift options “on board”. These features allow you to record any broadcast at a given time, and your presence is not required. You only need to set the start time of recording the program on the desired channel, and the time when the recording should stop.
Currently gaining popularity set-top boxes from Rostelecom, which have a modern filling: large size random access memory And powerful processor. The Rostelecom tuner is connected to the TV in the same way as other similar devices. The kit includes one that can be configured to control both the set-top box and the TV itself.
If you are going to buy a TV, then look in the technical specifications to see if it supports DVB-T2. Most modern TV models already have a built-in tuner for watching DTV, and you don’t need to buy a set-top box.
Types of connections
Connecting a dvb t2 set-top box to a television receiver is not much different from connecting a satellite receiver or AV receiver. There are several methods for connecting T2, and they depend on the types of connectors located on the two mating devices. The tuner can be connected via:
- RCA cable (popularly called “Tulip” interface);
- antenna cable.
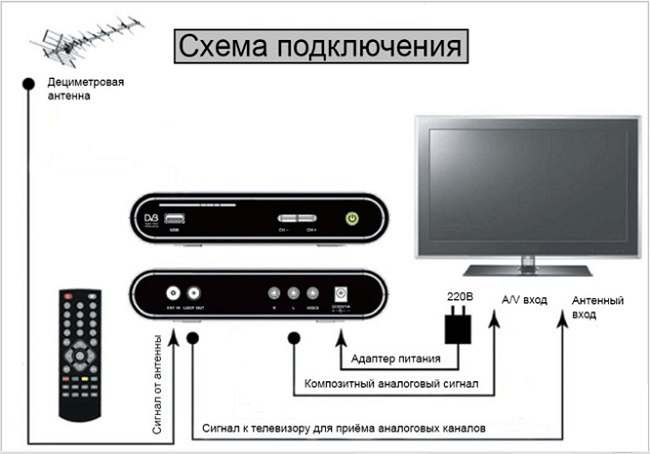
The figure shows a general diagram of connecting the tuner to the television receiver.
RCA cable
This is the simplest and standard way how to connect a digital tuner to your TV. The picture quality, of course, will differ from the connection via HDMI, but the difference will be unnoticeable on television receivers with small diagonals.
So, before connecting the cable, you need to turn off the power to both devices. After turning off the power, insert the cable plugs into the sockets on the set-top box. Since each plug has its own color, they are inserted into the connectors of the corresponding color. The cable with the yellow plug carries a video signal, and the white and red plugs carry 2 audio channels. Next, connect an outdoor or indoor antenna to the tuner into the appropriate socket (on the set-top box it is designated “RF IN”).
There are times when the TV does not have a “Tulip” interface, but there is SCART connector, which is popularly called “Comb”. The figure below shows what it looks like (for example, a Samsung TV receiver is taken).

How to connect the receiver to the TV in this situation? In this case, you need to purchase a special adapter from RCA to SCART. In the same way, you can connect a satellite receiver.

HDMI interface is capable of transmitting signal High Quality. For example, the quality of the transmitted video signal can be up to 1080p, and the audio signal – 192 kHz. These capabilities meet the highest standards in the field of multimedia content.

If you have a modern TV receiver and it has an HDMI connector, then it would be more correct to connect the receiver to the TV through this interface. The same recommendations apply to a satellite tuner to watch TV in high definition.
Antenna cable
This type of connection is used to connect a digital receiver if the TV receiver does not have any other connectors other than the antenna input. For example, you can connect a tuner to an old TV in this way by plugging the cable into a socket called RF OUT.

Before you can connect the t2 digital tuner to your TV, you will need to purchase the cable shown in the picture below.

This method of connecting to the receiver cannot provide a picture. good quality, and it’s not worth comparing it with the image transmitted via the connected HDMI interface. But given that the TV is old, the image can be considered acceptable for this situation.
Setting up channels
After connecting the receiver to the TV, it's time to think about how to set up TV channels. Many users, when connecting the receiver to a TV, have a question: how many channels can they watch if they set up a digital tuner? In reality, it all depends on whether you will use a paid package of services from a certain provider, or whether it will be enough for you on-air television broadcasting. About 20 free TV channels are available for CETV. If these 20 TV programs are not enough for you, then to watch encoded broadcasts you will need to purchase one, which is inserted into the TV receiver.

And the card of the CETV provider you have chosen is inserted into the CAM module. In this situation, you get access to a huge number of television channels for a certain monthly fee.
So, in order to start setting up the DTTV, you should turn on the TV (the set-top box must be connected), switch it to AV mode and go to the tuner menu.

Since the default set-top box does not contain a list of TV channels in its memory, you will have to find them yourself. For this it is recommended use “Autosearch”.

After a while, you will see that the receiver has found from 10 to 20 TV channels.

When the search is completed, the tuner will offer to save the list of found broadcasts, after which you can start watching ETTV. The detailed configuration algorithm is similar for different manufacturers, however, there are certain nuances of settings and.
The most reliable TVs of 2018
TV LG 43UJ634V
TV Samsung UE50MU6100U
TV Hyundai H-LED24F402BS2
TV LG 22LH450V
TV Samsung UE22H5600
It seems that it could be simpler than plugging the antenna plug into the antenna socket of the digital receiver and the “bell” plug into the TV and after automatic tuning you can watch football or cartoons on digital television. In general, “that’s it, that’s how it is, but just a little bit ts and not like that,” Mikhail Pugovkin’s character used to say in one of the films. films.
How to connect an antenna
There are some points when connecting several digital terrestrial receivers to one antenna, which I want to outline in this article. If you are using a regular PC to watch digital programspassive antenna, it is enough to apply - a splitter and that's all. But the fact is that now very good ones have appeared on the market antennas forDVB- T2 , which have a television signal amplifier, the power supply of the amplifiers on these antennas is designed for a voltage of 5 Volts and these volts are supplied directly from the receiver itself. that is, a power supply is not included with such an antenna; the function of the power supply is performed by the receiver itself. This is very convenient, but creates some difficulties when connecting several receivers to one antenna. Several connection options are available.
Option one“ consistent” .
With this option, the set-top boxes are connected in series, the antenna output of the first set-top box is connected to the antenna input of the second set-top box, from the output of the second, to the third, and so on.
In the options of the first receiver, the antenna power is set to ON; on the remaining set-top boxes in the chain, the antenna power cannot be turned on.


For example, Oriel-203 - in general a good budget receiver, does not have such an option, so if you choose a daisy-chain connection, terrestrial digital receiverDVB- T2 must have an antenna output plug.

Another disadvantage is that the antenna amplifier is powered by the first receiver, and if this receiver is turned off, the remaining receivers will also not work, since the antenna amplifier's power will be turned off. You will have to keep the first receiver constantly on, and if the first receiver fails -An urgent replacement is required otherwise there will be no leakage.
As a temporary replacement for a receiver that has failed, you can connect the antenna input and output plugs (since they are “male and female”), and then supply power from a second working receiver.
Option two with a diplexer.
For the second option you will need For this connection option, any receivers are suitable; an additional antenna output is not required.

In this case, you turn on in the options of all set-top boxes, power to the antenna amplifier and with any set-top box on antenna amplifier supply voltage will be applied. Personally, I don’t see any disadvantages in this connection method, except that you have to fork out for a splitter.
How to connect the set-top box to the TV.
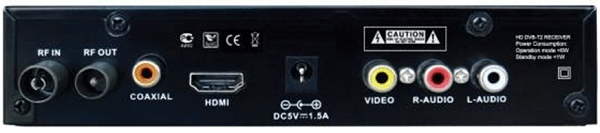
To connect to a TV, the digital DVB-T 2 receiver has several output connector options.
The most common is the RCA plug, the familiar “bells”, these bells can be connected to almost any TV. The signal transmitted through RCA is analog, i.e. digital signal, received from the air is converted to analog.
Connector HDMI is also available on all digital receivers, unlike RCA, a digital signal is transmitted via HDMI, this connection is preferable. Many modern televisions who do not have their own digital tuners can be connected via HDMI
Hello friends! In this post I will continue the topic of how to set up DVB-T2. Terrestrial digital TV, 20 channels for free, how to set up an antenna and enjoy a high-quality image.
If you are interested in what types of digital television there are and how to choose the right TV given this variety, then follow this link and
You can ask about how to choose the right antenna for digital television
Well, right now, about how to set up the antenna and equipment for digital channels.
A little general information for a better understanding of the matter.
Currently, terrestrial digital television offers 20 television programs for viewing and 3 radio stations for listening. Total 23 and these channels are included in two digital television packages.
But what’s interesting is that the user does not need to separately configure all 23 frequency channels on his TV or set-top box, but only two.
P.S. Residents of Moscow and the region can enjoy more; they are broadcasting a third package, which already includes 30 digital television programs and the need to tune in three frequency channels.
To make it clearer, let's remember how it works in analog signal? In this case, one TV channel is broadcast on one frequency channel, for example, in my region, Channel One was broadcast on frequency channel 6, the Rossiya TV channel was broadcast on channel 12, and NTV channel broadcasts were broadcast on channel 27 in the UHF range. And then further - One frequency channel = one television channel!
With the advent of digital broadcasting, everything has changed!
And one of its advantages is that now not one TV channel is broadcast on one frequency channel, but ten or more at once, so to speak in a package. This is called “Package” or “Multiplex”. For example, from the television center in Belgorod on channel 43 of digital broadcasting, 10 television channels and plus 3 radio stations are transmitted - this is the first package, and on the frequency of channel 46 another 10 TV channels are transmitted - this is the second package. Thus, only two television frequencies are used, and not twenty-three. But keep in mind that if in Belgorod these are channels 43 and 46, then in another city these will be different frequencies.
There is only one thing that unites everyone, in any region these will be frequencies of the decimeter (UHF) range, and therefore an antenna is also needed for UHF. (ADDITION: Currently, some broadcasters are still broadcasting only one of the two packages, i.e. only ten channels.)
Find out on which channels Digital Terrestrial Television is broadcast in your region, where the transmitting towers are located and whether they operate in full mode, broadcasting two packets. This information can be extremely useful for the successful installation of the antenna.
So, if you decide to organize digital terrestrial TV channels, you will need:
- A TV with a built-in DVB-T2 tuner or, if it does not have one, then you will need a set-top box for digital television, also in DVB-T2 format.
- And of course the antenna itself, UHF range. Indoor or outdoor, depends on the proximity to the translator and the quality of the signal in your area.
- Television cable, antenna plug.
- Sometimes it helps to have a helper, and it never hurts to have patience and persistence.
How to find out if my TV is capable of receiving Digital Terrestrial Television
First, let's find out whether your TV is capable of receiving DVB-T2 signals without a set-top box, the fact is that not all devices are able to do this, old, non-flat TVs don’t even need to be checked, but flat LCD TVs may or may not receive . But if you know exactly what your TV is capable of, feel free to skip this part.
There are several ways: 1) (Dreary) Get the technical passport from the TV and look in the “technical specifications” section to find the presence of DVB-T2 there. Why is it boring? Look at your passport!….. Although sometimes you get lucky.
2) (Simpler) There is a tag on the TV case, on its back, with the TV model written on it, write it down or take a photo. Next, you need to enter the TV model into the search bar of your browser and add the word “Characteristics”. See examples in the photo below.

The model has been determined, we type in the search engine…….

Upon entering the site, select “ Specifications» then “Advanced” And we get where we need to be.

As you can see, this model is capable of receiving DVB-T2; it does not need a set-top box. Further designations indicate: C - digital cable, S2 - digital satellite. But we are interested in DVB-T2 and it is present, otherwise we would have to purchase an additional set-top box for digital television.
How to set up your antenna and TV for digital TV under different signal conditions
Let's look at the simplest option first: You live in an area of good, reliable signal reception. We have decided on the antenna, an article about this will help you. We connected the antenna to the TV and turned on auto channel search, in some models, when we go to the settings menu, the TV may ask you to choose whether to configure analogue or digital channels, choose digital. If everything went well, the TV itself will save the caught channels. You can admire the excellent image quality.
Let's complicate the situation a little. On auto-search, the TV did not catch anything, or only a few channels that were snowing. If this is so, then these are not digital channels, but ordinary analogue ones; digital television cannot go with the snow. (the fact is that on auto search, the TV can scan the entire range, both digital and analog).
Your next steps: If the auto search did not help, then It will greatly simplify the situation by knowing which TV channels broadcast the first and second multiplexes in your area. And also where and in what direction the TV tower is located from you in order to correctly point the antenna. If you don’t know this, then you can also see the desired direction of the antenna by paying attention to where the neighbors’ antennas are “looking.” Just don’t use satellite dishes as a guide; they are pointed at the satellite.
If you know the channel number, then do the following - You need to find the mode in the TV menu manual settings, do not forget to select “Digital”; it may be designated as DTV. Next, your task is to dial from the remote control the channel number on which one of the multiplexes (packages) is broadcast. IN manual mode a scale will be displayed on the screen that visually shows the signal level received by the antenna. (Sometimes there may be two scales, for example “Level” and “Quality”, refer to the bottom one)
And now, on the scale, you can see whether there is a signal from the antenna, in some cases, if there is no signal, then the indicator on the scale may behave like this: It will jump, zero percent - one hundred percent - zero - one hundred ..... etc. d. This indicates there is no signal. By changing the position and direction of the antenna, visually determine best level signal, and this level should be stable, and if it changes, it should be within small limits, not to zero.
IMPORTANT: Please note that the result from changing the antenna position will not be reflected immediately, after about 5 seconds. Therefore, look for the best position in stages, each time taking a short pause and observing the signal level on the scale. If the antenna is located on the street, then it will be more convenient to work with an assistant.
When we managed to find the antenna position at which the signal is stable, we give the command to search and save channels. We repeat the search and save procedure for the second multiplex, indicating its channel number (if there is broadcasting of two multiplexes, it is not everywhere yet)
And now a very difficult situation: You live in an area with difficult television reception. This may be due to the distance from the transmitting tower, the complexity of the terrain (mountains, lowlands, wooded areas). High-rise buildings located quite close to you and at the same time standing on the way to the transmitting tower, your antenna directed at the tower seems to “rest” against the high-rise.
In these cases, the principle of the adjustment itself is the same as described above; you need to visually determine the best position of the antenna using a scale. But the antennas used and some methods differ.
Antennas in difficult reception conditions must be used active ones, i.e. with an amplifier, also structurally having a higher gain. Typically, the longer the antenna arm, the greater its own gain.
Methods include the following: Determine if there are other transmission towers in a more favorable position for you. And try to catch a signal from them (fortunately they will be built quite tightly)
Using masts and other heights is the task of raising the antenna higher. (Effective in lowlands and wooded areas)
In built-up areas that are not very far from the tower, it is not necessary to use powerful antenna, try to catch the reflected signal, point the antenna not at the TV tower, but in the opposite direction, at the building behind you or on the side. If it is possible to install an antenna on the roof of a high-rise building, this will give excellent results.
Antenna setup via digital set-top box
When using a digital set-top box, everything is the same as described above; it is better to set it up manually in order to see the signal level. The only difference is that the TV plays the role of a monitor connected to the set-top box via hdmi cable or RCA (tulips). This means that all settings need to be made in the set-top box, and not in the TV. Just don’t forget to switch the TV to the appropriate VIDEO or HDMI mode (depending on what connectors you used for connection)
To do this, you need to find the corresponding button on the TV remote control, in different models it can be indicated in different ways, here are a few examples, with an asterisk: AV* AV/TV*VIDEO* SOURSE * HDMI * RECTANGLE ICON WITH ARROW IN* INPUT* On some SONY TVs, the order is - HOME - Settings - External inputs.
All further setup steps are performed using the remote control of the set-top box, through manual or automatic search.
Do not forget that in this case we connect the antenna to the set-top box, and not to the TV.
Read about what you need to know when choosing a digital set-top box.
Well, I hope this article can help you in connecting digital broadcasting to your home.
P.S. I decided to add them below to this article as interesting cases related to tuning antennas become available. If you have any, write them in the comments and they will definitely appear in your feed.
- In my practice, very rarely, but there were cases when the antenna did not receive the signal at all, but as soon as I moved it literally a meter to the left or right, everything went fine, we returned it a meter back, again everything disappeared.
- Today I encountered another incident. I'll describe it in detail. The situation is this: An old TV is on the floor, it works great through the set-top box, the indoor antenna is on the windowsill nearby, the signal level is about 70-80%. In this case, there is the following task.
You need to set up the number on the new LG LCD. I put it on the windowsill, next to the antenna that I connect to it, so what? LG does not see a signal at all, not even an ounce. Maybe it doesn’t support DVB-T2, I thought! I checked the model, no, everything is supported in order. What's wrong with the antenna? No, the old TV works through a set-top box. I'm at a loss!
I connect a set-top box to the new LG (What if!)........ There is a signal through the set-top box, but below 10% - It’s some kind of mystery why everything is fine with the old TV, but with the new one, which, even when in monitor mode, is connected through the set-top box, - the television signal drops completely. 😯
After a short “Dancing around and around” It turned out!
The power supply of this LG was external and it was connected to the socket there, on the windowsill (there was an extension cord tee there). So, the OH power supply emitted such radio interference that being next to the antenna completely jammed the signal.
As soon as we moved the antenna and power supply of the LCD TV in different directions, several meters, everything immediately returned to normal. Bringing it close to the antenna again, the signal disappeared!
3. If you use an indoor antenna and your window is covered with metal blinds, then they can also seriously interfere with the signal. Keep this in mind!