With active use personal computer the most different situations, requiring responsible decisions. In some unexpected situations, formatting may be the only solution. And many users are seriously wondering: Nowadays, for some reason, some people think that this is impossible, but this statement is not true. This opinion is provoked by the fact that such formatting requires floppy disks, which are now outdated. So how to format HDD via BIOS?
First step
Of course, first you need to insert a floppy disk into the drive. By opening the Control Panel, which can be found in the Start menu, you need to find and select the option to install and remove programs and operating system components Windows systems. Computer disks can have different purposes. IN in this case we need a bootable one. In the window that opens, click on the corresponding “Boot disk” tab and click on the “Create” button. Execute this action quite simple, just follow the instructions that appear.
Second step 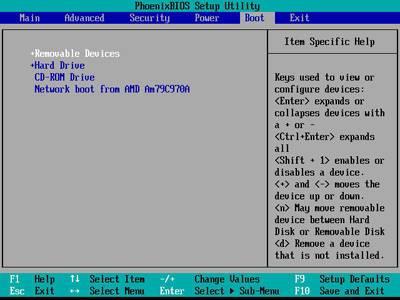
Now you need to completely turn off your PC, reinsert the floppy disk and turn on the computer again. If the BIOS contains the option to boot the system from hard drive, you should change it to boot from To do this, immediately before booting the system, press the “Del” button, which will allow you to enter the BIOS. Next, you should open the “Advanced BIOS Features” item, which will display several sub-items. IN this menu In addition to the floppy disk and CD, there may be several partitions with hard drives. This is due to the fact that hard disks for PC can be installed on a computer in the amount of two or more pieces. We need the “First Boot Device” item. Using the “PgDn” and “PgUp” keys, set the “Floppy” line to the first place. Now close the window with the “Esc” key and exit the BIOS while saving the data by pressing the “F10” button. After these steps, the system will first boot the floppy disk rather than the hard drive.
Third step 
After loading the PC, a menu will be displayed on the screen in which you should use the cursor keys to select the following item: “No. 2. Start computer with CD-Rom Support.” The selection will need to be confirmed by pressing the enter key. After a few seconds of loading, the command line “A:\^” will start flashing at the bottom of the screen. Now you should type the command Format C: and confirm it again with the enter key. Instead of drive C, you can format any other one; to do this, you just need to change the letter in the command. For example, D would be called by the following command: Format D:. After confirming the entered command, a warning will appear stating that all files with of this disk will be irretrievably erased. To confirm, press the Enter key again. Now the question of how to format a hard drive via BIOS should not cause any difficulties.
But remember that formatting will completely destroy all your data on the selected drive. After the procedure has been completed, it will be impossible to restore them. Therefore, before formatting the hard drive via BIOS, the files needed in the future must first be saved to any external storage device.
Formatting is the process of marking up media. In other words, this process creates a structure that allows access to the data. There are two types of formatting: low-level and high-level.
Low-level formatting is performed during the manufacturing process of the hard drive and involves applying information about the location of sectors and tracks necessary for positioning the servo drive heads.
High-level formatting is the creation of a master bootable media, partition table, recording structure file system etc. This is a process necessary for the storage medium to be usable by the operating system. The user has to perform high-level formatting in cases where he installs a new drive on the computer so that he can work with it.
For media already in use, formatting is performed if necessary complete cleaning disk or flash drive, removing viruses and fixing errors, as well as when installing a new OS. Portable drives may come with different file systems. Therefore, for them to work correctly, it is often necessary to format them to harmonize the file system of the drive and the computer.
You need to understand what formatting means complete removal available information. In this regard, if the data is of any value to you, then you must first save it to another medium.
Selecting a file system and cluster size when formatting
 Before you begin, you need to decide what type of file system you will use on the media. You will be offered this choice before starting work, no matter which of the available methods you choose. In most cases it is offered NTFS systems and FAT32.
 More old system is FAT32. Today it is used much less frequently, due to limitations on the size of partitions and stored files. These file systems are used mainly on computers using older Windows versions(before Windows Millenium Edition).
For modern computers the best option is NTFS, which not only allows for more efficient use of memory, but also has additional advantages, including in the field of security and self-healing in case of errors. Another advantage of NTFS over FAT32 is the ability to store files larger than 4 GB.
In addition to the file system, you will have to choose the cluster size. This parameter characterizes minimum size file that can be stored on storage media. Accordingly, you need to choose the cluster size based on what files you will primarily store on the media. If these are large files, then it is better to choose larger size cluster, and for small files - a smaller size. In most cases, the optimal cluster size is the one offered by the system by default.
Quickly format a disk or flash drive using Windows
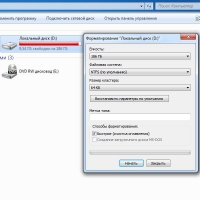
 Most in a simple way is formatting in Windows. For this purpose, just open “My Computer”. Here you need to select the volume you will work with and call context menu right click mouse, and then select the “Format” command. After this, a window appears where you will need to select the file system, cluster size and confirm the operation (see photo).
 An alternative way to access this feature is through the Disk Management menu, which is accessed through My Computer, then Manage. And by selecting “Disk Management” in the menu, you can not only format the entire hard drive, but also its partition.
You can format a hard drive in Windows only if there is no operating system. This method is also suitable for external hard drives. If the media contains an OS, then it will simply not be available to perform this operation. If you need to format a disk with Windows installed, you can use formatting methods through the BIOS.
Creating partitions and formatting a flash drive or disks in Windows
 This method is recommended if for some reason you decide to create and format partitions on a drive or flash drive. Or if you have expanded the information storage capabilities of your computer and installed an additional new hard drive on it, then to start working with it, you need to format it. This method also allows you to change the drive letter assigned to Windows.
 For this purpose, you need to go to the “Disk Management” menu, the path to which is through the Control Panel, we discussed earlier (see photo). All installed drives will be displayed here: SSD, HDD or Micro SD, MMC, USB flash drives. The new hard drive will appear as Disk 1. Right-click on it and select the “Create simple volume” menu item, after which the simple volume creation wizard will launch. Here we can choose letter designation volumes, file system, cluster size. After that, in the wizard’s dialog box, check the “Quick Format” box and click “Next”. Now all that remains is to wait until the program completes its work.
In some cases, it becomes necessary to divide the media available on your computer into partitions. Of course, this should not harm your data, especially the operating system.
This task is solved through the same “Disk Management” menu. In this case, on the disk we need, we need to right-click and select “Shrink Volume”. The system then checks the space available for compression. After this, a dialog box opens asking you to select the size of the compressed space. At the same time, the system shows us the size of the space remaining after compression. These two numbers will correspond to the volume of each of the resulting hard drive partitions. After this, all that remains is to click the “Compress” button.
When the compression is complete, in the Disk Management menu we will see that unpartitioned space has appeared in the volume we are sharing. After this, just call the New Volume Creation Wizard and format it according to the description suggested above.
Methods for formatting a flash drive or disk via BIOS
 Besides standard means Today, special software for formatting hard drives, external drives, as well as other media. The use of these utilities often greatly simplifies the process and gives the user a whole range of additional features. In particular, such programs allow you to easily merge and separate media, resize them, move and copy from complete preservation information. Some of the best among these programs include such utilities as Acronis Disk Director, Partition Magic, FreeFormat and a number of others.
 The disc must first be loaded into the drive, and then the computer must be started. While your computer is booting, press F2 to bring up BIOS settings. In the settings that open (in the Boot section), you need to set the boot priority to CD-ROM and save the settings using F10. The computer will restart automatically.
After this, the computer will start from the CD-ROM on which the disk program is recorded. IN special programs The interface is quite simple or you just need to follow the instructions of the program (see photo).
There is also a formatting method when installing Windows. For this method you will need installation disk or Windows flash drive. During Windows installations, you will be prompted to select a partition to install the operating system. Here you need to select the media you need. Having selected the desired hard drive or its partition, you must click “Disk Setup”, after which a menu will open in which you need to select the “Format” command.
P.S.
Thus, today there are enough options for formatting flash drives or disks available to any user. Special utilities provide maximum convenience and efficiency in this process.
Formatting is the process by which the media is marked up, that is, a file system is created. For the user, this usually means that the information that was previously contained on the media is completely deleted. In this article we will look at how it is done hard formatting disk via BIOS.
Let's assume you have a connected computer hard a disk that needs to be formatted, and formatting must be done through the BIOS, for example, if the computer does not have an operating system installed.
If we talk about formatting, then as such this procedure cannot be performed only through the BIOS, since this menu does not provide the ability to erase connected disks. However, if you use special utilities that can be launched through the BIOS, then the task becomes feasible.
Formatting a hard drive via BIOS
Below we will look at two methods available to each user that will allow you to format a hard drive through the BIOS. Each of the methods will use additional tools in its work (nowhere without them), and you just have to choose the most suitable one.
Method 1: Format the hard drive through the Windows setup menu
This method is the most common, because today boot disk or flash drive with distribution any Windows available to many users.
As you may have already figured out, you will need a bootable device that contains the Windows Installer. In this case, we will not install Windows, but will launch it via BIOS program installation in which the formatting process will be launched.
The caveat is that using Windows Installer you can perform extremely quick formatting - no additional settings not provided here. In addition, the size of the Windows installer is significantly larger than the utility in the second method.
1. First of all, you will need a boot disk or flash drive. In the event that you have neither one nor the other, the most convenient thing is to write down bootable USB flash drive with the distribution. For example, on the official Microsoft website at the link below there is a special utility that will download the Windows distribution kit to your computer, and then allow you to easily and quickly write it to a flash drive, thereby making the flash drive bootable.
2. Once you have the boot device in hand, you need to connect it to the computer on which the hard drive will be formatted, and then enter the BIOS. As a rule, for most computers, entering the BIOS is accomplished by quickly pressing the special hotkey- this is most often F2, Del or F1.
3. Once you get into the BIOS, you will need to find " Boot MENU", in which you can set the boot device that will start first. IN different versions BIOS this item may be located differently and have a slightly different name variation, but the essence is the same. In our case, the item we need is in the menu "Advanced BIOS Features" - "First Boot Device", where you need to set the name of the flash drive as the first boot device (if the name of the flash drive is not displayed, select USB-HDD) or CDROM (if you are using a Windows disk).
4. When the necessary settings are set, you just have to exit the BIOS, after which the computer will begin to reboot, and as a result, the Windows installation menu will be displayed on the screen.
5. Having selected a language, a window will appear on the screen in which you will need to select the drive on which Windows will be installed. Select the disk with one mouse button, and then click on the button below "Disk Setup".
6. An additional set of options will appear on the screen where you need to select "Format".
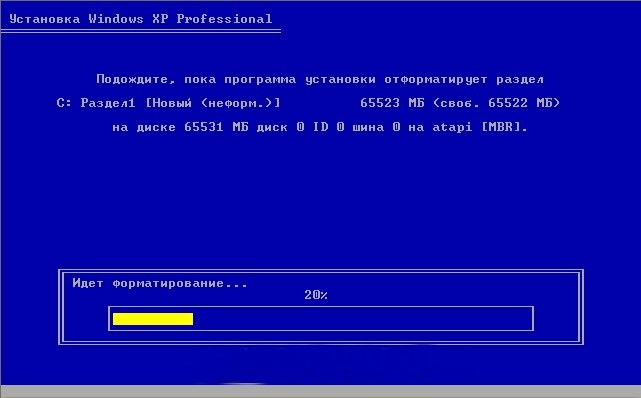
7. A warning will appear on the screen stating that formatting will delete all data from the disk. If you agree with this, click "OK" to continue.
The process will begin. Once the formatting is completed, a message indicating the successful completion of the procedure will be displayed on the screen.
Method 2: Format the disk using Acronis Disk Director
In the event that you do not have bootable media with Windows OS, then it is better to go straight to this method, since in this case you will need to write much less information to a disk or flash drive (3-4 GB versus 15 MB).
Popular instrument Acronis Disk Director allows you to carry out complex work with hard drives even if there is no operating system installed on the computer. The utility is paid, but it has a free demo version that will allow you to verify the capabilities of this program and, of course, complete the formatting task we set.
Download Acronis Disk Director
1.
After downloading the utility from the developer’s official website, you will need to install it on your computer and then launch it.
2. Connect the USB flash drive or disk to the computer on which the Acronis Live-CD will be written. In the left area of the program window that opens, click the button "Acronis Bootable Media Builder".
3. A utility window will appear on the screen, in which you will need to click on the button "Further".
4. Leave the settings presented in the next window as default.
5. Specify the components that will be written to the bootable media (in our case, for example, the component for 64-bit systems will be used, but if you do not know the bitness of your computer, select both).
6. Finally, you will need to choose where the utility will be written: directly to a flash drive or saved as an ISO image for subsequent recording to disk. Since in our case a flash drive is connected to the computer, we select it and move on.
7. If you need to add drivers, the program will prompt you to do so in the next step.
8. Click the button "Continue", to start burning bootable media.
9. The recording of the bootable media will begin, which will take a little time, since the size of the utility being written does not exceed 20 MB. As soon as a message indicating the successful completion of the process is displayed on the screen, the flash drive or disk can be removed from the computer and connected to the one on which the hard drive will be formatted via BIOS.
10. You will need to enter the BIOS and set your boot device as the primary boot device. How to do this was described in the first method from points two to four, so we will not stop at this stage.
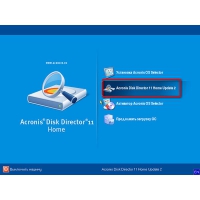
11. The Acronis window will appear on the screen. To continue working with the program, you will need to select the desired utility. In our case, only one version was recorded, so we select "Acronis Disk Director".
12. The utility will begin downloading, which may take several minutes. A disk browsing window will appear on the screen, showing the available disks. Click the button to continue "OK".
Let’s make a reservation right away: it is impossible to format a hard drive using microsystem BIOS tools alone. As, however, it is impossible to carry out the formatting process system partition hard drive while directly in the operating room Windows environment. Based on all of the above, the question is: How to format a hard drive via BIOS, you should understand the user’s desire to carry out full partitioning disk space, without excluding certain areas of the drive. The most common and most correct formatting tools will be discussed in this article.
Today we will look at:
How can BIOS help you when you need to partition your hard drive?
In order to format a disk drive, you will need a boot disk or flash drive, onto which a special software tool, through which further operations are carried out for marking the HDD or a comprehensive software solution in the form of a software package, one of which is the tool of interest to us. In most cases, the user uses a regular boot disk with a Windows OS distribution, which initially contains a program capable of formatting both the entire hard drive as a whole and each individual area selectively.
However, without making some changes to the operation of the microsystem BIOS, using bootable storage media is quite difficult. Because the BIOS during the boot process uses a priority list of bootloaders, in which the computer’s hard drive is considered the main startup device. In case you need to boot from a flash drive or using optical drive To boot from a CD/DVD disk, in the basic settings you need to specify a specific boot method, changing special parameters in one or more optionally assigned sections of the microsystem. But first you need to have knowledge of how to get into the BIOS environment?
How to enter the BIOS microsystem?
Due to some differences among those on the market BIOS systems, in each individual case (meaning different versions of the basic microsystems) its own scheme for entering the BIOS environment is used. At the same time, access to the basic settings of the computer can be obtained if, during the initial boot process of the system, the corresponding service key is pressed several times.
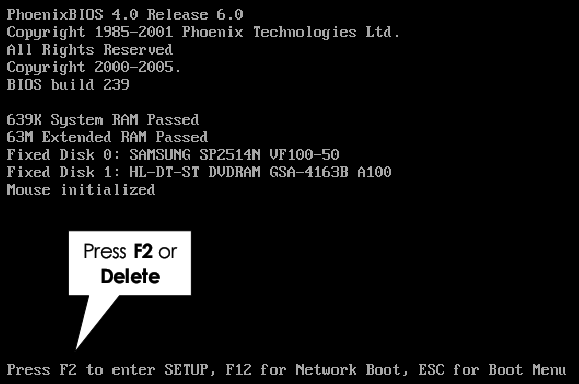
The most common scheme for gaining access to the BSVV is considered to be the option of using one of the keys: “Delete” or “F2”. Otherwise, you can get acquainted with the information you are interested in from technical documentation to your device or use this link to an article in which in more detail provides recommendations for entering basic settings well-known computer modifications.
Method No. 1: formatting the hard drive using the installation disk
This formatting method can be considered the simplest. All you need to do is install the optical storage medium into the drive, assign the reader as the priority bootloader equipment and carry out a few simple manipulations in the installer software shell.
Let's say you are using a Windows 7 distribution:
- Once in the window for selecting the operating environment installation directory, select the required section from the list.

- Click on the "Disk Setup" button.
- After that, activate the next button - “Format”, which will appear nearby in the lower area of the window, on the left.
Method #2: Using a Recovery Disk
In the Windows operating environment, you can always create a recovery disk, which can later be used to format the system partition (C:\). How can this be done? , well, we follow according to the schedule...
- Use the “Command Line” item, which will ultimately take you to the service console of the same name.

- It is worth noting that the letters of the partitions that you have observed for some time in the Windows environment and consider to be assigned unifiers of drive partitions, in the mode command line may vary. Therefore, it is most expedient to “recognize” disks by their storage capacity, that is, in size.
- Enter the command: wmic logicaldisk get deviceid, volumename, size, description.
- Carefully study the list presented and make the right decision.
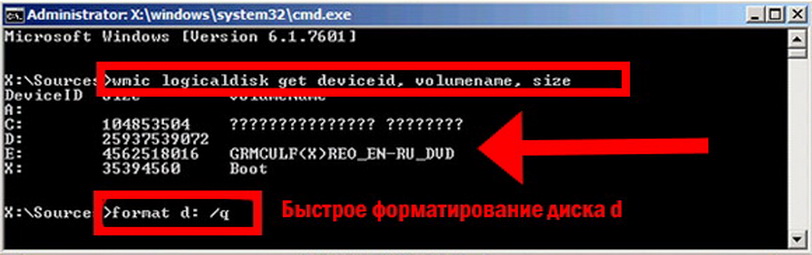
- After you enter the command: format /FS:NTFS X: /q(where X: is the drive letter) and press the “Enter” key - the immediate process of quick formatting will begin.
- If you need to format a disk or partition using the FAT32 file system using a similar method, then instead of the NTFS parameter present in the command, set the required FAT value
Method No. 3: formatting the hard drive using third-party software
Today there are many various programs and utilities that cope with disk space layout tasks with particular ease. However, two, let's call them, particularly interesting programs are still worthy of special mention.
So, to your attention, dear reader:
ERD Commander
![]()
So to speak, a lightweight software tool that has a separately presented “Disk Cleanup” option, with the help of which the process of formatting a certain disk space is carried out. Moreover, selecting and managing editable HDD areas is a very simple action in a few clicks.
Acronis Disk Manager

Very convenient and, in its class, undoubtedly the leading specialized program for managing hard disk partitions. However, despite its versatility and a number of wide possibilities for editing HDD partitions, Acronic is as easy to manage as the ascetic “ERD Comander” presented above. However, more detailed information about the program you can .
Good luck with the formatting process and good mood!