In fairy tales, everything is simple: you find an ancient bottle (or a magic lamp), pull out the cork (or rub it), and that’s it - you become the master of a mighty genie, life is good. It would seem that the owners personal computers on the Windows platform have no less power over their machines, but to get them to high-quality reproduction music, even with a decent external DAC, is much more difficult. The prejudice that only Mac computers are suitable as the “correct” source has some basis, but does this mean that we should put an end to Windows PCs once and for all? Is it possible to organize accurate (bit perfect) output of digital music information on them? In our opinion, quite. This publication is devoted to how to do this.
The topic is by no means new for us - in the article “The Tao of Sound” (), we already gave recommendations on how to turn a computer into a high-quality music source, and talked about this in responses to letters from readers. However, a lot has changed since then, so it makes sense to refresh the topic taking into account modern technologies and new experience. At the same time, we will not limit ourselves to practical recommendations, but we will also try to explain what they are based on. If possible, make it as simple and intelligible as possible.
THE RICH ARE UNHAPPY TOO
On Internet forums dedicated to the use of a computer as a sound-reproducing device, there are constantly complaints about bad sound and requests to suggest a player program with which you can get maximum quality. When local “gurus” get to the bottom of the problem, in most cases it turns out that sufferers listen to music on computer speakers costing $50 - $100, using audio interfaces integrated on motherboards or the most affordable gaming sound cards. It must be said that even with such equipment there is an opportunity to improve something, albeit within very small limits. For example, try to correct uneven frequency response of speakers using a digital equalizer or make the sound smoother by increasing the sampling frequency. The resulting distortion that inevitably results may not be noticeable due to the many times higher level of harmonics in the amplifier and acoustics.
However, now we are interested in other situations: when there is a decent Hi-Fi or even High End system with a serious external DAC, but the quality of the digital stream received from the computer turns out to be frankly mediocre. Music lovers who are not short of money solve the problem in an extremely trivial way: they purchase Apple laptop, install paid player programs Amarra, Audirvana Plus, Decibel or Fidelia on it (there are also free Vox, Cog, etc.) and after that they are forever convinced of what to get high quality sound Not possible from a Windows machine. Although in reality this is not the case. The question is whether you prefer ready-made solutions or are willing to do a little work and spend not much time setting up the system. And not only and not so much for the sake of economy (it is not always possible here either), but out of curiosity, an inquisitive nature, or even a healthy spirit of contradiction, which pushes us to be “not like everyone else.” By the way, it is these human qualities that move science and technological progress forward, allowing the majority to ultimately enjoy ready-made solutions.
An extremely attractive property of Windows systems for me is the availability of adaptation to individual needs, tastes and preferences. This is what largely explains the popularity of the free software player Foobar2000 - it is universal, has extremely developed functionality, which can be expanded with additional modules, allows fine tuning almost all subsystems and has the ability to “mimicry,” that is, to change its appearance. Naturally, mastering all the capabilities of the program requires some effort and time. Like any universal tool designed for the broadest masses, and not just audiophile enthusiasts, it comes with some average default settings that only ensure the program works on any hardware, and ultimately it depends on it whether you get cherished bit-accurate digital output. But if the equipment (that is, the audio interface with drivers) does not provide output of an unmodified digital stream, no player will force it to do this. Let me give you a specific example.
My very first computer dedicated to music playback had an audio interface integrated on the motherboard, the drivers of which had a hard-coded oversampling of 48 kHz (by the way, many budget Creative sound cards suffer from this). For a smart programmer, this may not be a problem, but I don’t know programming, so I had to install an additional PCI sound card. When that machine became obsolete and could no longer be updated, I had to build a new one and purchase another sound card for it, which fully met my requirements. Fortunately, in our field, even the most stupid mistakes are fraught with only additional costs. You have a chance to avoid them if you read this publication to the end and take it into account.
INTERFACES FIRST...
In recent years, laptops have been increasingly used as digital music sources. It must be admitted that we also made some contribution to this trend by publishing in the Digital Truth article about a very interesting project implemented by the Moscow company Stereopravda.
And although the main character of that publication was the original Stereopravda UC601 USB-I2S converter, many of our readers paid attention not to it, but to the fact that a laptop served as a digital transport for it and that battery power provided a low noise level, which is one of the main problems of computer sources. A little later, DACs with asynchronous USB appeared, and laptops began to be widely used by participants in High-End exhibitions; experts armed themselves with them (of course, they are so convenient for on-site tests). However, over time it became clear that USB interface still not perfect - even when it comes to Apple computers.
Among orthodox audiophiles, it is customary to explain the “defects” of USB by the fact that it was not originally intended to transmit sound. Indeed, the Universal Serial Bus was developed to connect computer peripherals. Therefore, the requirement for the integrity of the data transmitted over it was one of the priorities: when sending a document to the printer, you must be sure that it will be printed without “edits” made by the interface. And since the bus has only two signal wires (two more for power), transmission is carried out alternately: data packets alternate with blocks of service information necessary, in particular, for flow control, error detection and processing.
Depending on the type of device connected to the computer's USB connector, the interface works differently. If it is a printer, scanner or, say, HDD drive, i.e. large volumes of data are transferred and their 100% integrity is required, the bulk transfer mode is used, but wide bandwidth and high speed are not guaranteed, since data retransmission may be required for error correction. You can try a simple experiment: try copying a large file to external USB-HDD, connected to the computer with a cheap and long cord - the copying speed will slow down sharply due to constant requests to resend packets (maximum three attempts, after which the system reports an error).
To transfer multimedia data (video or sound), the interface switches to isochronous transfer mode, which gives priority to the best throughput due to increased tolerance to data loss** - the interface developers believed that the user would not notice this.
**Here I will quote from the encyclopedia “PCI, USB and FireWire Buses” (author - M.Yu. Guk, quoted from the 2005 edition): “Neither the device nor the host controller responds in any way to packets received with an error answer. In isochronous transmission, the invalid packet data should simply be ignored (it is lost); for other types of transmissions, means of ensuring reliable delivery are used.”And you say jitter! In fact, “holes” are formed in the flow. Depending on the number of errors, this may manifest itself audibly in sound degradation or even clicks.
Implemented in modern USB DACs asynchronous mode is, in fact, a special case of isochronous. The fundamental difference between them is on which side controls data transmission and, in particular, clock synchronization. In the classic isochronous mode, this is done by the host, that is, the computer (which almost inevitably leads to an increase in jitter); in the asynchronous mode, this is done by a DAC equipped (ideally) with a high-precision clock generator, according to which the data stream is recalculated in a special buffer. In this case, there is a channel feedback, through which the host receives instructions about the baud rate from the DAC controller. As a result, it is indeed possible to reduce jitter to a minimum, but the problem of data integrity is not only not solved, but is partly aggravated. Let us remember that the main advantage of asynchronous USB was presented to us as the ability to transmit streams with a resolution of up to 192 kHz/24 bits, which requires even more bandwidth than with the so-called. CD quality, i.e. 44.1 kHz/16 bit. It is not surprising that such a “purely computer” interface suddenly turned out to be extremely sensitive to the quality of cables (the more advanced the design, the better the conductors and the more efficient the screen, the less interference and more accurate data transmission), and among fans of Hi-Res files the opinion began to spread that material sampled at 96 kHz sounds better than 192 kHz. Naturally! With crooked USB controllers in computers, budget USB cables and not always flawless USB receivers in DACs, this is how it should be. However, admitting to yourself that not everything is fine in your system is much more difficult than repeating another myth or scolding HDTracks for the low quality of music files (which, by the way, is often true).
From this point of view, the coaxial S/PDIF interface seems to be no better, since it does not provide data integrity control at all. However, information is transmitted continuously through it and is not subject to such manipulations with unpredictable consequences as in USB. Yes, clock pulses are mixed into the data stream (that’s why I2S is better - there is a separate line for them), but processing them in a DAC is still simpler than assembling a stream from separate packets, some of which may be lost. In addition, we have long had no illusions about S/PDIF; we are trying to organize a decent coaxial output (for example, by installing in desktop computer decent internal sound card) and in any case we are not trying to get an impressive sound using the first cord that comes to hand, as often happens with USB. Still, a serious attitude towards building a system is a necessary condition for success.
SOFT POWER
So, we figured out the computer interfaces and did everything possible to ensure that information was transmitted without errors on the way from the computer to the DAC. Is this enough to get the best possible sound quality? Of course not - it is necessary that the output connector of the computer (no matter whether it is coaxial, optical or USB) receive the most pure and undistorted digital stream - as they say now, with bit precision, bit perfect. As I wrote above, the hardware bears a significant share of responsibility for this, and not only the USB controller on motherboard, but also the motherboard itself, the memory installed on it, of course, the power supply, the type of HDD and even the case - if the convection air flows in it are not properly distributed, the system will overheat, and the noise of the fans will make it impossible to use this machine as a digital source. By the way, my laptop, with which I go on business trips, is noticeably louder than the desktop on which I play music. Because the first one never got around to cleaning its cooling system (besides, there is no certainty that this will help), and the second one was originally designed for silent operation.
Okay, let’s say that the hardware is in perfect order (and you even replaced a regular HDD with an SSD - I highly recommend doing this). It remains to put in order one more thing responsible for sound - software.
Let's start with operating system.
In my opinion, Windows 7 is most suitable for playing music - it has better networking than Windows XP, has support for new peripherals and, finally, is still supported and therefore more secure. But my experience with the “eight” turned out to be unsuccessful - despite all the obvious advantages, it has a significant drawback: too large a volume of background service tasks that are automatically launched by the scheduler, and, as luck would have it, at the very time when you decided to listen to music. Attempts to disable all these tasks were not very successful, and it turned out to be much easier to roll back to Windows 7 - there may also be scheduled tasks there, but disabling them is much easier.
The ideal option is to have a separate computer exclusively for playing music. I understand that this idea may seem too wasteful to many. You can, of course, use universal car, which serves both for work and for entertainment, but then you need to create a separate profile (user) into which you will log in to listen to music. In it, the system should be as “lightweight” as possible, free from all background processes and services that are not involved in the playback process.
I will give the most significant steps. The first thing you need to do is disable the swap file - this will reduce activity hard drive, thereby reducing the power load and, accordingly, the noise level. And if in the car in the role system disk SSD installed - will protect it from premature wear. True, this assumes that the computer has sufficient capacity random access memory, fortunately it is inexpensive now. And don’t be afraid of “surpluses” - you can create a RAM disk in RAM so that you can upload files to it before playback.
Next, you should disable unnecessary services - you can easily find recommendations on this on the Internet. Simplify appearance"windows" by selecting the "Classic" theme and disabling all decorations on the "tab" Visual effects", selecting the item "Provide best performance" in the "Performance Options" section (Control Panel > Customize your PC settings > System > Extra options systems). However, if the car has fast processor and a large amount of memory, you don’t have to do this.
Some experts advise changing the priority of completing tasks by giving it background processes. The developer of the JPLAY player suggests doing this by changing the value of the Win32PrioritySeparation parameter in the registry (HKEY_LOCAL_MACHINE\System\CurrentControlSet\Control\PriorityControl) - in his opinion, the best value for sound is 0?14 (hexadecimal). For those who have never edited the registry and don’t even know what it is, this kind person has prepared a file that will make the necessary changes itself. Look for it at: jplay.eu/computer-audio/playback-tweak-cpu-scheduler/. The player, it should be noted, is interesting, but has one significant drawback: it costs 99 euros. Although it can't do anything that Foobar2000 couldn't do for free.
If the computer player is simultaneously working, and you are too lazy to delve into the registry and system settings, you can use the special optimizer program Fideliser (www.windowsxlive.net/fidelizer) - it disables all processes that are not involved in music playback and gives maximum priority player. Moreover, it has several configuration options, which differ in the degree of “cleaning”. For example, in the “Extremist” mode, even many system services are killed and the network is turned off. On a dedicated machine, which is optimized for audio tasks, this program does not produce an audible effect, but on my work computer its effect is clearly audible. True, you have to be careful - don’t forget to uncheck the item on the configuration screen “Set Windows X’s Live as default homepage”, otherwise the program will change home page in your browser. And the most unpleasant thing: you can unload it from memory only through the task manager, and completely eliminate its influence on the operation of the system by rebooting. Therefore, I repeat: the ideal option is a separate machine dedicated to the role of a player.
SETUP “SOMETHING”
Translated from English, the word foobar means “something”. The creators of the player cannot be denied their wit: after all, we are actually downloading something completely indefinite for free, and it is up to us what it will ultimately turn into - into a wretched mediocrity or into the Swan Princess with a charming voice. In fact, there is no magic, the principle of transformation is the same as when preparing the operating system: nothing superfluous, no obstacles or additional transformations in the way of the digital flow.
Let's go through the menu items from top to bottom.
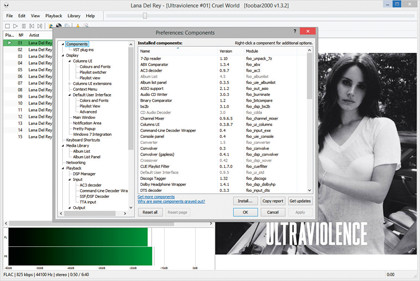
We go to the Files menu, slide down and find the Preferences section - this is where we will make all the changes. Let's start from the first point - Components. We go there to check the availability of the most important components for us - ASIO support and WASAPI output support, we will need them regardless of how our computer and DAC are connected - via S/PDIF or USB. Purely theoretically, we could get by with ASIO alone - provided that our audio interface supports it (almost all modern USB DACs have such support), but the actual sound quality also depends on the audio interface drivers. However, there are many theorists who will argue that drivers do not affect the sound. I know of cases where stream output via WASAPI gave better results than ASIO, probably due to errors in the driver. Therefore, you need to try both modules and decide which one suits you best.
At the same time, I recommend that you stop using the volume control built into Foobar2000 - always keep it at maximum. It’s generally hidden in my player so as not to tempt me. Of course, under no circumstances should you use the regulator. Windows volume(it can sometimes be available even when using ASIO, for example with the ESI Juli@ card). The same applies to sound card control panels.
We skip the subsequent sections of the settings (the sound quality does not depend on them, but you can return to them yourself when you have time) and go to the Playback item. In the window on the right at the very top we find ReplayGain and set “none” in both fields, that is, we disable this processing. Although it can be useful for playing collections at dances and parties when high fidelity is not required. Just below we find two Preamp engines - set them to 0.
We return to the tree structure on the left and go to the Playback > DSP manager subsection. We see two windows there - the left one should be completely empty. If there is something there, highlight it with the cursor and press the arrow pointing to the right, thereby removing the plugin from the left window. In fact, this section of the menu is extremely interesting and allows you to perform a variety of manipulations with the digital stream: change the sampling frequency, convert multi-channel recordings to stereo or mono (and vice versa), add an “echo” effect, perform binaural processing for more comfortable listening with headphones, apply filters, apply effects (distortion, etc.) ... And considering that Foobar2000 supports VST plugins, the list of possible processing can be very long. I myself sometimes use the Convolver module - it can be used to perform de-emphasis to listen to rips of old discs recorded with pre-emphasis. But if the goal is to obtain a digital stream that most closely matches the original one, all these plugins must be disabled. If you want to get spectacular sound with cheap computer speakers, you can experiment with them.
Now let's move on to the most interesting part - the Playback > Output section: in the Device drop-down menu we must select the output interface. By default, there is one of the DS (Direct Sound) options - for us it is completely unacceptable, since the stream with it is sent through the Windows mixer and can be subject to harmful processing, and even a simple digital volume control can kill the sound. The KS (Kernel Streaming) interface is outdated, the corresponding plugin for Foobar2000 has not been updated since 2006, and I honestly don't see the point in it at all. Most best option- ASIO module for your audio interface (it is contained in the drivers sound card) or USB DAC.
Another item in the Playback > Output menu that is worth paying attention to is Buffer length. By default, it is 1000 ms - on some machines, reducing it to 500 ms or even less has a positive effect - provided, of course, that playback remains continuous and smooth.
Below in this menu is the ASIO tab (provided that the ASIO support component is installed) - there you should check the Use 64-bit ASIO drivers (naturally, if you have a 64-bit version of the system) and Run with high process priority checkboxes. Below there is a Custom channel mapping window - there you can change the distribution of interface channels, if necessary.
As I wrote above, out of curiosity you can try WASAPI, and if it suddenly turns out to be the best, stop there. Then in the menu section Playback > Output it becomes possible to select the output format (Output format) - there you need to set the maximum bit depth supported by the sound interface (16 or 24 bits, or maybe 32 bits - if there is no sound, you will return a lower value).
Take a look at another section - Advanced > Playback > WASAPI, there you can change the buffer size, and separately for push and event modes - we are interested in the latter. It is believed that the minimum value should be set at which artifacts (stumbling, clicking, etc.) do not appear during playback, that is, the stream maintains continuity. On my system, the size of this buffer does not affect the sound, but on the old computer it did, and quite strongly.
In difficult situations, when the existing audio interface does not support ASIO, and you don’t like the sound of WASAPI, you can try an additional universal driver ASIO4ALL (www.asio4all.com) - many are prejudiced against it (apparently due to the crude first versions), but now it is functional - provided it is configured correctly. However, this is only a temporary solution: if you suddenly discover that your sound card does not have ASIO support, you should seriously think about replacing it. Alas, but to overcome the shortcomings of iron software impossible. As I have written more than once, there are no miracles in technology, and the genie in the title is just an artistic image and nothing more.
P.S. The material does not pretend to be an exhaustive discussion of the topic. I do not guarantee publication in the magazine, but I will try to answer everyone personally.


![]()


Why Apple computers usually "sound" better than Windows PCs?
There are several reasons for this.
The first is the different organization of work with sound. If you compare the audio subsystems in MacOS and Windows, the advantages of the first become completely obvious: low latency, the shortest signal path, no processing, etc., and all this is provided immediately and with default settings. A small but significant detail: most USB DACs do not require installation of additional drivers on Apple computers - plug and listen.
The second reason: Windows computers often use cheap components, for example, clock generators, USB controllers - Apple equipment for the most part has more carefully selected hardware, and complaints about software arise less often.
In principle, you can achieve bit perfect output of digital information on a PC, but for this you will have to make some efforts - pay special attention to the choice of hardware, configure the player program, and ideally add a high-quality interface converter to the system, for example, Berkeley Alpha USB or M2Tech hiFace EVO*. I think that in the near future the range of such converters will expand. Moreover, their use gives a significant increase in sound quality not only from a PC, but also from Apple.
What are ASIO and WASAPI and what are they eaten with?
The ASIO (Audio Stream Input/Output) protocol was developed by Steinberg to overcome the known Windows features and make it possible professional work with sound in this OS. In particular, he had to reduce delays to an acceptable level, which did not allow, for example, recording vocals in the studio with pre-prepared accompaniment or making live concert mixes.
On this moment ASIO is the most direct and shortest path between a music application (player) and an output device driver (sound card or USB), it outputs a digital stream bypassing the Windows mixer and other processors.
WASAPI interface ( Windows Audio Session API) appeared starting with Vista and moved to all subsequent versions of the OS. By default, it works in Shared mode and in a sense replaces the DirectSound interface, which is no longer available in Windows starting with Vista. After it, the digital stream passes through many other software “layers”, including a mixer, resampler and others, which inevitably introduce distortion into the signal.
The WASAPI output support module in the Foobar2000 player allows you to use this interface in Exclusive mode - the signal in it is transmitted from the player to the almost “transparent” KST (Kernel Streaming Transport) level and then immediately to the output driver.
WASAPI also has two buffering modes - Event and Push, each of which is a separate item in the Playback > Output > Device settings section. From the point of view of sound quality, the first is most preferable, but it does not work with all sound cards. As you can see, with ASIO everything is much simpler and more accurate.
NOTE: The article is located in progress. At the moment, the information in this article is relevant for foobar2000 v0.9.6.9 - v1.0 and Windows XP SP3.
Copyright (C) 2010, Audiophile
When playing this text or part of it reference to the source is required.
INTRODUCTION.
The main criterion for playback quality is the amount of distortion that is introduced into the audio stream when passing through the audio path. Distortion, in turn, is inevitably introduced during any processing, so our main task is to minimize or completely eliminate sound processing in the section of the path along which the signal is transmitted digitally.
The sound path in our case has the following form:
1) Source- the sound file itself - MP3, FLAC, OGG etc
2) Decoder- built into the player, decodes the input data stream, resulting in an uncompressed audio stream in the form of pulse-code modulation, or rather a stream in 32 bit floating-point PCM format.
3) Digital sound processors - DSP, effects, etc.- perform additional processing of the audio stream. It should be noted that this component of the path should be used only when necessary, because Almost any sound processing - even changing the volume - will certainly introduce some distortion
4) Output plugin- this component is necessary as a link between the player and the sound card. The output plugin determines how the resulting (as a result of the work of all previous links) audio stream from the player will be output to the sound card. Often this link plays a decisive role, because sometimes it allows you to bypass some poor-quality sections of the further tract. It should be noted that at the output stage the stream is converted to a fixed-point format (bit depth from 8 to 32 bits - depending on the selected parameters), what this can lead to will be discussed further.
5) Sound card driver- a component that plays no less a role than all the previous ones - at this stage sound processing can also be performed, but here it is absolutely undesirable
6) DSP sound card- this is already a hardware component. Digital Signal Processor is located directly on the sound card and performs the necessary processing of the audio stream, as well as processing in accordance with the settings in the sound card mixer (all actions that this block performs depend on the settings of the sound card and the sound card model itself)
7) DAC- Digital-to-Analog Converter. Converts the received digital audio data into analog form for further amplification and supply to the analog output of the sound card (from it to headphones or an external amplifier).
PART 1. Setting up the foobar2000 software player
Now let's look at the first four components of the path - the source and the components related to the player.1. Source
Undoubtedly, this link is the basis. If the recording is initially of poor quality, there is little point in wasting effort on setting up the rest of the path.Sources can be divided into two types:
Lossless(wav, flac, wv, ape, tak, tta, ofr etc.) - lossless encoded audio (when decoding, the resulting audio stream exactly matches what was encoded in Lossless - similar to unpacking files from a ZIP archive)
Lossy(mp3, ogg, aac, mpc etc.) - lossy compressed audio. During encoding, irreversible losses of some part of the information occur (namely, that part of the sound data that a person does not perceive or almost does not perceive is cut out).
If in the first case the problems of high-quality reproduction are reduced to a minimum, then in the second case, for the highest quality reproduction it is necessary to take certain measures, which will be described later.
2. Decoder.
foobar2000 has no problems with this component (or rather, with components, a decoder for each format) - decoders are constantly updated, the smallest errors are quickly corrected, there is no need to talk about quality.
3. Digital sound processors
This link in the player can be divided into two points: ReplayGain and DSP. It also includes a volume control and a bit depth converter, but these will be discussed later.
First of all, it should be noted that any lossy audio file does not contain a digital audio stream as such. It contains its description using various functions, etc., from which you can restore approximate form source wave (which is what decoders do lossy formats). And so, when decoding, one nuance arises: because encoding occurs with losses (I repeat: the data in a lossy audio file allows you to restore only the approximate shape of the original wave), the level of samples at the output has a level different from what was at the input - to the point that some sections of the sound wave may go beyond the maximum level - 0dB (if you enable View->Visualizations->Peakmeter in Foobar2000, you can see the current level yourself). Most often this happens when the level of the encoded recording was high and the peak of the recording was at the maximum level - 0dB - or close to it; almost always such recordings, after lossy encoding and subsequent decoding, have sections beyond 0dB.
Next I must point out one more fact. The foobar2000 decoder operates in a floating-point format, which allows it to process and describe the wave not only within 0dB (level values in this case can be from 0 to 1) but also beyond them (values above 1). The problem is this. After the signal is transmitted by the player to the output, it is automatically converted to a fixed-point format, which is equivalent to losing everything that lies above maximum level, all samples that have values above 0dB (in a floating point format they had a value greater than 1) are equated to the 0dB level (in a floating point format this would be the same as setting them to one). So what do we get? All sections of the wave that go beyond the maximum level are “cut off”, as a result of which, instead of a sine wave, for example, we get something similar to rectangular pulses (if the “tops” of the sine wave are above 0dB, they will be “cut off”), which means that we have additional nonlinear distortion (the level of distortion depends on what part of the sound wave goes beyond the maximum). Something similar can be heard when “locking” the speakers - when you apply a signal to the speakers with a power exceeding the maximum permissible - the diffusers cannot move beyond the maximum deviation level, the same distortions are obtained as in our case. The first phenomenon (with a digital audio stream) is software clipping, the second (with diffusers) is hardware clipping (in some other cases this phenomenon is called “overload”).
Why do we need ReplayGain in our case?
a) To determine whether the level of the decoded signal is outside the permissible limits, namely to determine the peak recording level - this is done by ReplayGain Scanner.
b) Lower the level of the track so that it fits within the acceptable range - after the scanner has scanned, it writes ReplayGain tags (with information about the peak level), and the player, when playing, reads these tags and lowers the volume level of the entire recording (namely, the entire - so as not to change the volume balance between individual sections) so that the peak is at the 0 dB level (in this case, this level corresponds to the value 1), and everything else, of course, is not higher than this level.
Setting:Volume- change the volume in the player. The maximum value is strongly recommended.
Replay Gain
Source mode:track, if you want to maintain volume balance only within one track, album- if the volume balance between the tracks of the entire album is important to you.
Processing:Prevent clipping according to peak- the best option in most cases, which will only prevent clipping (the level at which the volume will be reduced will be calculated using the track peak or album peak tag - depending on the selected source mode).
Apply gain- in this mode, ReplayGain will help equalize the perceived loudness of the tracks you are listening to (often the perceived loudness is not related to peak levels, since it is determined by the method of psychoacoustic analysis); This option is not recommended, because in this case, the volume of the tracks can change greatly, which only worsens the situation in terms of quality.
Apply gain and prevent clipping according to peak. As a result of analyzing a track, the ReplayGain utility may consider it too quiet and write a positive gain value in the tags; the volume when playing such a track will be overestimated, as a result of which the peaks of the resulting signal may be higher than the maximum level. This mode allows the utility to analyze not only the track (or album - depending on the source mode) gain tag during playback, but also the track (album) peak tag and calculate the maximum allowable gain to prevent clipping.
Pre-amp: Additional gain at user's choice. Works only when Apply gain is enabled (or apply gain and prevent clipping), summed with the gain from the Track (Album) gain tag. Use of this feature is not recommended, because, again, it can negatively affect the quality.
With RG Info- for tracks with ReplayGain tags
Without RG info- for tracks without Replay Gain tags
3.2 DSP
These are digital audio processors needed to perform various transformations of the audio stream in real time.
Ideally, of course, there should be no audio processing of any kind, but in most cases, some processors must be used to achieve higher quality. In particular, a DSP called Resampler is simply necessary in the absence of hardware support by the sound card for the sampling frequency of the reproduced signal (most often this is material from audio CDs with a sampling frequency of 44.1 kHz) to perform a preliminary conversion of the audio stream into a form corresponding to the hardware capabilities of the sound card (more often in total this conversion is 44.1->48 kHz).
SettingsLet's consider two options for playing materials with a sampling frequency of 44.1 kHz:
a) Your card hardware supports this sampling rate. In this case, to achieve maximum quality, the DSP tab should not have any enabled processors (first list, left).
b) Your card hardware Does NOT support this sampling rate. To achieve maximum quality, install the plugin and set its settings to the maximum sampling frequency that your sound card hardware supports. After the SoX resampler plugin, be sure to add Advanced Limiter to the list of active plugins - this plugin will prevent clipping by lowering the levels of sections of the audio stream that, as a result of signal resampling, may be higher than the maximum permissible level.


If you have the second case and you have set the recommended settings, then now it will be possible to play back not only 44.1 kHz recordings with the highest quality (for this sound card), but also recordings with any other sampling frequency. If the frequency of the reproduced material coincides with the maximum supported by your card, the resampler will simply turn off (as unnecessary).
3.3 Output
As I already wrote, this link in the digital audio path is often decisive. But I must note that not always. At the moment, foobar2000 has the following sound output methods: DirectSound, Kernel Streaming, ASIO, WASAPI (only for Vista and Windows 7, will be discussed later, in newer versions of the article).
The first outputs audio through the Windows mixer - that is, the playback volume will be affected by the Wave control in the Windows mixer. I must say that in the case of using this output and low-quality sound card drivers (this is not uncommon now, especially outdated drivers) additional distortion may be introduced into the audio. These distortions can occur either as a result of software volume control using the Wave control (which is highly not recommended!), or if this control is set to maximum, because For some drivers, setting the Wave control to maximum does not actually correspond to the maximum value.
Two other output plugins solve this problem. Both plugins bypass some low-quality sections of the downstream path, including the Wave control. The main difference between ASIO and Kernel Streaming is precisely that they are able to output sound past the Windows mixer and, in some cases, avoid the quality problems described above. The difference between ASIO is that this interface is focused on minimizing delay (output latency), which does not in any way affect the playback quality. In addition, different ASIO drivers may have their own errors, and therefore, to achieve the most accurate output, it is recommended to use Kernel Streaming.
Setting: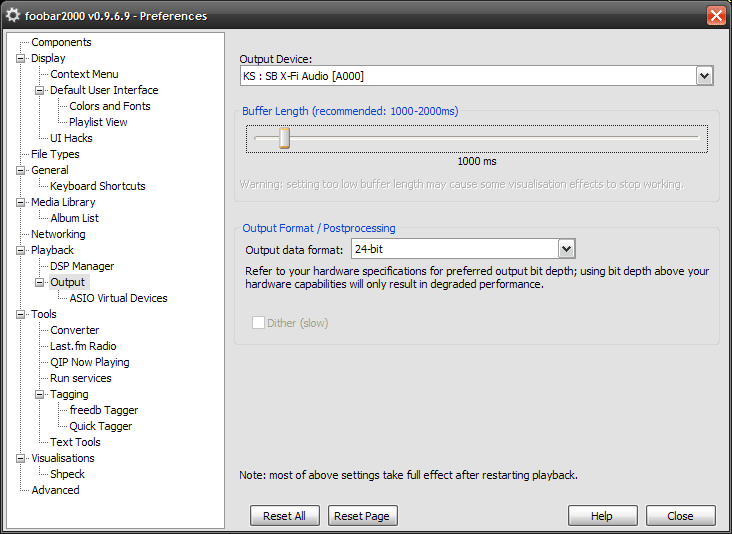
And so, everything is simple here. Install the plugin, run foobar2000 and on the output page select:
Output Device:KS:<Ваша звуковая карта> - the Kernel Streaming plugin will be used to output sound, the sound will be output to the specified sound card.
Buffer Length: adjusting the player buffer. How less value- the faster (counting from the moment of inclusion/change) volume changes, inclusion of plug-ins, etc. will take effect. This option does not affect the output quality; changing the standard value is not recommended.
Output format/Postprocessing
Output data format: set the maximum bit depth supported by your sound card hardware.
Dither: enable dither + noise shaping. This function can only be useful if one of the following conditions is met:
a) If your sound card hardware does NOT support audio bit depth higher than 16 bits and you use one of the functions: ReplayGain, DSP, Volume Control (volume control in foobar2000).
b) Your sound card hardware does NOT support audio bit depth higher than 16 bits and you are playing material with bit depth higher than 16 bits in foobar2000.
In all other cases (for example, if your sound card hardware supports audio bit depth higher than 16 bits) Enabling this feature will only degrade the quality.
PART 2. Setting up the sound card
Since there are a huge number of sound cards, this part provides only general recommendations or recommendations for configuration using standard Windows tools.1. Setting up using Windows
To start setting up, you need to go to Windows Control Panel->(Sound, Speech and Audio Devices->)->Sounds and Audio Devices.
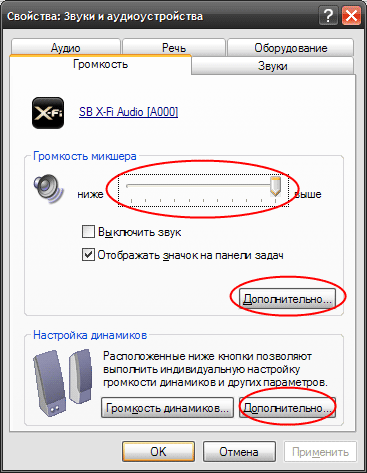
Rice. 1. The volume should be set to the maximum position, and the volume level should be adjusted using the analogue method (for example, using a knob on an amplifier). After completing the settings, click on the “Advanced” button in the “Mixer volume” column.
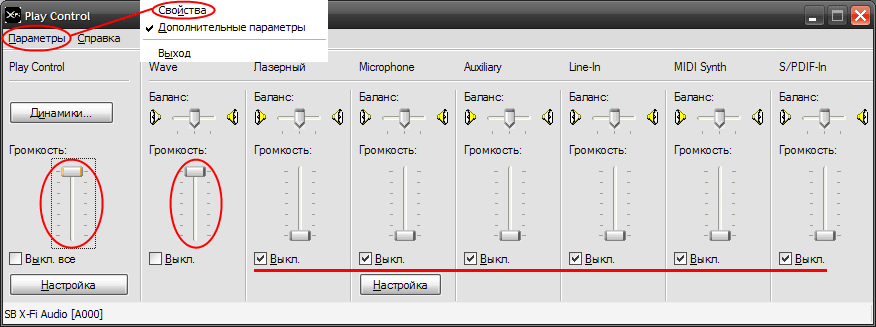
Rice. 2.1. All sources except Wave (which must be set to maximum) and Play Control, of course, should be turned off. Wave can also be disabled if you do not use DirectSound output in the player, but all other sounds, including system sounds, will not be heard. First you need to go to "Properties" and enable the display of all sources:
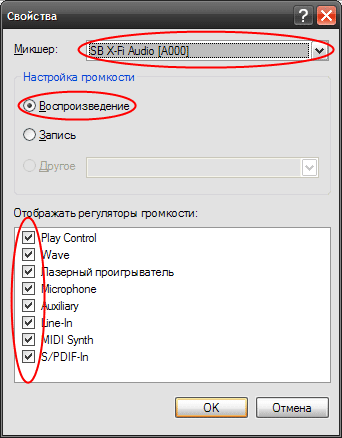
Rice. 2.2. Here you must enable the display of all playback sources for the device being configured.
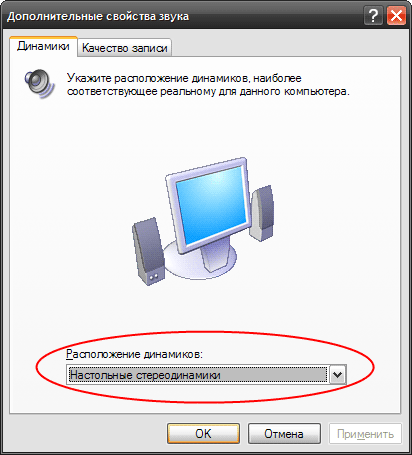
Rice. 3. This window is called up using the "Advanced" button in the "Speaker Settings" column of the window shown in Fig. 1. Here you must select your speaker configuration. Next, go to the second tab.

Rice. 4. Here both regulators should be set to the maximum position. Naturally, it is assumed that you do not experience any problems with sound playback (most often this can happen in games). If there are problems, select the highest positions of the regulators at which the problems will disappear. In this case, it is worth noting that these settings do not affect playback using Kernel Streaming and ASIO, it follows that if you had to set one of the controls to a lower position, for high-quality sound output in the player you must use one of these plugins output.
After completing the settings, click the “Ok” button in each window.
At this stage, the setup principle is no different from the previous ones: it is necessary to ensure reliable transmission of the digital audio stream without making any changes to it (ideally, up to the digital-to-analog converter itself). Setup recommendations are as follows:
a) All effects/equalizers, etc. must be turned off. If possible, you should enable the "Bit-Matched Playback" mode (for Creative cards, this option may be in the Creative Audio Console or Console Launcher).
b) For most cards, it is possible to select a reference sampling rate (Master Sampling Rate) - it should be set equal to the sampling rate of the reproduced material or the frequency set in the foobar2000 resampler. There may also be a setting for the quantization depth (Bit Depth) - it should be set to maximum.
c) All volume controls that affect playback volume should be set to maximum.
For getting best result, it is recommended that you do the following before playing a track.For lossy:
1. Select the track(s) in the foobar2000 library or playlist, right-click on the selection and select Utils->Verify Integrity from the drop-down list. The track(s) will be scanned for errors. If there are errors in MP3 files, foobar2000 can fix them. If you see an error like "Reported length is inaccurate...", select the tracks for which the error was displayed this error, press the right button and select Utils->Fix VBR MP3 Header, after processing, check the track again, there should be no error.
If during testing you see an error like "MPEG Stream error...", you can fix it using the Utils->Rebuild MP3 Stream option. After performing the error correction operation, do not forget to check the tracks again.
2. Select tracks, click on the selection right click and select ReplayGain->Scan Per-File Track Gain if tracks from different albums are selected or albums are not specified in tags, Scan Selection As Single Album - if tracks of one album are selected and Scan As Albums (by tags) - if several albums are selected. You can also use the Scan As Albums (by folders) option if album tags are not specified but the tracks of each album are in a separate folder. After scanning you will see information about the calculated peaks and gain values for each album/track (depending on the selected scan type), click the "Update File Tags" button to write the ReplayGain tags to a file.
For lossless:
With this source type, no action is required to achieve maximum quality. You can also check the material for errors using the Utils->Verify Integrity function, but the probability of errors for lossless is less, especially if there are any, there is no way to fix them using foobar2000 (at least in the same way as in the case of MP3 ). It is not recommended to use the ReplayGain function in the case of lossless, because There cannot be clipping (in the form in which we usually have it in the case of lossy) in lossless sources, and the use of the "Apply Gain" function is not recommended because this processing can only degrade the quality.
For their help in the “search for truth” many thanks to the participants of the forums foobar2000.org, websound.ru, hydrogenaudio.org
Computer Audio Basics
It is becoming more and more common to use your computer, PC as an audiophile product or standalone solution for storing and playing high quality music. Capabilities PC, Mac, Network, Wireless, NAS, Firewire, USB, SP/DIF, etc.
These are all terms that can make the beginning music lover feel a bit confused.
In this article I will try to explain some sound.
These days, from a technical standpoint, Macs, as well as Windows PCs, judging by my testing so far, desktop computers or laptops can sound very good. 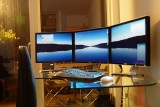
The disadvantage of using a computer may be the monitor, mouse and keyboard, etc. peripherals(background, interference). Good without 3 PC screens...
1. Do all this on a computer, based on a desktop PC
The computer can do all the tasks associated with computer audio recording/storage/playback, without the need for further hardware. It can be simple and most cost effective
an effective solution for many. After all, a PC can be quiet, although it does not have to be very large. The computer itself may be hidden. A simple PC or Mac system can be very powerful and doesn't require much maintenance.
2. PC for recording, storage and playback of music files, you can
control using external device– tablet or smartphone.
Or you can use the remote control remote control or touchpad to control playback, so there's no need to have a monitor, mouse, and keyboard in your line of sight. For control, you can use another computer or laptop using the remote desktop utility, on an iPhone, IPAD or Android tablet. This good decision, if you like comfort.
3. PC for recording and playback, external HDD or NAS for storage
This is still the same situation as above, but using external storage For  additional space or using a NAS, so PC files can be accessed in different locations, or even from anywhere in the world. The PC is still used for playback, so each additional room that needs playback still needs its own PC - accessing the network and playing files.
4. PC for recording, external NAS/music server for both and playback
This is comparable to the previous situation, but now the computer is simply used to record music (CD-  copying or downloading). When the files are transferred to the server, they can be accessed by any other computer on the network. But main computer no longer used for playback; The NAS or server can do this now because it has its own operating system. But the capabilities will depend on the make and model. In its simplest form, a NAS doesn't know anything other than present its media files to the appropriate program running on (the) computer or separate hardware, such as a Squeezebox or Sonos. The list of compatible devices continues to grow, and they won't be so expensive soon. In their simplest incarnations, they can only be controlled via infrared. In their advanced incarnations they can be controlled in several ways, for example from their own remote control with touch screen, remotely via a web browser on any device or on the device itself. Depending on the capabilities of the NAS/Server, you can even listen directly to your iPhone or other MediaPlayback-compatible device. In its most sophisticated form, a music server may be capable of not only routing media files for playback, but also present as an analog or digital audio output on the rear panel, so all you need is an audio cable for your .
5. Transition to wireless transmission
Until now, all connections were connected by wires. But wherever a network is required, the connection can also be wireless. Apple has a built-in solution, Airport, which makes it possible to send music from  computer to another room without using a cable. Airport is a wireless receiver that adds hardware playback and audio output. You can still control your music from your computer or using iPhone. But in reality, as long as both PCs and devices are connected to the same network, be it wired or wireless, the same options should exist using either wireless router, provided you have a playback device at the receiving end. I also think a wired connection might be more reliable. Usage wireless network is an invisible solution where only a small, complex control panel and/or display is visible, indicative of a .
Music system 2 - Standalone
Going standalone means that you are no longer using a computer, but there is only one integrated device for recording, managing and playing files, also sometimes called a music server. There are a few .
1. Built-in music server
Several brands produce components that, in their simplest form, resemble DVD players /  recorders in appearance, but also in how you control their playback. CD, HDD and audio outputs are built in one and you can select files using the buttons and display on the unit itself or using the included remote control. Good such devices are Naim HDX. Both are compact all-in-one-device-solutions that sound very good and are very easy to use. Naim HDX, in terms of sound, is currently the most the best option, but also very expensive. Olive would probably be the second best solution at the moment, but also expensive.
2. Autonomous but consisting of several devices
Here the possibilities are also endless that I can't name them all. But at the core they are still the same 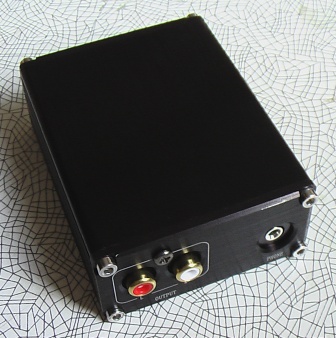 as from the complex device indicated above, but separated by function. You could, for example, buy a recorder + hard drive and playback + control unit. The latter can be with a monitor, display with touch panel like Soloos, (currently owned by Meridian) or just a portable device. There can also be three units, in which you have a separate device to which you connect an amplifier or digital-to-analog converter (). Indeed, the possibilities here are endless and constantly evolving.
Music System 3 - Standalone, but with occasional PC help
This may seem contradictory, but it is easily explained. With this solution, your music playback system can function offline, but you still use your computer to download or copy music. After downloading/copying, transfer files to an external device that either has a built-in hard drive or uses external hard disk or NAS for storage. Music played through the device, Squeezebox, Sonos or any other available external device. To make this solution easier, you'll need Nas, but need a computer for more advanced tag editing or renaming.
Technical issues
PC/Mac
As stated above, PC and Mac are generally similar when it comes to their ability to play digital  audio files. I know there are still a lot of Mac-haters as well as Mac-enthusiasts. Without trying to choose one side or the other, I can say that Mac and PC systems have a right to the audiophile life, and it can be said that both have many positive sides and negative sides. The software is also very, very decisive factor for high sound quality. For example, iTunes sounds great on Macs, but not as good as on Macs unless you install third party software and do some tweaking (for more advanced users). It is also worth noting the capabilities of Mac in order to install Windows version for operating room Mac systems using Bootcamp. It is fully Mac supported and works flawlessly. Don't confuse this with virtual programs, Parallels and Fusion. Although these programs also work as advertised and work great on fast machines, they consume a lot of computer resources, thereby slowing down the system on older machines. Bootcamp is in a good way Mac use like Windows, and it works best if your Mac is a little older. The only remaining downside to the Mac that I can tell is the price. You pay for the design, and for the .
Formats
In the past when hard disks were small and expensive, mp3 was invented in order to compress  less and copy more to the CD. MP3 is a lossy codec format, which means that typically 4/5th of the original information is discarded. During playback, the missing original material is recalculated using a smart restoration process. Although mp3 may sound pretty good (depending on software for encoding and hardware), they are by no means equal to CD quality. While disc prices are low these days, you can store files natively in WAV or AIFF format if you want best quality. Uses PCM, AIFF and WAV code and is completely identical in sound quality. The only difference is the bit stream, which only cares about the sound quality. However, WAVs tend to be somewhat more compatible on many systems. Keep in mind that WAV and AIFF do not carry Tag information like mp3 does. So they have all the information in a real file. If you want to display all fields, artist, then in the corresponding fields, you must enter them manually. Additional information will not be added to the actual files, but will be stored in the playback application's library.
Remember that if you copy your music, Additional Information will not be transmitted! In mp3 it's easier this whole way. All information is added to the library of the playback application, and then it will be  added to ID3 tags. In the meantime, excellent formats for high quality audio were invented such as FLAC and Apple Lossless. The data is still compressed, typically to one-third of the original file. This codec simply encodes more efficiently. During playback, the original signal is restored. Although this process produces noticeably similar files, and many companies claim that the results are the same as using native WAV or , I disagree. My listening tests have shown that native formats are a slight advantage over any format that messes with the code, lossy or lossless. I agree that lossless compression formats are audio-wise much better than mp3, and the difference between and WAV is really small, so unless you're an audiophile like me, then Lossless formats a great alternative to MP3 or huge WAV. They just don't sound exactly as good as native. But there is another problem: not all programs can play or edit or use these formats losslessly. iTunes for example only supports Apple Lossless. Not FLAC! So, if you plan to use iTunes or plan to edit the files, then you will have to transcode them to WAV or AIFF. And, as always, any conversion entails losses in fidelity, so it’s better to start with native formats if you have the opportunity. There are ways to trick iTunes to play FLAC, but I'm still not happy.
Connection method
So, in order to maintain high quality, we need to extract audio digitally from PC or external device. This connection method is becoming increasingly important because differences can be heard when you use a high quality (D/A converter) rather than from the cheap DAC(chips) on motherboards and sound cards or the built in DAC(s) in most external ones.
This is probably the simplest solution. All PCs now have at least 2 USB port and digital audio is natively supported on these. 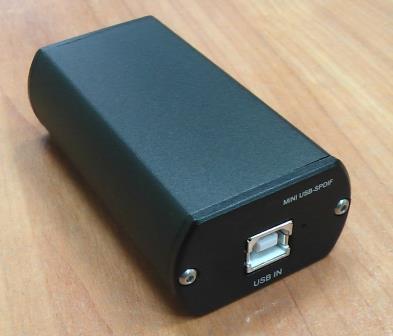
Not all DACs have USB inputs. USB can only be approximately 5-8 meters long, depending on the chip, without using a built-in signal amplifier. Additionally, there have currently been discussions about synchronous USB versus asynchronous USB. There are theoretical advantages to asynchronous USB, but not all DACs can handle this protocol. USB can give excellent high quality results.
Firewire
Firewire is more or less comparable to USB, it has its pros and cons. But its bandwidth is always guaranteed, unlike USB, which shares its resources with big amount other processes inside the computer. PCs are becoming (USB 3.0), this has become less of an issue, especially for 2-channel audio.
This is the original Sony/Philips Digital Interface protocol, between the ohm or transport and the DAC.  In theory, SPDIF is at a disadvantage compared to asynchronous USB and Firewire, but it has the best ability to precisely control the bit stream through software. This can result in a perfect stream that sounds very accurate. However, I have found that the resulting sound can be a bit sterile and a little too . While this is a matter of taste, I know that if you care more about enjoying the music than the accurate rendering, you may feel the same way. In addition, SPDIF has two main advantages in use. Firstly, you can easily use 15-20 meters without losing sound. Secondly, it has at least one digital coaxial input, so you have a choice to suit your musical taste.
Net
Then, of course, there is the UTP network cable. Over the network you can send any signal you like, using any encoding you like. I won't go into the specifics, but basically a network cable simply streams music and raw data from a NAS or NAS to a device that can decode the signals. Believe it or not, but network cables may affect the sound. Choose a good cable if you care about sound. I can't recommend best brands since I haven't experimented with them enough. As soon as I know more, I will write an article.
Well, that's already a lot of information. So I'll go into detail and get to the conclusion.
CONCLUSION
What's happened best system for you? It basically comes down to a choice between versatility and ease of use, but there's also the matter of sound quality.
Although I still feel like CDs playing on a high end CD player sound,  better than a standard computer system, but I use a DAC myself. I also firmly believe that server-based music has a future. Companies around the world are constantly making new equipment and the quality will continue to improve.
But the time will come when server-based music will sound better than the good old CD, when more high frequencies sampling will be used more.
I hope the article “Computer Sound” was interesting and helped someone. Please leave comments below so I can get back to you.
Don't be afraid of me and join me
The post will be useful, if not for music lovers, then at least for people who didn’t have a bear step on their ears in childhood... Also for those who are on Windows 7 (if anyone doesn’t know, the sound quality in 7 (and Vista too) has suffered sooooo much compared to the same Windows XP). By the way, why this happened is also described below. Go...
The main criterion for playback quality is the amount of distortion that is introduced into the audio stream when passing through the audio path. Distortion, in turn, is inevitably introduced during any processing, so our main task is to minimize or completely eliminate sound processing in the section of the path along which the signal is transmitted digitally.
The sound path in our case has the following form:
1) Source- sound in MP3, FLAC, OGG, WAV etc. format.
2) Player- actually foobar2000. Contains:
- Decoder
- Sound handlers
- Conclusion
3) Windows mixer, sound card driver- very closely interacting elements. At this stage, software audio processing (often of poor quality) can be performed, which is extremely undesirable.
4) DSP sound card- this is already a hardware component. The Digital Signal Processor is located directly on the sound card and performs the necessary processing of the audio stream, as well as processing in accordance with the settings in the sound card mixer (most of the operations that this block performs depend on the settings of the sound card and the sound card model itself).
5) DAC- Digital-to-Analog Converter. Converts the received digital audio data into analog form for further amplification and supply to the analog output of the sound card (from it to headphones or an external amplifier).
1. Source
Undoubtedly, this link is the basis. If the recording is initially of poor quality, there is little point in wasting effort on setting up the rest of the path.
Sources can be divided into two types:
- Lossless(wav, flac, wv, ape, tak, tta, ofr etc.) - lossless encoded audio (when decoding, the resulting audio stream exactly matches what was encoded in Lossless - similar to unpacking files from a ZIP archive)
- Lossy(mp3, ogg, aac, mpc etc.) - lossy compressed audio. During encoding, irreversible losses of some part of the information occur (namely, that part of the sound data that a person does not perceive or almost does not perceive is cut out).
If in the first case the problems of high-quality playback are minimized, then in the second case, for the highest quality playback it is necessary to take certain measures (see “Recommendations for playing audio material”).
2. Software player foobar2000
Now let's take a closer look at everything related to foobar2000. One of the advantages of this player is a very thoughtful and transparent path. To clearly demonstrate this, I drew a block diagram (click to view):
Notes:
1. As can be seen from the diagram, the presence of all components is not necessary - some can be turned off, and some are turned on only when necessary. For example, a decoder is needed only for compressed formats, and a bit depth converter is turned on when the input data format does not match the output data format.
2. For Windows 7, floating-point output is possible (32-bit output via DS).
2.1 Decoder
Decodes the input data, resulting in an uncompressed audio stream in the form of pulse code modulation. Most lossy decoders operate in floating point mode (32-bit). The output of lossless decoders is data with parameters similar to the original audio (which was compressed).
2.2 Postprocessor
This element was included by the developer in the tract relatively recently. Acts as a decoder for HDCD and DTS formats (only lossless sources - for now FLAC and WV). Since the data from a conventional decoder must be transmitted bit-for-bit to successfully decode these formats, the postprocessor is located in the path immediately after it.
2.3 Handlers
Perform digital processing of the audio stream. It should be noted that they should be used only when necessary, because... Almost any sound processing - even changing the volume - will certainly introduce some distortion. All handlers operate in floating point mode by default. Foobar2000 digital processors include:
2.3.1 ReplayGain
First of all, it should be noted that any lossy audio file does not contain a digital audio stream as such. It contains its description using various functions, etc., from which you can restore the approximate shape of the original wave (which is what decoders do lossy formats). And so, when decoding, one nuance arises: because encoding occurs with losses (I repeat: the data in a lossy audio file allows you to restore only the approximate shape of the original wave), the output samples have a level different from what was at the input.
What does this threaten? The foobar2000 decoder operates in a floating point format, which allows it to process and describe a wave not only within a certain range (for example, 16 bits with a fixed point: 2^16 = 65536 possible level values). But the fact is that after the signal is transmitted by the player to output, it is automatically converted to a fixed-point format.
Let's look at an example. If we convert a sample with a level of 1.000000 (floating point) to a 16-bit fixed point format, we will get the number 65536 - this is the maximum level for 16-bit fixed point. But let's not forget that when decoding lossy, the original signal is restored approximately, and we can get samples with more high levels, for example 1.124325. And it will no longer be possible to correctly describe this value in fixed point mode, i.e. the level of this sample will automatically be equal to the maximum - 65535.
So what do we get? Thus, all sections of the wave (consisting of sample points) beyond the maximum level are “cut off”, as a result of which, instead of a sinusoid, for example, we get something similar to rectangular pulses (if the “tops” of the sinusoid are above the maximum, they will be “cut off” "), which means that we have additional nonlinear distortions (the level of distortion depends on what part of the sound wave goes beyond the maximum). Something similar can be heard when “locking” the speakers - when you apply a signal to the speakers with a power exceeding the maximum permissible - the diffusers cannot move beyond the maximum deviation level, the same distortions are obtained as in our case. The first phenomenon (with a digital audio stream) is software clipping, the second (with diffusers) is hardware clipping (in some other cases this phenomenon is called “overload”).
Why do we need ReplayGain in our case?
a) To determine whether the level of the decoded signal is outside the permissible limits, namely to determine the peak recording level - this is done by ReplayGain Scanner.
b) Lower the level of the track so that it fits within the acceptable range - after the scanner has scanned, it writes ReplayGain tags (with information about the peak level), and the player, when playing, reads these tags and lowers the volume level of the entire recording (namely, the entire - so as not to change the volume balance between individual sections) so that the peak is at the maximum level (0 dB on the peak meter), and everything else, of course, is not higher than this level.
Setting:
Source mode:track, if you want to maintain volume balance only within one track, album- if the volume balance between the tracks of the entire album is important to you. Processing:Prevent clipping according to peak- the best option in most cases, which will only prevent clipping (the level at which the volume will be reduced will be calculated using the track peak or album peak tag - depending on the selected source mode). Apply gain- in this mode, ReplayGain will help equalize the perceived loudness of the tracks you are listening to (often the perceived loudness is not related to peak levels, since it is determined by the method of psychoacoustic analysis); This option is not recommended, because in this case, the volume of the tracks can change greatly, which only worsens the situation in terms of quality. Apply gain and prevent clipping according to peak. As a result of analyzing a track, the ReplayGain utility may consider it too quiet and write a positive gain value in the tags; the volume when playing such a track will be overestimated, as a result of which the peaks of the resulting signal may be higher than the maximum level. This mode allows the utility to analyze not only the track (or album - depending on the source mode) gain tag during playback, but also the track (album) peak tag and calculate the maximum allowable gain to prevent clipping. Pre-amp: Additional gain at user's choice. Works only when Apply gain is enabled (or apply gain and prevent clipping), summed with the gain from the Track (Album) gain tag. Use of this feature is not recommended, because, again, it can negatively affect the quality. Note: if for some reason you do not want or cannot use ReplayGain, there is another option - Advanced Limiter DSP (see below). These are digital audio processors needed to perform various transformations of the audio stream in real time. Ideally, of course, there should be no audio processing of any kind, but in some cases it is necessary to use some processors to achieve higher quality. In particular, a DSP called Resampler is simply necessary in the absence of hardware support by the sound card for the sampling frequency of the reproduced signal (most often this is material from audio CDs with a sampling frequency of 44.1 kHz) to perform a preliminary conversion of the audio stream into a form corresponding to the hardware capabilities of the sound card (more often in total this conversion is 44.1->48 kHz). Note: For embedded renderings, the stream is captured immediately after passing through the DSP chain. There is a special sample for this case: This sample consists of a sequence of tones with a sine wave superimposed on it, the frequency of which floats in the range of 19-20 kHz: In case of low-quality software resampling, when playing this sample you will hear grinding, noise, or other distortions. Note: To check resampling accurately, you should first set correct settings output (see clause 2.4.1/2.4.2). Let's consider two options for playing materials with a sampling frequency of 44.1 kHz: a) Your card hardware supports this sampling rate. In this case, to achieve maximum quality, the DSP tab should not have any enabled processors (first list, left). b) Your card hardware Does NOT support this sampling rate. To achieve maximum quality, install the plugin and set its settings to the maximum sampling frequency that your sound card hardware supports. After the SoX resampler plugin, be sure to add Advanced Limiter to the list of active plugins - this plugin will prevent clipping by “on the fly” lowering the levels of sections of the audio stream that, as a result of signal resampling (or other processing), may be higher than the maximum level. If you have the second case and you have set the recommended settings, then now it will be possible to play back not only 44.1 kHz recordings with the highest quality (for this sound card), but also recordings with any other sampling frequency. If the frequency of the reproduced material coincides with the maximum supported by your card, the resampler will simply turn off (as unnecessary). The player's own volume control. If you need software volume control, it is recommended to use it (and not the controls in the sound card/Windows mixer settings). When withdrawing via WASAPI shared ("DS:<звуковая карта>" in Windows Vista/7) is synchronized with the program control in the Windows 7 mixer. Used to convert data into a format that the sound card can understand (usually 16 or 24-bit fixed-point PCM audio). The format selection options depend on the output plugin used (see next paragraph). The output plugin is required as a link between the player and Windows/sound card driver. The plugin determines how and through which interface the resulting audio stream (as a result of the work of all previous links) from the player will be output to the sound card. Often this link plays a decisive role, because the use of alternative interfaces allows you to bypass some low-quality sections of the path. It should be noted that at the output stage the stream is most often converted to a fixed-point format (bit depth from 8 to 32 bits - depending on the selected parameters), what this can lead to has already been discussed in the section on ReplayGain. Currently, foobar2000 has the following audio output methods: DirectSound, Kernel Streaming, ASIO, WASAPI Shared, WASAPI Exclusive (only for Vista and Windows 7). Due to the fundamental differences between the architectures of Windows XP and Windows 7, we will consider setting the output for each OS separately. Here is an approximate diagram of the Windows XP sound subsystem: As you can see, when outputting through DirectSound or MME, the sound goes through the Windows mixer (Kmixer). The main difference between DirectSound is the wide range of possibilities for using the hardware resources of the sound device, incl. hardware mixing and low latency. But the fact is that these capabilities directly depend on the drivers used. Thus, due to low-quality sound card drivers (this is not uncommon now, especially outdated drivers), distortion may be introduced into the audio. They can arise either as a result of the operation of the Wave regulator (included in Kmixer), or as a result of poor-quality software resampling or other unwanted processing. Two other outputs that can bypass Kmixer will help solve the problem - ASIO and Kernel Straming. Kernel Streaming is a bit-by-bit audio output tool from Microsoft, part of DirectSound (in the diagram - a stream bypassing Kmixer). ASIO also allows you to bypass Kmixer, but first of all it is a professional input/output standard designed to minimize latency, although this is not important for high-quality music playback. Different ASIO drivers may contain their own errors, and therefore it is recommended to use Kernel Streaming to achieve the most accurate output.
With RG Info- for tracks with ReplayGain tags
Without RG info- for tracks without Replay Gain tags.2.3.2 DSP
2.3.3 Volume Control
2.3.4 Bit depth converter
2.4 Conclusion
2.4.1 Windows XP
And so, everything is simple here. Install the plugin, run foobar2000 and on the output page select:
Output Device:KS:<Ваша звуковая карта> - the Kernel Streaming plugin will be used to output sound, the sound will be output to the specified sound card.
Buffer Length: adjusting the player buffer. The lower the value, the faster (counting from the moment of activation/change) changes in volume, activation of plug-ins, etc. will take effect. This option does not affect the output quality; changing the standard value is not recommended.
Output format/Postprocessing
Output data format: set the maximum bit depth supported by your sound card.
Dither: enable dither + noise shaping. This function can only be useful if one of the following conditions is met:
a) If your sound card hardware does NOT support audio bit depth higher than 16 bits and you use one of the functions: ReplayGain, DSP, Volume Control (volume control in foobar2000).
b) Your sound card hardware does NOT support audio bit depth higher than 16 bits and you are playing material with bit depth higher than 16 bits in foobar2000.
In all other cases (for example, if your sound card hardware supports audio bit depth higher than 16 bits) Enabling this feature will only degrade the quality.
2.4.2 Windows 7
In this OS (as in Vista) sound subsystem has a completely different structure. Below is a simplified block diagram of it:
API- Application Programming Interface
APO- Audio Processing Object
CPT- Cross Process Transport
KST- Kernel Streaming Transport
As you can see from the diagram, there is no DirectSound here (there is only its visibility for compatibility with older programs). By default, all sounds are output via the WASAPI (Windows Audio Session API) interface in the so-called. general mode, which includes various services, software processors and a mixer. It is also obvious that the sound is transmitted to the device driver only after passing through all the above components. Thus, all sounds are reduced to the same frequency and bit depth, mixed (all processing is carried out using the computing resources of the CPU), and the stream arrives to the sound card in finished form.
As practice has shown, such processing narrows the dynamic range of a 16-bit signal by about 2 dB, which is equivalent to introducing a little noise into it. But we don't need noise, do we?
Note: A caveat needs to be made here. If the settings of the output device (in the control panel) set the bit depth to 24 (of course, the device must support such a quantization depth), the level of introduced noise is minimized. But nevertheless, we still won’t be able to get bit-by-bit output.
This OS still has Kernel Streaming (KST), but in practice it does not always work - sometimes the device is “busy” for unknown reasons.
If you look at the diagram, you will notice that direct access to the driver is available via ASIO. Hence the conclusion: if your card supports ASIO in hardware (and has a sane ASIO 2.0 driver) - use this interface. Don't forget that this requires a plugin.
But what to do if the card does not have ASIO support? I’ll say right away that ASIO4ALL is unlikely to help here, since it works through the same unstable Kernel Streaming.
Fortunately, there is still a way out of this unpleasant situation. The developers left us a loophole, and it’s called WASAPI Exclusive Mode. In this mode, you can gain direct access to the hardware resources of the sound card and bypass all unwanted WASAPI components. However, in exclusive mode there are strict restrictions - when an application uses this mode, the sounds of all other applications are turned off.
Setting:
And so, download the WASAPI output plugin, install and configure the output as in the screenshot. In field Output data format you need to set the maximum bit depth at which playback will work (most often - 24 bits). About the function Dither read in the previous paragraph (Windows XP).
3. Setting up the sound card
Since there are a huge number of sound cards, this part provides only general recommendations or recommendations for setting them up using standard means Windows.
3.1 Setting up using Windows
3.1.1 Windows XP
To start setting up, you need to go to Windows Control Panel->(Sound, Speech and Audio Devices->)->Sounds and Audio Devices.
Rice. 1.1 The volume should be set to maximum, the volume level should be adjusted using the analogue method - for example, using a knob on the amplifier (if you use headphones without a volume control, adjust it using foobar2000). After completing the settings, press the button Additionally in the column Mixer volume.
Rice. 1.2. All sources except Wave (which must be set to maximum) and Play Control, of course, should be turned off. Wave can also be disabled if you do not use DirectSound output in the player, but all other sounds, including system sounds, will not be heard. First you need to go to "Properties" and enable the display of all sources:
Rice. 1.3. Here you must enable the display of all playback sources for the device being configured.
Rice. 1.5. Here both regulators should be set to the maximum position. Naturally, it is assumed that you do not experience any problems with sound playback (most often this can happen in games). If there are problems, select the highest positions of the regulators at which the problems will disappear. In this case, it is worth noting that these settings do not affect playback using Kernel Streaming and ASIO, it follows that if you had to set one of the controls to a lower position, for high-quality sound output in the player you must use one of these plugins output.
After completing the settings, click the button in each window OK.
3.1.2 Windows 7
To start setting up, you need to go to Windows Control Panel->Hardware and Sound->Sound and on the first tab, double-click on the playback device that you want to configure.
Rice. 2.1 Set the main volume to maximum. All unnecessary sources (microphone, line input) turn off, set the channel controls (Front, Rear, etc. - they are not visible in the screenshot) to the maximum position..
Rice. 2.2 The presence and name of this tab depends on the installed sound card. As experiments have shown, enabling/disabling this option only affects software effects that are superimposed when outputting in general mode. When outputting via WASAPI Exclusive, this option does not affect anything - in this case, only the effects imposed by the hardware DSP of the sound card will work.
Rice. 2.3 On this tab, we are most interested in enabling the exclusive mode required for WASAPI to work. Purpose of the option Give priority to exclusive mode applications I don't know for sure, but it's better to leave it on.
Setting the frequency and bit depth here also works only for the general mode, i.e. This is the reference frequency and bit depth of the software mixer to which all sounds entering it will be reduced. It is advisable to set the frequency corresponding to the characteristics of your sound card, the bit depth - the maximum supported (use the Examination).
At this stage, the setup principle is no different from the previous ones: it is necessary to ensure reliable transmission of the digital audio stream without making any changes to it (ideally, up to the digital-to-analog converter itself). Setup recommendations are as follows:
- All effects/equalizers, etc. must be turned off. If possible, you should enable the mode Bit-Matched Playback(for Creative cards, this option may be in the Creative Audio Console or Console Launcher).
- For most cards, it is possible to select a reference sampling rate (Master Sampling Rate) - it should be set equal to the sampling rate of the reproduced material or the frequency set in the foobar2000 resampler. There may also be a setting for the quantization depth (Bit Depth) - it should be set to maximum.
- All volume controls that affect playback volume should be set to maximum.
For best results, it is recommended that you do the following before playing a track.
For lossy:
1. Select the track(s) in the foobar2000 library or playlist, right-click on the selected one and select from the drop-down list Utils->Verify Integrity. The track(s) will be scanned for errors. If there are errors in MP3 files, foobar2000 can fix them. If you see an error like “Reported length is inaccurate...”, highlight the tracks for which this error was displayed, right-click and select Utils->Fix VBR MP3 Header, after processing, check the track again, there should be no error.
If, when checking, you see an error like “MPEG Stream error...”, you can fix it using the Utils->Rebuild MP3 Stream option. After performing the error correction operation, do not forget to check the tracks again.2. Select the tracks, right-click on the selection and select ReplayGain->Scan Per-File Track Gain, if tracks from different albums are selected or albums are not specified in the tags, Scan Selection As Single Album - if tracks of the same album are selected, and Scan As Albums (by tags) - if several albums are selected. You can also use the Scan As Albums (by folders) option if album tags are not specified but the tracks of each album are in a separate folder. After scanning you will see information about the calculated peaks and gain values for each album/track (depending on the selected scan type), click the "Update File Tags" button to write the ReplayGain tags to a file.
For lossless:
With this source type, no action is required to achieve maximum quality. You can also check the material for errors using the Utils->Verify Integrity function, but the probability of errors for lossless is less, especially if there are any, there is no way to fix them using foobar2000 (at least in the same way as in the case of MP3 ). There is no need to use ReplayGain in the case of lossless, because clipping (in the form in which we usually have it in the case of lossy) cannot exist in lossless sources, so this function can only be useful for leveling the volume between tracks/albums.