Entering the network password does not act as a mandatory means of protecting your computer. But using it will provide you with network security. In order to open access to your personal network, an attacker only needs to know a username.
How do I enter my network password?
If you try to connect over the network from a computer on the Windows 7 platform, the system will ask you to enter the network password. The Windows 7 operating system will allow input if a number of the following conditions are met:
- Classic configuration of the network access model;
- Authorization under the same credentials;
- The client computer is authorized in the system under an account that does not exist on the server computer.
Today, when the development of technology does not stand still, the use of a flash card for data transfer is not relevant and outdated. Transfer information from one computer to another, today, is as easy as downloading information from the Internet.
Wired and wireless networks... But, the use of such opportunities requires, in turn, certain knowledge. Currently, computers are often sold already with a preinstalled Windows 7 operating system, however, connectivity is mainly carried out through Windows XP.
At the initial stage of configuration, it is recommended to use a password-free connection scheme. Setting up a connection is quite simple - specific, special knowledge is not required here. If you need to create home network, change the settings in the control panel. You just need to sequentially go to the following directories:
- First, go to the position "Network and Internet";
- Find the folder "Select homegroup settings";
- Finally, select “Connect Password Protected Sharing” or “Disable Password Protected Sharing”.
Then, configure the workgroup for all computers. If Windows 7 is installed on all computers, then this setting will be done automatically. If you have a Windows XP computer on your network, you will be denied access.
In Windows XP, shared folders contain symbolic names, and in order to create a shared folder, you will have to perform a number of other steps. You can do this by clicking the "Share this folder" item in the folder properties in the "Share" menu.
But this fact does not mean at all that you will be able to use the connection at a high quality level. In this situation, you should not fill your head with special wisdom. You just need to remove some "barriers", which are set out in the instructions specially designed for this.
To carry out the correct operation, it will be enough to create a shared folder in the direct directory of the disk with the installed software... After that, all connection problems evaporate! And you will be able to enter the network password in Windows 7.
How to remove the network password prompt?
If you want to remove the network password prompt, you just need to do the following:
- Open the "Start" menu;
- In the line “Run” enter “Controluserpasswords2” and click “Ok”;
- Highlight the required account and uncheck the box “Require username and password”.
Windows 7 allows you to disable the network password by changing the computer's security group policy. However, it must be understood that negative consequences of such actions are possible. Performing these operations can significantly reduce the security level of your computer.
Instructions
Click the "Start" button to enter the main menu of the system and go to the "Control Panel".
Enter the value gpedit.msc in the search bar box.
Open the Computer Configuration section and select Windows Configuration.
Specify the "Security Settings" section and go to "Local Policies".
Select "Security Options" and call service menu by double-clicking on the field "Accounts: restrict the use of blank passwords only for console login".
Disable the required option. If you want to automatically sign in without user interaction, follow these steps.
Return to the main menu and go to the "Control Panel".
Open the Network icon.
Select "Log on to Windows normally" in the "Configuration" tab of the application window.
Click the "No" button in the dialog box that opens, prompting you to restart your computer.
Return to Control Panel and open the Passwords icon.
Click the Change Windows Password button on the Change Passwords tab of the application window.
Enter your existing real password in the Old Password field in the Change Windows Password dialog box that appears.
Do not enter any values in the New Password and Confirm Password fields.
Go to the "Configuration" tab of the application window.
Select the check box next to "All users work with the same global settings and desktop settings."
Reboot your computer.
Enter the existing user password in the appropriate field of the Enter Network Password dialog box during the Windows startup process.
Subsequent system loads will use automatic registration. The Enter Network Password dialog box will be canceled.
Modern operating systems are endowed with sufficient powerful tools created to protect personal computers... Sometimes these functions greatly interfere with the configuration of a certain type of local area network.
Instructions
To disable security policy on a specific computer while running Windows Seven, follow these steps. Open the start menu and go to the control panel. Open the User Accounts submenu. Select "Change User Account Control". Move the slider to Never Notify. Click the "OK" button to save the specified settings.
If you are using Windows XP, then open the User Accounts menu located in the Control Panel. Proceed to Turn User Account Control On and Off. In the menu that appears, uncheck the box next to "Use User Account Control to protect your computer." Save changes and restart your computer. Remember that sometimes it is much easier to confirm the launch of certain applications than to fix system errors that they caused.
Disable your computer's protection settings so that other users can connect to it. Open the "Administration" menu and go to the "Services" item. Find the item "Windows Firewall" and click on it right click mice. Select Properties. In the menu that opens, find the "Startup type" item. Set it to Disabled. Return to the "Services" menu, again right-click on the "Firewall" item and select "Stop".
If you are using additional program controlling network connections then disable it or create a specific rule. Typically, you need to specify a range of internal IP addresses whose owners are allowed full access to this computer.
Check your antivirus software. Modern antiviruses include a built-in firewall. Disable it. Set the startup type of this function to "Manual" to prevent unwanted activation.
Related Videos
The Windows XP operating system assumes the setting of a password on the computer for data protection. The password is requested when the system boots or when it exits standby mode. If the need for data protection is no longer necessary, this function can be disabled.

Instructions
Left-click on the "Start" button in the lower left corner of the desktop screen. This menu also opens when you press the Windows logo button on your keyboard.
In the "Start" menu at the bottom right, find the line "Run" and place the mouse cursor on it. A window for entering the command will open. Here you can call the tool you need - the user account management console. The window for entering commands can also be opened by simultaneously pressing the button on the keyboard with the image of the Windows logo and the letter R in the Latin layout.
In the line for entering the command, type the following phrase: control userpasswords2. Press the OK button. In the window that appears, click on the "Yes" button. Please note that your account must have administrator rights on the computer to perform this operation.
Find your account in the window that opens with the title "User Accounts". In the box next to the line "Require password and username" uncheck the box.
At the bottom of the window, click on the "Apply" button. Enter your password twice in the dialog box that opens. If you do not have a password, leave both fields blank. Click OK. Restart your computer. Now you do not need to enter a password when starting the system.
To disable the prompt for a password when waking up from sleep mode, disable this feature in the computer's power settings. Right click on free space on your desktop. In the menu that appears, select the last line "Properties". Open the "Screensaver" tab and press the "Power" button. Go to the "Advanced" section. Find the line "Prompt for password when exiting sleep mode" and remove the check mark from the adjacent box. Click on the "Apply" button.
Windows Firewall is a firewall that is used in new operating systems from Microsoft to protect against virus attacks and unauthorized access to user data through the applications that he uses. To disable it, just use the appropriate options in the system.

Instructions
To disable the Windows 7 firewall, use the appropriate functions in the system control panel. Go to "Start" - "Control Panel". Type "firewall" at the top of the search box in the search form, and then select "Windows Firewall". You can also go to the section directly through the applications "System and Security" - "Windows Firewall".
In the left part of the window that opens, select the item "Enable and disable Windows firewall". If you are using a non-primary account, you will be prompted for an administrator password. Enter your password and press Enter.
Click the Disable Windows Firewall link under each network location you want to disable protection. For example, check the box next to the required item in the "Home or work network placement options" and "Public network placement options" blocks. Then click on the Ok button.
You can also completely disable the firewall service on the system. To do this, go to the Start menu and enter services.msc in the search bar. Select services. In the "Services" window that appears, select the line "Windows Firewall", then double-click on it with the left mouse button.
In the window that opens, go to the "General" tab and click on the "Stop" button. In the "Startup type" line, select the "Disabled" option, then click OK.
In the search bar "Start" in the same way enter msconfig and select the result that appears. In the new window, uncheck "Windows Firewall" and click OK. Reboot your computer. Windows 7 firewall is disabled.
To turn on the firewall, go to "Control Panel" - "Windows Firewall". On the left side of the window, click the "Turn on or off firewall" link. Click on the "Turn on Windows Firewall" button under each network location for which you want to create a secure channel.
This article will show you an easy way to configure file access on Windows 7, for those cases when you need to provide anonymous access to shared Windows resources 7. This setting assumes that network access will be without a password, without restrictions. This is a common situation for home and office networks.
Similar articles for other OS:
So, step by step.
Share this folder
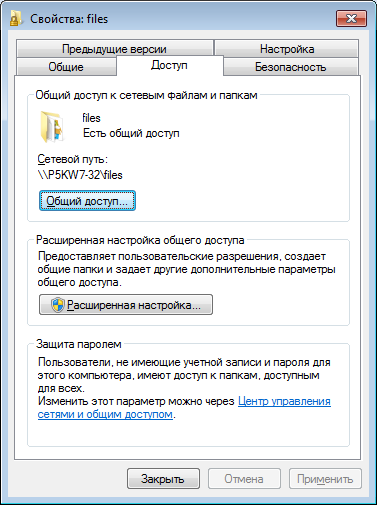
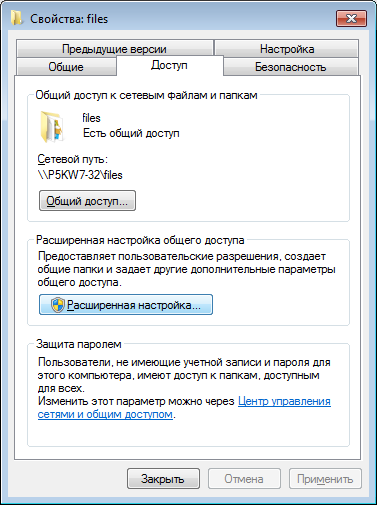
In Explorer, you need to find the folder that you want to share (share it with), and right-click on it. V context menu open the Properties of this folder. In the properties window go to the "Access" tab and click the "Share" button:
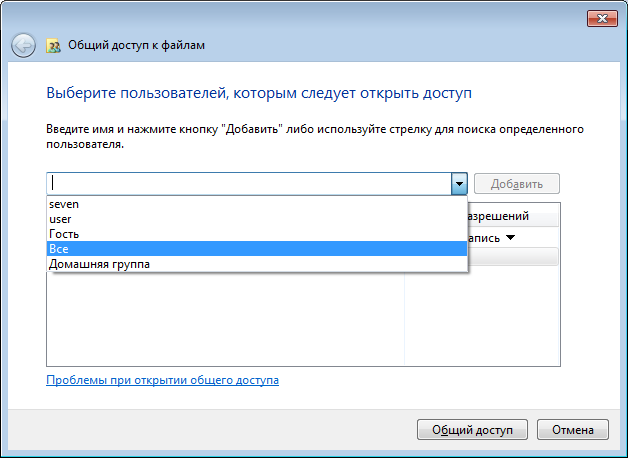
After that, in a new window, you need to specify full permissions for the "Everyone" user group:
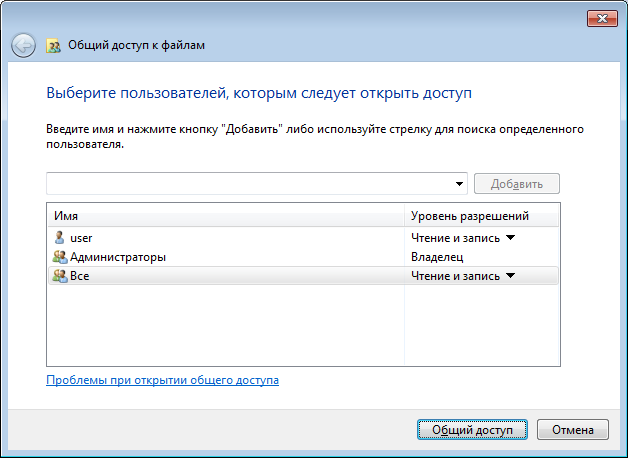
After clicking the "Finish" button, this folder will become available over the network:

Now, in the properties of the folder, you can see that it is available over the network:
Configuring Windows 7 Network Settings
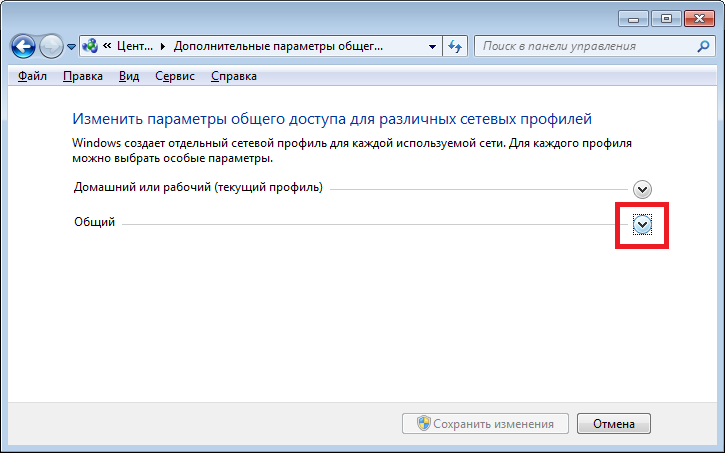
Next, you need to open " Network and Sharing Center"(via the Network icon in the tray or via the Control Panel) and in the left part of the window click on" Change Extra options general access ":

In the next window, the profile of your local network will be immediately opened - there you need to enable two parameters and click the "Save changes" button:

After that, in the same window, go to the "General" profile:
And there, disable the "password protected sharing" option and, of course, click the "Save Changes" button:

This is the setting network access no password for Windows 7 is complete. Now it will be possible to enter through local area network on this computer and Windows will not require a password.
If Windows requires a network password
Despite the fact that the settings described above are made, when logging into this computer, another computer may ask for a network password. This is possible if both computers have local users with the same name but different passwords.
There are two solutions to this problem:
- Remove matching usernames.
- For users with the same login, specify the same password. An empty password is also considered the same.
How to stop sharing a folder in Windows 7
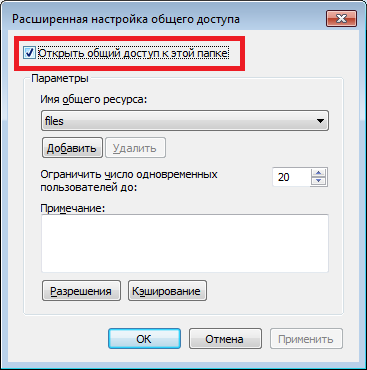
On Windows 7, the cancellation of sharing is not at all obvious, in contrast to Windows XP. On Windows 7, to cancel sharing, you need to click the "Advanced Settings" button on the "Access" tab and disable it there. Microsoft developers have a peculiar logic.
Share Windows 7 folder via command line
File sharing can be set up much faster by using command line(console, cmd.exe). Execute just one command in the console:
net share files = c: \ files
It shares the folder c: \ files and asks for her network name files.
You can also cancel sharing through the console:
net share files / delete
This command deletes the network (public) folder files. Folder c: \ files of course stays in place.
Windows 7 File Sharing via the Shared Folders snap-in
Included in the toolbox Windows management 7 there special program(snap-in) for managing shared resources on a computer. It is called " Shared folders"and you can run it with the command fsmgmt.msc(in the console or via Win + R):
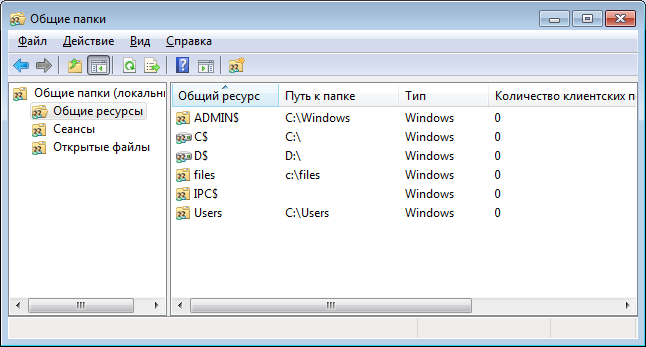
Alternatively, this snap-in can be opened through the Start menu: "Control Panel - Administrative Tools - Computer Management - Shared Folders".
Configuring passwordless access for other operating systems
If you live in Krasnodar and you need to set up a local network in Windows
If you found it useful or just liked this article, then do not hesitate - financially support the author. This is easy to do by throwing money on Yandex Wallet No. 410011416229354... Or on the phone +7 918-16-26-331 .
Even a small amount can help you write new articles :)
Windows XP allows you to disable the network password by changing the group policies computer security. At the same time, it is necessary to accurately understand the meaning and possible consequences of your actions, since carrying out such operations can significantly reduce the level of computer security.
You will need
Sponsored by the placement of P & G Articles on the topic "How to disable the network password" How to disable automatic login How to change group policy How to clear the virtual memory in the computer
Instructions
Click the "Start" button to enter the main menu of the system and go to the "Control Panel".
Enter the value gpedit.msc in the search bar box.
Open the Computer Configuration section and select Windows Configuration.
Specify the "Security Settings" section and go to "Local Policies".
Select "Security Options" and open the service menu by double-clicking on the field "Accounts: Restrict the use of empty passwords only for console login".
Disable the required option. If you want to automatically sign in without user interaction, follow these steps.
Return to the main menu and go to the "Control Panel".
Open the Network icon.
Select "Log on to Windows normally" in the "Configuration" tab of the application window.
Click the "No" button in the dialog box that opens, prompting you to restart your computer.
Return to Control Panel and open the Passwords icon.
Click the Change Windows Password button on the Change Passwords tab of the application window.
Enter your existing real password in the Old Password field in the Change Windows Password dialog box that appears.
Do not enter any values in the New Password and Confirm Password fields.
Go to the "Configuration" tab of the application window.
Select the check box next to "All users work with the same global settings and desktop settings."
Reboot your computer.
Enter the existing user password in the appropriate field of the Enter Network Password dialog box during the Windows startup process.
Open the checkbox on the line "Save password in the list of passwords" and confirm your choice by clicking OK.
Subsequent system loads will use automatic registration. The Enter Network Password dialog box will be canceled.
Other related news:
Performing the task of removing the network password may be necessary when using multiple accounts with different passwords, since the automatic login of the system makes it difficult to change the user. A change or deletion of the saved data is required. Sponsored by placing P&G Articles on
To log in with an administrator account when forgotten password you will have to apply a different algorithm of actions depending on the set Windows versions... But the principle remains the same - logging in, resetting the password, creating a new password, logging in to the system. You will need - Windows XP Home
A huge number of tips on what to do if you forget your password, existing on the Internet, recommend very exotic procedures. Actually the entrance to Windows system can be carried out using standard tools and without potentially involving malware third party developers. To you
Disabling autoloading of removable USB-media (flash drives) and CDs serves to increase the level of computer security. Most malware and viruses use the autorun.exe file, which is the autorun program. Sponsored by the placement of P & G articles on "How to disable
Automatic logon without entering a password is much more convenient than the standard one if the computer has only one user or one account is used much more often than others. By default, the only account logs in without a password. All other cases require
A network password is not required to protect your computer, but using a password will help keep your network secure. Indeed, an attacker would be able to gain access to the network knowing only the username! This state of affairs can hardly be considered satisfactory. Sponsor
Entering the administrator password is standard procedure in operating system Microsoft Windows XP required to authorize many operations. Using the built-in administrator account allows you to reset the administrator password and change Accounts others