The question of changing the resolution in Windows 7 or 8, as well as doing it in the game, although it belongs to the category “for very beginners,” is asked quite often. In this instruction we will touch not only directly on the actions required to change the screen resolution, but also on some other things. See also: (+ video instructions).
In particular, I’ll talk about why the required resolution may not be in the list of available ones, for example, with a Full HD 1920 by 1080 screen it’s impossible to set the resolution higher than 800x600 or 1024x768, why on modern monitors It’s better to set the resolution to match the physical parameters of the matrix, and what to do if everything on the screen is too large or too small.
Changing screen resolution in Windows 7

To change the resolution in Windows 7, just click right click mouse over an empty space on the desktop and in the appeared context menu select “Screen Resolution”, where these parameters are configured.
Everything is simple, but some people have problems - blurry letters, everything is too small or large, there is no required resolution, and similar things. Let's look at all of them, and also possible solutions in order.
- On modern monitors (any LCD - TFT, IPS and others), it is recommended to set the resolution to the physical resolution of the monitor. This information should be in the documentation for it or, if there are no documents, it can be found specifications your monitor on the Internet. If you set a lower or higher resolution, distortions will appear - blur, “ladders” and others, which is not good for the eyes. Typically, when setting a resolution, the “correct” one is marked with the word “recommended”.
- If the list of available resolutions does not contain what you need, and only two or three options are available (640×480, 800×600, 1024×768) and everything on the screen is large, then most likely you have not installed drivers for your computer’s video card. It is enough to download them from the manufacturer’s official website and install them on your computer. Read more about this in the article.
- If, when you set the required resolution, everything seems very small to you, then do not try to change the size of fonts and elements by setting a lower resolution. Click the “Change the sizes of text and other elements” link and set the ones you need.
This is the most common problems that may be encountered during these actions.
How to change screen resolution in Windows 8 and 8.1
For Windows 8 and Windows 8.1 operating systems, changing the screen resolution can be done in exactly the same way as described above. At the same time, I recommend following the same recommendations.
However, the new OS has introduced another way to change the screen resolution, which we will consider here.
- Move your mouse pointer to any of the right corners of the screen to make the panel appear. On it, select “Settings”, and then, at the bottom - “Change computer settings”.
- In the settings window, select “Computer and devices”, then “Display”.
- Set the desired screen resolution and other display options.

Changing screen resolution in Windows 8
Perhaps this will be more convenient for someone, although personally, to change the resolution in Windows 8, I use the same method as in Windows 7.
Using graphics card management utilities to change resolution
In addition to the options described above, you can also change the resolution using various graphics control panels from NVidia ( GeForce video cards), ATI (or AMD, Radeon video cards) or Intel.

Many users, when working in Windows, have an icon in the notification area for accessing the functions of the video card, and in most cases, if you right-click on it, you can quickly change the display settings, including screen resolution, simply by selecting the desired one in menu.
Changing the screen resolution in the game
Most games that run full screen set their own resolution, which you can change. Depending on the game, these settings may be located in the “Graphics”, “ Extra options graphics", "System" and others. I note that in some very old games you cannot change the screen resolution. Another note: installing more high resolution in the game can cause it to slow down, especially on not very powerful computers.
That's all I can tell you about changing screen resolution in Windows. I hope the information is useful.
On Windows XP
Click the Start button, select Control Panel, and search for Display if you have the classic panel view. Or “Designs and Themes” - “Screen”, if you have a category view configured. In the “Options” tab, find the “Screen resolution” slider and select the view that suits you. Click the "Apply" button to apply the changes. A countdown timer window will flash on the screen. If you don't like what you see, click "no" and look for a new option. If you are satisfied with everything, click “yes”.
Change screen resolution in Windows Vista
Start again from the Start button and Control Panel, click the Appearance and Personalization button, click the Personalization button, and then click Display Settings. Move the slider until you are happy with the result.
Click the Apply button at the bottom of the menu for the changes to take effect. The timer will flash again on the screen. If you are happy with what you see, click OK.
Changing screen size on CRT monitors
Due to system failures, it may happen that you see the screen surrounded by black bars on the right and left. If you have a CRT monitor, you can easily fix this using the buttons on its panel. Just press the “Menu” key, enter the parameters and use the buttons on the monitor panel to select the option you need.
To play video on most mobile devices, you need to reduce size images so that a weaker phone or player processor can correctly process and run the file. There are special video editor programs for resizing videos.
Instructions
One of the most common utilities for editing video files is VirtualDub, due to its small size and wide functionality. Download the VirtualDub archive from the program's official website and unpack it using an archiver program (WinRAR or WinZIP).
Go to the extracted folder and run virtualdub.exe. In the window that opens, select the File – Open video menu. Specify the path to the video file you want to shrink. Wait until it opens and displays in the player window.
Go to the Video – Filters tab in the top panel of the window. In the menu that appears, click the Add button. From the list of available filters, click resize and then Ok.
In the Filter resize menu, specify new parameters for the width (width) and height (height) of the video image. If you want to play the file on your device, please adjust these settings according to your display resolution. For example, if the screen has a resolution of 176x220, then the width is set to 176, and the height is 220. You can find out the width and height of the display in the specification for your device, in the instructions for use, and on the Internet by entering the model name in the search.
After making all the settings, click Ok. Go to the File – Save tab to save the applied settings. The image has been resized.
There are many other converters that allow you to downsize videos. For example, the Format Factory application. The program has many presets for various screens, has the ability to save modified video in various formats, including mp4 and 3gp, which are most common in mobile devices. Changing the file format allows you to reduce its size, which is important for phones and players with small amounts of memory.
The computer display is its face. In our time of 4K resolutions, it has become extremely important for the user to see a clear, beautiful picture in front of him. At the same time, however, many people do not have to endure very much. high quality image not because the PC's capabilities are limited, but because the display is not configured properly. In this article we will tell you how to customize the screen on Windows 7.
Setting the screen resolution
Screen resolution is probably main characteristic determining the quality of the picture that it can demonstrate. The higher the resolution, the sharper the image and the more visually pleasing it is for the user, and therefore setting the screen resolution is the most important point in the answer to the question how to set up the screen on Windows 7.
In order to adjust the screen resolution you need to:


4. Opposite the “Resolution” parameter in the drop-down list, set the maximum possible resolution.

5. Click OK.

6. Done! Now your PC will display the image on the monitor with the best possible resolution.
Screen brightness is also an important aspect of its visualization; this parameter is especially important, for example, if the owner of a laptop has to work outside on a sunny day. Adjusting brightness can usually be done using the Fn+Left/Right Arrow hotkeys, but if this combination does not work on your PC, adjust the brightness as follows:
2. Set the display type to “Small icons” opposite the word “View” and click on the “Screen” link.

4. Move the “Brightness” lever to the required position.

By default, all Windows PCs come with a small font that ensures readability and ensures that all interface elements and desktop icons fit perfectly on the screen. However, if you have difficulty seeing, you can enlarge the font, however, the system will warn you that in in this case Some items may not fit on the screen.
However, to configure Windows fonts 7 needed:
2. Set the display type to “Small icons” next to the word “View” and click on the “Screen” link.
3. In the right part of the window, set a point in the “Medium” or “Large” box - as desired, then click “Apply”.

Windows 7 fonts can also be configured using ClearType technology, however, it is no longer responsible for the size, but for the quality of text display. The technology appeared during the massive transition from CRT screens to LCDs. It was noticed that on the latter, large text looks angular, which leads to rapid eye fatigue, which is especially harmful if the user often works with text.
To configure ClearType, you must:
2. Set the display type to “Small icons” next to the word “View” and click on the “Screen” link.

4. In the next window, check the “Enable ClearType” box and click “Next”.

5. Now a setup window will appear in front of you, click “Next”.

6. In the subsequent windows, you will need to select several times the text option in which the font is best read in your opinion and click “Next”.


7. After completing the setup, all you have to do is click on the “Finish” button.

Setting Color Display
Optimal color display in Windows 7 is ensured if the display color depth is 32 bits, but sometimes the system defaults to a lower value. To fix this you need to:
2. Set the display type to “Small icons” next to the word “View” and click on the “Screen” link.

4. Select the “Monitor” section, set the color rendering quality to “True Color (32 bits)”, click “OK”.

Results
Well, now you know how to customize the screen on Windows 7 and you can enjoy high definition, excellent brightness, readable fonts and realistic colors. We hope our instructions helped you!
Instructions
If you are working on a computer with installed system Windows 7, then most likely change the resolution monitor you will not have to. operating room Windows system 7 is good, among other things, because it installs itself necessary drivers to the video card and monitor, and also selects the optimal one for your monitor screen resolution.
However, if the need to change the resolution still arises, go to the desktop and right-click on it. A drop-down menu will appear on the screen, from which select the line “ Permission screen" (you can also get to this menu item through "Start - Control Panel - Appearance - Adjust screen resolution").
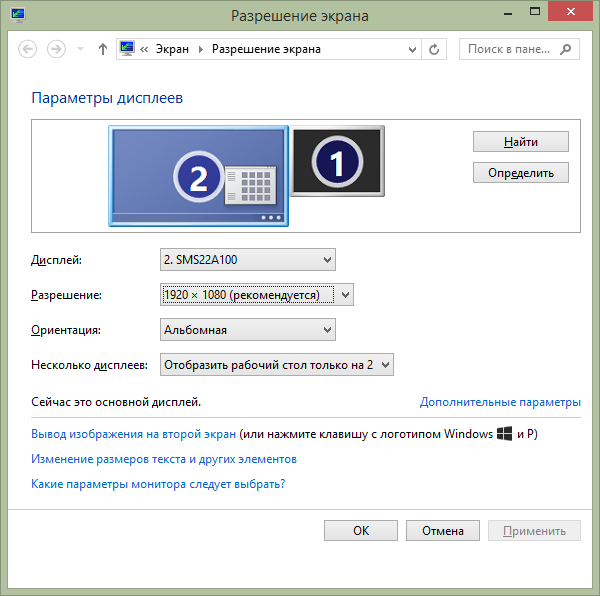
In the window that opens you will see your current settings. The “Screen” line must indicate the name monitor, which you are using, in the line " Permission" - the currently set screen resolution; in the "Orientation" line - the orientation of your screen ("landscape" or "portrait"). Typically, in the line " Permission"next to the current dimensions in brackets is indicated "recommended" - that is, this is the resolution that the system considers most suitable for your monitor. If you want to change it, click on this line and drag the slider with the mouse to the value you need.
Click the "Apply" button. The selected settings will take effect immediately and a window will appear asking “Save these screen settings?” You can choose "Save" or "Cancel". If you do nothing, the change will be canceled after a few seconds.
If the new resolution suits you, click “Save”, followed by the “OK” button.
When running on systems older than Windows 7, it may indeed be necessary to manually change the resolution monitor, since these systems do not always select best option. To do this, right-click on the desktop on any empty space and select “Properties”.
In the window that opens, go to the “Options” tab. The type of your monitor, under which there is a section “ Permission screen." Here, use the slider to select the resolution you need, then click “Apply” and, if the selected resolution suits you, the “OK” button. After this, the selected resolution will take effect.
If permission screen monitor does not meet your requirements, you can change it in the settings operating system computer. With its change, the clarity of the display of texts will change and the number of elements that can be placed on the desktop space will change.
Instructions
In Windows XP, the resolution is selected in the properties window screen, to launch which you need to right-click on the desktop space free from shortcuts and select the “Properties” line in the context menu. In the settings window screen go to the “Settings” tab. You can get to this tab in another way: press the WIN key and launch the control panel, and in it click the “Appearance and Themes” link. In the “Select a task” list there will be the line you need “Change permission screen».
Section "Resolution" screen" is located in the lower left part of the Settings tab. Move the slider with the left mouse button to select the desired value and click the “OK” (or “Apply”) button. The utility will change permission and will open a dialog box with a timer - if you don’t like the look of the desktop in the selected resolution screen, then you don’t need to press anything. Without receiving confirmation, the utility will return the previous value and you can try another option.
Sometimes the permission selection list screen contains only a few values, none of which provide acceptable image quality. Typically this means that the OS is using
Monitor screen resolution is reflected in the ratio of the number of pixels (dots) that fit in one line to the number of lines that fit on the computer screen. It's no secret that this value can be increased. How? Let's find out from our article. Useful information Both Windows OS owners and Linux and Mac owners will benefit from it.
How to increase screen resolution: methods
Let’s immediately make a reservation that you can increase the resolution of a laptop screen in the same way as on a PC. The only difference is in the settings of your operating system electronic device. It would be logical to talk about each OS.
Windows
- To accomplish this task, go to the Start menu.
- Next, go to the "Control Panel" option.
- In the resulting list, find and open the "Design and Personalization" section.
- Now select the "Adjust screen resolution" command.
- Click on "Permissions". After this, a list will appear from which you need to select the desired option. After that, click on the "Apply" button.
- If you are satisfied with the result, click the "Save" button. If you feel that these settings are not suitable for comfortable work, click the "Cancel changes" button.
Linux
- Access the Control Center window.
- Click on the "Hardware" button on the left side of the "Control Center".
- On the right side, you will see a list of various computer settings.
- Now go to the "Graphics Card and Monitor" link. After this, you will see a dialog box appear to adjust the screen resolution of your PC or laptop.
- To change the resolution, select the monitor name, after which you can change the desired settings (you can also reassign the screen color depth) in a way that suits you best.
- You will find the monitor name in the "Monitor Settings" dialog box. You can open this window using the "Change" button located next to "Monitor".
- The last thing to do is select the “Resolution” setting, where, in fact, you can change the monitor settings.
Mac
- Go to Dock mode. There, select the "System Settings" option.
- A dialog box will appear in front of you in which you need to select " Hardware". From the list, select the "Monitors" component.
- A window will open where you will find the available resolution settings. All you have to do is select one of the options.
Is it possible to increase the maximum screen resolution? It's impossible because maximum values the number of dots per line and the number of lines are set at the manufacturing plant. Don't download anything software or utilities to jump over the capabilities of your monitor. Most of them are fakes that change absolutely nothing.
In addition, some of these programs can introduce viruses into your computer system. There are examples of programs that are supposedly capable of “overclocking” a monitor to settings higher than factory settings. They implement a software shell that simply increases some image parameters without affecting clarity. Namely, the clarity and capacity of the screen can serve as an indicator of high resolution.