You have installed or purchased a computer with the Windows 10 operating system. How to protect and configure the system yourself without third-party programs?
After installing Windows 10, we will correctly configure user rights, make automatic login and install protection.
Protecting the system using Windows 10
The very first thing you need to do after installing Windows 10 is to create users with at different levels access to the system.
This action is necessary in order to malware could not get into your computer. If you are running under a user who does not have rights to change important system files, then a virus or other malicious program simply will not be able to enter the system or damage data.

To do this, you need to create a user with full Administrator rights, as well as a user under which you will work in Windows 10.
In this way, we create protection against malware using the system itself.
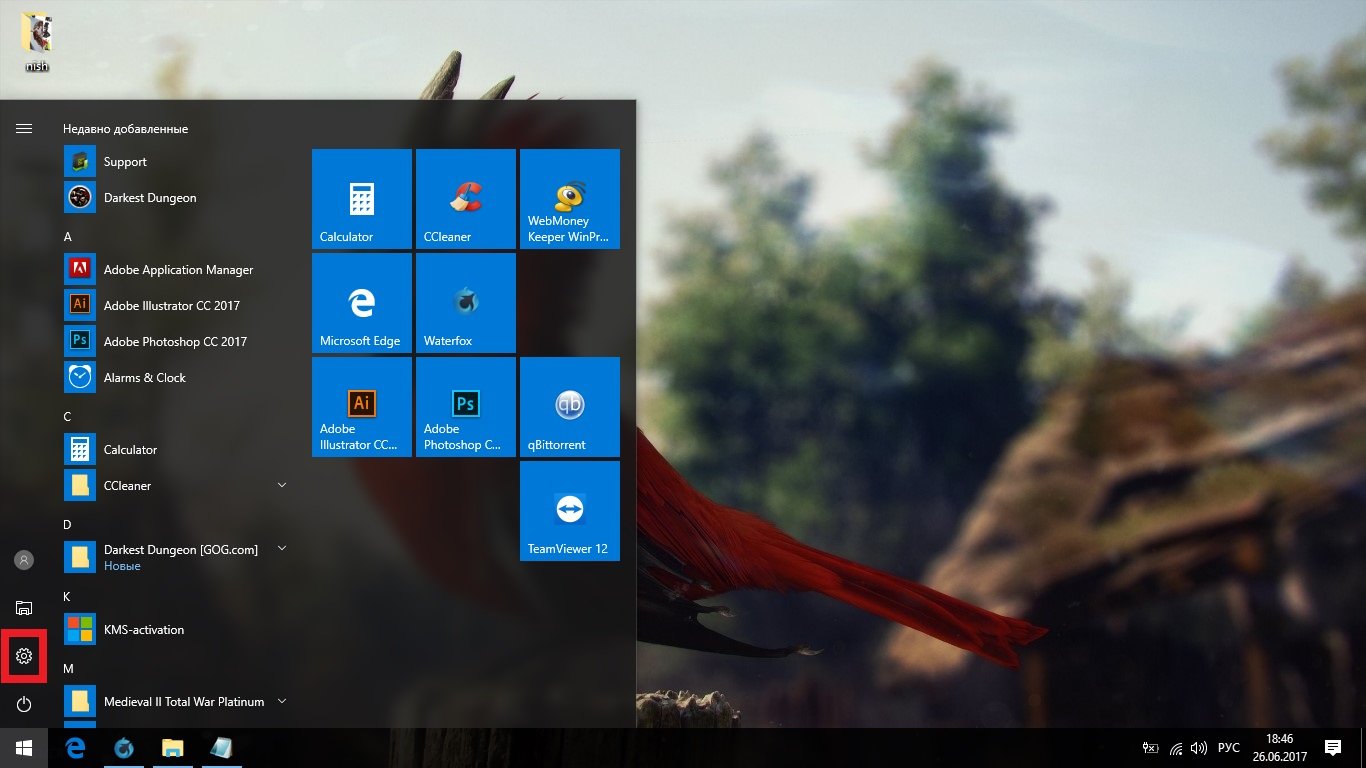
Go to “Control Panel” > “All Control Panel Items” > “Administrative Tools” > “Computer Management”
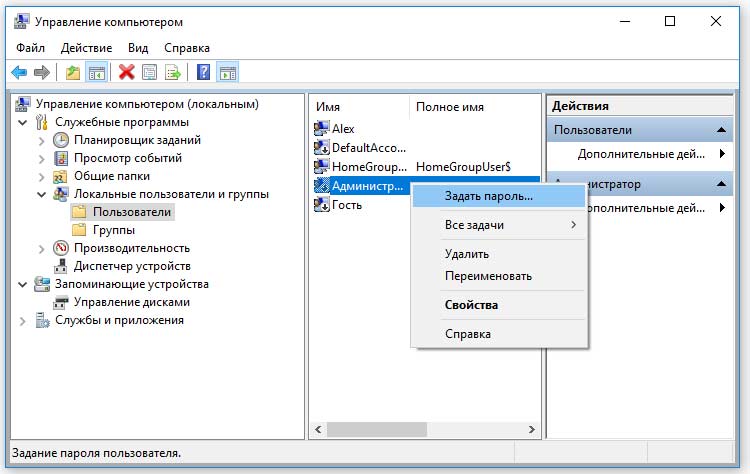
In the “Users” tab, select the Administrator, set a password, and in the “Properties” tab, activate the account by unchecking the “Disable account” checkbox.
The Administrator user with full access is now activated.
Setting up regular user rights
We limit the rights of the user under whom we will work in Windows 10. In our example, the user is called “Alex”.
We set the password for the “Alex” user, just like for the Administrator( passwords must be different), then go to “Properties” and go to the “Group Membership” tab. There we remove the Administrator from the list. This way we limit the rights of the “Alex” user.
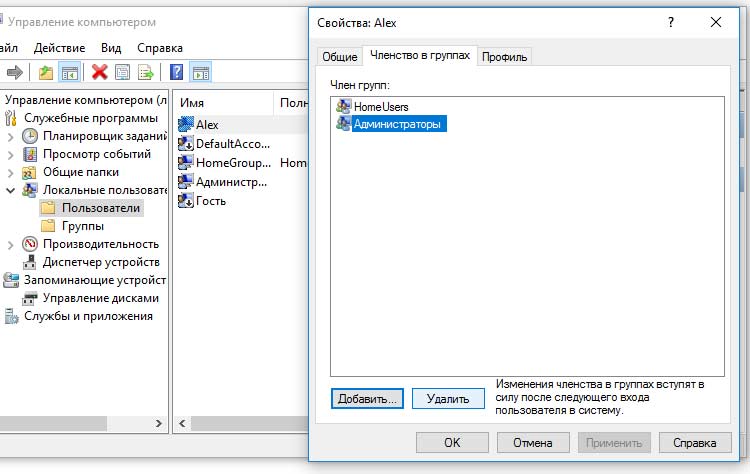
Thus, we differentiated the rights of a regular user and the rights of an Administrator.
Setting up automatic login to Windows
Quite often, users do not want to set a password on their accounts because they are too lazy to enter the password every time they boot the system. So if you don't want to enter your password every time to log into Windows 10, we can set up automatic login.
Click right click on the “Start” menu, then click “Run”. Next we enter the command control userpasswords2 into the text field
In the window that appears " Accounts users" and uncheck the "Require username and password."
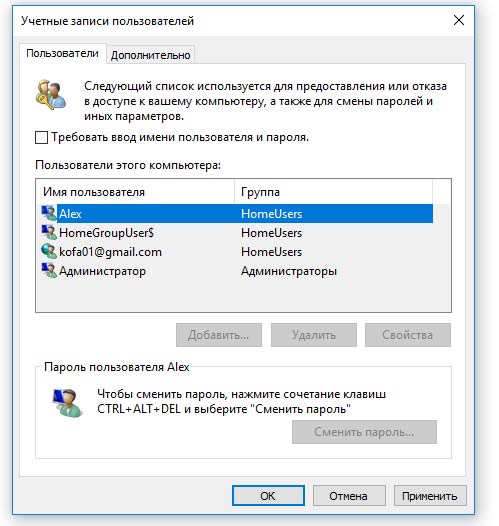
Now when you boot your computer operating system Windows 10 will not require a password.
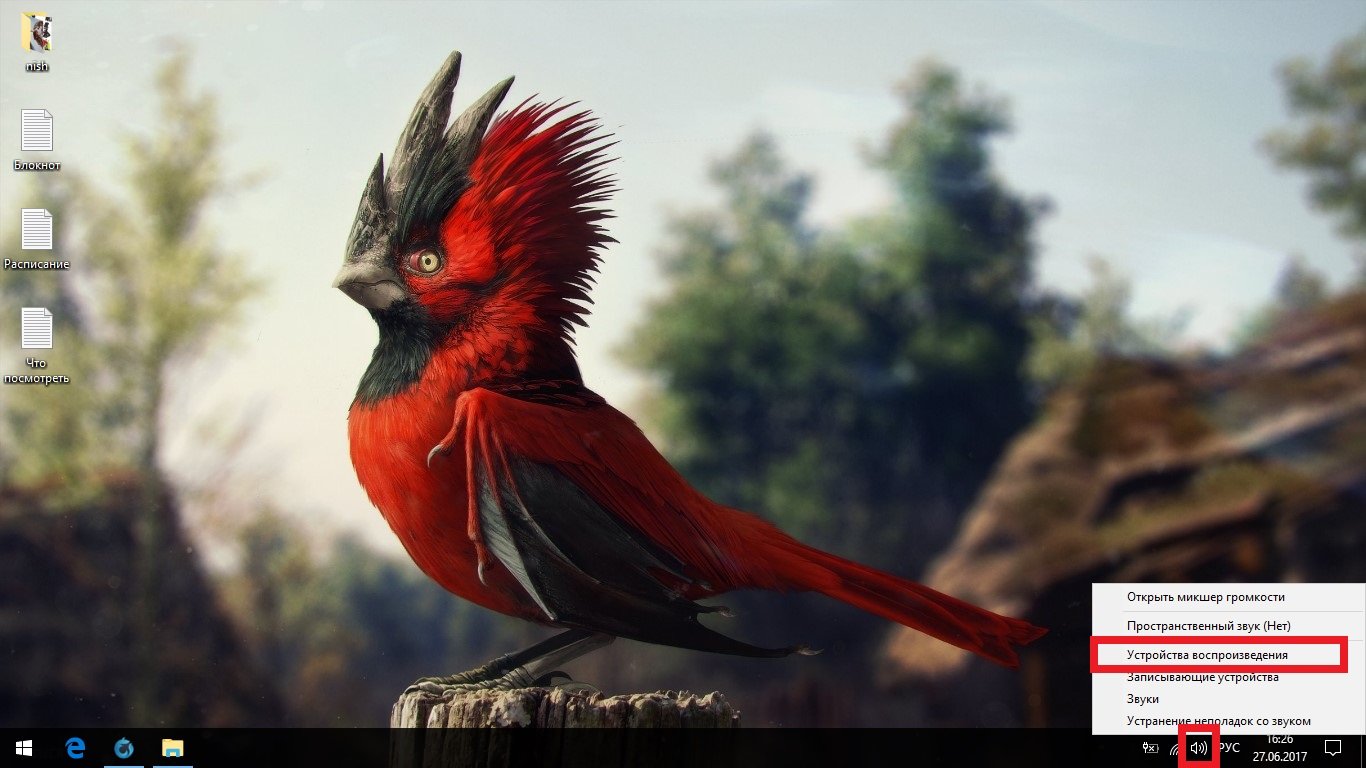
Turn on Windows 10 Defender
Windows 10 has a built-in antivirus called Windows Defender. To launch it, click the “Start” button and write the phrase “Defender”.

By clicking on the menu Windows Defender, you will open a window with its settings. By clicking the enable button, you activate the built-in antivirus.
![]()
Update your antivirus database after activating it and configure its settings. Defender's settings are intuitive, so we won't describe them.
Windows 10 setup results
Now, whenever you want to install any program on your computer, Windows system 10 will ask for a password to confirm your actions, and if the program wants to make changes to system files, the system will prompt for the Administrator password.
For example, when viewing an unknown site, you may be asked to click “Yes or No” in the window that appears (If the site is malicious, then, regardless of your actions, the virus will try to get into your computer after pressing any button.)
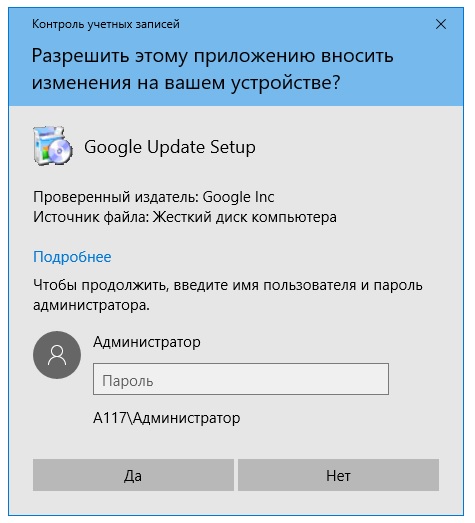
Since only you know the password, the malicious program will not be able to install itself in your computer. background.
It should be noted that when installing new programs, you must be sure that this program is not malicious; to do this, you need to download programs from trusted sources and scan them with an antivirus.
Installation and Windows setup 10 is as simple as possible. This is not a seven, but something can be done to improve performance. The first time after installing Windows 10, the user is most surprised by two things: the absence of Control Panel signs and the inability to enable hibernation mode. The first is solved quite simply, and there are several ways. The second is much more difficult to implement. Otherwise, no configuration of the Windows 10 operating system is required after installation.
Some people change the page file size or try to update the drivers, but we can tell you from experience that both are not needed right now. As with Windows 7, a lot depends on the graphics performance of the operating system itself. Simplifying design elements to the maximum speeds up your work. We believe this is the main thing for many, because few people want to admire the design from Billy Gates. Most of it goes into the system to work.
Minimizing a set of effects
It should be noted that the top ten is very democratic. An instance of the system installed on a weak laptop works at almost the same speed as a powerful desktop. To get a noticeable difference, the shell needs to be optimized:
You will see that all the checkboxes in the window will be unchecked. But the speed of your PC will increase. But there is no need to stop there. Let's activate the simplified theme.
Improve performance by choosing a theme
It was possible to customize themes to improve performance in seven. The difference is that the list of tens is a little more extensive. Right click on free space desktop and select last point menu.

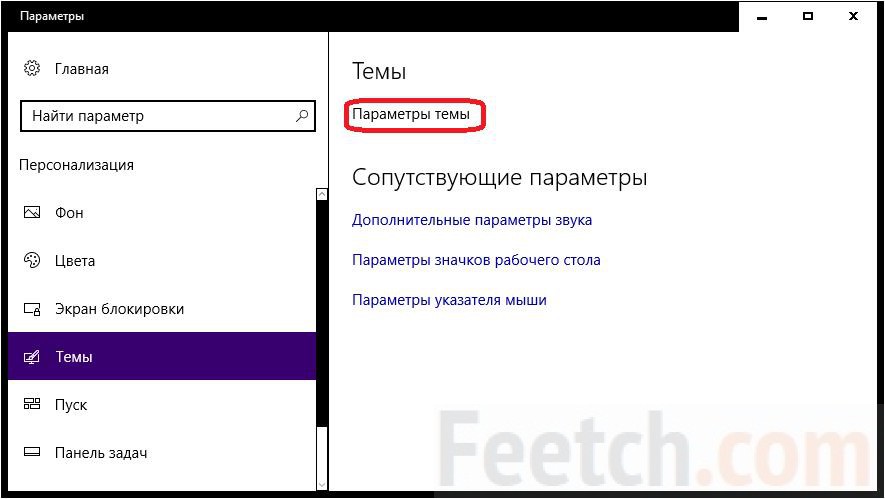
Choose, for example, a contrasting white theme.

Please note that the wallpaper will disappear from the desktop. Reinstalling it means reducing performance. Take comfort in the speed boost you get from these steps.
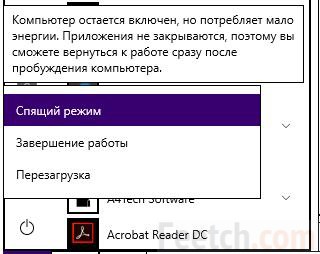
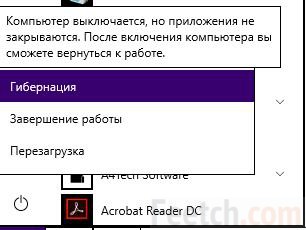
Hibernation
Hibernation mode allows you to start working exactly from the point where the process was interrupted. This is absolutely necessary for everyone who has nothing to hide. The system simply writes its state to disk and then reads it for loading. This is considered a security vulnerability, but what should people hide? social accounts which are already available by law to all competent authorities? Therefore, the first thing you need to do after installation is to enable hibernation mode.
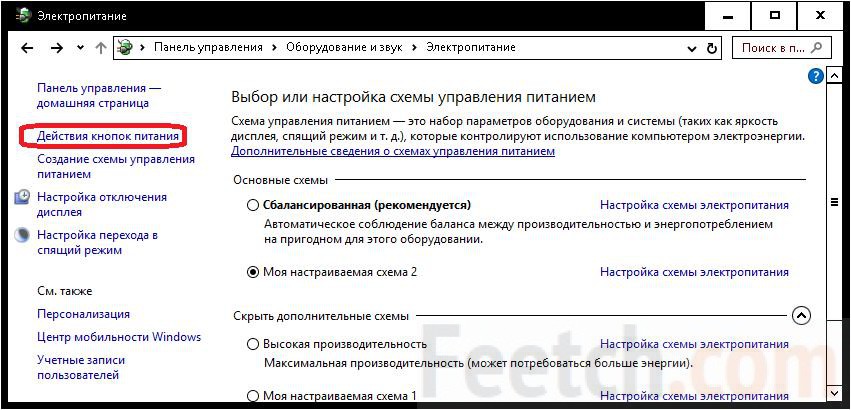
Allowing hibernation

However, the menu does not yet have the required button. See for yourself!
Adding hibernation to the menu
The next thing to do after installing the option itself is to add it to the menu. We operate through the same control panel. Go to the power settings and click the “Button actions...” link.
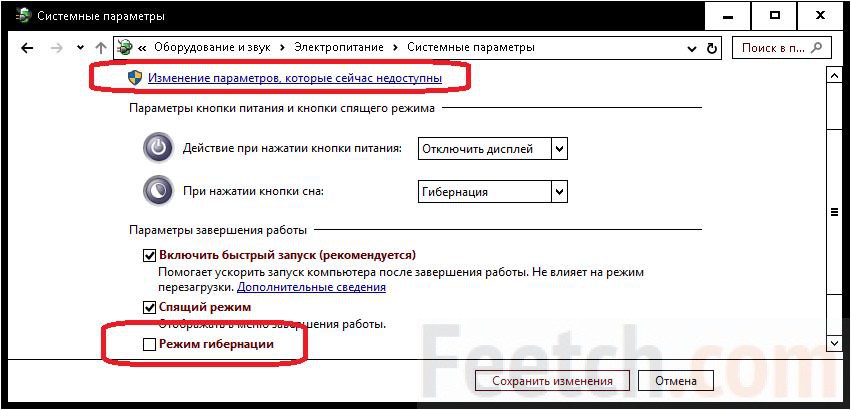
This tweak will allow you to quickly send an operational screenshot of the RAM memory to the hard drive. This will also allow you to start working much faster next time.
Firewall and Telemetry
There are dozens of applications that literally spy on their users. Not everyone knows that this can be turned off via group policies, and even fewer people will be able to do it in person. But anyone can tweak their privacy settings and firewall permissions a little. This will significantly reduce the load on HDD and processor. The easiest way to find the desired window is as follows.
As for the firewall, it is available from the Network and Sharing Center... 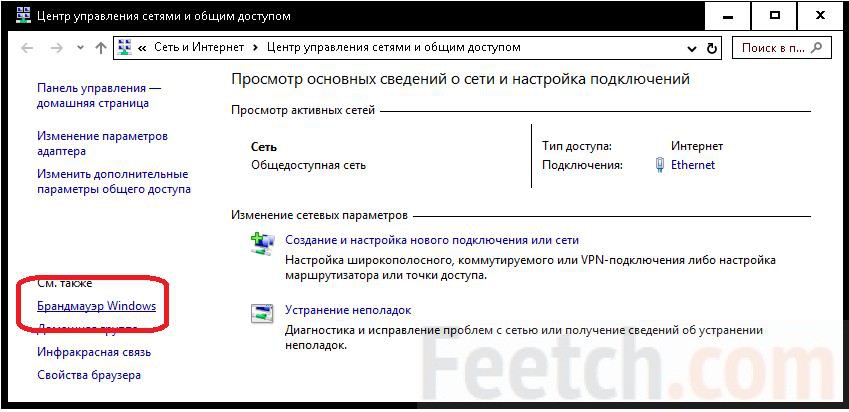
Block the maximum number of processes from accessing the network.
The Windows 10 operating system tries to do everything itself: from installing drivers to optimizing applications. It turns out that it does this well, but if you leave all important processes to the conscience of the operating system, then you can soon find a bunch of incomprehensible applications and services that will periodically launch, self-update and eat up all the resources of your computer. If you want to configure Windows 10 so that your computer does not have to share its performance with strange services, while leaving everything useful that the system can give you, you will have to combine automatic installation with manual. This is not so easy to do, because Windows 10 practically does not tolerate interference in its processes, but if you strictly follow all the instructions below, you will not have any problems with the setup. And if some of the possible errors related to installation and configuration of the system, we will help you eliminate them completely.
One of the main points of pride in Windows 10 is the complete automation of everything possible, including setting up and optimizing the operating system itself. The idealized version of preparing Windows 10 for use, as Microsoft sees it, is extremely simple:
- You are installing Windows 10.
- The system starts, downloads all drivers and updates, configures itself and restarts.
- Windows 10 is ready to go.
In principle, this scheme works quite well, at least in most cases. And if you have relatively good computer and you don’t experience any discomfort after automatically setting up Windows 10, you can leave everything as is.
Now let’s list the disadvantages of automatic tuning:
- Microsoft has a lot of low-quality programs and games that need to be promoted somehow - some of them will be installed automatically on your computer;
- Microsoft wants you to pay or watch ads, or better yet, all at once;
- automatic setup of Windows 10 does not take into account outdated and weak hardware;
- Windows 10 is the most spying operating system in history, and it collects information using the resources of your computer;
- a huge number of minor services that run in the background and eat up RAM;
- automatic system updates that can take you by surprise;
- application updates, service updates and updating everything just to eat up as many resources and traffic as possible;
- Not everything works perfectly and failures are possible, and the system will not show it.
Roughly speaking, without manual configuration, your computer will be used not only by you, but also by completely unnecessary services that fully fit the definition of a virus.
At the same Windows time 10 is a surprisingly good and very capable system that really does a lot of good things in automatic mode. If you want to cut out all the imposed garbage and preserve all the good that Windows 10 can give you, without turning the system into a log along the way, you will have to spend a little time and do manual setting. It will take you two hours, but at the end you will get the most better system of all available, and free of charge.
Settings to be made after installing the OS
As mentioned above, setting up Windows 10 is a labor-intensive task and will take much longer than with previous versions. The main task will limit the amount of loaded junk, while allowing everything else to install, and then erase and disable everything that could not be prevented.
The sequence of points is very important, try not to disturb the order and restart the computer after each stage.
Store activation and limitation
The main task of this stage is to limit the store through a firewall; Windows can be activated at the very end of the setup, but it’s better now.
If your computer is already connected to the Internet, disconnect the connection quickly.
After connecting to the Internet, bulk downloading of drivers, updates and applications will begin. Let's take a look at preventing the downloading of unnecessary applications.
- Open the Start menu, find “Store” there and launch it.
Open the Start menu, find “Store” there and launch it
- Click on the button with your profile picture at the top of the window that opens and select “Settings”.
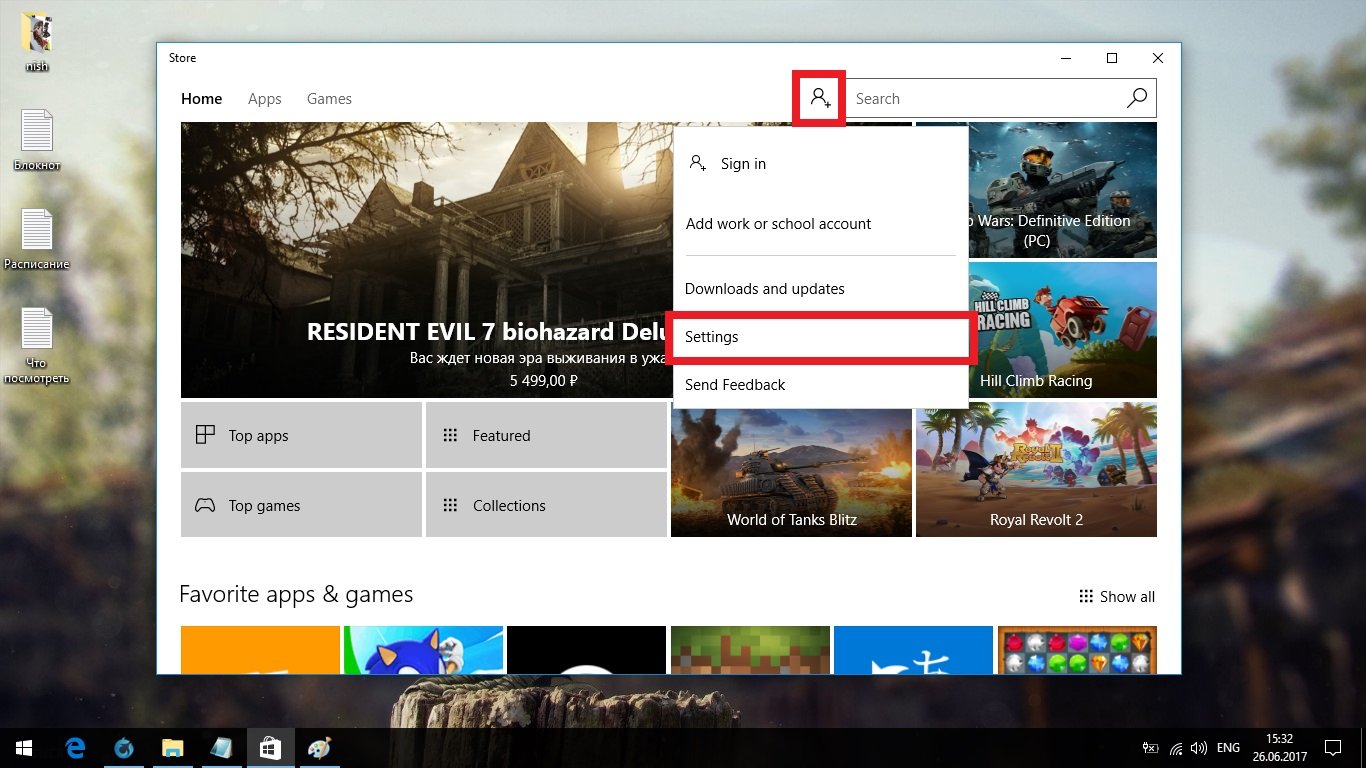
Click on the button with your profile image at the top of the window that opens and select “Settings”
- Uncheck automatic update applications.

Uncheck automatic app updates
- Now search for Control Panel and open it.

Find the control panel through the search and open it
- Go to the System and Security category.

- Open Allow apps through Windows Firewall.
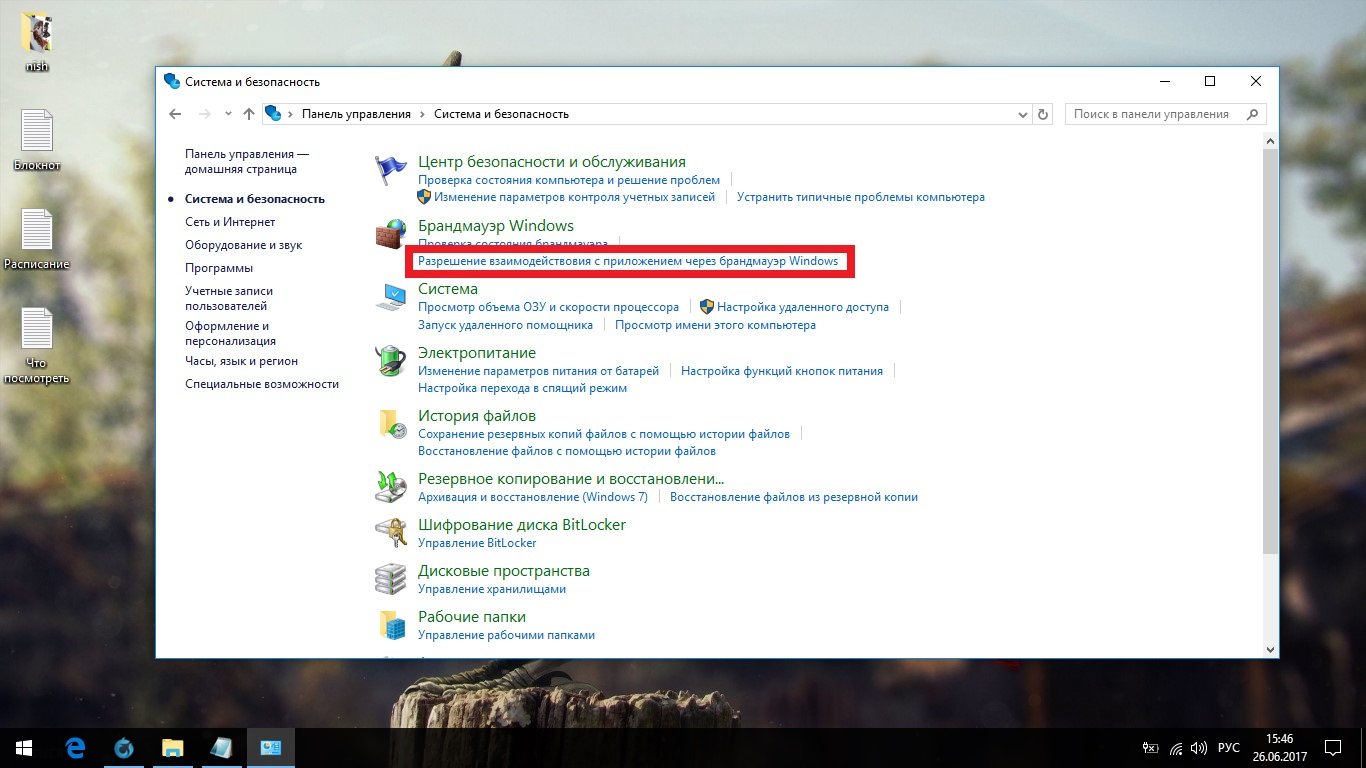
Open "Allow apps through Windows Firewall"
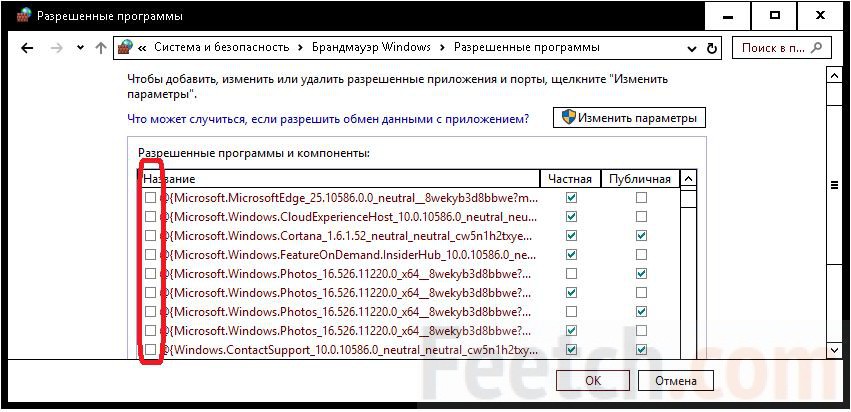
- Click “Change settings”, find “Store” in the list and uncheck all the boxes. Then confirm the changes.
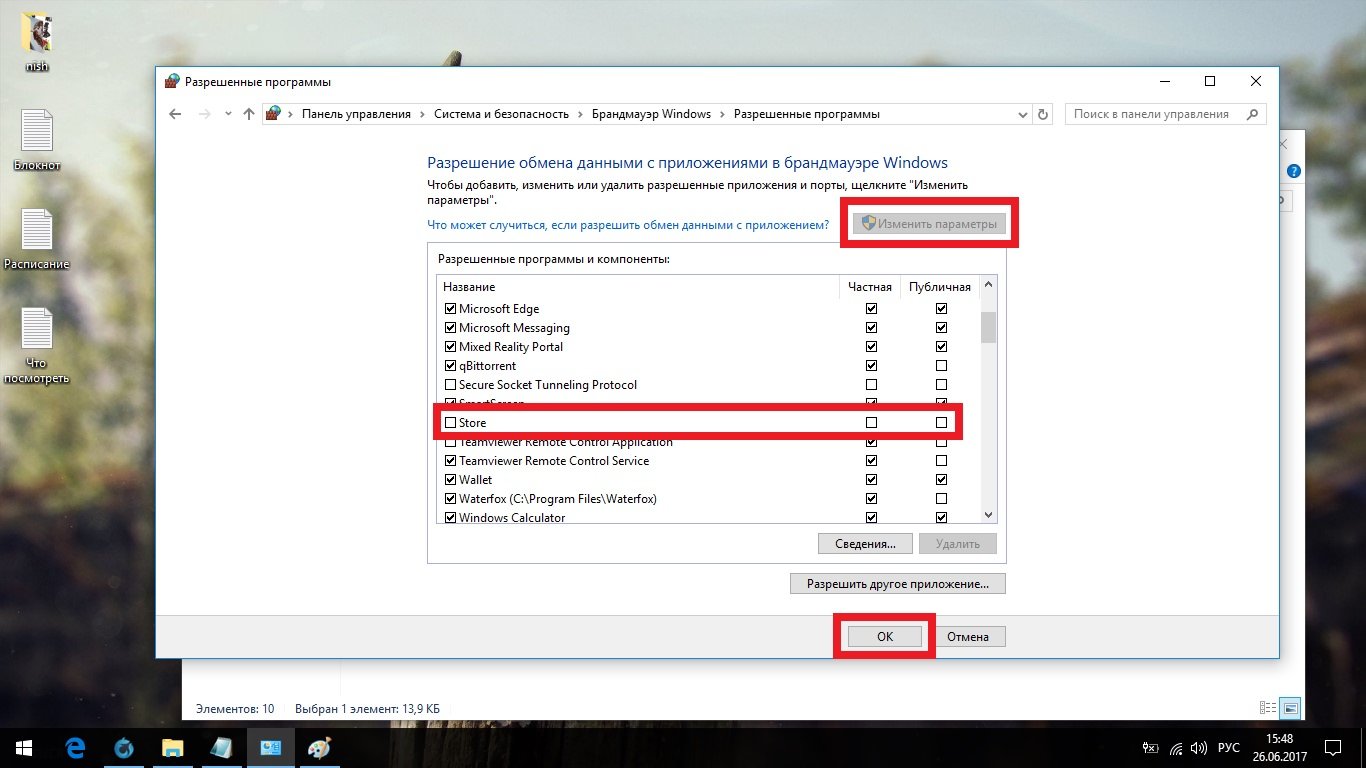
Click “Change settings”, find “Store” in the list and uncheck all the boxes
- Now it is advisable to activate Windows. It is best to use a KMS activator. If you have not prepared the activator in advance, download it from another device, since it is advisable to make the first connection to the Internet with Windows 10 already activated.

For Windows activation 10 It is best to use a KMS activator
- Restart your computer.
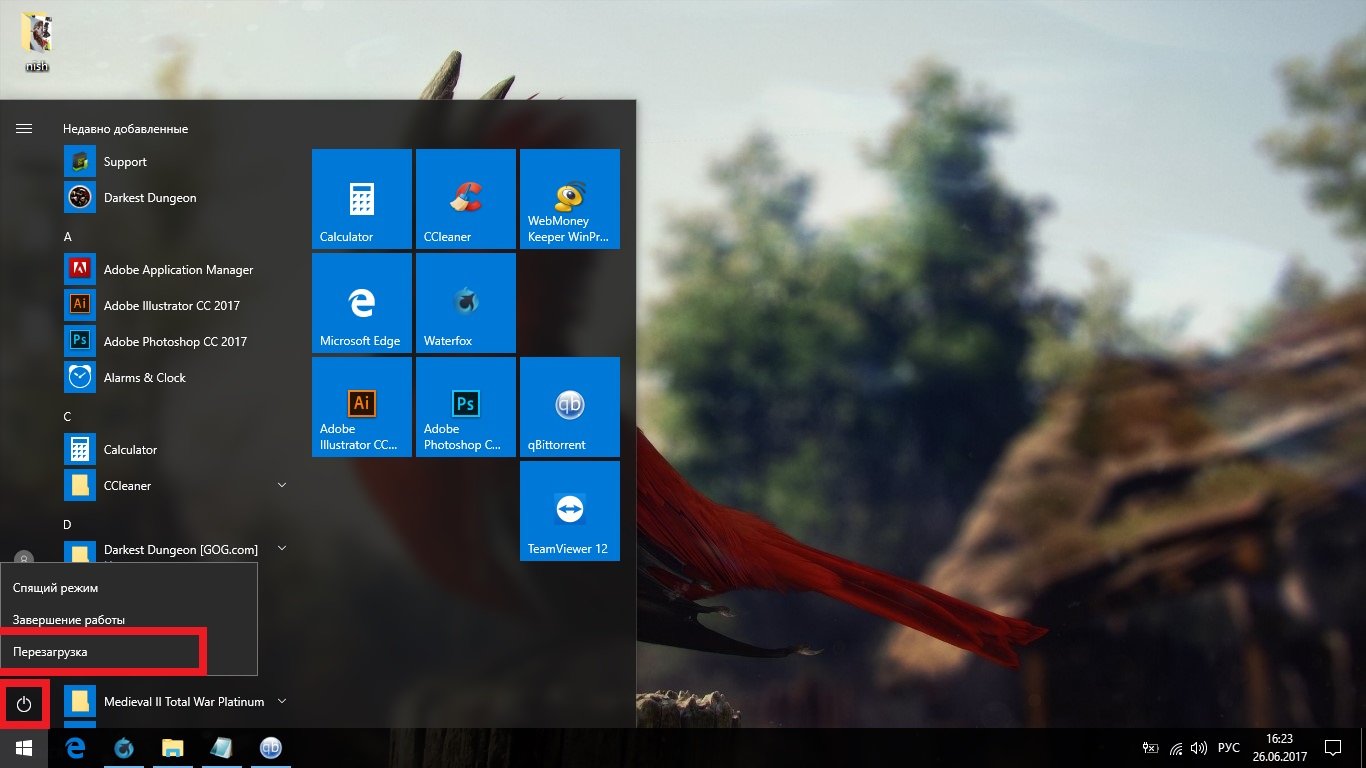
Restart your computer
System auto-tuning
Now you should let Windows configure itself. This is the key point at which the Internet turns on.
- At the previous stage, we limited the Microsoft store, but on some Windows versions 10 this may not help (very rare cases). Launch the store again, click on the user button and open Downloads and Updates.
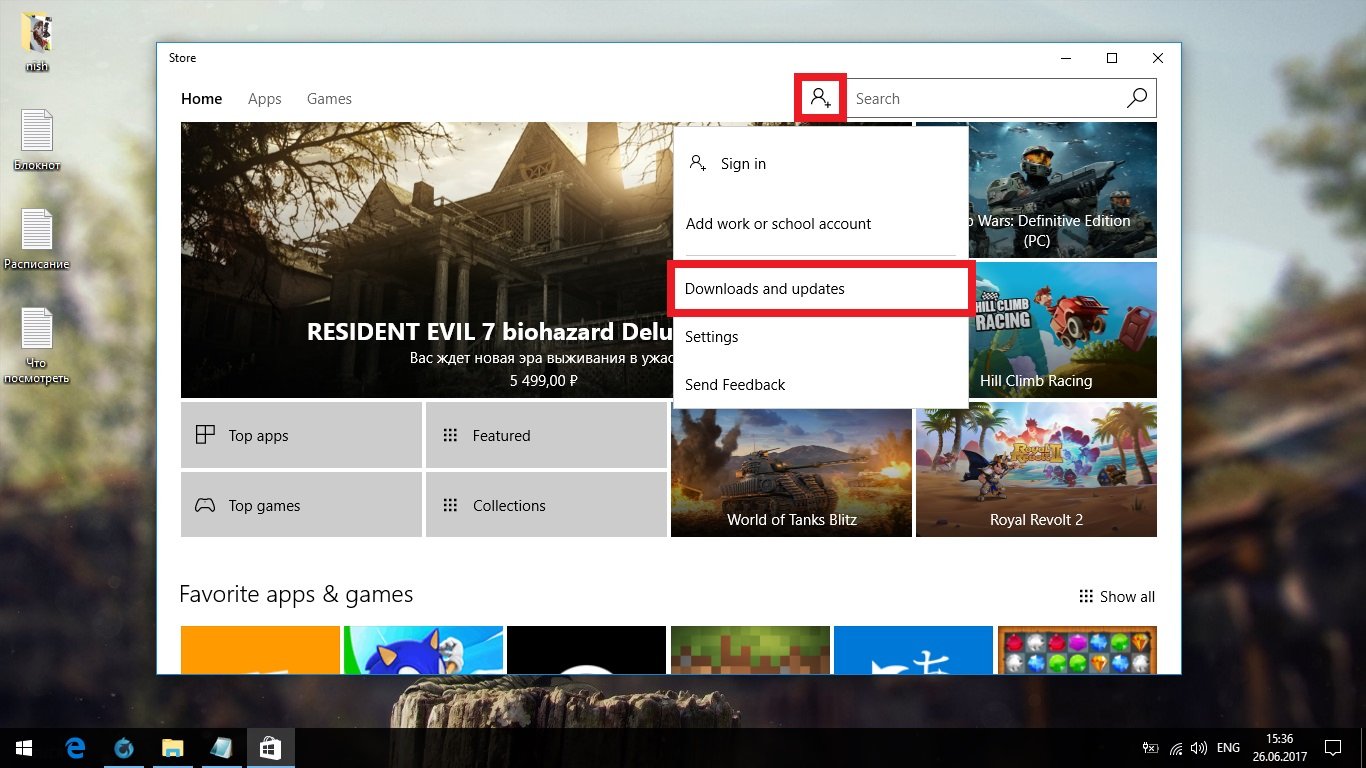
Launch the store again, click on the user button and open "Downloads and Updates"
- Drag the window down so that it is out of your way. Throughout the current stage, periodically look at the store window. If the download icon appears (marked in green in the screenshot), click “Stop All” and go through the crosses on all applications in the download queue. Required applications and there are no important updates here.
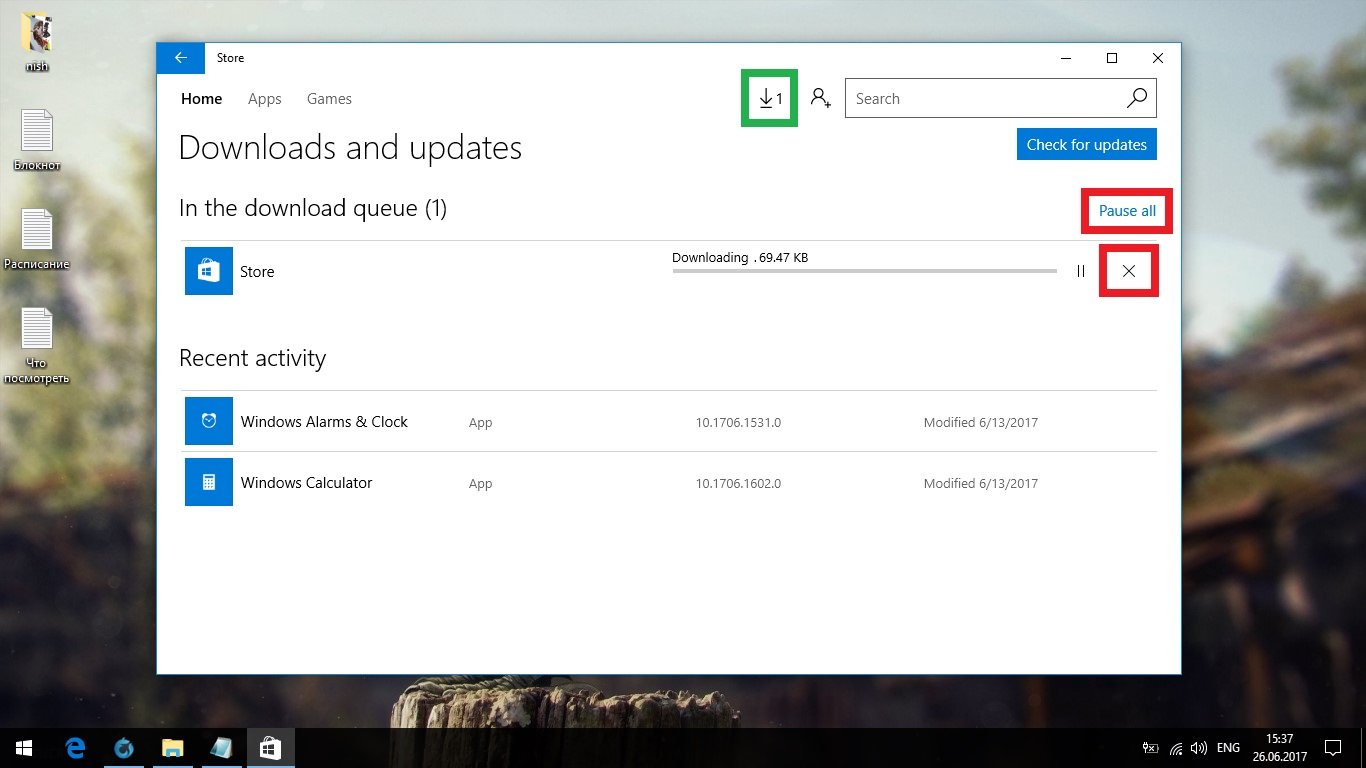
If the download icon appears (marked green), click “Stop all” and go through the crosses on all applications in the download queue
- Now it is very desirable to connect all devices to your computer: printer, joystick, and so on. If you are using multiple screens, connect them all, press the key combination “Win+P” and select the “Extend” mode (this is what you will change after the reboot).

If you are using multiple screens, connect them all, press the key combination “Win+P” and select “Extend” mode
- It's time to connect to the Internet. Windows 10 should do this without drivers, but if you have problems, install the driver for network card or Wi-Fi module (download only from the manufacturer’s website). More details about manual driver installation are described in the next step. Now you only need to connect to the Internet.
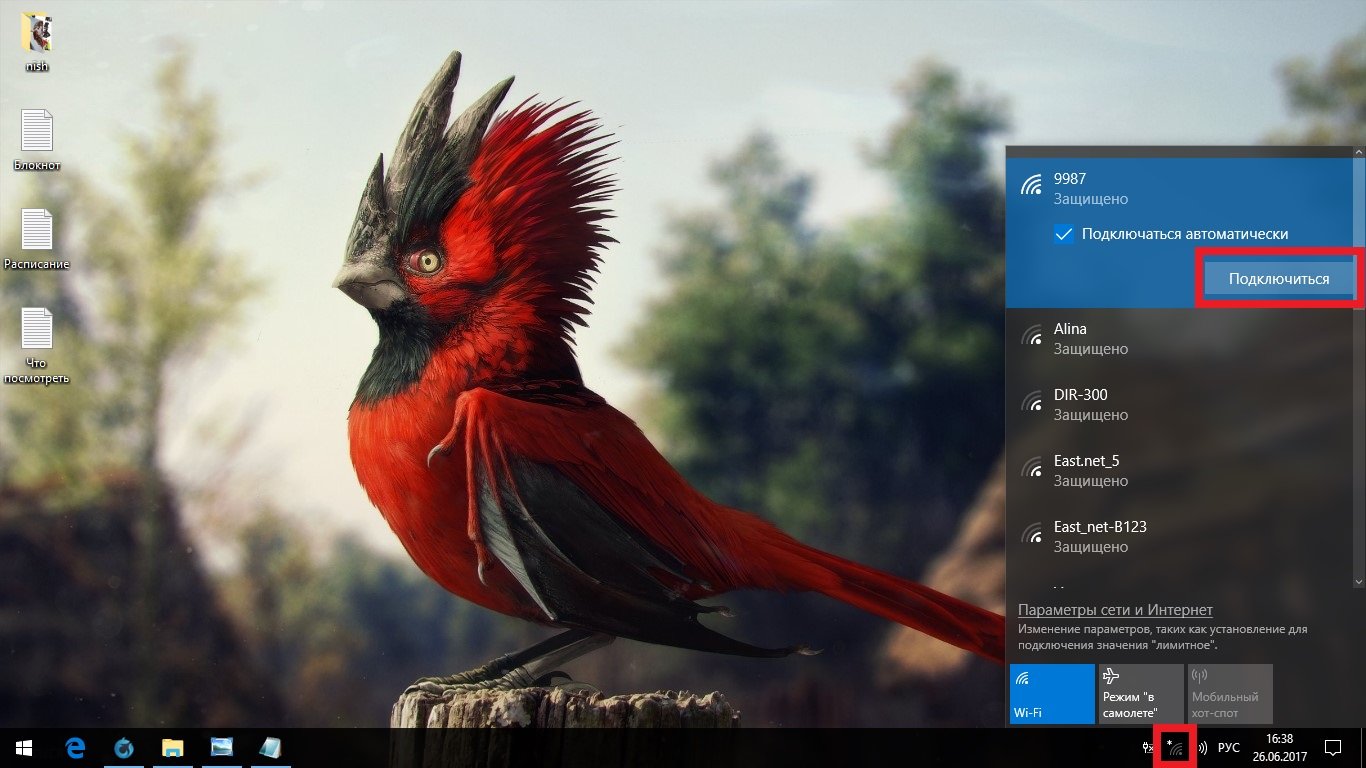
Windows 10 should see the Internet without drivers, but if you have problems, install a driver for your network card or Wi-Fi module
- Now the bulk download, installation and optimization will begin. Don't try to do anything with the computer: the system needs all the resources it can. Windows won't notify you about the end of the process - you'll have to figure it out yourself. Your guide will be the moment you install the driver for the video card: the correct screen resolution will be set. After that, wait another 30 minutes and restart your computer. If the resolution does not change even after an hour and a half or the system itself reports completion, restart the computer.
Installing missing drivers
As mentioned above, Windows 10 auto-configuration may fail, which is especially true in the case of installing drivers on outdated hardware, which is not taken into account. Even if it seems to you that all the drivers are in place, it is better to check it yourself.
- Open Control Panel and expand the Hardware and Sound category.
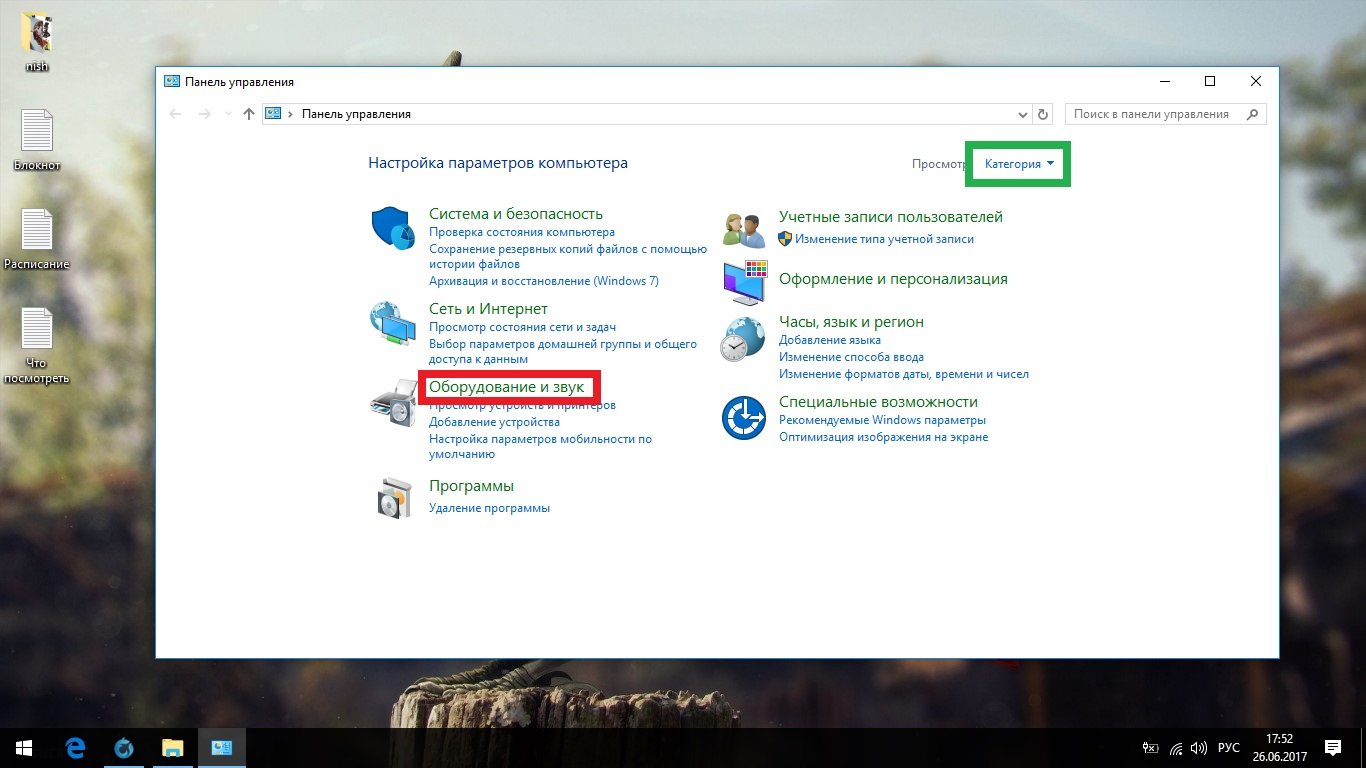
Open Control Panel and expand the Hardware and Sound category
- Go to Device Manager.
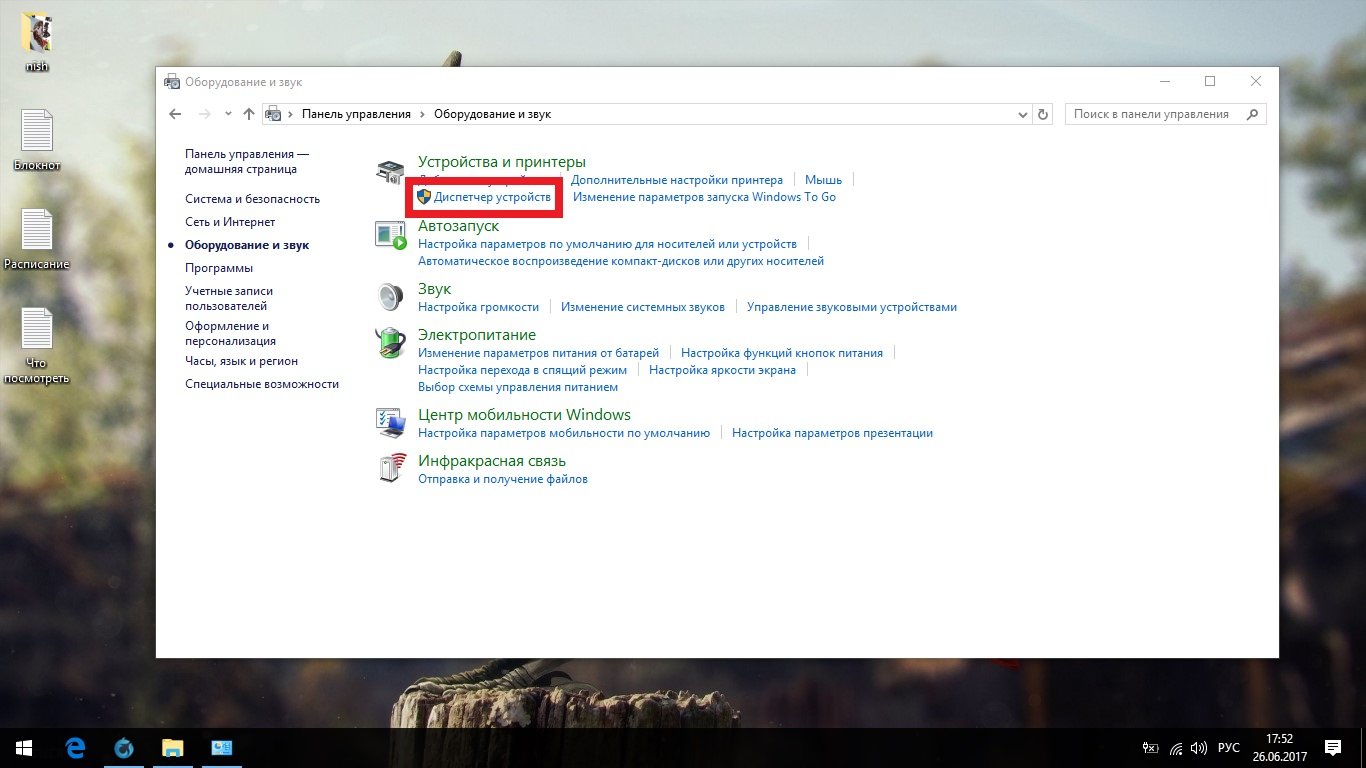
Go to Device Manager
- Now you need to find all devices with a yellow triangle on the icon, they will be visible immediately. If you find something like this, right-click on it and select “Update Driver”.
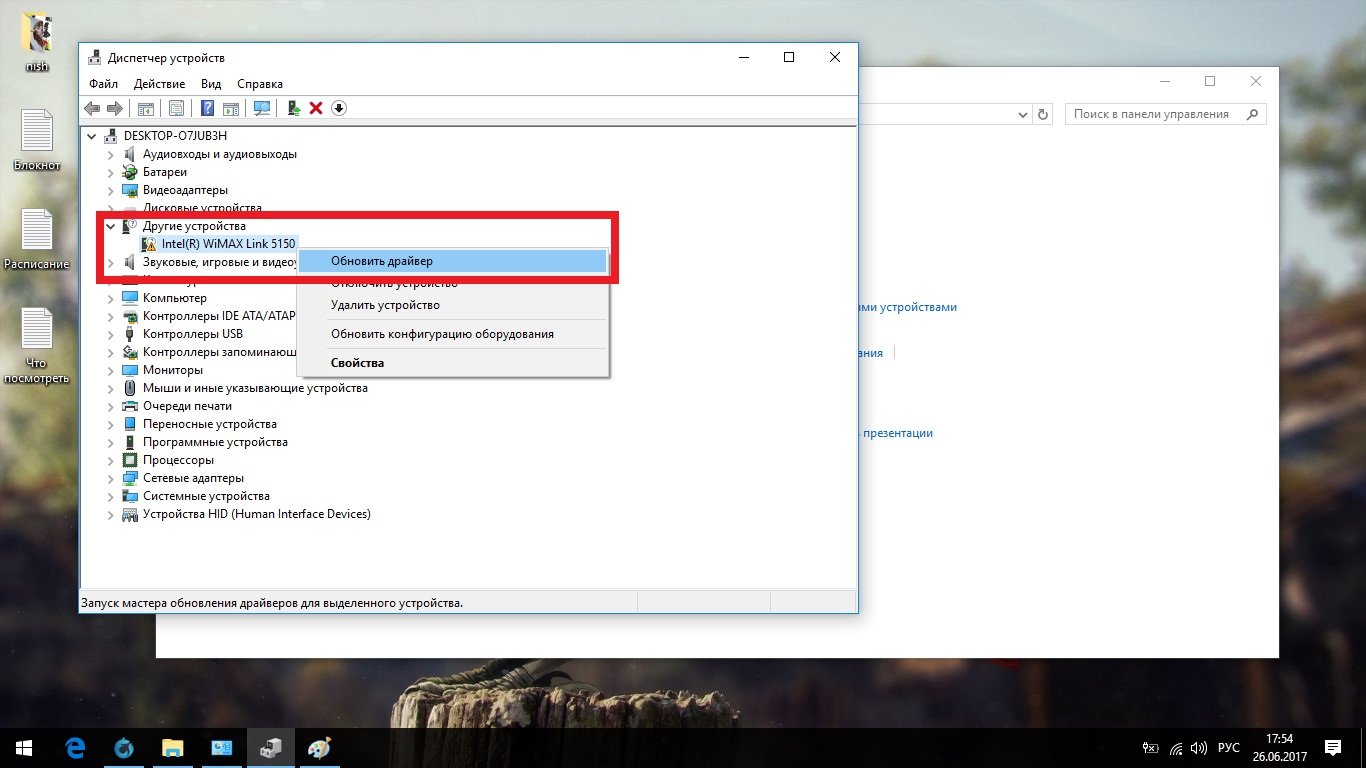
You need to find all devices with a yellow triangle on the icon and update their drivers
- Choose automatic search. Then the system will tell you everything itself.

Choose automatic search, then the system will tell you everything itself
- If it doesn’t help, which is very likely, right-click on the device again and go to its properties.
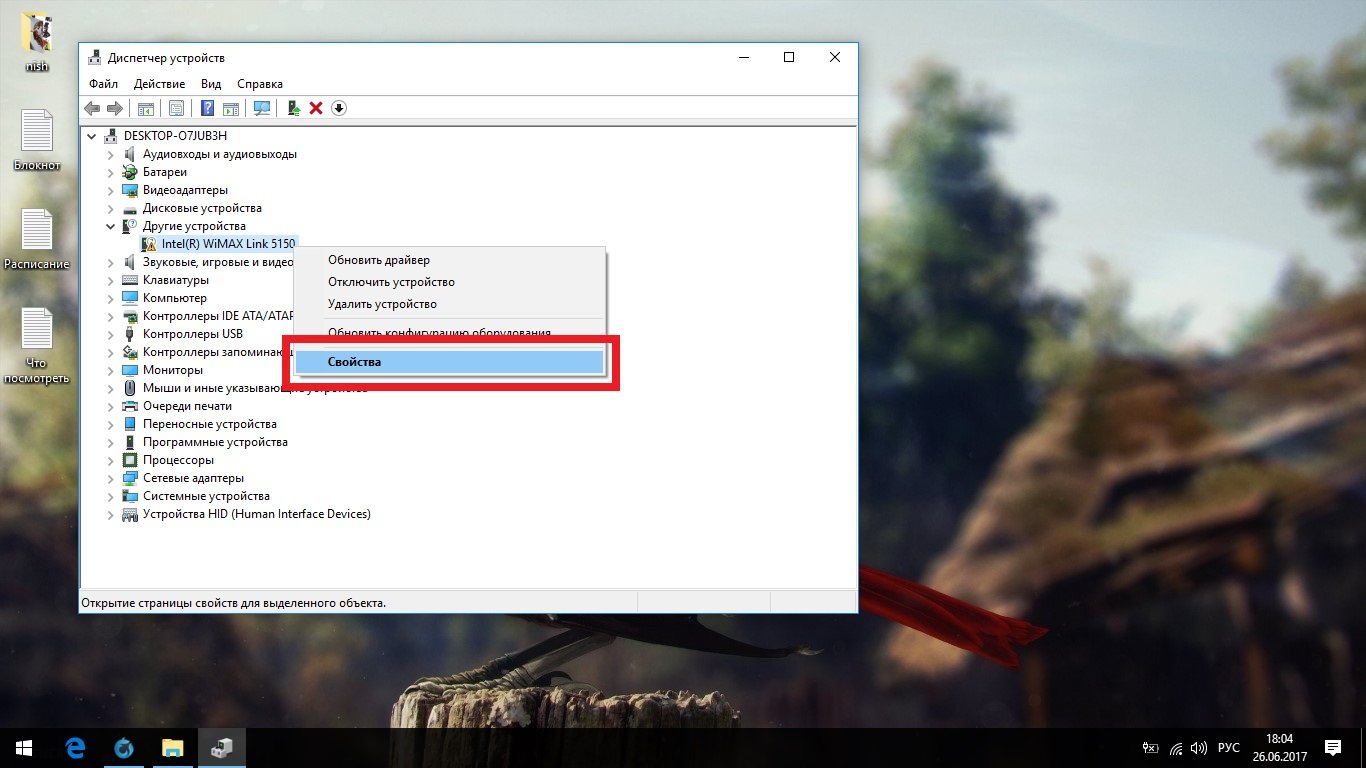
Right-click on the device and go to its properties
- The “General” tab will contain all the information that the system can find out about this equipment. Based on this data, you need to find on the Internet, download and install the missing driver yourself. If the manufacturer is indicated, the first thing to do is go to their website and look there. Drivers should only be downloaded from official sites.
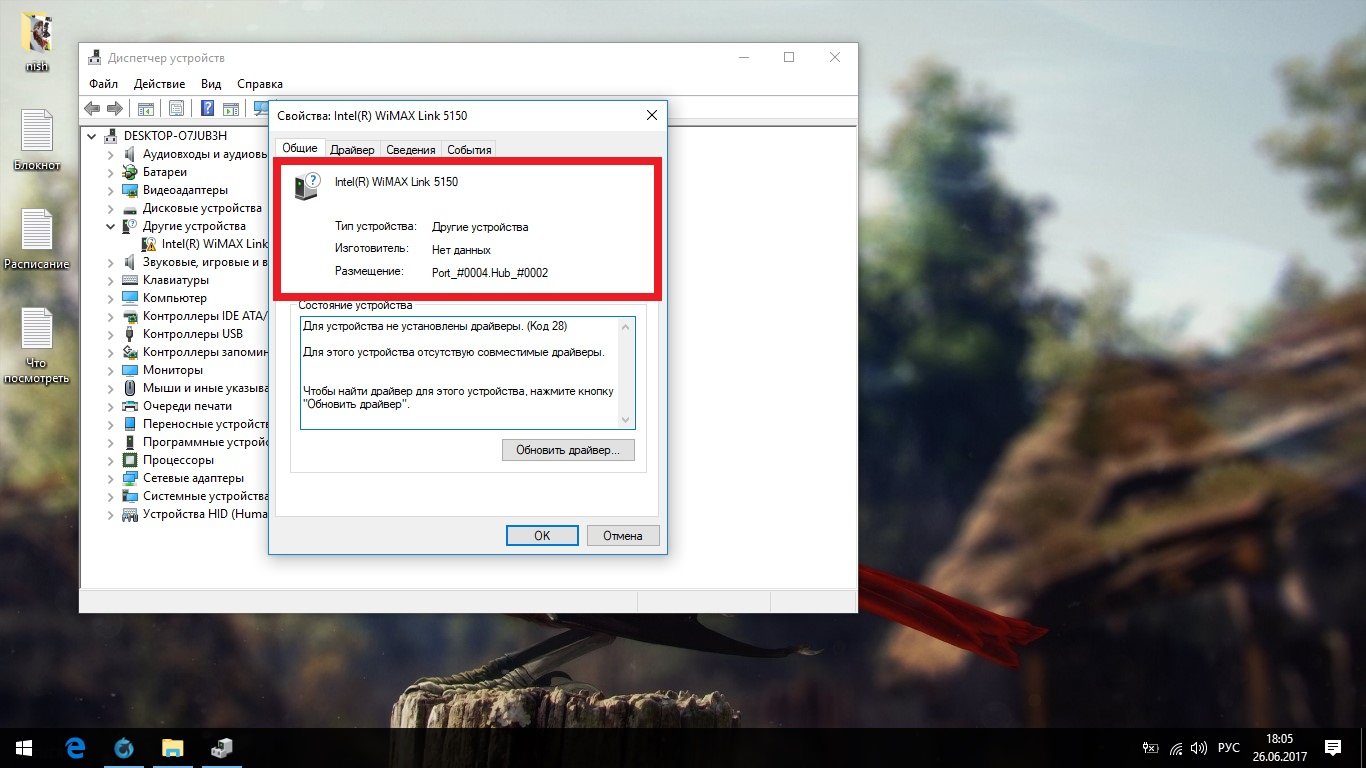
Based on the data that opens, you need to find on the Internet, download and install the missing driver yourself
If you have any problems installing drivers, follow the link below with an article on this topic or watch a short video that discusses manual installation drivers.
Video: how to install the driver manually on Windows 10
System update
There are many variations of Windows 10, tailored for different hardware and bit depth, but during installation, a universal version of the system is installed to minimize the size of the image. Windows 10 has an update center that automatically updates the system to current version and changes the Windows version to the most compatible one. We are not interested in updating the version: the changes are minimal, completely unnoticeable and not always useful. But optimization is very important.
As with the second launch, this stage can take a long time.
If nothing is found, then the system has already managed to update itself.
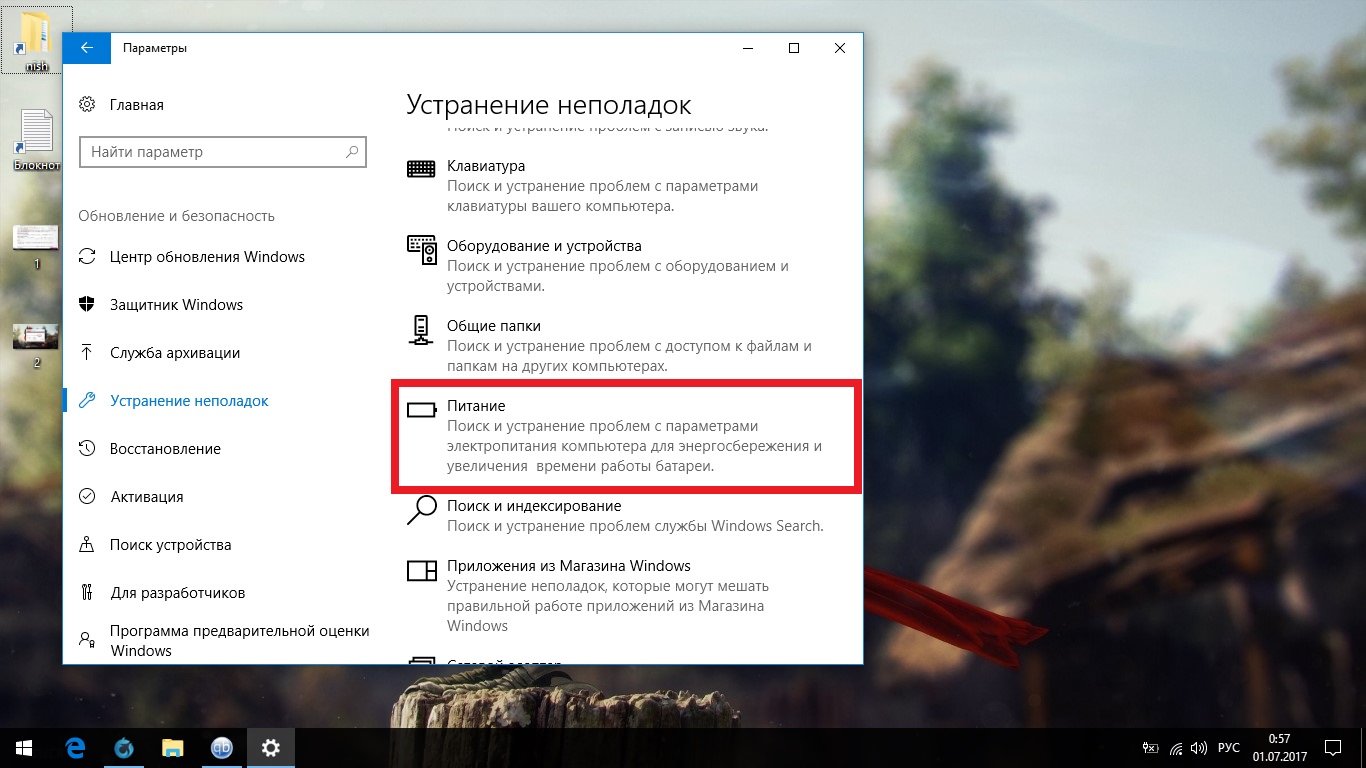
Ensuring maximum performance
Disabling auto updates
You should start by disabling automatic system updates. Updates for Windows 10 come out very often and nothing useful for ordinary users do not contain. But they can start on their own at the most inopportune moment, which puts pressure on the performance of your computer. And after you want to quickly reboot, you suddenly have to wait half an hour for the updates to be accepted.
You will still be able to update the system as described in the previous step, but now you will be in control of the process.
General limitation of services
As you probably know, Windows 10 actively spies on its users. But you don’t need to worry about your personal data: Microsoft is not interested in it. You need to worry about the resources of your computer that are spent on this espionage.
In order not to waste time digging through the corners of your system, we will use the Destroy Windows Spying program, which will not only protect your computer from spying, but will also remove all associated threats to the performance of your computer.
Radical limitation of services
Destroy Windows 10 Spying kills only the most unpleasant processes, but many things remain untouched. If you are determined to be sterile, you can perform a more subtle cleaning of services using the ShutUp10 program.

Installing programs
Windows 10 is almost ready to work, all that remains is to clean up the remaining garbage and heal registry errors. You can do this now, but it’s better after you install everything you need, as new errors and garbage may appear.
Install programs and games, configure your browser and do everything you’re used to. In terms of required software, Windows 10 has the same requirements as previous versions, with a few exceptions.
Here are the programs that are already built in and you don’t need to install them:
- archiver;
- image emulator;
- DirectX or its updates;
- antivirus (if you are not very good at navigating the Internet, then it is better to ignore our advice and still install a third-party antivirus).
If you doubt the set of necessary software, here is a comprehensive list of programs that you may need in the future:
- third party browser (best Google Chrome or Mozilla Firefox);
- Microsoft Office (Word, Excel and PowerPoint);
- Adobe Acrobat;
- players for music and video (we recommend AIMP for music and KMPlayer for video);
- GIF Viever or other third party program to view gif files;
- Skype;
- Steam;
- CCleaner (will be written about it below);
- translator (for example, PROMT);
- antivirus (installing it on Windows 10 is rarely useful, but this is a very controversial issue - if you decide, we recommend Avast).
Finally, don't forget to restart your computer.
Garbage, Registry and CCleaner
After installing programs and updates, a decent number of registry errors and temporary files, also called junk, should accumulate on your computer.
- Download, install and launch CCleaner. In the "Cleaning" tab Windows section tick all the boxes except “ Network passwords", "Shortcuts in the Start menu", "Shortcuts on the desktop" and the entire "Other" group. If you set up Microsoft Edge and plan to use it, you should not mark its group. Don't rush to start cleaning.
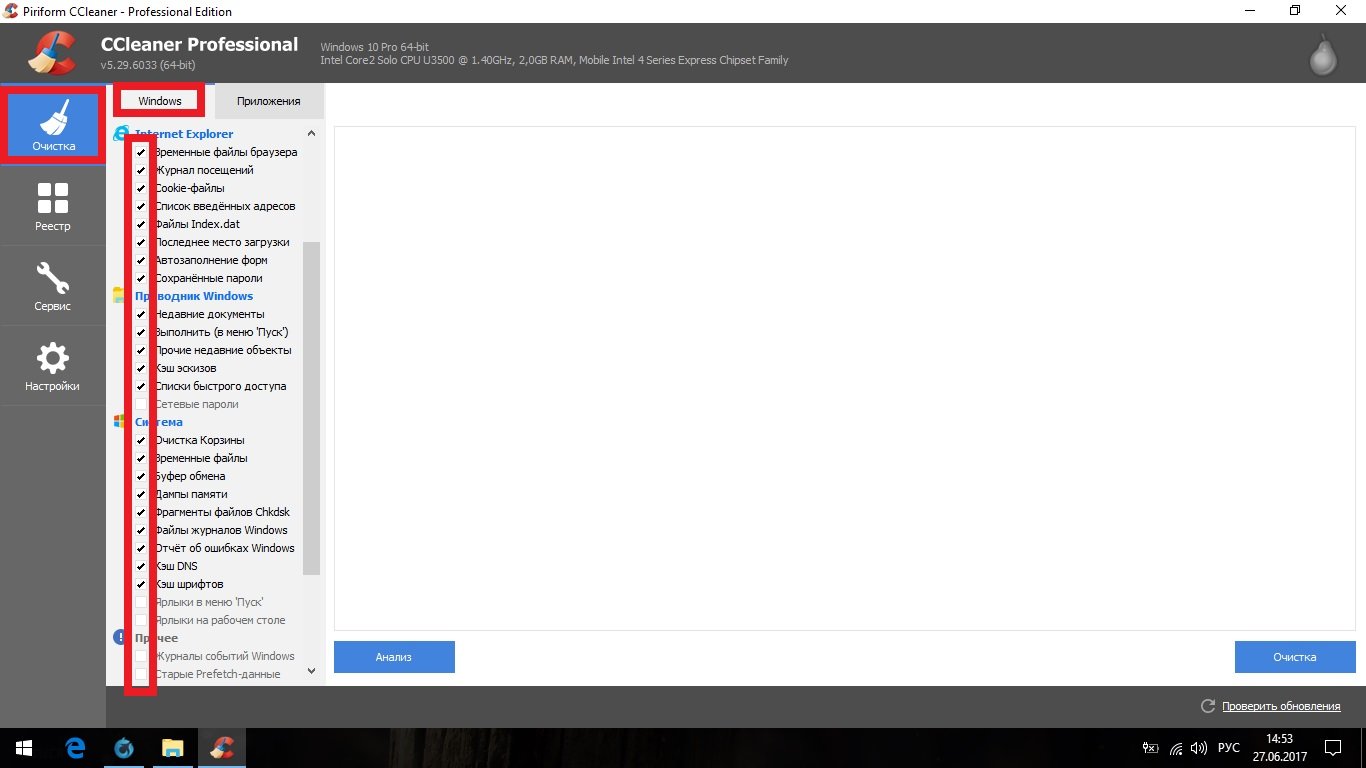
In the “Cleaning” tab in the Windows section, check all the boxes except “Network Passwords”, “Shortcuts in the Start Menu”, “Desktop Shortcuts” and the entire “Other” group.
- Go to the “Applications” section and uncheck all the checkboxes there. Now click “Clear”.
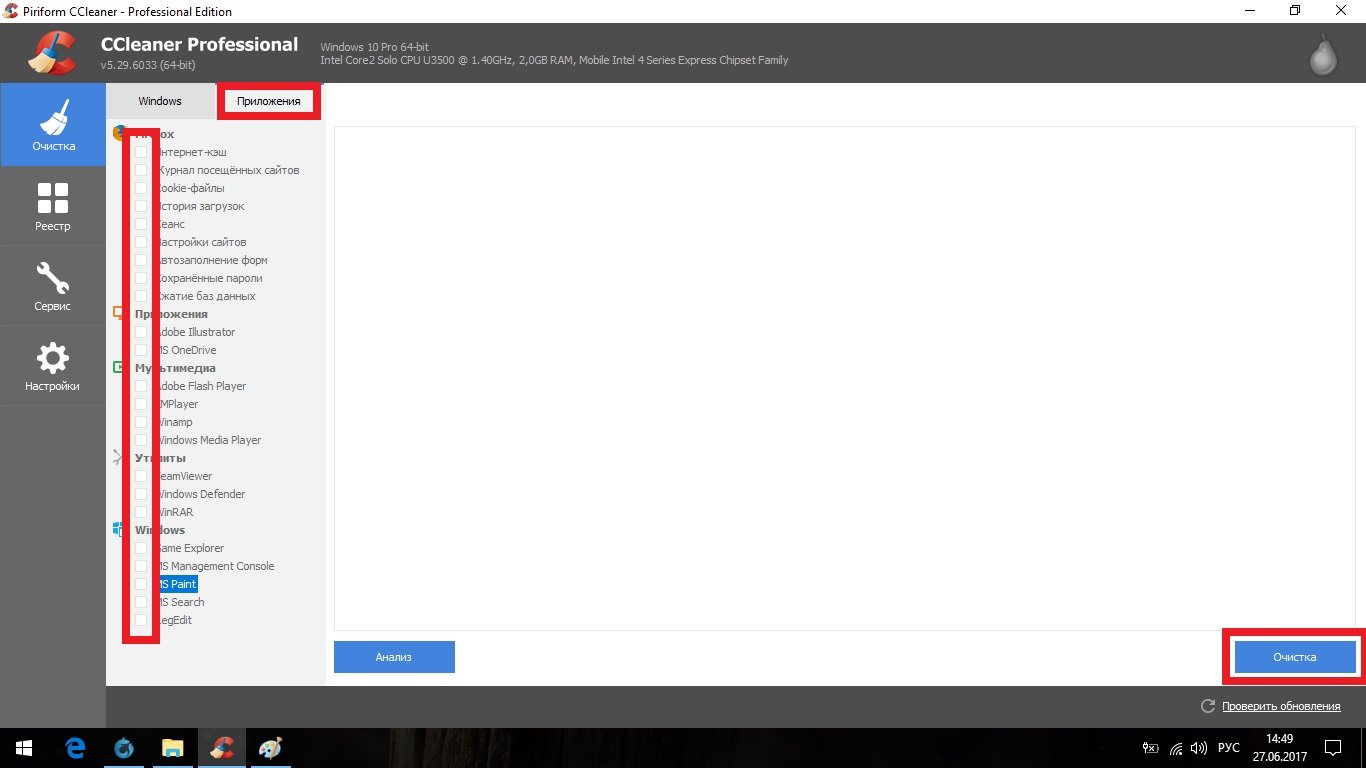
Go to the “Applications” section and uncheck all the checkboxes there, then click “Clear”
- Open the Registry tab and click Search for Problems.
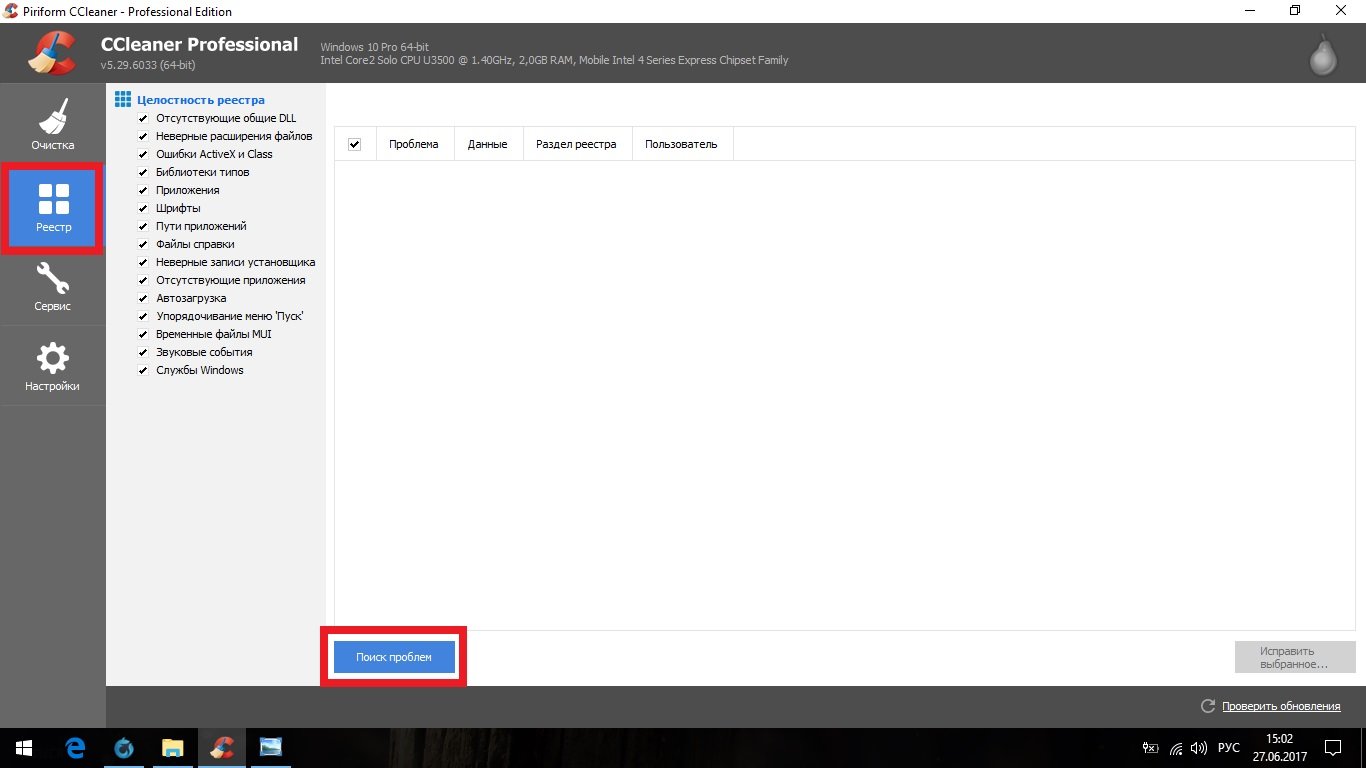
Open the Registry tab and click Search for Problems
- When the analysis is complete, click “Correct Selected...”.
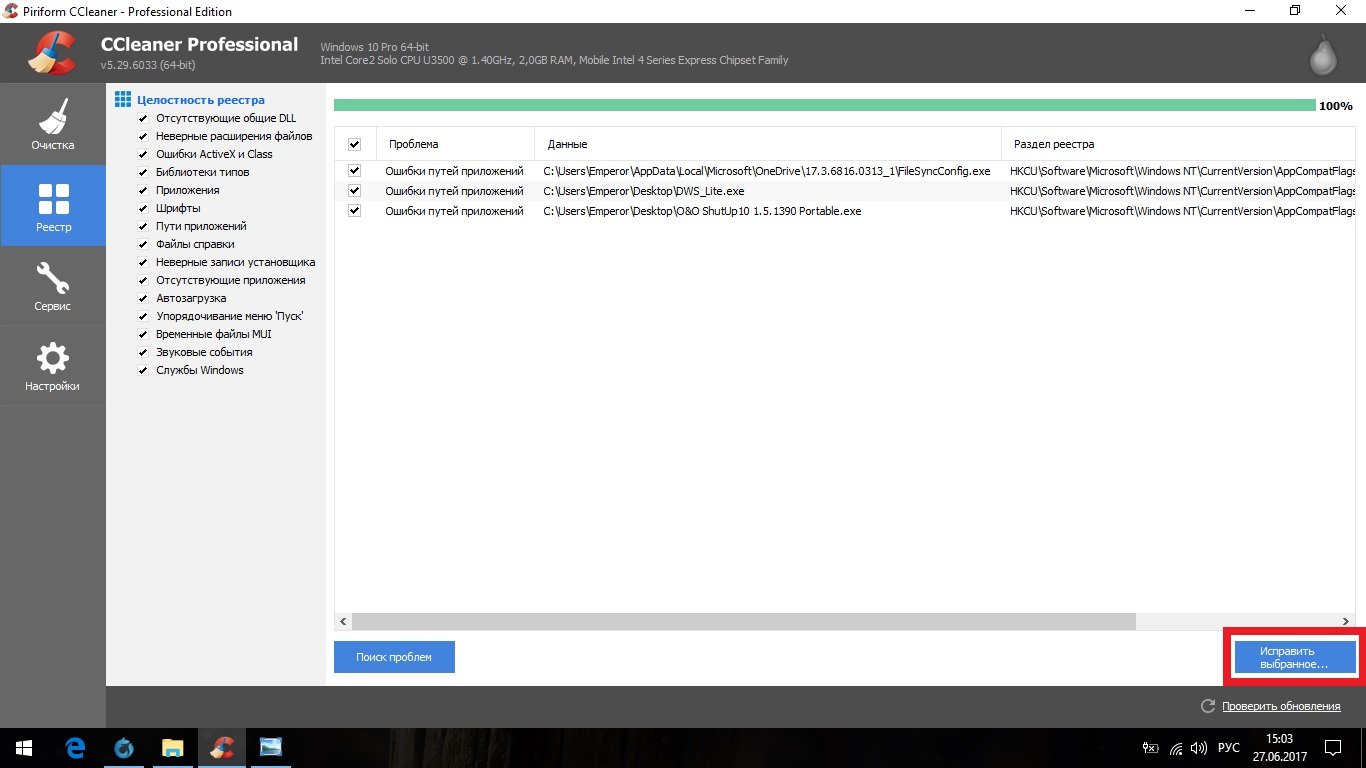
When the analysis is complete, click "Fix selected..."
- It is better to keep backup copies.
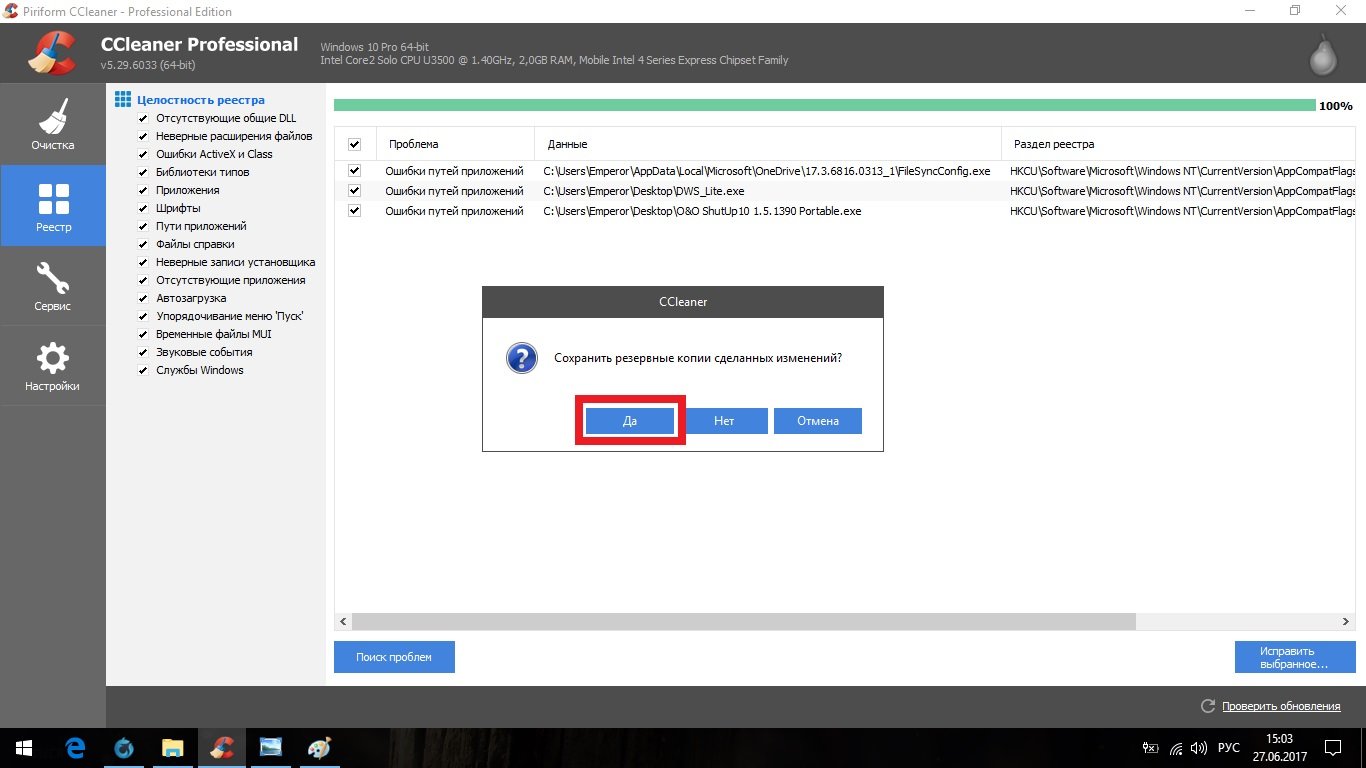
- Now click “Correct marked”.

Now click “Fix marked”
- Go to the service tab. In the “Uninstall Programs” section, you can erase all optional applications that managed to slip through during the system update. You won't be able to do this using standard methods.
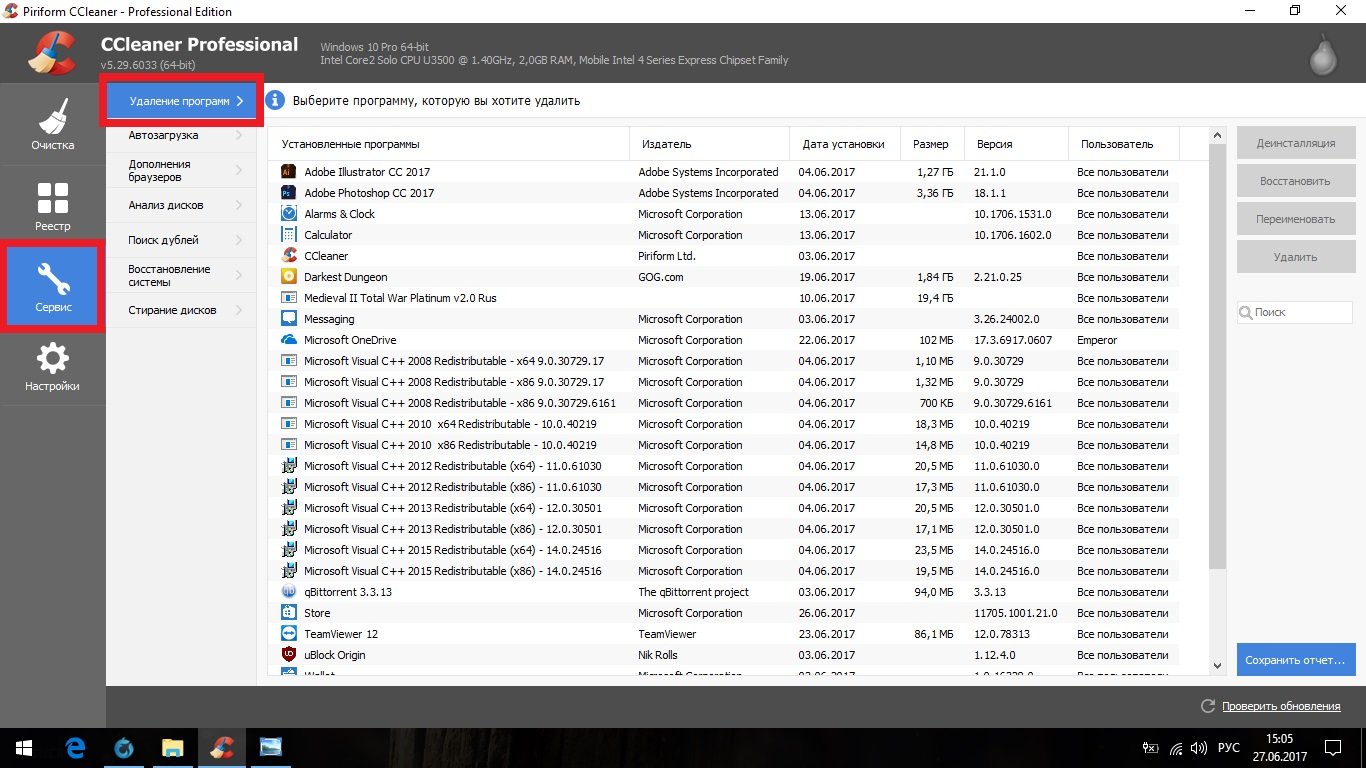
In the “Uninstall Programs” section, you can erase all optional applications that managed to slip through during the system update
- Go to the "Startup" section. In the inner Windows tab select all items and click “Turn off”.

In the Windows internal tab, select all items and click “Turn off”
- Go to the internal tab “Scheduled tasks” and repeat the previous step. Then restart your computer.
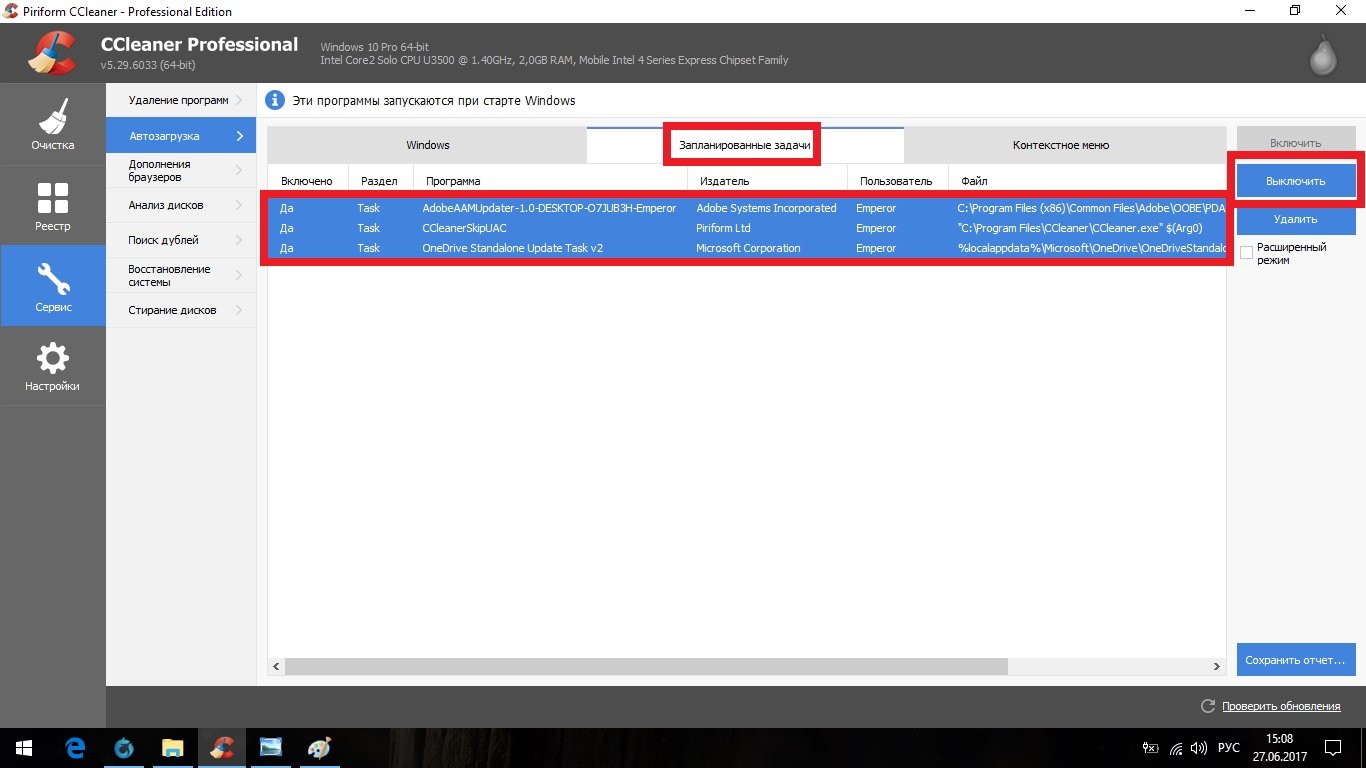
Go to the internal tab “Scheduled tasks” and repeat the previous step
It is advisable to leave the Ceaner program on your computer and check the system for registry errors every few months.
Grub recovery
If Linux is installed on your computer at the same time, then after installing Windows 10 you will be in for a not very pleasant surprise: when you turn on the computer, you will no longer see the Grub operating system selection menu - instead, it will immediately start Windows boot. The fact is that Windows 10 uses its own bootloader, which is automatically installed along with the system itself and completely overwrites Grub.
You can still get Grub back in a standard way using LiveCD, but in the case of Windows 10 everything can be done much easier through the command line.
Video: 4 ways to restore Grub
Possible problems and their solutions
Unfortunately, the installation of Windows 10 does not always go smoothly, which can result in errors from which no one is immune. But most of them are treated very simply and even inexperienced users can eliminate them.
General method (solves most problems)
Before moving on to a detailed consideration of each problem, we will describe the general method for solving errors provided by Windows 10 itself.

Hard drive gone
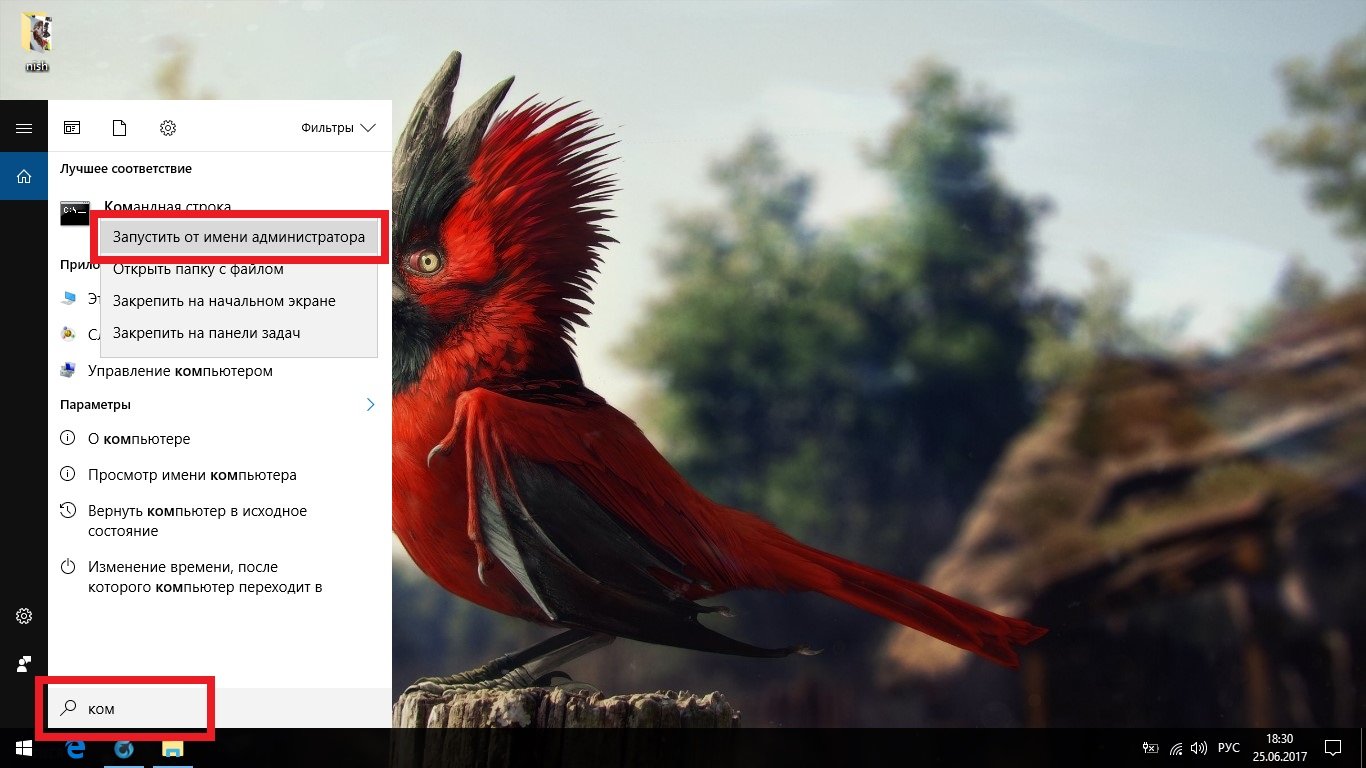
- Open the Start menu and search for "diskmgmt.msc".

Open the Start menu and search for "diskmgmt.msc"
- If you see an unidentified disk at the bottom of the window, click on it and select “Initialize disk.”
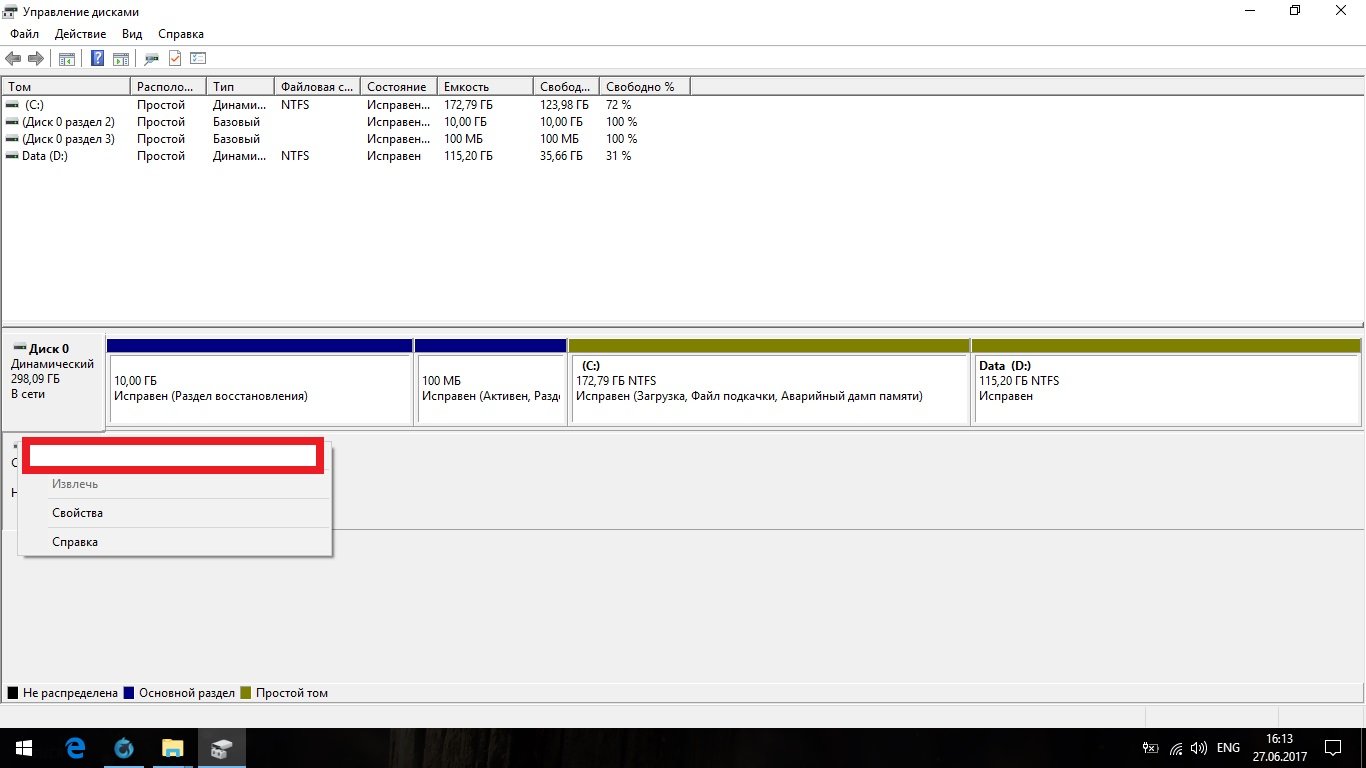
If you see an unidentified disk at the bottom of the window, click on it and select “Initialize disk”
- If there is no unidentified disk, but there is unallocated space, click on it and select “Create simple volume.”
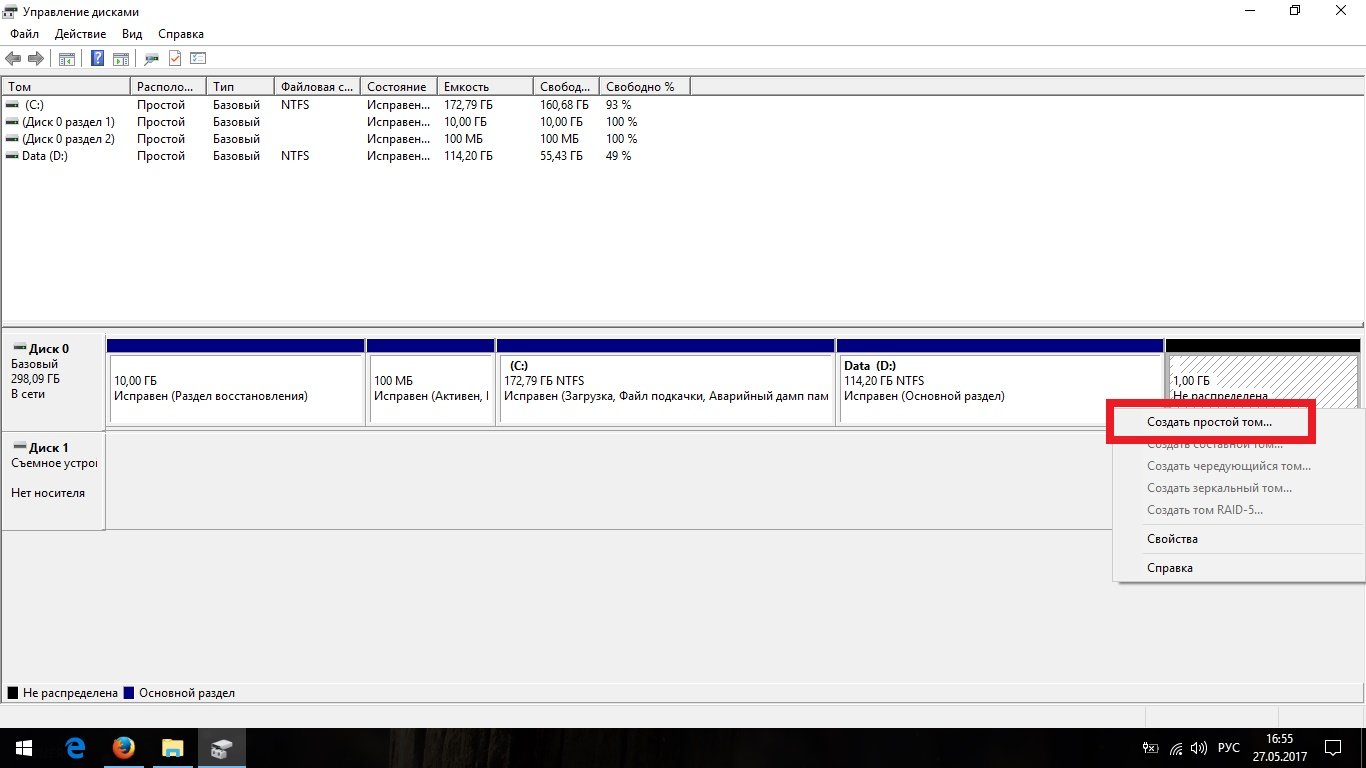
If there is unallocated space, click on it and select "Create simple volume"
- Leave maximum value no changes and click “Next”.
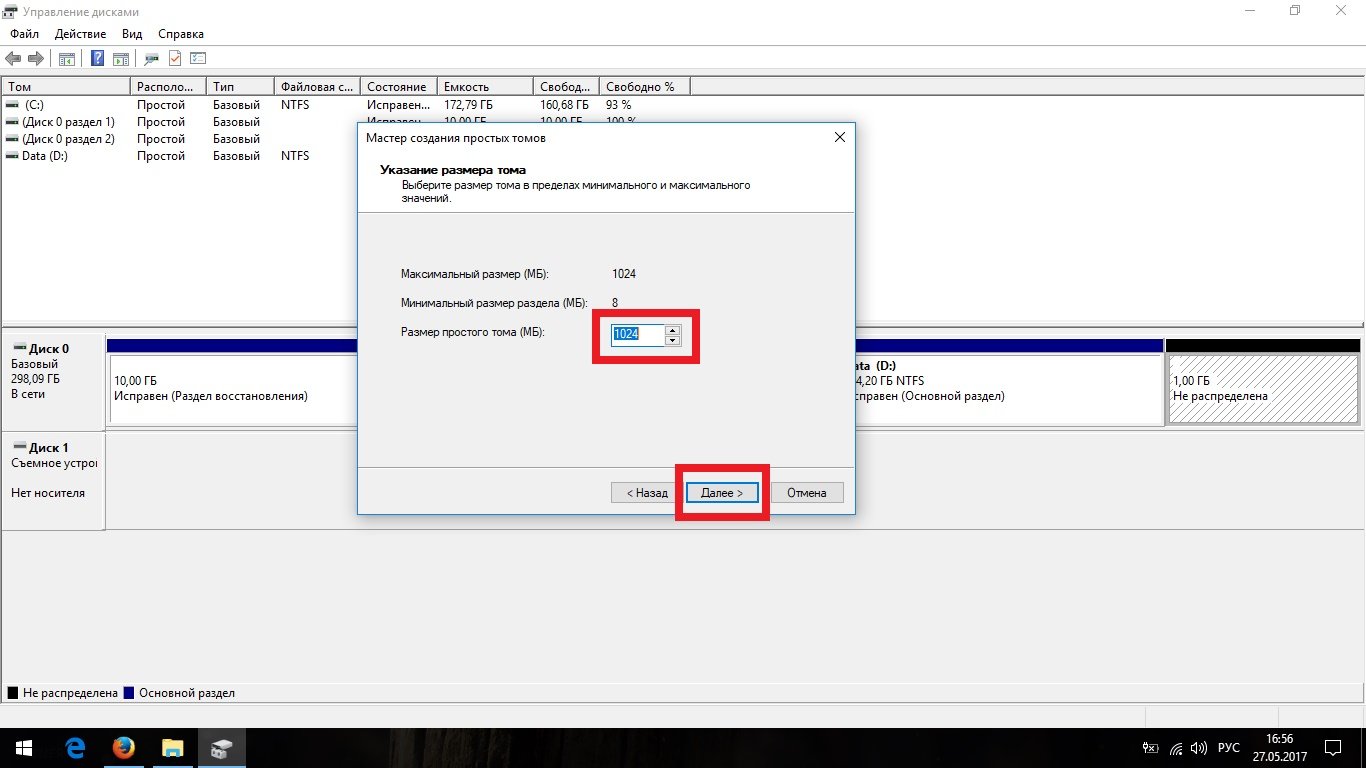
Leave the maximum value unchanged and click “Next”
- Assign the volume its initial letter and click Next.
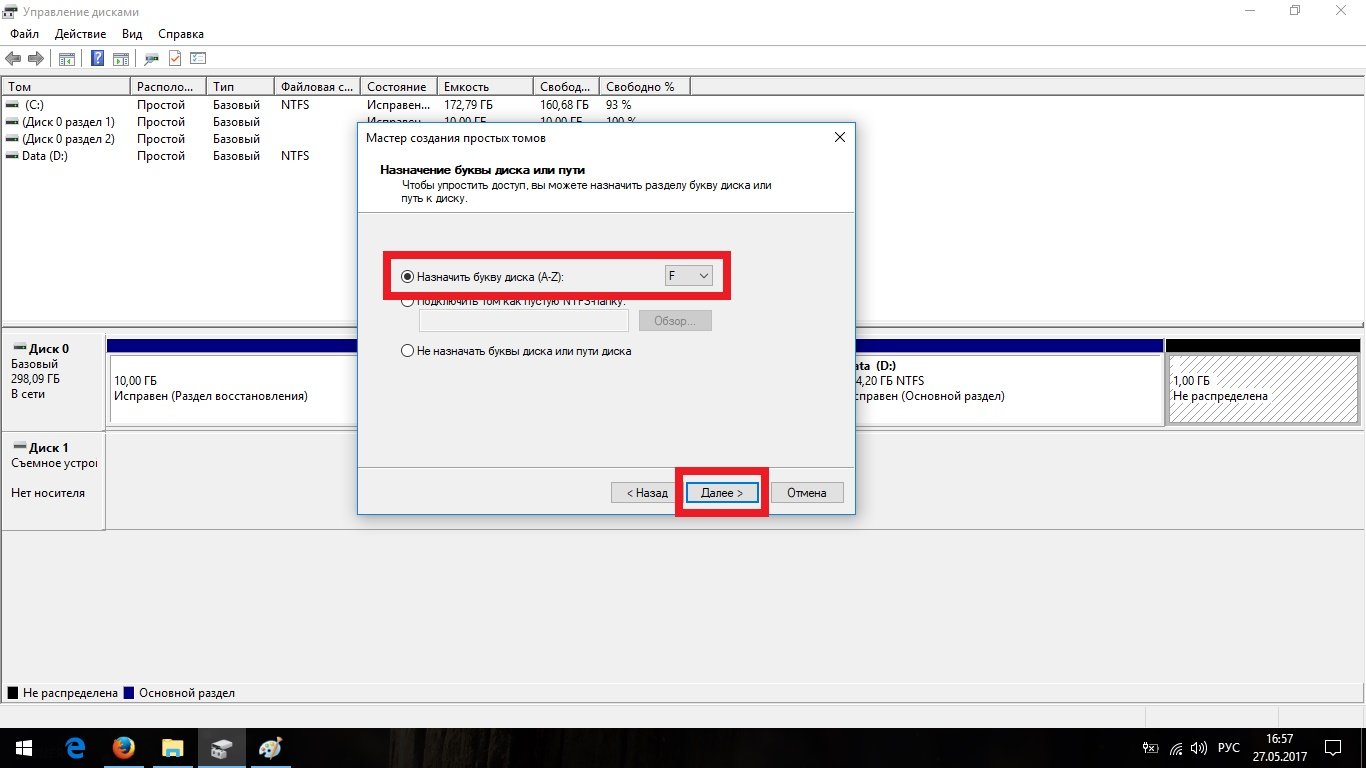
Assign the volume its initial letter and click Next
- As file system select NTFS.
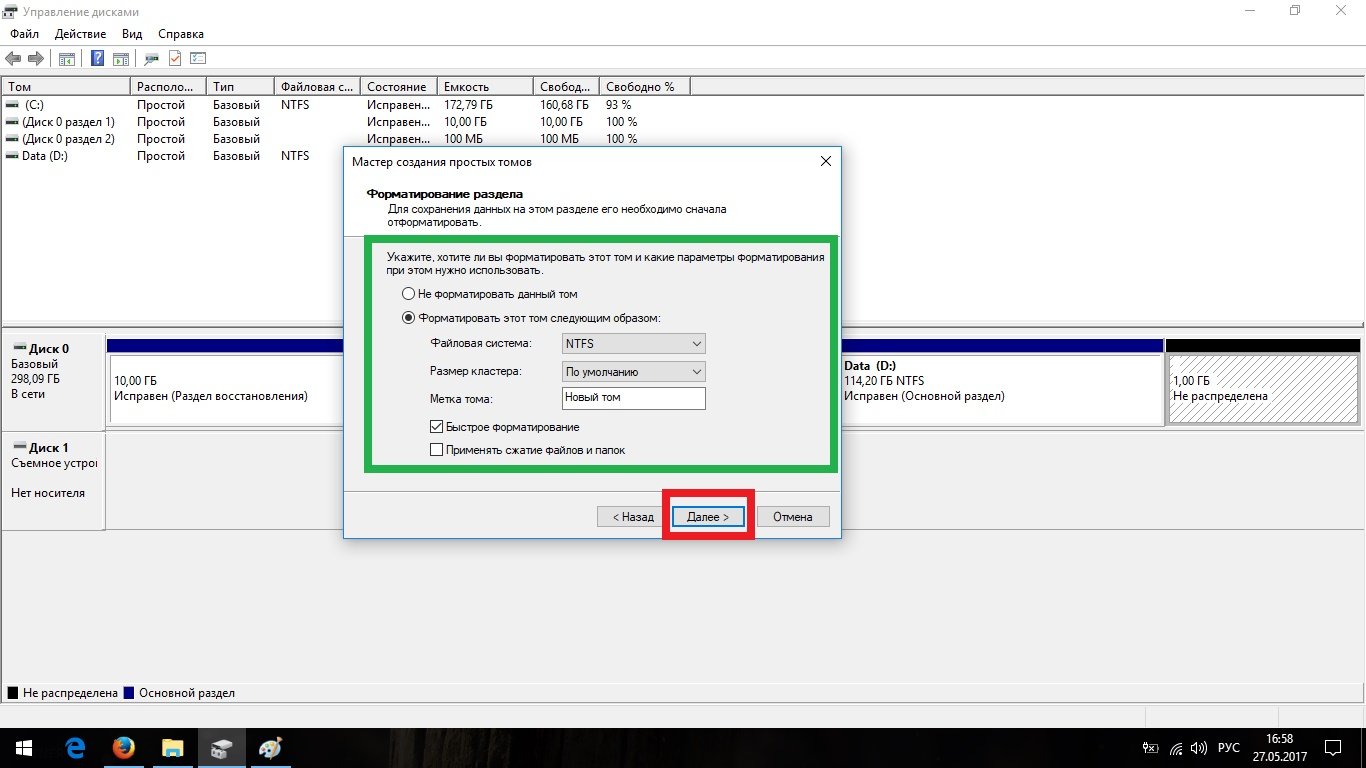
Select NTFS as the file system
Sound problems
Before starting this instruction, try the general method described at the beginning of the chapter.
If you have a laptop and this method does not help you, install original drivers from the manufacturer.
Blue screen
This problem usually occurs during the installation of updates when an attempt is made to display the system boot screen prematurely. The correct solution would be to simply wait for the updates to install (this can take up to an hour). But if this doesn’t help, you don’t have time, or you are firmly convinced that the system is frozen, you can restart your computer: the system will not try to install updates again and will start immediately. You can do this in two ways:
Black screen
If immediately after turning on the computer shows you a black monitor, you are faced with a crashed video driver error or a compatibility problem. The reason for this is the auto-installation of the wrong driver. If you encounter this problem, you need to manually install the video driver from the manufacturer, but this will be a little more difficult, since you will not be able to log into the system.
This problem can also occur if you installed the x86 driver on a 64-bit system (usually there are no problems with this, but sometimes exceptions occur). If you can't find suitable driver, you will have to reinstall the system to a different bit size.
In rare cases, this problem may be caused by another driver unrelated to the video card.

Computer slows down or gets hot
The problem lies in the persistent attempts of services to update, which they do not always succeed. If you encounter this problem, it means you did not take the steps described in the “Providing maximum performance- be sure to follow them.
If you are dealing with a laptop and it continues to heat up, try installing official drivers from the manufacturers ( required driver should be called ChipSet). If this does not help, you will have to limit the processor power (this does not mean that now it will work below normal: Windows 10 just made a mistake and uses the processor in merciless mode).

OS selection appears
If at Windows installation 10 you didn't format system disk, you may get a similar error. The reason is that the previous operating system was not removed correctly and now your computer thinks that it has multiple systems installed on it.

The screen flickers
Usually the cause of this problem is a driver mismatch, but there are exceptions in the form of two conflicting services. So don’t rush to install official drivers and try another method first.

There is no Internet connection, the monitor resolution has changed or the system does not see the video card
If you came to this section, you need to install the factory drivers, which are available on the manufacturer’s website. Especially often, owners of Chinese laptops that use rare hardware or modified versions of it encounter similar problems. The main reason for the problem is that Windows 10 cannot clearly recognize one of the components of your computer (for example, the video card) and tries to install the most suitable driver, which is completely inappropriate.
If you have a laptop and can't find a driver for your video card, look for a VGA driver.
Battery problems
The problem with the battery in laptops is almost the most common, especially for the Lenovo brand. Most often it is presented in the form of a message: “The battery is connected, but is not charging.” The Windows 10 developers are well aware of all this: if you use the general method for solving problems, which is presented at the very beginning, Windows will independently analyze your computer and determine everything possible reasons problems and will tell you about options for eliminating the error.
The Windows 10 troubleshooter can help you fix all your laptop's battery problems that you can.
Also try going to the website of your laptop manufacturer and downloading the Chipset driver there - more about that Windows version won't tell you.
Kaspersky or another program was uninstalled when upgrading to Windows 10
Windows 10 really doesn't like intrusions system processes and everything that threatens them. If, when updating your system, your antivirus, CCleaner or other similar program disappeared, it means they were added to the list of potentially dangerous ones and Windows removed them as a threat. This cannot be changed, but you can reinstall the lost program. But if you reinstall Windows and select the “System Update” option, everything will be deleted again.
Manually setting up Windows 10 is quite a time-consuming task, but after completing all these steps, you will get the best and productive system of all available. Moreover, Windows 10 is very self-sufficient and very rarely needs reinstallation, which means you will have to do all this infrequently.