Hello dear readers! Not much time has passed since the release of my first mini-article, and the topic for the second immediately came to mind.
But if you look at it this way, you can write these little articles every day, since they are easy to write.
What will this article be about?
A long time ago, at the dawn of the opening of this site, I was asked a question by one of the visitors - “Hello Fedor! I have a CD with music, when I insert it into the player in the car, the music plays , but when I try to reproduce it at home, it doesn't play on the computer, and on the computer, she too not copied. Tell me if there is any program for copying music discs to PC? I’ll answer right away, I don’t know why I remembered this question, it just popped into my head.
How to copy music from a disk to a computer?
I don’t remember whether I answered this question then or not, but it’s not that important, I’ll answer now.
After you install it, insert a music disc into the drive that you cannot copy. The files on such disks look something like this.

But our situation is different. If you try to copy any of the cda format files to your computer, you will see that it cannot be played.
So, insert the disk and launch the program.
The following window will open in front of you (maybe a couple of setup windows will pop up, but you can close them).
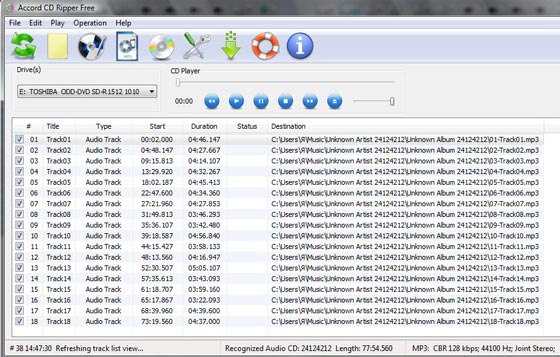
Even though the program is in English, everything is clear in it. Don’t rush to convert anything; first, let’s make some settings. Go to Operation and select Options, in top menu. There we should select a storage folder. By default, everything is saved to drive C, this won’t work, select the folder on the drive where you store all your music, movies and pictures, for me it’s drive D.


You can also adjust the quality of the music, but my advice to you is to leave everything as it is. Then click “Apply” and OK.
Once you are done, click on the disk image shown in the picture.
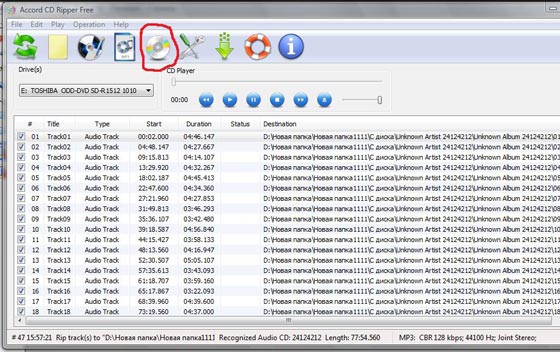
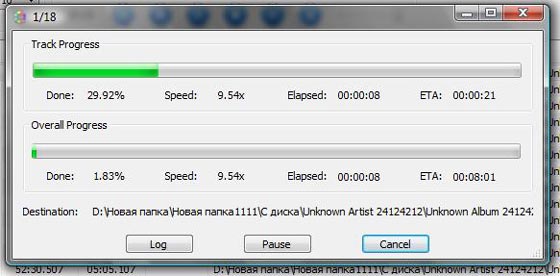
After which you will see a window where you will see the entire “remodeling” process.
When finished, click Finish.
After which, by going to the folder that you specified in the settings, you will see all your songs in mp3 format; if suddenly the size of the songs is too large, you can compress them without losing quality. I talked about how to do this in.
OK it's all over Now.
And if you look at it this way, then now everything is a long time ago, you can do everything without bothering with any programs. But if it’s necessary, it’s necessary.
P.S. I decided to make a short video lesson for clarity.
Modern portable media devices, for the sake of compactness, are unable to play Audio CDs. If you have accumulated an impressive collection of your favorite discs, it makes sense to convert it to digital so you can listen to it on a flash player. We'll tell you how to do this without losing quality.
Laser audio discs will not lose their relevance for a long time, but we are already on the threshold of an epoch-making change in storage media. Home players, stereos and car radios are still equipped with CD drives, but they also allow you to connect flash drives. Now these playback media are also on the verge of dramatic changes: the domestic automaker has already announced that it intends to equip new car models with radios only with a USB flash connector. And if it is still impossible to imagine high-end home audio systems without laser discs, then flash memory has long ruled the roost in portable devices. And producers are gradually switching to digital content, selling albums and even individual audio tracks via the Internet.
But what about your favorite CD collection? It is best to digitize it and save it on a hard drive, so that you can then copy it to a flash player. At the same time, I want the quality not to suffer. Our workshop will introduce you to all the nuances of working with lossless formats and the best programs for digitizing audio.
Theoretical audio training
The most common audio storage media are CD-DA (Audio CD) format discs. It is on them that music gets from recording studios to stores, and from there to end consumers. To create backup copy disc or simply record tracks from it to a computer, you will need a special operation to convert audio data into files. If the copy is as close as possible to the original (ideally, accurate to a bit), then it is called a lossless copy, or lossless.
Unfortunately, almost no CD drive is capable of reading an audio disc with 100% accuracy due to design limitations: it may malfunction on problem areas of the surface. In most cases, the errors are minor, but some are perceived audibly in the form of clicks and other unwanted noises.
Special complex lossless reading methods provide a 99% guarantee that there will be no inaccuracies in the copy.
There are two types of converting audio discs - copying individual tracks and copying the disc into an image with a separate file containing CUE metadata. The metadata file contains information about the album as a whole (artist, year of release, genre) and each composition separately (title, duration, etc.). Few software players support the CUE format, let alone portable devices such as pocket players And Cell phones. Therefore, track-by-track digitization is more universal.
In the case of lossless copies, it is customary to use lossless file compression formats, the operation of which is similar to a conventional archiver. They specialize specifically in audio data compression: high decoding speed, tags for fast rewinding, tags for storing service information.
Data is copied directly from the audio disc to an uncompressed PCM stream with a bitrate of 1411 kbps. After this, you need to make a choice - leave the file uncompressed in the WAV format or compress it a little with the FLAC codec to a bitrate of 900–1000 kbps, which will give a gain in volume of one and a half times. Moreover, lossless compositions of the same length can occupy different volumes. This is due to the fact that the saturation of the sound scale proportionally affects the size of the output file. For example, a powerful rock composition will weigh more than calm music.
How to evaluate the quality of the original
Unfortunately, some CD publishers, in pursuit of profit, produce audio products that do not meet quality standards. Therefore, before performing lossless copying, it is a good idea to make sure that this procedure is appropriate. However, even to create lossy copies in MP3, OGG or WMA formats, it is better to first evaluate the quality of the CD.
For this purpose, spectral analysis of tracks is usually used. We recommend using for express analysis free application Audiochecker. A score below 99% indicates insufficient quality. A more thorough study is carried out by visually assessing the sound frequency map in Adobe programs Audition (more than $600) or free TauAnalizer (http://ru.true-audio.com).
A clean CD surface is the key to a high-quality copy.
Before starting digitization, it is recommended to carefully examine the surface of the audio disc. If the CD has been actively used, its surface will likely have collected a lot of fingerprints, smudges and small scratches. Warm water and a soapy solution (dishwashing liquid) can help prevent greasy marks, including fingerprints. Microfiber cloths, often supplied with LCD monitors and laptops, are good for blotting.
If there are a lot of scratches on the surface that cause reading errors, you can try polishing the disc using aerosol furniture polish. The liquid should also be rubbed with a microfiber cloth, strictly from the center to the edges, avoiding circular movements.
Now let's move from theory to practice. There are quite a lot of programs for digitizing discs, both commercial (for example, Easy CD-DA Extractor, which costs about $30) and free.
Moreover, this function is provided in Windows itself starting from version XP. But there are few settings in it, file names do not contain song names, there are restrictions on formats (in particular, there is no FLAC and CUE). We have selected for you free tools for ripping lossless audio CDs that are optimal both in terms of ease of use and the quality of the output audio files - Audiograbber and Freac.
Let's start with Audiograbber as the easiest to learn, although it offers less additional features. Once launched, the program will automatically detect the disc inserted into the drive as CD-DA and display the number of tracks, as well as the expected size of the output files.
To digitize into MP3 format, you will need an additional plugin, but it is better not to use it, as it causes a noticeable loss in quality, and this is not in your interests. By default, Audiograbber saves audio tracks in uncompressed form (WAV format), and, unfortunately, does not support other codecs. To achieve maximum compliance with the sound of the disc, do not activate the volume normalization function (the “Norm.” button). So, preparation for copying is completed - all that remains is to press the “Grab!” button. and wait for the process to complete. Be prepared for the output files to be quite large: each track can take up 20–25 MB.

Freac has a discreet interface, but it has the ability to create both FLAC and CUE images. The menu in Russian helps you understand everything. The second tool is Freac ( FREe Audio Converter) has a wider range of functions and is also completely Russified.
To start working with the disc, click on the “Add Audio CD contents to the list” button on the toolbar. After this, the program automatically accesses the CDDB database to find out the track names. The user can also replenish the CDDB database (menu “Database | Send CDDB data...”).
Freac has two key differences from Audiograbber. Firstly, this program can create not only track-by-track lossless copies, but also images with a metadata file.
Secondly, it works not only with WAV, but can also save music in the FLAC format, compressed without loss of quality. To do this, go to the “Settings | Basic Settings | Codecs | Codec" you must select "FLAC Audio Encoder". Clicking the “Start encoding process” button starts track-by-track digitization of the audio disc.
If you need to create a lossless image, then in the settings you should check the boxes “Create cue sheet” and “Encode into one file”. As a result, instead of a dozen tracks, you will receive only two files with the album name - an image with audio data and a list of CUE tracks. The quality of the output files is commendable, as is the speed of the program. By the way, it is this last indicator that professional utilities cannot boast of due to their extreme demands on the quality of the disk surface.
Storing music on CDs is not very convenient. If you are a music lover and like to listen to a lot of good music, then you will need a lot of disks to store it, because their size is limited. It’s much more convenient to store all your music on a computer, because HDD designed to broadcast many files. This way you can conveniently place your audio recordings by artist, size, and so on in different folders. This is very convenient and will not take up extra space on your desktop.
What does it mean to “rob an audio compact”?
To rob audio from a CD (to rob from the English "grabbing") - this means to capture an audio track, which can then be listened to from hard drive.
If you try to simply copy music from a CD, you won't succeed. The thing is that when recording to a CD, a special format is used, which, when copied, is not read from the hard drive, but only information about the tracks is displayed. Thus, to copy audio files from a CD, you need to use special programs. For this, many people use free program in Russian, which you can download on our website. This utility very easy to use and suitable even for beginners.
One more in a simple way Loot the contents of a CD is very popular. She happens to be standard program Windows operating system, so you don't need to download anything.
Most likely, you have only heard of it as a multimedia player with which you watched movies and listened to music, but experienced users also use this application to copy the contents of CDs.
So, let's figure it out in order, how to using Windows Media Player to grab the necessary music from the disk:
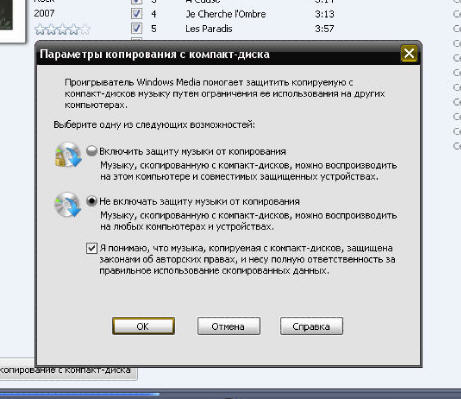
1. Insert into the drive required disk and open Windows Media Player. Next you need to select necessary files and click “Copy from disk” as shown in the picture below:
3. Wait until copying is finished. It's worth noting that this can take quite a lot of time, since this process will also involve transcoding the music into the format we need. All necessary files will be stored in the “My Music” folder.
That's all. Now you have learned how to rip music from a CD. We also recommend that you read other articles on our website to learn more about operating system Windows and programs associated with it.
Many programs for ripping audio discs have the ability to transfer music tracks to your hard drive in the form of WAV files. Despite the fact that data is read from the disk surface bit by bit, many music lovers complain that the sound quality of the recorded copy of the disk differs from the original. What's the matter? It would seem that if information is copied digitally, why is the quality lost in sound? This is explained very simply. Take some audio CD with a long playing time. Try using some ripper to copy all the tracks as wav files to your hard drive. Now calculate the total volume occupied by all compositions. If you took a disc that was completely recorded, the total volume of audio tracks read from it must exceed the standard volume of a CD media. The thing is that 700 or 650 MB represents the amount of data that the laser media manufacturer guarantees when recording regular data such as files and folders. The laser disc contains a high recording density, at which the loss of the slightest information is unacceptable. If even one error is made in the program code when reading from a CD, this will lead to the file being damaged and the utility will not be able to work normally. The developers of the technology for recording data on laser media have foreseen this, so when you burn a CD with data, a certain part of the disk is allocated for additional information, which will be used to correct errors when reading the data. As for audio discs, for this category of digital media the losses are not so critical, and the reserve area is occupied by audio data. Consequently, when reading a digital audio code, no one can guarantee that the data transferred to the hard drive will completely repeat the information recorded on the audio disc. To rewrite data as accurately as possible, you must have a drive with very good optics, and also use a special software. Some of these programs will be discussed in this review.
Copying an audio CD using Easy CD-DA Extractor 10
Easy CD-DA Extractor is quite popular among MP3 record collectors. It is easy to use and contains all the necessary tools for working with MP3, WMA, OGG and other digital audio formats. Many owners of an MP3 music library prefer this program, primarily because it allows you to automate the process of recording and organizing music. Let's take a closer look at its capabilities. To work with digital audio, the program uses three main tools: "Copying Audio CDs", "Converting Files", "Burning Audio CDs" and "Burning Files". When you launch Easy CD-DA Extractor, each of these tools is located on its own tab, but all three tools can be launched as stand-alone utilities from the Start menu. In this article we will look at “Copying audio discs”. When you have to rip music to MP3 format, sorting the songs can be a real headache. Most music formats store special metadata (tags) with additional information about the album title, composition, artist, genre, etc. This information greatly simplifies the process of organizing songs. Entering such information manually is a very labor-intensive task that will take up a lot of your time. In addition, you may simply not be aware of the name of the album or who the artist is if your friend shared this music with you. To solve this problem, the freedb online service is used. It is enough to insert an audio disc into the drive and run Easy CD-DA Extractor, the program will connect to a huge database of audio discs, after which, based on the duration of the songs, it will determine which artist was recorded on the audio CD, what is the name of his album, in what year and in what studio he was recorded by. In accordance with the data received, the track titles will be changed from simple 01, 02, 03 to the exact names of all tracks. Using this option has virtually no Internet traffic overhead, even if your Internet connection speed is slow. When your collection of MP3 songs amounts to tens of gigabytes, we are sure that you will appreciate this service. Each time the audio disc data is read, the program automatically makes new entry to your disks directory. Thus, over time, you will have your own mini “music encyclopedia”, which will include all the information about the albums that you listen to on your computer. When converting an entire disk, the program automatically creates a folder for it with the name “artist-album” and places the compositions there. When copying music, the program can also immediately create a playlist in M3U format, which can later be used when playing files with some player, for example, Winamp. The encoding settings in the program are thought out to the smallest detail. Even if you don't like the standard Easy CD-DA Extractor encoding engine, you can connect an external MP3 encoder, such as the popular LAME encoder. To start the process of copying music from a CD, you must click the "Copy" button.When you take an MP3 player with you on the road, you are unlikely to listen to clear audio with a high bitrate. The noise of city traffic and crowds around us makes it difficult to hear the difference between 128 Kbps and 256 Kbps. Therefore, for the MP3 music lover the main task- selecting encoding settings that will ensure that the MP3 music composition is small in size and has relatively good sound. Using settings Easy programs With CD-DA Extractor, you can safely experiment with different compression formats and select the optimal encoding parameters. In the settings dropdown list you can see a large number of templates with preset music encoding parameters.
Each template can be edited, and using the "Set" button you can access all the settings for the selected codec.
Exact Audio Copy
Exact Audio Copy is one of the best programs for accurate recording of audio tracks. Copying audio CDs is its main purpose. During the process of reading data, Exact Audio Copy repeatedly recalculates the information recorded on the disc and compares it with what was read in previous attempts. As a result, the accuracy of the copied information increases many times. Using the program, you can copy both individual tracks and a selected area to a CD.Exact Audio Copy uses one of four audio data reading algorithms: “Fast” – fast and least accurate, “Burst” – simple reading and two “reliable” modes (Secure) – accurate reading with error detection and correction . If errors occur during the reading process, Exact Audio Copy automatically reduces the drive speed, thereby increasing the accuracy of copying audio data. Thanks to this, using the program you can try to save even scratched discs.
Exact Audio Copy keeps a record of all tracks that have been copied using it. When creating a copy of a disc, you can query track information from the freedb database or enter song and album names manually. In any case, the program carefully stores this information in a database on your hard drive, so you can see at any time which albums have already been transferred to digital format. The database window looks like notebook: select a letter and see a list of performers, surnames, and titles that begin with it.
Among other things, Exact Audio Copy even has a full-fledged audio editor that allows you to perform all basic operations with sound: changing the volume, correcting frequency characteristics using a graphic equalizer, eliminating noise, clicks and other interference. Finally, another advantage of the program is its free status. A comedian-developer living in Germany offers to send him a postcard with a view of the city in which you live instead of money. The address can be found on the official website.
Using the SoundForge 8 editor to copy
You can also use the SoundForge audio editor to copy music from an audio CD. Run the FileExtract Audio from CD command and select in the window the tracks that you want to save to your disk. In the Drive list, select the drive into which the audio disc was inserted. If the audio disc you inserted into the drive contains scratches, select minimum value Speed parameter - this will allow you to more accurately extract audio data.By default, the Read by track item is selected in the Action list, in which data will be read by track. If necessary, you can change the reading method to Read entire disc, as a result of which the data will be read as a single track, or to Read by range, as a result of which the data will be read as a single track in the selected time range. Start the music copying process. Depending on the selected reading speed, the duration of the disc, as well as technical capabilities drive, transferring audio data can take from a few seconds to an hour or even more. If Read by track is selected in the Action list, after copying is complete, all tracks will be opened in your program window separate files(accordingly, when copying an entire track, there will be only one project file in the program window). The sound in this window is presented in the form of two graphical dependencies, each of which shows the change in the amplitude of the signal of the right or left channel over time. You can listen to what you've created using the control buttons at the bottom of your project window or the same buttons on the toolbar under the main menu. This visual representation of an audio file makes it possible to easily select, copy and delete fragments of the finished recording. To save the file, run the FileSave All command. In the "File type" line, select MP3 Audio (*.mp3) or other format. In the Description field you can see the mp3 encoding parameters set for the default format. The sound quality of the output file directly depends on these parameters.
You can control the digital audio output settings in two ways - using templates with preset encoding settings or manually, defining each parameter yourself. To install a particular template for compression, you need to select the line with the name of the desired template in the Template drop-down list, and then click the “Coxan” button. As you can see, everything is very simple. You can access format settings by clicking the Custom button.