The farther, the better the camera in the iPhone. If the photos from the first models looked decent only on the own screen of the devices, then today's photographic capabilities of the iPhone are very impressive. You always want to dump such photos on your computer and look at big screen, process, use in collages or publish on social networks after processing.
First way
How to copy photos from iPhone to computer? At first glance, the ideal assistant for this business is the iCloud service, which automatically saves all photos from mobile device and syncs them with your computer via an Apple server. iTunes is simply not needed here - it's not her job.
But what if there is no connection to the Internet, and you need to transfer the photo from your smartphone to your computer urgently?
Second way
Connect your smartphone with a cable to the computer. Then it should be recognized in the "My Computer" tab as a digital camera.
Open this virtual "camera" with File Explorer and copy photos as you would from any other camera - select them with the mouse and drag them. You can also copy them on the camera and paste them into a folder on your computer.
IN Windows versions 8.1 when connecting an iOS device, the system offers various options. Select "Explorer", then the device will automatically open as a camera. The photos you need will be in the DCIM folder.
An important point: do not rush to copy files from the first folder (although it seems that the photos are located there). Open Photo Stream fully. This way you will not copy the thumbnails for preview with reduced quality, but the original photos.
Alas, this approach does not always work. It's hard to say why, but sometimes Apple device does not appear in the "My Computer" list.
Third way
If the second method does not suit you, then you will have to resort to another regular iTunes feature - backing up your iPhone.


Applications for devices on Android platform, which allows you to stay in touch with your friends in the most visited social network Russia and CIS. The Vkontakte application has the same function ...

Background Hi, I once volunteered to help a school set up a stubborn Linux system. At the first conversation, the director of this school itself could not really explain anything, that is ...
Once, a businessman I know approached me with a request to limit the bad on the Internet, referring to the fact that his colleagues spend a lot of time watching strawberries. I said I'll...

Apple phones are famous for their cameras.
No wonder that their owners constantly take thousands of photos. It is physically impossible to store them all on the device, so you have to copy to HDD computer.
Due to the peculiarities of Apple products, this procedure is not so obvious. This article will give instructions on how to transfer photos from iphone to computer. The features of copying photos on OS X, Windows and using the iPhoto program will also be highlighted.
How to Transfer Photos from iPhone to Mac
OS iOS and OS X are different a high degree integration. However, the connected device does not appear as a physical storage medium. For those who do not want to use the iPhoto service, the opportunity will come to the rescue "Image Capture".
This utility is built into OS X and allows you to move photos and other images from your phone, both to a specific directory and to the desired application. Finding with search spot light. To do this, just start typing the name in the search bar.
The program will show all the photos and actions available on the device. It is possible to set up automatic actions when connecting a device (copying to a hard disk and deleting originals, for example). Otherwise, this is actually a regular folder with which you can do all the same actions.
How to Transfer Photos from iPhone to Computer Windows 8, 7 and XP
to computer by Windows control freely installed iTunes. However, you can copy photos without synchronization, because this OS is able to recognize the phone as a physical medium.
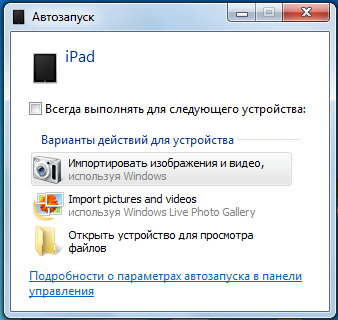
We connect the device to the computer using our USB cable. Quick way the system will suggest in automatic mode.
In the autoload menu, just select the item "Import images and videos". The illustration shows the actions from the iPad, transferring pictures from the iPhone is no different.
In my opinion, it is easier to open the device after detection immediately, as you will see Windows window Explorer, which will offer you a series of actions that you can do. For this we choose "Open device to view files".
However, the message may not appear, or the user may automatically close it.
In this case, you can use Windows Explorer. First you need to open "Computer» and double-click on the icon of the connected device.
In addition, when the computer "sees" your iPhone, then in the "My Computer" section, in the left column under the list of your displayed hard drives your device will be displayed by the name you gave your iPhone when you set it up in iTunes. It will be displayed as a media device, with its own camera icon. If for some reason you did not open the device with the item above, you can do it now by clicking on it with the mouse.
This will open access to the built-in data storage (Internal storage).
It will contain the root directory of the DCIM device and then to a folder specific for each name (for me it is “860OKMZO”, in which the images will be stored.
You can handle these files just like any other. Copy to disk, email or delete.
How to Transfer Photos from iPhone to Computer Using iTunes
iTunes by itself does not involve working with photos. Usually, for such purposes, they use the programs built into OS X - iPhoto. The program opens automatically after the connection to the PC has been made. It can also be opened using the dock panel. In the main window, just select the photos you need to import and click "Import Selected".
You can import one or all photos at once. After the transfer, the program will offer to save or delete photos from the device.
Deleting original images will free up space on your device and speed up the creation backup. All photos in iPhoto are sorted by date added, albums, and devices.
How to Transfer Photos from iPhone to Computer via Wi-Fi
In addition to connecting with a wire, photos can also be transferred via wireless connection. The photo transfer process WiFi assistance fundamentally different from other methods. That is, the same thing happens. Just before starting the transfer, you will need to synchronize via Wi-Fi. This is done in the following way.
First you need to connect the device with a cable and open iTunes. In the left part of the window, in the block "Devices" you must select an iPhone or iPad to sync. In the tab "Review" in the block "Options» you will need to put a checkbox opposite "Sync. devices over Wi-Fi.
Now the gadget will automatically sync when it is on the same network as the computer on which iTunes is installed. From the phone, synchronization can be started through the device settings. To do this, the menu "Basic" need to select an item "Sync with iTunes over Wi-Fi".
Data synchronization will occur automatically if certain conditions are met:
- Computer and iPhone are connected to the same internet network
- iPhone is on, battery is charged, or connected to charger
- iTunes launched on PC
The presence of synchronization is indicated by the icon in the tray of the phone.
The device now appears as connected. Therefore, all actions on it can be performed in the same way as when connected using a conventional cable - twisted pair.
Note! If there are any problems with the connection, then you should first restart the computer, and then the device itself. If progress is not detected, then the reason may lie even in the router itself. To do this, you need to reboot it.
How to Transfer Photos from iPhone to Computer via Email
If the iPhone is configured Email, then the photos can be sent via e-mail, and then transferred to a computer.
There are many various ways transfer pictures from iPhone or iPad to computer. You can transfer via USB cable, via iTunes, using cloud storage, through third party file managers etc. However, none of the previously known methods can be compared in convenience with the method described in this manual for uploading photos from an iPhone or iPad to a computer.
Note: Using the method assumes that iCloud Music Library is enabled on your iPhone or iPad. You can turn it on if necessary in the menu "Settings" → "Photos" → "iCloud Photo Library".
Step 1. From a computer, go to the site iCloud.com.
Step 3. Select the application " Photo". You will see all the photos and videos that are in your " iCloud Music Library». In simple words, you will see all the media on your iPhone or iPad.
 Step 4. Hold down the key ctrl and left click on all the photos you want to download to your computer. The selected pictures will be marked with a blue border.
 Step 5. Click on the " Download» to download photos to your computer. Please note that the browser may ask for permission to download multiple files at the same time. The request must be answered in the affirmative.
![]() Ready! All the pictures you choose will immediately be downloaded to your computer in the folder where the browser downloads by default. Note that the selection of images after loading does not disappear. This allows you to immediately delete pictures from your mobile device, thereby freeing up valuable memory space.
Ready! All the pictures you choose will immediately be downloaded to your computer in the folder where the browser downloads by default. Note that the selection of images after loading does not disappear. This allows you to immediately delete pictures from your mobile device, thereby freeing up valuable memory space.
See also:
Rate:
iPhone owners shoot videos every day with their smartphones, but most often this creativity remains in the device’s memory. There are several reasons: some simply do not want to bother about this, while others have not figured out how to do it right when iTunes help. We recently looked at the easiest way, now it's time to talk about how to download videos from iPhone to computer.
In iOS 7 standard application Photo is responsible for storing not only photos, but also videos. That is why it has become much easier to save a collection of multimedia files.
How to Transfer Videos from iPhone to Mac with iPhoto
iPhoto will automatically start (if the program is not installed, you can download it from this link)

Step 2. In the interface iPhoto click Import all to save all media files, or Import. selected to download individual photos or videos to your computer
Step 3. After the import is completed, you will be prompted to delete the photos from the device - then decide for yourself whether you need them on the device or not.
How to Transfer Videos from iPhone to Mac with Image Capture
Step 1. Connect iPhone to computer. Program image capture should start automatically, otherwise go to the folder program and open it manually
Step 2. In image capture specify a location to import photos
Step 3. Click on the button Options, go to tab Options and set the parameter Delete objects from camera after upload, of course, only if you want to free up space on your iPhone
Step 4. After exiting the options, click the button Download all to transfer videos and photos from iPhone to computer
How to download videos from iPhone to Windows 8
Windows 8 also has several ways to save photos, but there is only one fully working one:
Step 1. Connect your iPhone to your computer and go to the folder Computer -> [your device]
Step 2. Go to the folder \Internal Storage\DCIM\100APPLE, it contains all your photos and videos
Step 3. Select all files or several specific ones and copy them to the desired folder on your computer
This method is not the easiest and most convenient, and photos are not automatically deleted from the device, but all alternative ways simply do not save all media files from your iPhone.
How to Transfer Videos from iPhone to Windows 7 or Windows Vista
Step 1. Connect iPhone to computer. In the event that the autorun window starts, click Import images and videos using Windows otherwise, you need to do it manually. To do this, go to Computer, search icon connected iPhone and by clicking on it right click, select an item Import images and videos
Step 2. Click on Import options and select the folder where you want to upload videos and photos from your iPhone
Step 3. Click the button OK, then Import
Step 4. Wait for the import to finish and check if all media files are in the specified folder

On Windows 7 and Windows Vista automatic import of photos and videos is much more stable than in Windows 8, but still crashes sometimes. You can always copy all media files from your device by going to the folder Computer -> [your device] ->Internal Storage -> DCIM -> 100APPLE.
How to download videos from iPhone to Windows XP
Step 1: Connect iPhone to Computer and Wait for Launch Scanner Wizard or digital camera


Attention! The Scanner or Digital Camera Wizard does not support importing large video clips (larger than 500 MB). In order to download these files, you need to manually go to the folder My computer -> [your device] -> Internal Storage -> DCIM -> 100APPLE and move the videos to the desired folder.
This instruction is equally well suited not only for the iPhone, but also for the iPad and iPod Touch, so you can easily import videos and photos from any Apple mobile device.