- Metal carcass
- Execution of work
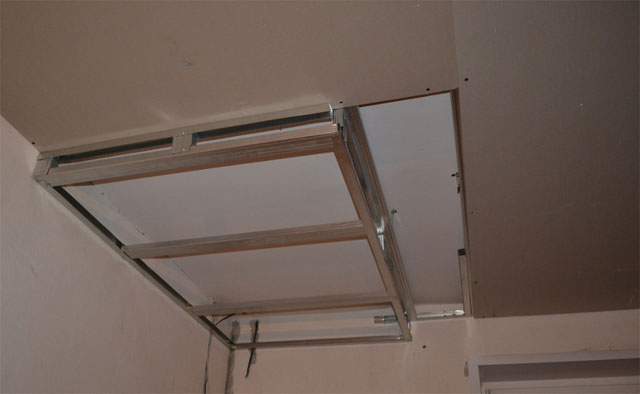
- Wooden frame
- Installation of timber frame and drywall
In wooden houses, quite often the ceiling surface has various irregularities and defects. As a rule, the optimal material for finishing such ceilings is gypsum board (gypsum cardboard sheet), especially in rooms whose height is 3 m or more.
Suspended ceilings are used in any room with a height of more than 2.5 m. Fastening occurs using a suspended frame.
Today there are several main options for a wooden ceiling:
- with special adhesive for drywall;
- on wooden slats;
- on metal carcass.
Drywall can only be attached to glue if the ceiling surface is perfectly flat and smooth. Certainly, this method GCR installations cannot be called reliable, since there is a risk that over time the drywall sheets will begin to sag or fall off altogether.
Metal carcass

Frame made of metal profiles Attached to the ceiling using 40 mm dowel nails.
Installation of drywall on metal profiles in a wooden house requires the following tools:
- building level (at least 1 m long);
- marker or pencil;
- square, ruler, tape measure, plumb line;
- powerful impact drill or hammer drill;
- special knife for processing and cutting gypsum boards;
- screwdriver or set of screwdrivers;
- metal scissors.
Each part and all suspensions must be attached to the ceiling correctly, so that there is no sagging of the drywall sheets under their own weight. That is, it is necessary to maintain a certain distance between them, otherwise cracks and bumps may appear at the joints.
To properly install drywall to the ceiling in a wooden house, it is recommended to use professional fasteners.
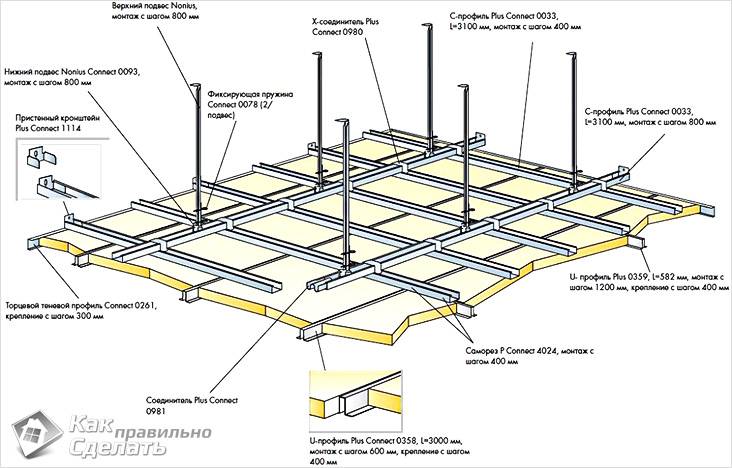
It is necessary to purchase hangers that have a “U” shape. The frame made of metal profiles is attached to the ceiling using 40 mm dowel-nails. The final fastening of the profile is carried out using metal screws (for example, “baby”) with a small drill. The longitudinal profiles are attached to the guides with ordinary “crabs”, and the gypsum board itself is attached to the finished frame with metal screws 20 mm long.
Return to contents
Execution of work
When attaching metal guides for a suspended ceiling, it is convenient to use a screwdriver or other similar device.
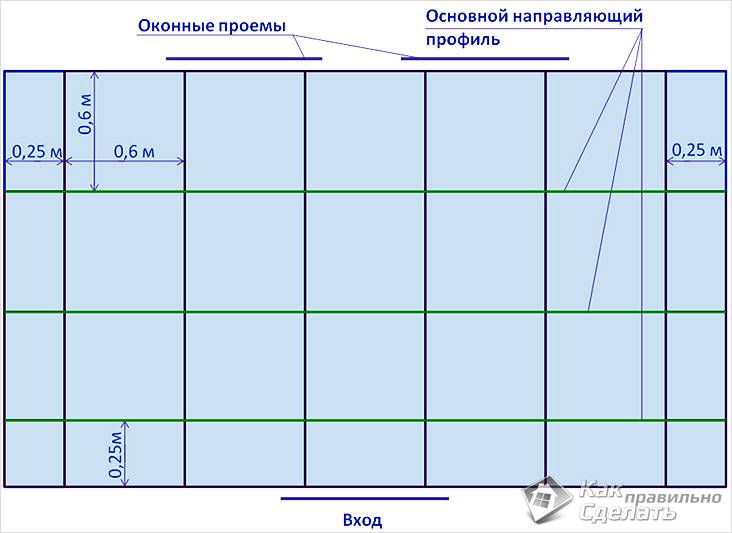
- Along the entire perimeter of the room in a wooden house, we mark and outline a line along which the starting profile will be installed in the future. Points should be marked in each corner of the room, using a building level for these purposes. This marking should be located from the base of the ceiling at a distance of up to 20 cm. Due to this reserve, under the plasterboard installed on the ceiling, it will be possible, if necessary, to place electrical wiring and communications. Then we connect the marks at the corners into one line.
- We begin installing the profiles along the marked line on the dowel-nails. There should be a distance of 35-50 cm between the fastenings. We place the first dowel-nail on both sides of the edge of the profile by 10 cm.
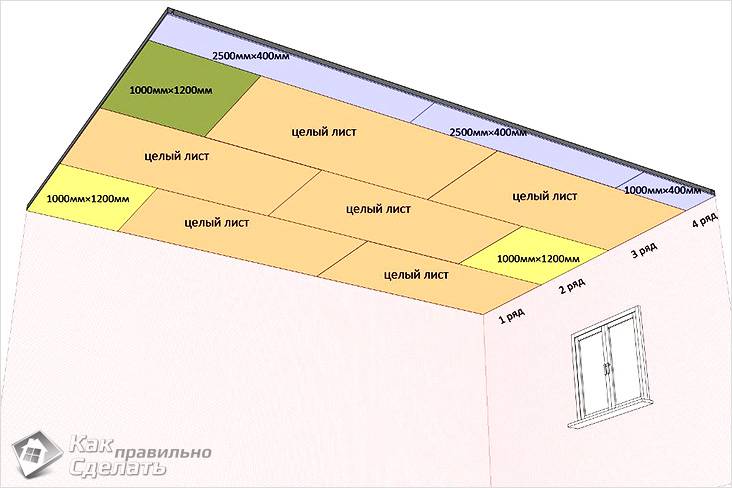
- Then we mark the ceiling surface for hangers and supporting guides. Upon completion of this marking, it is necessary to cover the ceiling with parallel lines at a distance of approximately 1200-1250 cm (this is half the entire width of the gypsum board). The main guide parts of the frame should be located both in the middle of the plasterboard sheets and along their edges.
- According to the markings made, the hangers are first attached. The specific dimensions of the latter depend on the parameters of the room and are individual. Installation of suspensions to the base of the ceiling is carried out using 40 mm dowels and nails.
- Now we proceed to install the guides from the profiles into the starting profile, which is located around the perimeter. They must fit correctly, that is, not too tightly, and it is also necessary to leave a gap of 1-2 mm. This ensures that the ceiling does not deform during temperature changes.
- We attach the guides to the hangers using “baby” self-tapping screws. Be sure to screw in two screws on each side. During the work, it is necessary to regularly check the horizontalness of the frame with a building level and not allow deviations of more than 1 mm per 1 m. During installation, we leave some play, including at the joints on the end side, as well as when connecting profiles to the ends of the hangers.
- For maximum rigidity and strength of the entire frame, we attach longitudinal profiles. The metal profile can be cut to the required size using metal scissors; accordingly, there is no need to calculate and prepare the dimensions of the parts in advance. The recommended distance between adjacent “stiffeners” for transverse fastening of plasterboard sheets is about 600 mm, for longitudinal fastening - 400 mm.
- If in the future it is planned to carry out soundproofing work or insulate the ceiling, then the heat-insulating material is laid between the profiles.
Return to contents
Fastening is done with metal screws. The gap between the joints should be no more than 150-200 mm.
Directly to the ceiling is an equally important stage, at which it is necessary to adjust the dimensions of the sheets with maximum accuracy in order to make it easier to carry out finishing work in the future: sealing seams, putty, etc. Here are some points to consider:
- It is advisable, even before carrying out all the work (installation of profiles, installation of drywall, etc.), to treat all sheets of drywall with soil on the inside - this will provide the necessary vapor permeability and waterproofing. Afterwards, on the finished ceiling surface, you can begin to treat the sheets with a primer.
- It is necessary to leave a gap of 4-5 mm between the sheets of plasterboard and the walls for free air circulation in the room.
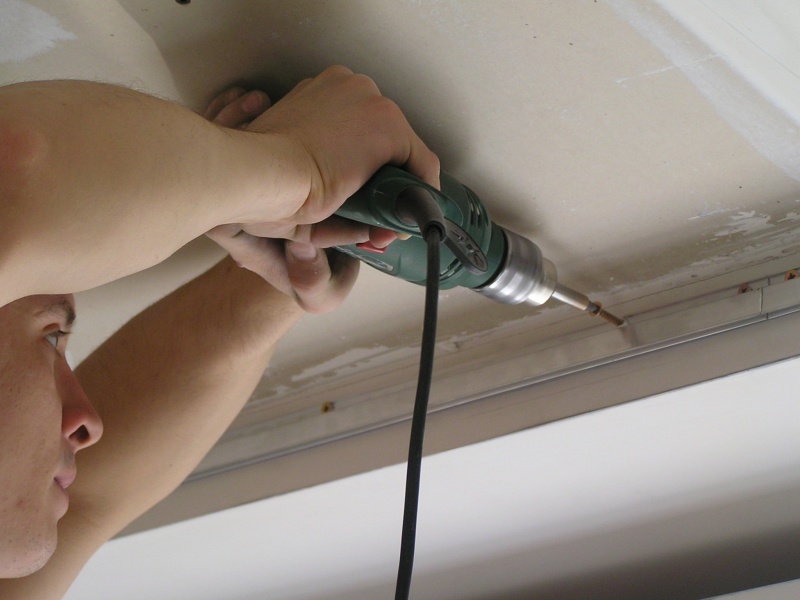
- A typical version of the work involves installing drywall on longitudinal profiles in the transverse direction. The first sheets are mounted away from the walls. Fastening is done with metal screws. The gap between the joints should be no more than 150-200 mm. During the final rotations of a drill or screwdriver, it is necessary to calculate the forces so that the head of the hardware enters the sheet of drywall to a depth of 2-3 mm. These caps will be hidden later with putty.
- Upon completion of installation, it is necessary to properly treat all existing gaps and joints with putty and wipe down the locations of the screws.
Specialization: facade finishing, interior finishing, construction of summer houses, garages. Experience of an amateur gardener and gardener. We also have experience in repairing cars and motorcycles. Hobbies: playing the guitar and many other things that I don’t have time for :)
How to install drywall on the ceiling? I used to often ask myself this question, but now, having some experience, I will tell you how to assemble a frame and correctly attach plasterboard to the ceiling on a profile. I am sure that this information will help beginners cope with this work on their own.
Installation of gypsum boards on profiles
The process of installing drywall (gypsum board) on the ceiling can be divided into several main stages:
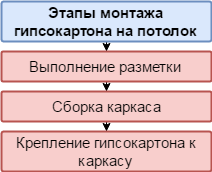
Performing markup
Before attaching drywall to the ceiling, you must make markings. This determines how smooth and high-quality the ceiling will be.
The marking process looks like this:
| Illustrations | Description of actions |
 |
Level designation:
It's even easier to mark a line using a water level. Use it to move the mark to the corners of the room, then connect the dots with a paint cord. |
 |
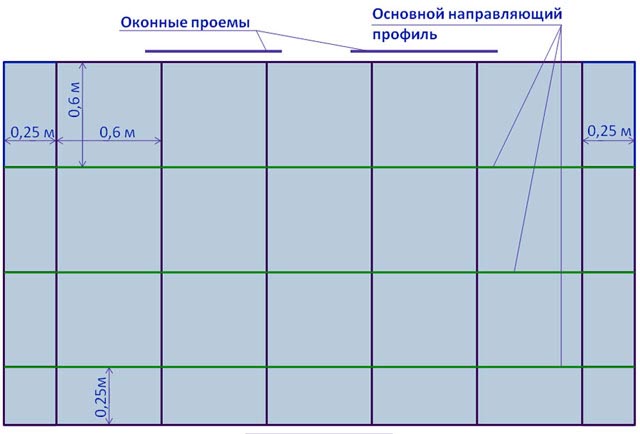
Marking for profiles. Draw lines across the entire ceiling in 600 mm increments, 250 mm from the wall. Keep in mind that the lines must be across the sheets, i.e. you need to decide in advance how you will place the gypsum board on the frame. |
 |
Marking for hangers. Mark lines on the ceiling perpendicular to the existing ones in increments of 0.5 m. Draw the first line at a distance of 0.25 m from the wall. |
At this point, the marking process is completed, and you can begin assembling the frame.
Frame assembly
Since the gypsum boards are attached to the ceiling using a frame, it is extremely important to assemble it correctly. Therefore, it is necessary to approach this operation no less responsibly than applying markings.
Instructions for marking are as follows:
| Illustrations | Description of actions |
 |
Materials:
|
 |
Installation of UD guides. Along the perimeter of the room, guides need to be attached to the walls, aligning them to the intended level. For these purposes, use dowel nails. If the walls are wooden, you can use self-tapping screws. |
 |
Installation of hangers. Secure straight hangers using dowel nails. During the installation process, make sure that they are positioned strictly according to the markings. |
 |
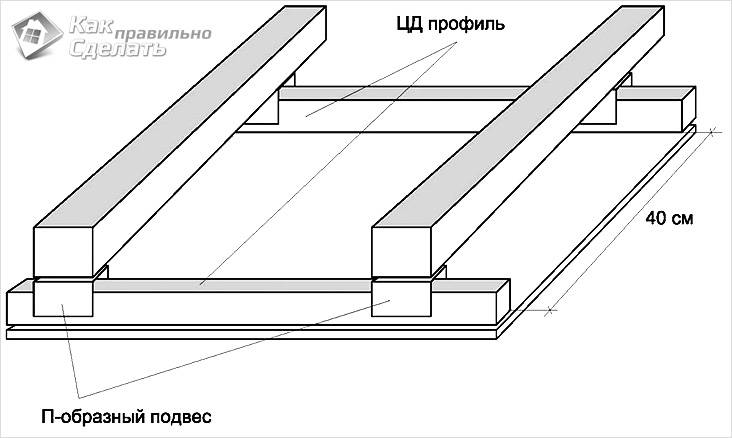
Installation of CD profile. The CD installation process is generally quite simple. However, keep in mind that the profiles sag, especially if the room area is large. Therefore, the work should be done like this:
|
 |
Jumper installation:
|
If the base is fairly level, install the gypsum boards on wooden slats. The latter can be attached to the ceiling using dowel nails.
GKL fastening
So, we have figured out the installation of the frame, now we will look at how to properly attach drywall to the ceiling. To avoid a number of problems after covering the frame, the following rules must be observed:
- The gypsum board must be positioned correctly. Cut the sheets so that they do not form cross-shaped seams on the frame;
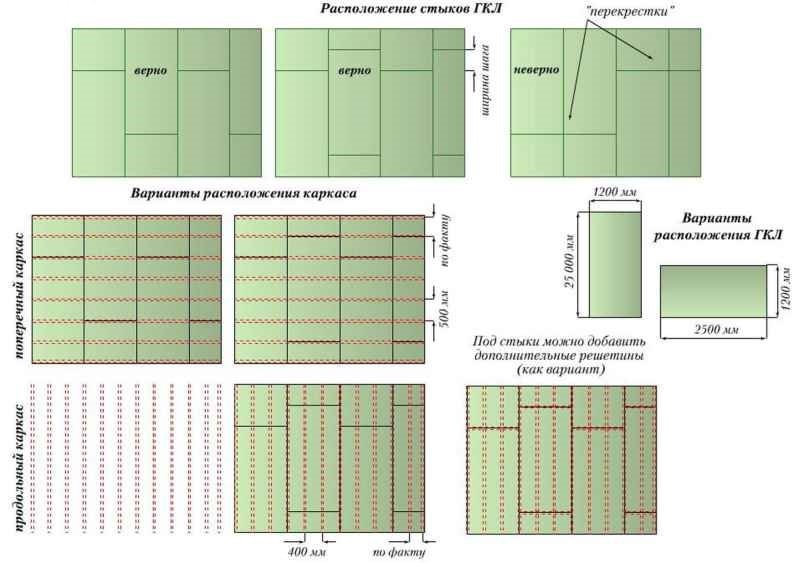
- The edges of the sheets should be on the profile.“Hanging” edges of gypsum boards will lead to the formation of cracks;
- The screws must be positioned correctly relative to the edge of the sheet and relative to each other. The distance from the edge of the sheet to the screw should be 1 cm, the optimal step between the screws is 25 cm;
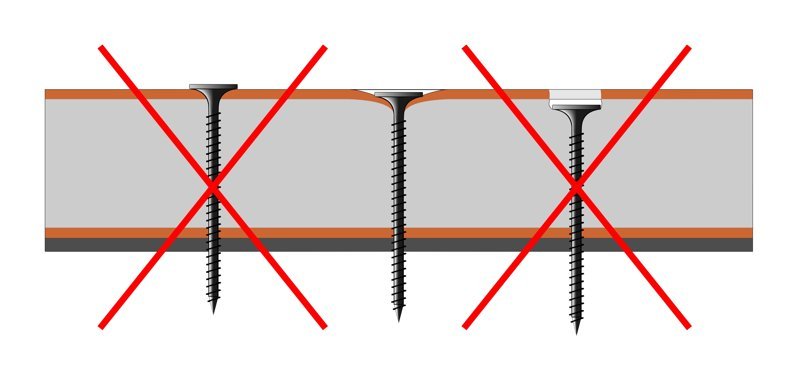
- Drive screws correctly. Mounting for plasterboard on the ceiling, i.e. The screw should be deepened by about a millimeter. If the cap sticks out above the surface of the ceiling, it will not allow you to perform the putty properly.
If you deepen the screw too much, the head may break through the cardboard, and the material will not be fixed at all.
When finishing a bathroom or kitchen, sheets marked GKLV should be used. Their price is higher than the cost of conventional drywall, but they are resistant to moisture.
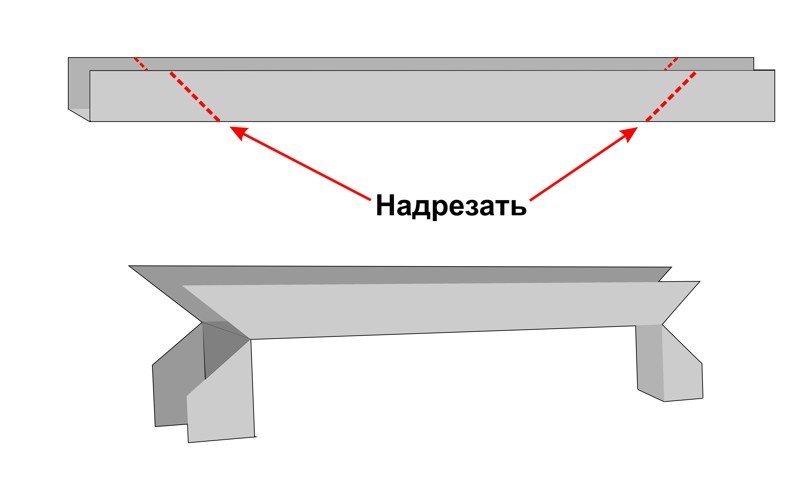
Before attaching drywall to the ceiling, you will probably need to cut the sheets. The work is done like this:
| Illustrations | Description of actions |
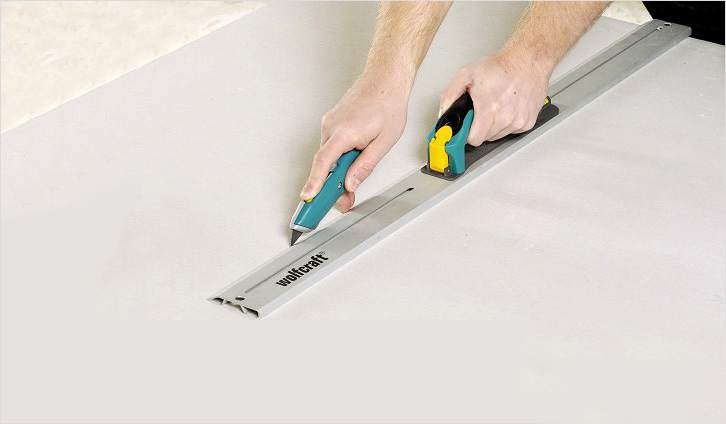 |
Cutting cardboard from one side:
|
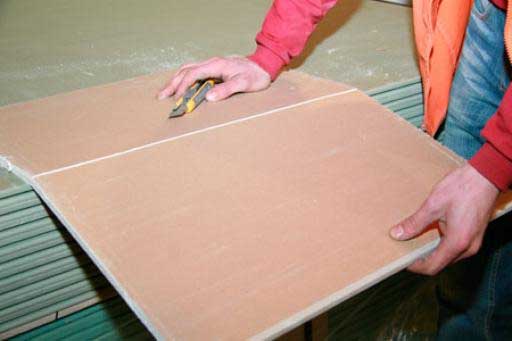 |
Bending the sheet. Break the sheet along the fold line, as shown in the photo. |
 |
Cutting the cardboard from the second side. Cut the cardboard along the fold line. |
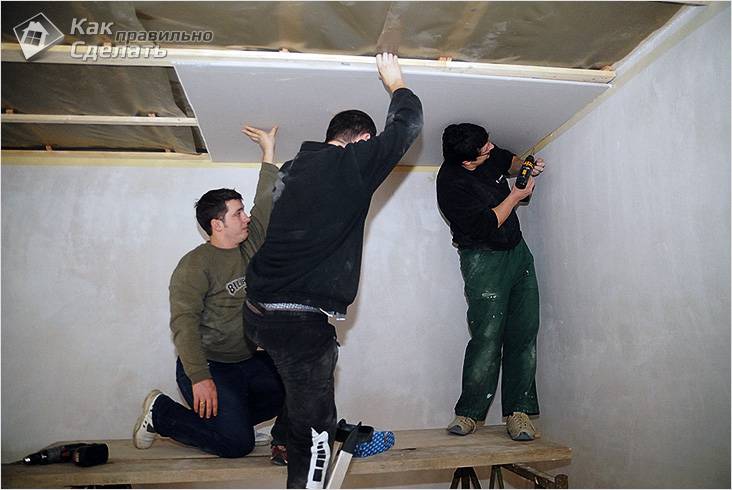
After cutting the sheets, you can attach the plasterboard to the ceiling. The work itself is quite simple - you need to attach the sheet to the frame and secure it with self-tapping screws, following the rules that we discussed above. The only thing, keep in mind that the sheets are quite heavy, so it is more convenient to do the work together.
If you are going to work with your own hands without helpers, you can make special devices in the form of mops. The length of such a mop should slightly exceed the height of the room. This will allow you to place the sheet on the mop and support the frame with it.
Gluing
In cases where the base is level, you can do without a frame by gluing drywall to the surface with liquid nails. This solution allows you to significantly reduce finishing time and costs.
The process of gluing drywall looks like this:
| Illustrations | Description of actions |
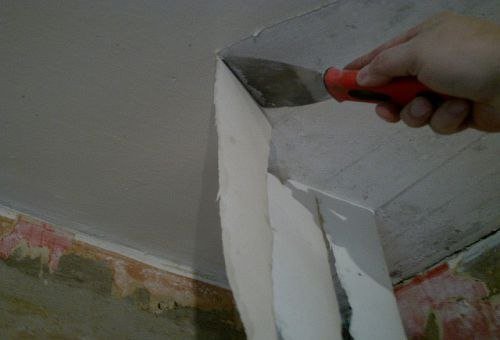 |
Preparing the base. Preparation involves removing the topcoat, if any. This could be wallpaper or, for example, water-based paint. If the base is in poor condition - the plaster is peeling off or the paint is difficult to remove, then it is more advisable to abandon gluing and attach it to the frame. |
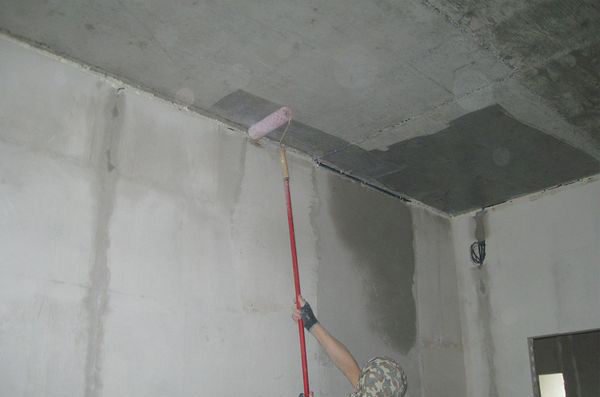 |
Padding. Prime the base with a universal primer or deep penetration primer. |
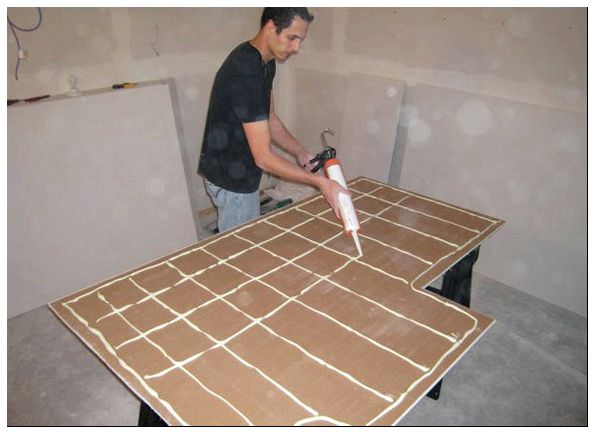 |
Gluing drywall:
|
That's all the information on how to attach drywall to the ceiling.
Conclusion
Now you know how to install gypsum boards on the ceiling, and you can cope with this task yourself. Additionally, watch the video in this article. If you have any questions regarding the installation of gypsum boards, you can contact me in the comments.
May 30, 2017If you want to express gratitude, add a clarification or objection, or ask the author something - add a comment or say thank you!
To level ceilings, builders and apartment owners themselves use sheets of plasterboard. This choice is explained excellent characteristics material: moisture resistance, light weight, ease of installation, due to which in a short time, without unnecessary noise and dust, they create a smooth, neat surface, giving it a different texture or shaped outline.
The technology for fastening gypsum board sheets includes several stages and is carried out different ways, each of which can be implemented independently. The most common ones include installation on a frame made of metal profiles using dowels or self-tapping screws. The frame can also be wooden structure from load-bearing and support beams. Well, the cheapest option is gluing a sheet of drywall to the ceiling.
Whatever technology is used, the planning stage cannot be skipped. It includes measuring the ceiling height, preparing tools and purchasing materials. At the same stage, a drawing of the ceiling is made, which shows the layout of electrical wiring and outlets for lamps, and the parameters of the level and outline of the frame are given if the ceiling being mounted is of a figured type.
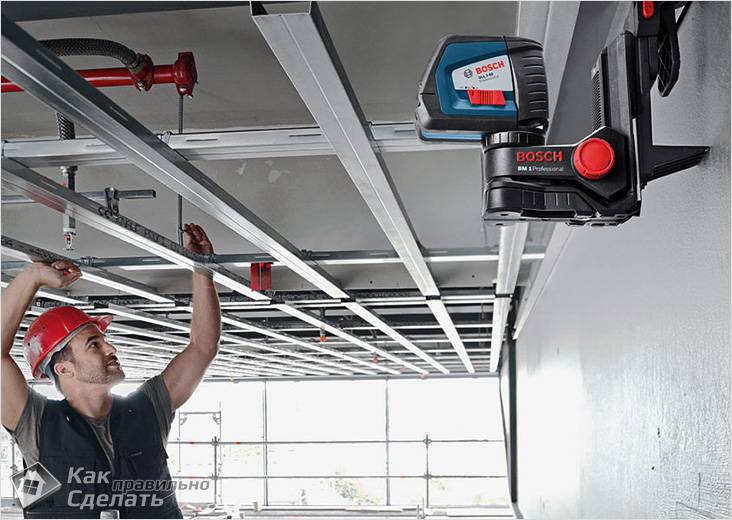
The initial frame level is measured as follows:
- Using a laser beam or a water level at a height of 1.5 meters from the floor, marks are made on each wall surface that are connected to each other by a solid horizontal line;
- measure the distance from the ceiling to the resulting line;
- a mark is made at the lowest point relative to the ceiling (at a distance of 25-30 mm from the top);
- exactly perpendicular to it on the other wall, make the same mark, which is connected to the first using a stretched thread or chokeline;
- The same is done around the entire perimeter of the room.
The resulting solid horizontal line is the lower level of the frame to which the profile or wooden beams are attached; we will tell you about the distance or step between them below. If the drywall is planned to be glued, this scheme for calculating horizontal markings is not used, however, we note that the evenness of the base and the durability of the structure depend on the correctness of these calculations.
Frame making
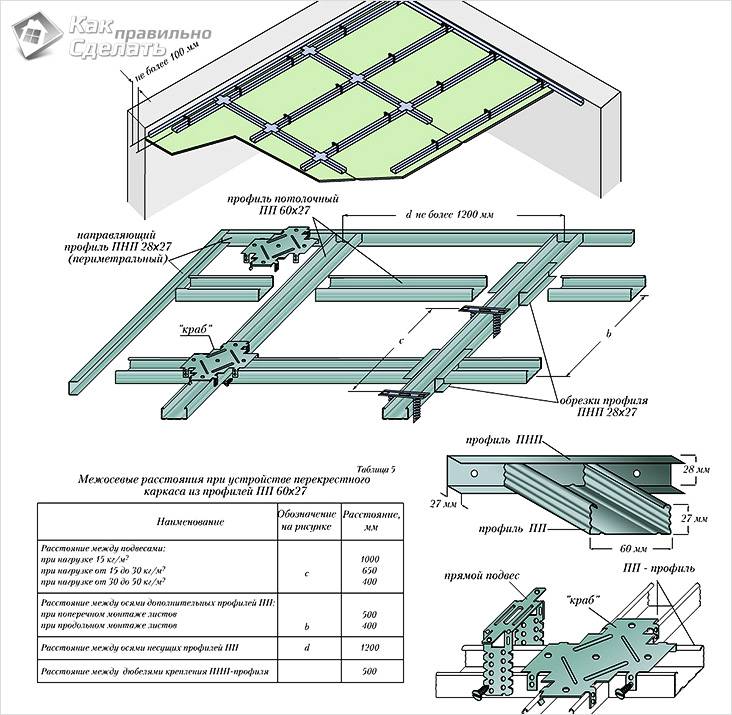
Let's look at how gypsum boards are fastened to a metal frame. To do this, you will need two types of profiles - guide and ceiling (bearing). Using the finished horizontal markings, a UD profile is attached using dowels (or self-tapping screws) and damper tape, after which the pitch of the ceiling strip is determined. Using this parameter, the number of frame hangers and the distance between them are calculated.
To do this, marks are made on the ceiling perpendicular to the UD profile, in the direction in which it is planned to mount the plasterboard sheets, at a distance of 50 cm, which are connected by a horizontal line. Marks for U-shaped hangers are made along these lines at a distance of 80 cm.
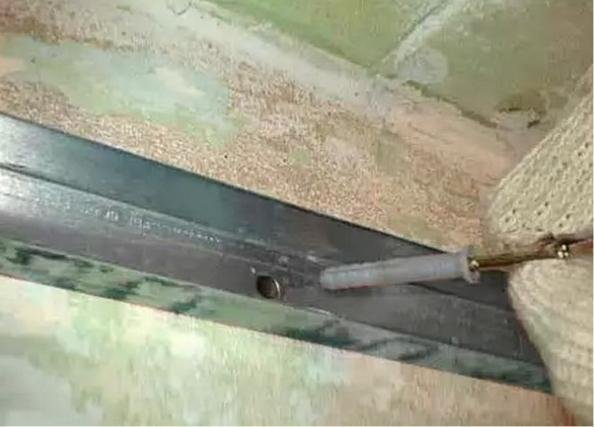
Using a drill, holes are made for the wedge anchors and hangers are inserted. This step of profiles is the most reliable: it strengthens the structure and protects the plasterboard ceiling from deflections.
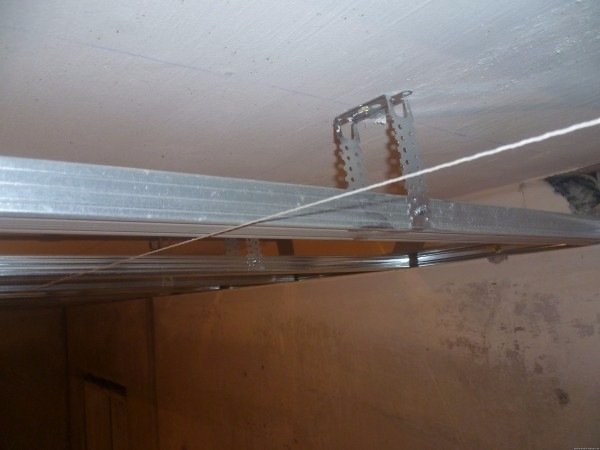
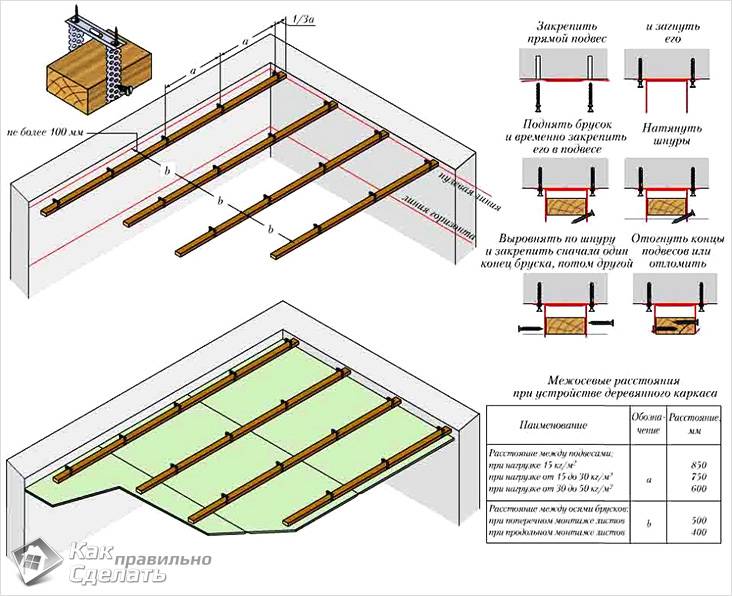
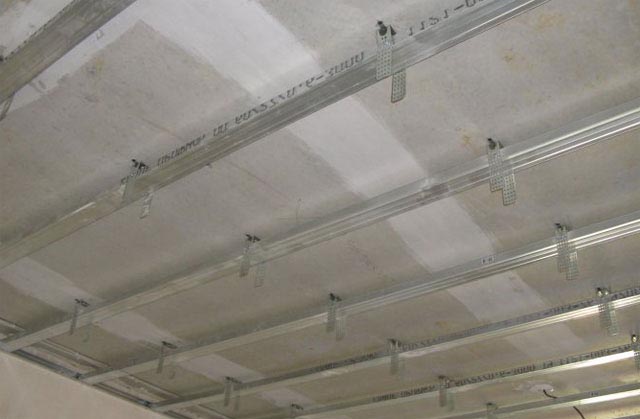
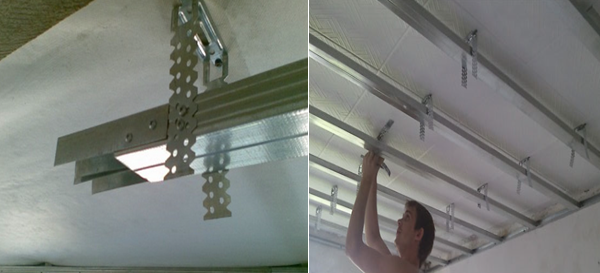 This is how the slats are fixed to the suspension
 To ensure that the gypsum board sheets lie flat in the future, screw the screws strictly horizontally. After the installation of the metal frame is completed, insulation and sound insulation begin. A diagram of the ceiling drawing drawn up at the preparatory stage will help you lay out wiring, fittings for ventilation or television.
Finishing work
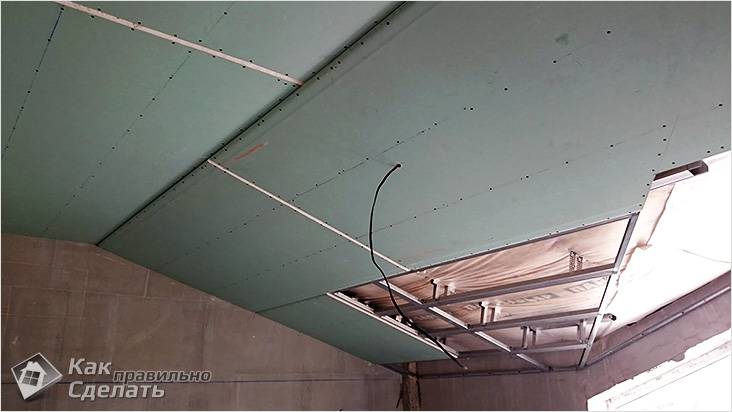
We proceed to the installation of drywall. It is cut to the required size and holes are drilled for lighting fixtures. You will see how fastening technology works, from the planning stage to finishing, in the video, which describes in detail how to correctly make a frame, carry out markings, and calculate the pitch of guides and load-bearing strips.
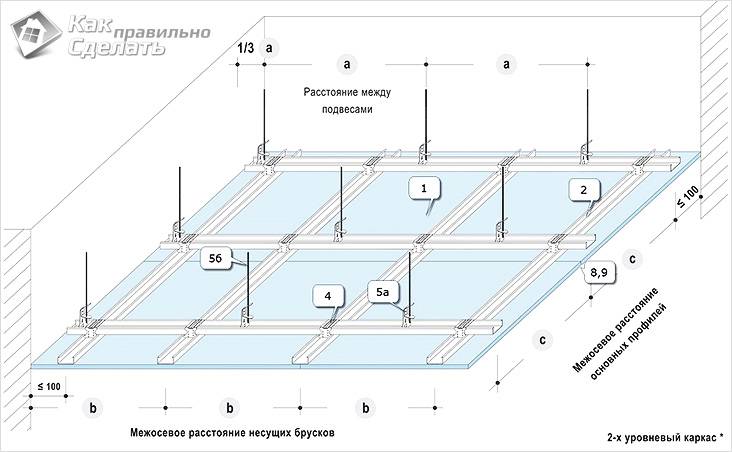
As you can see, a convenient pattern of intersections of profiles allows you to securely fasten gypsum boards to the ceiling, because each sheet falls exactly in the middle of the supporting strip. Often, metal jumpers are installed between the supporting planks, which even better fix the gypsum board to the ceiling, reliably protecting the edges of the sheet from sagging in the air.
The drywall is secured with self-tapping screws, which are not screwed in very tightly so as not to damage the paper layer on the drywall.
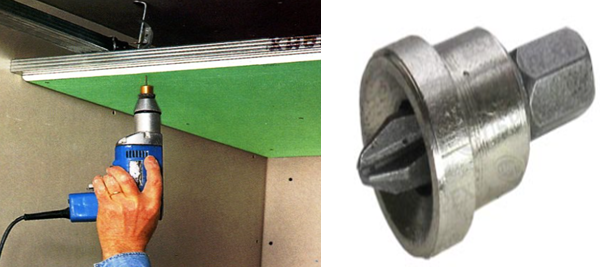 Fix the sheets with a screwdriver with a special attachment
 Their number should not exceed 60 pieces per sheet, that is, they are screwed in at a distance of 30 mm from each other. Then the heads of the screws, as well as the distance between the sheets, are sealed with putty, after which the surface of the ceiling becomes smooth. The final finishing involves treating the resulting surface with a primer, painting, plastering or using other decorative methods.
The simplest installation technology is described above, which involves making a frame for a solid plasterboard ceiling. Curly or multi-tiered ceilings are made using the same principle. As can be seen from the article, the work is not difficult, the only thing that is important is to correctly calculate the height and pitch of the frame profiles, because an ideal base is the key to the durability and safety of the structure.
In contact with
Today, the use of plasterboard sheets when carrying out repairs in a cottage, country house or apartment is the most correct and economical solution. Using the named building material, you can easily remove all defects of an uneven surface, obtaining an even base for subsequent finishing. In order to understand how to properly attach drywall to the ceiling, you will need to identify the features of this raw material and master installation options.
Gypsum plasterboard includes gypsum filler with various binding additives and facing layers of cardboard. The weight of one sheet ranges from 12 to 35 kg depending on its thickness: 6 mm, 9 mm and 12.5 mm.
The widespread use of the presented material is due to a number of important advantages:
- the ceiling surface will be perfectly flat;
- providing opportunities for placement and subsequent hiding of communication systems;
- providing heat and sound insulation;
- use in different types premises due to the variety of types: classic, fire-resistant, moisture-resistant and universal;
- ease of installation;
- implementation of complex design projects to create multi-level ceilings and unique lighting systems.

Preparatory work is an important stage of any construction project and determines the entire course of further installation. They include:
- Selection of the necessary tools and fasteners - a building level, a tape measure, a drill with a hammer drill and a cross-shaped bit, a jigsaw or a hacksaw with a small blade width, dowel-nails and self-tapping screws.
- Marking the ceiling. Taking into account the fact that in most cases the ceiling surface has some unevenness, the first step is to determine its lower limit. For this purpose, the distance to the floorboard is measured from each corner using a tape measure. Having determined the lowest point, it is worth securing a guide beam or profile around the perimeter of the intended space.
Correct marking of the positions of the guide elements is the key to the success of subsequent installation. It is worth remembering that the procedure described above requires a leveled floor!

The ceiling in a wooden house can easily be covered with plasterboard boards. This finish not only has an aesthetic appearance, but also provides a natural microclimate in the room.
The following types of fastening plasterboard to a wooden ceiling surface are currently used:
- through adhesives;
- on wooden profile slats;
Adhesive installation method
Installation of plasterboard slabs without a profile requires the use of special adhesives and the presence of a perfectly flat surface to be glued. In most cases, gypsum mastic is used as an adhesive mass, which includes bone glue and gypsum stone chips. Applying the mixture should start from the edges of the sheet in small cakes at intervals of 30 cm from each other, gradually moving towards the center. After which the plate is pressed onto the prepared surface. To increase the adhesive properties, it would be useful to prime the ceiling in advance.
Since plasterboard sheets have significant weight, when finishing a wooden ceiling, to reduce the pressure created, you can divide the slab into two equal parts, which will greatly simplify the installation procedure and the material will adhere faster.
The presented design allows you to “hide” all ceiling defects, greatly saving its height. It is advisable to use a rack frame when constructing single-level surfaces. The main advantage of this method is its low cost. However, when arranging it, a well-dried timber is required, otherwise the supporting elements will soon become moldy and deformed.
We place the main beam along the entire plane of the ceiling in increments of 80 cm. Afterwards, relative to it, at an angle of 90°, we attach load-bearing partitions at a distance of 50 cm from each other, which will subsequently become the holding base for the drywall.
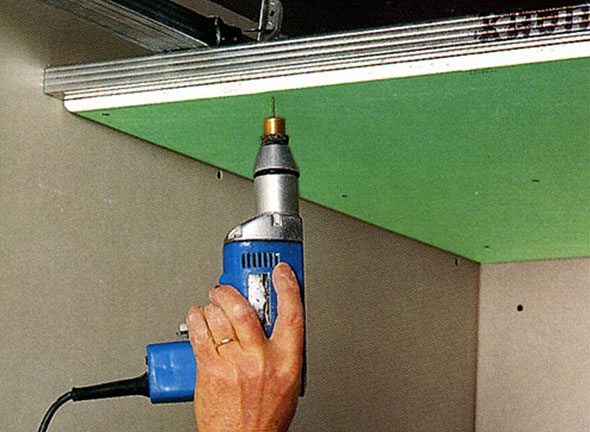
Having finished installing the frame, we proceed to attaching the slabs. Screws are screwed in around the perimeter of the sheet at intervals of 15 cm in a checkerboard pattern so that the head of the rod is slightly buried in the material. Subsequently, these places are puttied, and the entire surface acquires a smooth appearance.
When attaching drywall, you should leave a distance between joints of about 5–7 mm. Subsequently, these gaps are easily sealed with putty, providing better adhesion to the entire plane.
The method of assembling the structure is approximately the same as when arranging a wooden frame, however, there are a number of nuances. The guide profiles are attached in increments of 40 cm, so that one classic plate with a length of 120 cm is fixed on four such metal slats.
Having finished arranging the guide bases, we begin to fix the hanging devices. Attach them to the ceiling using dowel nails at a distance of 40 cm from each other. Next, the supporting profile is attached so that its ends are strictly on the guide rail at an angle of 90°, and its body is in the hangers. All frame elements are fastened to each other using special metal screws.
During all installation work, the horizontality of the profiles must be checked with a level, and places of expected load must be reinforced with jumpers or anchors.
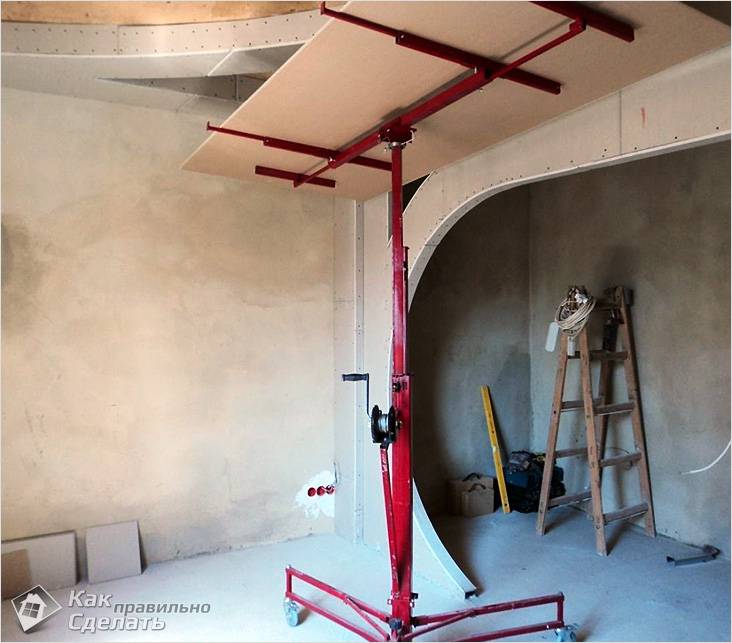
The procedure for installing plasterboard sheets requires the use of two pairs of hands, however, to sheathe the ceiling alone, you will need to use additional holding devices. One of these homemade devices are the platform and supports.
This option involves making a small structure from a pair of boards, hinges and supports. When opened, the height of the retractable platform should be 5–6 cm below the ceiling level.
When manufacturing, do not forget to take into account that this interval also includes, along with the design, the width of the plasterboard sheet.
The process of lifting the slab is carried out in several stages. First, the first selection is set to hand height, then the main one. After this, we climb onto the prepared scaffolding and calmly attach the drywall to the frame.
In conclusion, I would like to note that attaching plasterboard sheets to an equipped frame is the most reliable finishing option than using adhesives, especially in a wooden house. Due to the fact that buildings made of wood “live their own lives” and are constantly in motion, no one knows how the resulting adhesive base may behave after some time.
Video
In the provided video materials, you can learn the intricacies of making a plasterboard ceiling, as well as how to attach plasterboard alone:
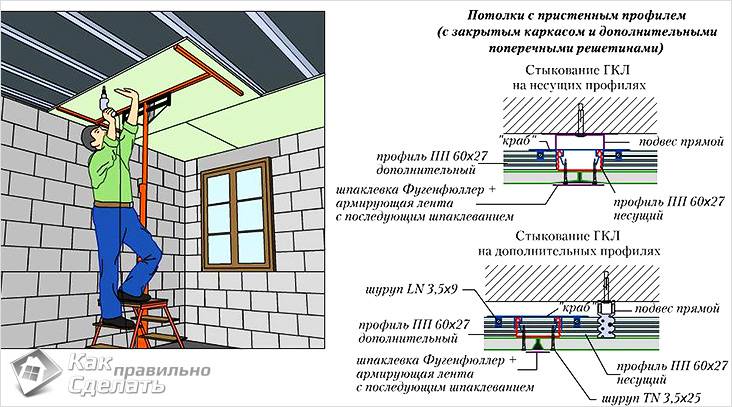
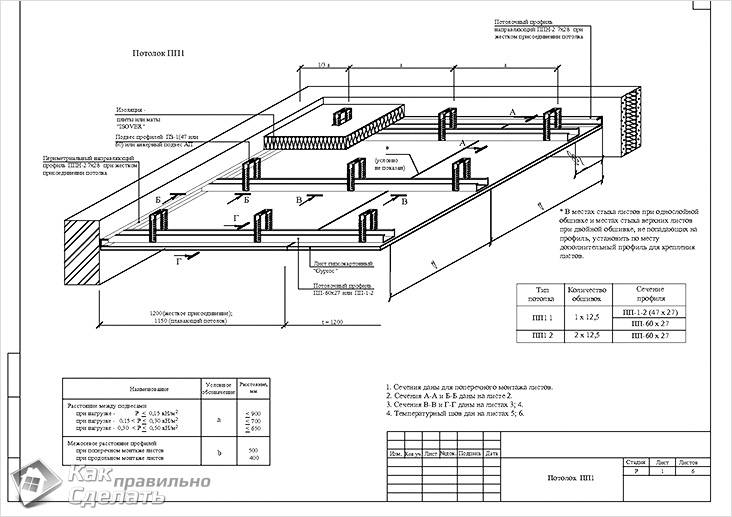
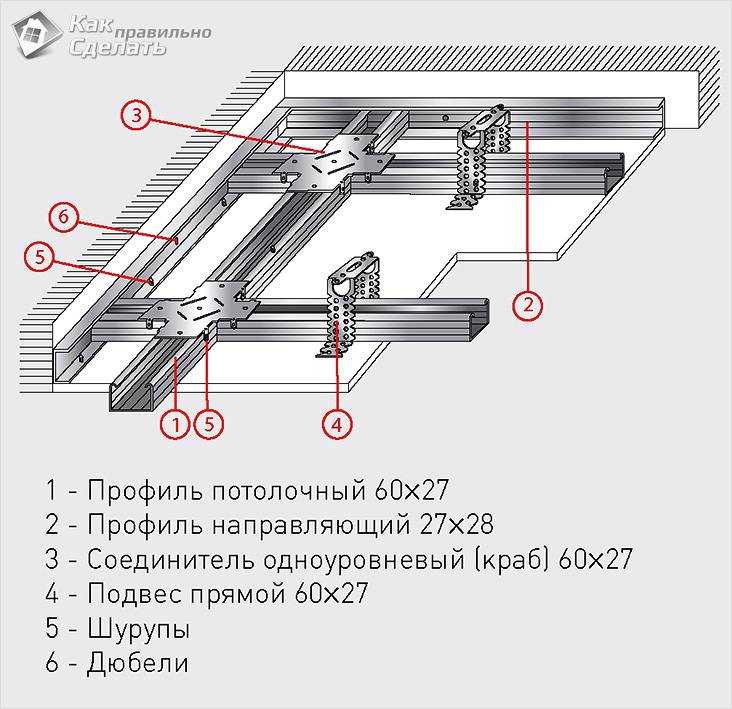
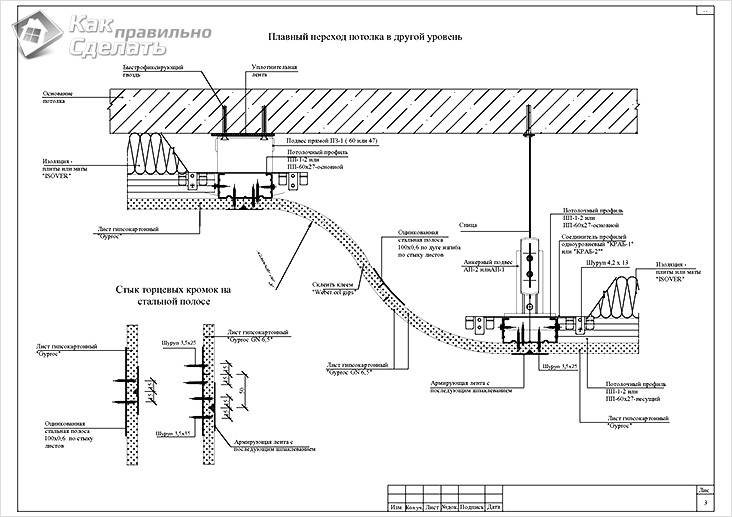
Scheme
In the diagrams you can see some features of attaching drywall and frame to the ceiling:
Among finishing materials for ceilings, plasterboard is considered the most profitable when taking into account its cost and characteristics. The simplest in terms of implementation is the single-level suspended structure, which is shown in the photo. Having understood the technology of creating a frame and how to attach plasterboard to the ceiling, you can make repairs at home on your own.
Exist different ways fastening plasterboard to the ceiling: directly to the base floor, to a metal frame, to wooden slats. And for each of these cases there are specific requirements for fastenings and materials used.
The procedure for attaching plasterboard ceilings
Suppose it is necessary to install a plasterboard structure as close as possible to the base floor, since it is necessary to maintain the height of the room as much as possible. Installation will be carried out on a metal frame.
First stage - marking. The installation of plasterboard ceilings begins with markings. On the base ceiling, you need to find the lowest point and move it to one of the walls in a randomly selected corner of the room. The distance from this point to the lowest part on the frame should not exceed 25 millimeters (profile thickness). Stepping back approximately 30 millimeters from the bottom point of the ceiling, a mark is made, which is transferred to all corners using a building level. Thus, there will be two marks in each corner (one on each wall).
Then, using chockline or blue thread, markings are made around the perimeter of the room. To do this, a thread is pulled between two marks, it is pulled back and suddenly released. As a result of impact with the surface, the chockline leaves a control line. According to it, a suspended ceiling made of plasterboard will be attached; it means the lower level of the frame.
Next, you need to decide on the direction of laying the plasterboard slabs - according to it, you need to mark two opposite walls every 50 centimeters. Lines are drawn between the applied marks using a chokeline - they are a guideline along which the suspensions will be attached.
Fastening the frame
Second phase - creation of metal. Along the line marked along the perimeter, screw the UD profile so that the lower part of the bar coincides with it.
For fastening, it is advisable to use 6 mm plastic dummy dowels and screws with a diameter of no more than 4 -5 mm. For screws and dowels, the length must be selected based on the density of the material of the walls of a particular room.
After this, the CD profiles are cut into pieces of the required length and inserted into the UD profiles mounted around the perimeter. To level CD profiles, a strong nylon thread is pulled under them. It is secured from wall to wall perpendicular to the CD profiles with small self-tapping screws on the UD profiles.
Each profile is aligned along a stretched thread and fastened to hangers with self-tapping screws designed for plasterboard profiles. In the same way, the CD profile and the UD profile are connected to each other, and the ends of the hangers sticking out to the sides are bent to the sides. When the frame for the plasterboard is created, the ceiling is almost ready for the installation of finishing slabs. It is also necessary to make electrical wiring for installation lighting fixtures and lay the wires in a special corrugated cable channel.
Third stage – installation of plasterboard boards. Each sheet has considerable weight (about 15 kilograms) and therefore it is advisable to carry out the work of installing gypsum boards with an assistant. Please note that it will be necessary to attach two plasterboard sheet, so the edge of each of them should be located on half of the profile.
Attaching a stretch ceiling to the ceiling: installation system "). In this case, attaching a stretch ceiling to plasterboard is a difficult task that only professionals can handle (read: " ").