First, you need to provide good cooling for the processor, northbridge, and video card with RAM. And not every motherboard can raise the frequency system bus(it just might burn out). Increasing the FSB frequency will accelerate accordingly CPU, RAM and video card.
Step 2
As soon as we have installed good cooling, we turn on the computer and go into the BIOS. And through the settings we increase the FSB frequency. There may be one of these options: advanced chipset feature>FSB Frequency; advanced>jumped free configuration; frequency>voltage control. We increase it not much, by 3-5 units. We save and exit the BIOS. It would be even better to lower the RAM timings.
Step 3
After that, we boot the computer and start testing the processor (well, about 5 hours). We play different powerful games and see if the computer is slowing down. If it slows down (if it didn’t slow down in these games before overclocking), we stop overclocking and return everything to its place. If everything is fine, we do the same. If after the next increase the computer does not boot, then reset it BIOS settings by removing the battery on the motherboard. Be careful, overclocking will shorten the lifespan of your computer.
And:
The north bridge may burn down
The central processor may burn out.
The video card may burn out
RAM may burn out
Any person gets lost when he finds himself in an unfamiliar situation. When you first get to some institution, you don’t know where to go or who to turn to. When you sit behind the wheel or helm for the first time, you don’t know how to control it vehicle. When you turn on your computer or access the Internet for the first time, you don’t know what to do next. Over time, experience will come, without hesitation, you will head to the elevators, turn on the ignition or open your favorite website and will not even remember that these elementary actions once puzzled you. But at first, you need a guide, advisor or instructor - this is the initial, introductory role this article is intended to play.
Why is overclocking needed at all? Very roughly, overclockers can be divided into three categories.
Thrifty and beginner overclockers. For the budget conscious, the goal is to get maximum performance while spending a minimum of money. A computer is assembled from the simplest, cheapest, obviously outdated components, from what you have enough money for or don’t mind. The rated performance of such a system is usually noticeably lower than the required level. Beginning overclockers already have a computer, they have no choice, and they have to work with what they have. After overclocking, the performance of such systems can be raised to more or less acceptable levels. Thrifty overclockers are not always poor. There are many other values in life besides computers. There are many excellent opportunities to wisely invest your available funds: in education, on food, on children, on housing, on family, on vacation, but spending everything on computers is far from the best use for them.
Experienced overclockers. Their goals are somewhat different - to get maximum productivity and pleasure without spending too much. It’s stupid to throw money away by purchasing older (and expensive) components, but it’s also stupid to skimp on little things, saving a penny, but thereby limiting your capabilities, depriving yourself of the chance to win a ruble. In this case, each element of the system is selected thoughtfully, taking into account many factors: the motherboard has rich capabilities, the processor has a high probability of successful overclocking, the cooling system is quiet but effective. The final system performance will be very high, at least comparable, but often exceeding the speed of a system made up of top-end components operating in nominal mode. Although such high performance is often not vital, the overclocker enjoys the result, a well-deserved feeling of satisfaction from a job well done.
Overclockers-enthusiasts, extreme sports enthusiasts. The goal is maximum productivity at any cost. Older models, the most powerful components, extremely low temperatures - everything is used in order to end up on a transcendental, unrealistic peak, inaccessible to the majority. To be among the top ten, five or three - what could be more wonderful? In this group, the element of competition is strongest and victory is the highest reward!
Of course, the proposed division is quite arbitrary; there are no clear boundaries between groups. Beginner overclockers eventually turn into experienced ones; experienced overclockers, if desired, are quite capable of doing extreme sports; there are even such exotic combinations as thrifty enthusiasts. But you always have to start somewhere, and we will start with the first, most important point.
1. Theoretical preparation
Take your time and don't skip this section. I understand perfectly well that searching for and absorbing information is boring and boring. I would like to immediately know those “magic buttons” that need to be pressed in order to immediately, without any fuss or hassle, get the desired result - an overclocked computer. But there are no such buttons; they are different in each case; to find them, knowledge is required.
After all, if you're not going to overclock, then why are you reading all this? And if you are going to, then over time, with experience, you will still learn and learn a lot, so why put it off? Why pay for your knowledge with burnt or damaged components, pointlessly wasted time and money, when there is ready-made information waiting for you to use it.
1.1 Collecting system information
Before we act, we need to know what we will be dealing with. If you assembled your own computer or at least took part in choosing the configuration, then you probably know what components it consists of. If not, then you should start by defining each of the components. Study your system, find out its components, look through the manual for the motherboard. Use information and diagnostic utilities, run some performance tests, record specifications, temperature, stress at rest and under load. All this data will be useful in the future. Knowing the exact composition of the system, you can approximately determine the possible overclocking level. Performance data will show how much the system speed has increased after overclocking. Sudden changes in voltages and temperatures will allow you to take timely measures and avoid irreversible changes. In addition, these preliminary tests will ensure that the system operates stably in nominal mode.
1.2 List of useful programs
In their daily activities, overclockers use a wide range of programs and utilities for various purposes. Conventionally, they can be divided into several groups:
- information and diagnostic;
- monitoring;
- acceleration;
- stability check;
- performance measurement.
Information and diagnostic programs can accurately determine the configuration of your system. First of all, these include two powerful packages: Lavalys Everest and SiSoftware Sandra. Their capabilities are not limited to defining the configuration; the programs are capable of performing monitoring functions, performance measurement and stability testing. However, it is not at all necessary to use these bulky and clumsy packages, especially since they provide only part of their capabilities for free. There are many lesser-known programs of this kind, such as WinAudit or PC Wizard. Instead, you can use a set of small free but functional utilities, each of which is good in its own area. For example, overclockers widely use the CPU-Z utility, which reports information not only about the processor, but also about the motherboard and memory. For more detailed control and management of memory timings, we can recommend the MemSet utility.
The best universal monitoring programs have always been made by enthusiastic, independent developers. Unfortunately, because of this, their lifespan is not as long as we would like. First, the MBProbe utility left us, then MBM (Motherboard Monitor), now all our hopes are connected with the SpeedFan program.
Overclocking a processor is best done using the BIOS, but manufacturers do not always provide us with sufficient capabilities. In this case, a universal overclocking utility from Windows called ClockGen will help. Also, check the software list that is included on the CD that came with your motherboard. Board manufacturers often include their own programs that can overclock from Windows, control fans, and monitor.
The list of programs for overclocking video cards is also wide. First of all, you should name one of the best utilities this class is RivaTuner. In addition, you may find PowerStrip, NiBiTor, ATI Tray Tools, ATI Tool, etc. useful.
None of the programs can give you a 100% guarantee of stable operation of an overclocked processor. But the chances increase dramatically if you use two or three different utilities. To check stability, you can use OCCT, S&M, Prime95 or any other program that can boot the system, for example, it could be your favorite game.
When it comes to performance measurement, there are hundreds of programs of this kind that test the entire system or the performance of individual components. A very good list of useful utilities is available on the BenchmarkHQ website, many of which you can download from our file archive.
1.3 Materials about overclocking
Almost every article on our site has some relation to overclocking. If you regularly read our news and articles, then you already have a certain amount of knowledge that will help you in practical experiments. CPU overclocking statistics can give you an idea of the approximate results you can get. Studying the conference materials will show a list of problems that overclockers face and possible solutions to them.
2. The problem of choice
If you are a beginner overclocker and you already have a computer, then this is both good and bad. It’s bad, because we can no longer change anything; even one unsuccessful component, for example, a weak power supply, can put an end to overclocking the entire system. Good, because we no longer face the problem of choice.
The problem of choice is one of the most difficult moments when assembling an overclocking system. Hundreds or even thousands of factors come into play: the current range of components, the balance of forces between various models, financial aspect and many additional points, ranging from ease of assembly, upgrade possibilities to attractive appearance. Overclocking the system is relatively easy and simple, choosing the optimal composition of components is a very difficult task, almost impossible, I can’t imagine how we cope with it.
Fortunately, going over the myriad of possible options is beyond the scope of this article. We will only touch on this issue from time to time, when overclocking options will depend on the choice.
3. Basics of overclocking processors
Overclocking is operating at frequencies higher than nominal. It is not so important to us why overclocking is possible at all. This may be a large margin of safety laid down by the manufacturer, marketing reasons that forced the standard characteristics to be underestimated, or the deliberate use of faster components than necessary. Our task is to skillfully take advantage of the opportunities provided.
Everything on a computer is standardized and synchronized. Standardization is necessary so that components from different manufacturers could work with each other without problems. Synchronization is used to coordinate the operation of different devices. The system bus frequency – FSB – was chosen as the starting point. The frequencies of various buses in a computer, that is, channels connecting various devices and the elements that ensure information transfer between them are usually smaller than the FSB, and dividers are used to set the nominal frequency of their operation. The processor frequency is currently noticeably higher than the FSB frequency, and multipliers are used to ensure that the processor operates at its standard frequency.
For example, processor Intel Core 2 Duo E6300 operates at a bus frequency of 266 MHz. Its multiplier is x7 and the product of the FSB frequency by the multiplier will give us the final processor frequency: 266x7=1.86 GHz. Thus, in order to increase the processor frequency or overclock it, you need to increase either the FSB frequency or the multiplier.
Older models of modern processors have a free multiplier and allow it to be increased, but such processors are too expensive, often an order of magnitude more expensive than the younger processors in the family. Their purchase is irrational, since with the help of overclocking we can bring the performance of junior processors closer to the level of older ones or even exceed it.
Thus, overclocking a processor usually comes down to increasing the FSB frequency. If we take the same Intel Core 2 Duo E6300 processor and can increase the bus frequency from 266 to 400 MHz, then the processor frequency will increase by almost 1000 MHz, to 2.8 GHz, if we increase the FSB to 500, then it will already be 3.5 GHz and so on more... In principle, this information is already enough for you to head to the BIOS of your motherboard, increased the FSB frequency and overclocked your processor. But there are some features that need to be taken into account when overclocking. You will learn most of the nuances over time, some are unknown even to me, since new nuances appear with the release of new processor models, but some features can be taken into account in advance.
4. Preparing for overclocking
Before you start overclocking your processor, you need to take a few mandatory steps. First, check to see if there is a more recent BIOS version on your motherboard manufacturer’s website and take an interest in the list of changes made. There are numerous examples where boards that were frankly unsuccessful for overclockers were miraculously transformed with a BIOS update. New versions not only correct noted errors, sometimes new parameters appear or the intervals of existing ones are expanded. You can see the current BIOS version number when the motherboard starts, but if the information flashes very quickly, you can press the Pause key on the keyboard. Sometimes the version number can be found by entering the BIOS, using information and diagnostic utilities or specialized programs for BIOS updates. There is no need to flash all available versions, starting with the oldest and ending with the latest. The latest BIOS version includes all changes from previous ones and, although not always latest version The BIOS is optimal for overclocking, but at least it is already free of errors from earlier versions.
So you've entered Motherboard BIOS boards and don’t know what to do next? It is very possible that you got a “smart” board that will do everything you need on its own; you just need to indicate the desired level of processor overclocking or FSB frequency. But it’s best not to leave everything to chance and take into account possible nuances and problems in advance. This will save time, save components and get the best possible result under the given conditions.
First you need to reduce the memory frequency. We have already said that everything in a computer is interconnected, therefore, when overclocking and increasing the FSB frequency, the memory operating frequency increases proportionally. If the memory initially operates with increasing factors, at a frequency that is high and close to the limit of its capabilities, then it will turn into a limiting factor that prevents further overclocking of the processor. It is advisable to set the memory to the lowest possible frequency in the BIOS. Don't worry about significantly reduced performance, it will increase with overclocking, and then, after we find the maximum frequencies for our processor, we will definitely come back and look at the memory.
The next stage is to increase the memory timings, at least the main ones; for the currently widespread DDR2 it is approximately 5-5-5-15-2T. This is done for the same reason that we reduced the memory frequency so that it would not interfere with processor overclocking. Memory can operate at high frequencies with high timings or at low frequencies with low timings. Even SPD memory sometimes stores two or more possible combinations. Reducing the frequency can be perceived as an indirect permission to reduce timings, if they are set motherboard automatically. And if in the nominal operating mode of the processor such a combination of low frequency and low timings is quite workable, then when overclocking and correspondingly increasing the memory frequency, low timings can become an obstacle.
If any BIOS settings are set to Auto by default, the boards can manage them independently. Most often they react correctly, but not always, so if possible it is better to avoid such cases and always specify the parameter values explicitly.
For example, you can recommend fixing the processor multiplier at its nominal value. There have been cases when the "smart" BIOS of the motherboard reduced the starting value of the multiplication factor. It was probably just a BIOS error, but it's better to be on the safe side.
In addition, it is advisable to explicitly indicate the nominal voltages so that the board does not overestimate them during overclocking. For memory, on the contrary, it is advisable to slightly increase the voltage in advance so as not to worry about restrictions on its part. There are certain difficulties with this point - the nominal voltage values are not always known. Many motherboards explicitly indicate the nominal processor voltage in a special information line. Sometimes the standard value for a voltage in the BIOS is the minimum possible. You can often find out the rated voltage of a processor using utilities such as CoreTemp or RM Clock.
Another possible, albeit less accurate, way to determine voltage is the selection method. By default, the motherboard usually sets the nominal voltage for the processor; you can view its value using any monitoring utility or in the BIOS in the PC Health section. Then try to explicitly set the Vcore voltage in the BIOS so that it matches the previous measured value obtained during automatic installation.
It is better to disable Spread Spectrum if the motherboard does not automatically disable this option during overclocking. This option is designed to reduce noise and interference that a running computer emits during operation. However, trying to compensate for them during overclocking can limit the overclocking potential of the system.
Some motherboards declare the ability to overclock the video card automatically. If there is a load on the video card, then its frequencies increase slightly. Disable this feature. An acceptable increase in speed cannot be achieved in this way, however, unforeseen problems are possible.
5. Overclocking the processor
Perhaps now you already know enough to start overclocking your processor. The step-by-step method is very simple - you increase the FSB frequency in the BIOS, save the settings, load operating system and test the stability of operation, not forgetting to control temperatures. If you have never seen a BIOS and find it difficult to find necessary settings, scroll through the note "How to overclock processors (guide with pictures)". At first, the frequency change step can be quite large: 50 or even 100 MHz - it all depends on the model of your processor. Previously, you should already know the approximate level of possible overclocking and set the frequency accordingly, although the capabilities of a particular instance may differ markedly from the “average” values. Then the step is reduced to 20, 10 or even 5 MHz. A smaller step is irrational. Overclocking with an accuracy of 1 MHz is possible only for the current moment, to set a record, for example. But for constant stable operation of an overclocked system, it is better to have some margin of safety in case of natural changes in any characteristics, say, temperature or voltage.
While the system works stably and passes tests, you continue to increase the frequency; as soon as errors appear, you lower it and, as a result, find the overclocking limit of your processor, which is always individual.
Is it possible to overclock it even more? Of course, but this will require an increase in voltage.
5.1 Do I need to increase the voltage?
A difficult question that cannot be answered unequivocally. First of all, you need to figure out what voltage needs to be raised. This is determined experimentally, very simply and quickly. Try increasing the processor voltage by one or two minimum steps in the BIOS. And then check whether overclocking has improved, whether the processor can now conquer the frequency from which it had to retreat a little earlier for stability. If the answer is “yes”, then continue to look for the overclocking limit in new conditions; if the answer is “no”, then you have increased the wrong voltage.
Insufficient voltage on the Vcore processor does not always limit overclocking; often the motherboard becomes such a “brake” if the system overclock on the bus is high enough. Try, just as in the previous case, increasing the voltage on the northbridge of the chipset - often it is NB Voltage that limits overclocking. Try a combination of voltages, for example, simultaneously increase FSB Termination Voltage if such a parameter is available in the BIOS. Before starting overclocking, we fixed all the voltages at nominal values, now try to get a hint from the board - set the Auto values and see within what limits the voltages will change.
How long should the voltage be increased? There are three criteria that can stop you. Further increases in voltage may be limited by the motherboard's capabilities, the temperature is too high, or it may not be practical. If the system actively responds to changes in voltage and temperature indicators remain normal, then why not continue? But if overclocking by 100 MHz requires raising the voltage on the processor by 0.3 V, then this is inappropriate, in my opinion. With current processor frequencies of several gigahertz, the speed increase from such overclocking will be almost unnoticeable, but the load on the system will increase significantly and the temperature will also rise. As the processor frequency increases, the temperature also increases, but with increasing voltages it increases very sharply.
5.2 What should the temperature be?
The normal processor temperature should be considered within 40-50°C; under load it can rise to 60, but avoid temperatures of 70 degrees or more. It is not always necessary to change the cooler on the processor to reduce the temperature. If the computer is not new, then sometimes it is enough to reinstall the cooler to update the thermal paste and the temperature will drop noticeably. In a small, airtight case, the temperature will inevitably rise over time, so make sure you have case fans.
When we talk about temperature, we primarily mean the temperature of the processor, but this is not the only thing that needs to be monitored. Be sure to monitor the temperature of the chipset, especially if you increased the voltage on it. In new Intel chipsets, the temperature sensor is built into the north bridge, and although currently none of the utilities can control this temperature yet, over time the situation should change.
Typically, motherboards can monitor two temperatures: the processor and the system. System temperature is not the chipset temperature. Somewhere on the motherboard, usually not far from the chip that manages the input/output ports, it could be Fintek, ITE, Winbond, there is a thermal sensor, and its temperature is recorded. Depending on its location, it may be important or play virtually no role and may not even change over time.
Also, pay attention to the temperature MOSFET transistors near the processor, especially if you are using a liquid cooling system. Usually they get very hot under load, but almost none of the manufacturers of “dropsy” provide standard means of cooling. Memory modules remain almost cool even with a noticeable increase in voltage, but become very hot if the memory is used intensively.
5.3 Do I need to reduce the multiplier?
There is another way to slightly increase system performance. Almost all modern processors allow you to reduce the multiplier; you can lower it, but accordingly increase the bus frequency, leaving the found frequency of stable processor operation unchanged. Increasing the FSB affects not only the final processor frequency, it usually affects the entire system as a whole. The higher the bus frequency, the faster system exchanges data, the greater the speed. Therefore, a processor with a frequency of 3 GHz, operating on a 300 MHz bus with a x10 multiplier, general case will be faster than the same processor with the same frequency of 3 GHz, which runs on a 200 MHz bus with a x15 multiplier.
It would seem that this is a simple, completely safe and “free” way to increase system performance a little more, but it is not suitable for everyone. The fact is that when the multiplier changes, processor energy-saving technologies stop working, which are based on reducing the multiplication factor and voltage during idle minutes, and they play an important role in reducing power consumption and temperature. Thus, this method is suitable only for those users whose computers are constantly loaded at 100%, for example, with distributed computing programs. It will truly be "free" for them as they get the speed boost without losing anything.
5.4 Nuances of overclocking Intel Core processors
Core microarchitecture processors are the most productive in this moment, they accelerate excellently, so we will pay special attention to them.
One of the unpleasant features Core processors, which must be taken into account when overclocking is the so-called FSB Wall. This new concept for us means the maximum bus frequency at which a given processor instance is capable of operating. In this regard, it is convenient to start overclocking Core processors by defining the FSB Wall. Reduce the multiplier to a minimum of x6 and find out what bus frequency your copy can accelerate to. It is not a fact that you will be able to achieve stable operation at this frequency with the nominal multiplier, but at least you will get preliminary information about the capabilities of the CPU.
For example, processors with a nominal bus speed of 200 MHz rarely overcome overclocking above 400 MHz FSB. This factor must be taken into account when choosing a processor. There is no point in overpaying for older and therefore more expensive processors; it is much easier to overclock a junior one, but you should remember that overclocking of younger CPUs with a nominal x8 multiplier will most likely be limited due to the FSB Wall and will not exceed 3.2 GHz, but will most likely stop somewhere then in the region of 3.0-3.1 GHz. This is not enough. Why limit yourself in advance? If possible, consider purchasing a processor with a x9 multiplier.
Among processors with a nominal bus frequency of 266 or 333 MHz, the junior one with a x7 multiplier is also often chosen, but overclocking such processors can be limited not only by the FSB Wall, but also by the capabilities of the motherboard or memory. It is advisable to use such processors with a multiplier of at least x8, but here a new problem arises - FSB Strap.
FSB Strap is not a feature of the processor, but of the chipset and motherboard. IN in this case This is the frequency at which the chipset switches to another operating mode, which results in an increase in latency and a drop in performance. Maternal Gigabyte boards on the Intel P965 Express chipset, the operating speed is immediately reduced as soon as you start overclocking the processor. Maternal Asus boards on the same chipset they demonstrate excellent performance up to 400 MHz, after which the FSB Strap also switches. While testing the Asus Striker Extreme motherboard on the NVIDIA nForce 680i SLI chipset, a drop in performance was detected when moving from the FSB frequency of 420 MHz to 425 MHz. Judging by the first tests, motherboards based on the Intel P35 Express chipset do not have this drawback.
Some "neo-overclocking" motherboards on Intel 945 and 965 series chipsets do not know how to switch FSB Strap at all, and therefore overclocking processors with a nominal 200 MHz bus on such boards only slightly exceeds 300 MHz FSB, or even does not reach this limit. A processor modification known as BSEL Mod may help. By isolating and connecting the contact pads on the “belly” of the processor, the motherboard is made to think that the nominal processor bus frequency is not 200, but 266 MHz and thereby significantly improves overclocking.
Thus, you should take into account the presence of an FSB Strap in advance, try to avoid “neo-overclocking” motherboards and choose a board taking into account the standard processor multiplier, so that when overclocking you do not fall into the frequency range where reduced performance is observed. You may even have to reduce your overclock a bit to avoid this. At the same time, one should not exaggerate the danger of FSB Strap. If your processor overclocks far beyond 500 MHz FSB, then you really don't care at what frequency the FSB Strap switches - high processor overclocking will cover the drop in performance.
5.5 Nuances of overclocking AMD processors
AMD processors are overclocked in the same way as any other, but there is one difference - in preparation for overclocking, it is useful to reduce the frequency of the HyperTransport bus that connects the processor to the chipset. Usually it is enough to set a x3 multiplier or a frequency of 600 MHz, which is the same thing.
In addition, AMD processors have a memory controller integrated into the processor. This means that the final speed of the system depends little on the chipset used and in many cases will be approximately the same. Therefore, you can take almost any motherboard, with the exception of “neo-overclocking” ones, which do not overclock processors well due to limited BIOS capabilities, poor design, or other reasons. You can find out whether the board you have chosen falls into this category from reviews or in a conference.
There is one more difference, which is also related to the integrated memory controller - for AMD processors, memory timings play a more noticeable role, especially if it is DDR memory rather than DDR2. Be sure to conduct tests; perhaps it will be more profitable for you not to increase the memory frequency, but to lower the timings.
It should be remembered that AMD Athlon 64 X2 processors based on 65 nm Brisbane cores are inferior to their 90 nm predecessors on Windsor cores due to slower cache memory and the use of fractional multipliers. To determine the memory frequency of AMD processors, it is not the FSB frequency that is used, but the processor frequency and integer divisors, so in some cases the actual memory operating frequency will be noticeably lower than that set in the BIOS, which leads to a drop in speed. In this regard, dual-core processors based on the Windsor core are more preferable for overclocking; they overclock no worse than their more advanced but slower counterparts.
6. Life after overclocking the CPU
If you think that, having decided on overclocking the processor, you can now sleep peacefully, then you are deeply mistaken, your troubles are just beginning. High frequency the processor is not an end in itself, the result should be increased speed of the entire system, and for this you need to work a little more. A lot depends on the processor, but the speed of operation is almost always reflected in the frequency and timings of the memory, and in games, performance will often be limited by the video card.
One of the first steps we took in preparation for overclocking the processor was reducing the memory frequency. Now is the time to increase it, if possible. In general, the maximum possible frequency provides maximum performance, so we leave the memory timings unchanged, we also increased them in advance, and are trying to achieve the maximum in memory overclocking. Increasing the voltage usually helps very well, but don’t get carried away; for DDR2 memory it is not advisable to raise it above 2.1-2.3 V. Found the maximum frequency? Great, now we are trying to determine the minimum possible timings for this frequency. Unlike frequency, the lower they are, the better.
The recommendations I give are general in nature, so feel free to check your achievements in practice. It may very well be that when increasing the memory frequency, you will have to install an “inconvenient” divider or increase the timings too much. It is quite possible that in your case it would be more beneficial from the point of view of overall system performance to slightly reduce the memory frequency, but at the same time significantly reduce the timings. Run tests using several different combinations of frequencies and timings, then choose the best combination.
Gaming performance is mainly determined by the video card, so if you are into games, be sure to overclock it too. Overclocking video cards is a fairly broad topic that requires a separate article. Long gone are the days when it was enough to increase the frequency of the GPU and video memory to get the best possible performance. Now you need to take into account the presence of several blocks in the kernel operating at different frequencies, monitor the appearance of "freezes" - freezing of the picture, reflash the BIOS of the video card to correct frequencies and timings... As a starting point, I can recommend reading the article "How to overclock video cards (illustrated guide for beginners) ", but for now you will have to figure out the details on your own, with the help of friends more experienced in overclocking, or ask for advice in conferences.
Now that your entire system is overclocked and showing significantly (hopefully) increased performance, you can now rest easy. But I don't think you will succeed. After all, first you need to inform everyone you know about your successes and actually try the capabilities of your noticeably stronger iron-silicon friend. Good luck with your overclocking!
It so happened that in almost twenty years of IT practice I have never had to deal with overclocking - somehow everyone had other interests. However, when choosing a configuration for another new (although now far from new) computer, for some reason I settled on an Intel processor with an open multiplier - i5-2500K. Why I did this, I don’t remember now, perhaps I intended to figure out in my old age what this overclocking is. And then one evening, when there was nothing to do, I realized that the moment had come, and I delved into studying the issue, and the next evening I applied what I had learned in practice. That's what I'm going to report on.
Overclocking theory
Overclocking issues have been of interest to humanity all the time from the moment computer technology came to the masses. The main driver of overclocking is the spirit of competition, passion, and the desire to achieve best results, than others. Well, its main object is innocent processors, which are subjected to inhuman loads in order to obtain these same results. There are two main ways to overclock a processor. The first is to increase the frequency of the BCLK clock generator, which, through multipliers, determines the operating frequency of the processor, memory, buses and bridges. This option is, in principle, universal, but it has many nuances and limitations associated with a specific processor and motherboard, so so that your experiments do not lead to the death of the computer, you need to carefully understand everything. The second method is to change the processor multiplier, the same one by which BCLK is multiplied to obtain the operating frequency. This path is much safer (only the operating mode of the processor is changed, and not the entire system) and simpler (essentially one parameter is responsible for overclocking), but there is one thing: the multiplier must be unlocked (allowed for change) by the processor manufacturer.
 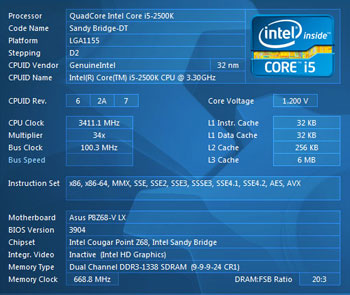 Initially, Intel processors had an open multiplier, but in the 90s of the last century, after a series of scandals related to the relabeling of processors by unscrupulous suppliers, when slow processors were overclocked and sold at the price of faster ones, the company blocked the multiplier. Since then, the unlocked multiplier has only been found in top “enthusiast” models, which, naturally, were not cheap. The situation changed fundamentally with the advent of second-generation processors Intel generation Core (Sandy Bridge) - their line included models with an unlocked multiplier for the mass consumer, which received the K index. Initially, the cost was K and non-K option one processor differed quite significantly, but now it has practically disappeared (for example, the difference between the Core i5 3570 and Core i5 3570K today is 150 rubles).
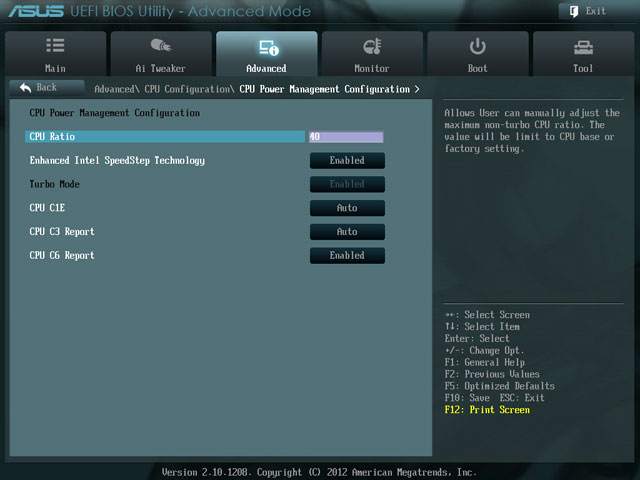
So, Intel itself has opened the way for “at-home”, fast and highly skilled overclocking. It would be a sin not to take advantage of such an opportunity, and I began my experiments. As a test bench, as I already said, my long-suffering home computer, by the way, was completely unprepared for overclocking; rather, on the contrary, it was chosen for reasons of efficiency and noiselessness.
Experiment
According to the specifications, the i5-2500K operates at multipliers from 16 to 56. With standard parameters and using SpeedStep, we have 16x at idle and 34x under load. Now let's start the process.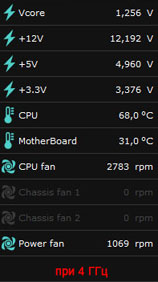 “Home” overclocking has become so homely that it can now be done directly from Windows, without going into the BIOS. But we will still be oldfags to begin with - only BIOS, only hardcore! However, we won’t get much hardcore – we only need one parameter there; in the BIOS of my ASUS P8Z68-V LX motherboard it is called CPU Ratio and is located in the CPU Power Management menu. To overclock the processor above standard values, you will also need to enable the Turbo Mode option (it has nothing to do with Intel Turbo Boost, which, on the contrary, is recommended to be turned off).
 The first overclock was tiny, up to 36x, in order to mark my entry into the ranks of overclockers. However, there was no fanfare, and nothing at all happened except the frequency in the CPU monitor. The temperature also remained unchanged. The next level is 40x, a significant figure; until recently such a result (when overclocked on the bus) was considered a grandmaster. The height was taken without the slightest effort and without changing the voltage on the processor. But the temperature, unfortunately, crept up and reached 68 degrees at 100% load. There is nothing to be done; the cooling system installed on the computer has shown itself to be completely unsuitable for overclocking.
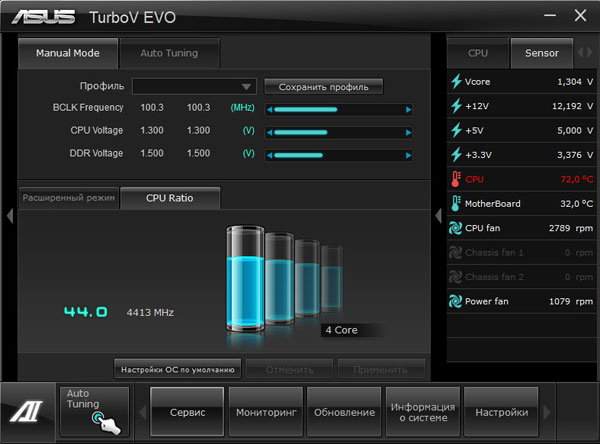
Step three. 44x, that is, 1 GHz increase. Having made my face like a brick, I started the computer. “Well, no, that’s enough,” he replied and flew into blue screen. It is necessary to increase the processor supply voltage. I immediately raised it to 1.4 V so that it would be enough. Now I decided to operate through the GUI on Windows. In the AI Suite software supplied with the ASUS motherboard, the Turbo V EVO component is responsible for overclocking. To operate, this program uses the TPU (TurboV Processing Unit) controller on the motherboard. The TPU module is so intelligent that it can itself, without human intervention, overclock the system to the highest possible parameters. Thus, overclocking technology, from the point of view of the “dummies”, has reached its highest point, when to get the result it is enough to press one button “make sure everything goes well”.  I was not able to really test the 4.4 GHz mode, because just a few seconds after starting a full load, the temperature rose to the maximum permissible, and I was forced to interrupt the experiment. However, I have no doubt that with normal cooling the operation of the processor would be stable - numerous experiments of other users convince me of this. If we talk specifically about the i5-2500K, absolutely everyone’s processors work up to 4.5 GHz, the result of 5 GHz is quite common, and the most stubborn ones reached 5.2 GHz. Let me emphasize that we are talking about stable operation under heavy (test or real) load. Thus, we are dealing with more than 50% increase in frequency with minimal material and mental costs.
Results and conclusions
As expected, the results of the computational tests climbed linearly as the frequency increased. For example, I chose the CPU Queen integer “chess” test. As you can see, with maximum overclocking, our processor “pushed” not only the extreme first-generation i7, but also the server Xeon (although it was initially inferior to both).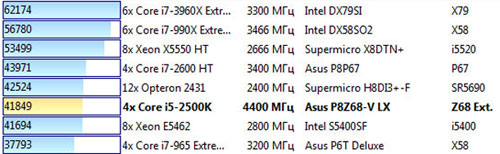
Some people are probably wondering what happened to the index Windows performance? Almost nothing, it increased by only one tenth, from 7.5 to 7.6. However, do not forget that for Windows 7 maximum value index is 7.9, so a big jump could not have happened.
Now let's try to answer the question, who needs this overclocking - except for overclockers themselves? However, it was answered before us: first of all - to amateurs computer games. Experiments have shown that processor power at standard frequencies is not enough to power top-end video cards, especially if there are several of them, and as the frequency increases to a certain limit, gaming performance also increases. Saturation occurs, by the way, at our “home” 4-4.5 GHz; it is at this frequency that the processor ceases to be the “bottleneck” of the entire system. In addition, people dealing with heavy media content, and, of course, respected fans of distributed computing will definitely be happy with the extra gigahertz. I note that all categories of citizens will have to vigilantly monitor the temperature of the processors and their cooling system - otherwise a slight “zilch” and smoke is guaranteed.
Instructions
If your motherboard supports fast overclocking mode, then restart your computer and hold down the Del key. It will open after a while BIOS menu motherboard. Open the System Configuration menu. Find the item related to CPU parameters and open it.
Now find the line that will display the original clock frequency processor and its multiplier, for example x5. Press Enter to change this setting. Be extremely careful! Change the multiplier by only one unit. Save BIOS settings by pressing the F10 key.
Wait for the computer to boot and make sure the processor is working properly. If you need to overclock the processor even more, repeat the procedure for changing its multiplier. Please note that if you have a relatively weak power supply installed, then after a significant acceleration The processor may disable some devices built into the motherboard, such as the sound card.
To overclock the processor in Windows environment there are special utilities. Download AMD OverDrive and install it. Naturally, it is only suitable for AMD processors.
Launch ADM OverDrive and wait while the program scans the connected equipment. In the left column of the menu that opens, find the Clock/Voltage item and open it.
Find the Clock submenu. If you have installed multi-core processor, then check the box next to Select All Cores. Now find the item CPU Core 0 Multipler. Move the slider located opposite this item to right side to increase the processor multiplier.
Click the Apply button to apply the changes. Now find the Preferences button in the left corner and click it. Open the Settings menu. Check the box next to Apply my last settings when system boots. Close the program and restart your computer.
To improve your computer's performance, you can overclock the processor. Typically this operation is performed by changing the processor multiplier in the BIOS or using auxiliary programs.
Instructions
If your computer's motherboard supports fast overclocking mode, restart it while holding down the DEL key. Check out the BIOS menu that opens. Open the System Configuration section. Find the CPU parameters item in it and open it.
Find the line in the list that displays the initial processor clock speed and its factor(for example, ?5). Press Enter to change this setting. Even if you are a fan of large values, do not change factor more than one unit. To save the new BIOS settings, press the F10 keyboard key.
Wait until the computer finally boots and make sure that the processor is working properly. If you think you need to overclock it a little more, reboot your system and enter the BIOS menu again. However, be careful, if you installed a low-power power supply when building (or buying) your computer, then after taking steps to speed up the processor, you may find that some devices connected to the motherboard do not work (for example, sound card or DVD drive).
Video on the topic
note
Not all processors can be overclocked. Thus, access to processors produced by Intel, for the most part blocked (the only exceptions are some inexpensive models). In this regard, AMD processors are, of course, preferable, since all programs for changing the multiplier are written by the manufacturers themselves. However, if your computer is still under warranty, you should not do this, since the manufacturer is not responsible for such independent user actions.
If you have installed on your computer AMD processor, then in order to increase its speed, you can use special program AMD OverDrive, which can be downloaded from the company's official website.
Unlocking the multiplier is used when overclocking processors. All boards support the ability to select multipliers, so you need to close certain contacts on the processor to change this setting.
You will need
- - computer;
- - skills in working with electronics.
Instructions
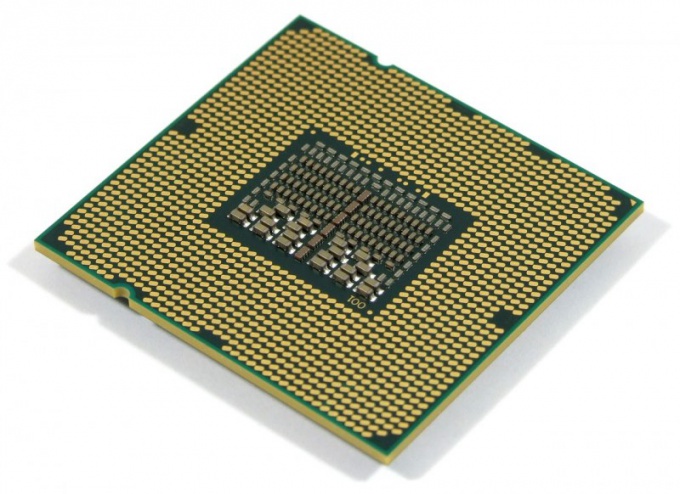
Disassemble system unit and remove the processor to perform multiplier unlock. Find bridges on it. Look at them carefully. There is a groove between the two points that need to be connected in order to make the contacts. You can see a thin copper coating in it.
If you close the bridges with a pencil or solder, you will also short-circuit the copper substrate, and as a result, it will be very difficult to bring the processor back to life. Therefore, the most important thing in closing the multiplier is to close the bridges so as not to touch the copper coating.
Fill the grooves with dielectric, you can use superglue as it. Do this very carefully because the glue must not get onto the bridge pad and the groove must be filled completely to ensure better insulation. Locate the grooves with tape.