We installed it in the case of the assembled computer HDD, it's time install drive for optical disks . From a technical point of view, it is now completely unimportant what type of disks your drive is designed for. Be it CD, DVD or BlueRay drive unit, the installation will look exactly the same. Perhaps the only exception may be some exotic drives, which may be smaller in height than the standard version.
What is it needed for DVD drive?
I hope the purpose of this device is clear in its essence. Everyone knows that a DVD drive is needed to read and write optical discs. Once upon a time, in the nineties of the last century, when no one had heard of the DVD and, especially, BlueRay formats, not every computer had a drive for reading optical discs.
Moreover, at one time I myself, as a teacher of IT-related subjects, personally gave failures to students who said that they could write their information on a CD. At that time it was simply unthinkable - all optical discs were recorded only using an industrial method.
Then they began to appear devices for recording information on CD. However, at first they were so expensive that for the cost of the recorder you could buy a Zhiguli car, and the cost of the blank was approximately equal to the monthly salary of the employee who dealt with it. It’s easy to imagine the trepidation with which people held this miracle of technology and engineering in their hands.
By the way, initially devices for reading, and even more so writing, optical discs generally belonged to the category external devices both in size and appearance resembled a small inkjet printer.
Now these devices are beginning to be gradually replaced by more convenient and compact flash drives, which can hold much larger volumes and take up much less space.
Many modern laptops no longer come with a DVD drive in order to reduce the size of the laptop itself.
When a person collects desktop computer, he can easily fall under the influence of these newfangled trends and abandon the DVD drive in his future desktop. However, in our humble opinion, this should not be done. The fact is that while many programs, external device drivers, etc. supplied on CD. Sometimes you may have to write some information to disk. In a word, it is better to buy and install it in new computer optic DVD-RW drive(or BlueRay for exotic lovers).
Lesson 5. how to install a DVD drive into a computer
The next lesson will be dedicated to
Sergey Samarin, Andrey Kuznetsov
Today we will talk about the first steps in mastering optical recording. Although enough has already been said about this on the pages of the magazine, some questions still remain “behind the scenes.” But if you don’t take everything into account, the most best device can only be the culprit of a headache, not only not helping, but also preventing you from working (or having fun) normally. Problems with connection or setup, failure to use the full potential of your purchase - what could be worse? Maybe: sudden death of the device or wasted money on consumables (this is especially true CD-R drives- damaged “blanks” can only be used to decorate the room).
Therefore, in this article we will try to answer all the questions that have previously received insufficient attention.
Installing the drive into the computer
The first thing you need to do is install the drive inside the system unit. You won’t have to do this only if you purchased an external drive (with a SCSI interface or the increasingly popular USB), but this is somewhat beyond the scope of this article (over time we plan to devote a separate article external drives for burning CDs). Any person who knows how to use a screwdriver can do this - no special training is needed. If you completed the installation yourself, then you can safely move on to the next section.
On the back of any system unit there are mounting screws for a Phillips screwdriver (usually four to six of them) that hold the case cover (or parts of it in some cases). They are located around the perimeter of the block and only on the rear side. Attention! The power supply is secured with the same screws - you should never touch them. Having unlocked the screws, you need to slightly move the computer case cover towards you, and then lift it up. In some cases, the side panels are removed separately - just pull them out a little. The cover is removed, and nothing else blocks access to the insides of the computer.
Remove the plastic plug from the free five-inch compartment. If it has not been used before, then in the ATX case you will also have to break it (in cheap models) or pull out the iron plug located behind it. This operation is more unpleasant, but completely solvable if you arm yourself with a thin screwdriver that can be used to pick up this piece of iron (if you are confident in your abilities, the easiest way will be to remove the front plastic panel of the case).
Let's assume that you have one hard drive and one CD-ROM drive in your computer, connected by a cable (in science - a ribbon cable) to the Primary IDE connector. IN in this case The Secondary IDE connector on the computer's motherboard remains unused. The standard delivery package for most drives includes an additional cable (if not, which is often the case with OEM kits, you will have to spend about $2 to purchase it). Connect it at either end to the connector located in close proximity to the Primary IDE. What to do if there are three connectors on the cable? Our third connector is not located in the middle, but shifted to one side. The correct connection is one in which the connector on the edge of the “long” part of the cable is connected to the motherboard (although the reverse option also works).
On the back side of the drive itself there is a block of jumpers (usually just one jumper) for selecting the IDE channel to be used (which position corresponds to what is usually explained in a plate painted on the drive body). Set (if necessary) the jumper to Master. Thus, when the system boots, the drive will be recognized as Secondary Master. Now place the drive in the empty bay. Connect a free IDE cable connector and a cable from the power supply to it. After this, secure the drive to the chassis with four mounting screws, and then close system unit computer.
Turn on the computer
When all mechanical part behind us, turn on the computer. Our model was detected by the system, and we saw that the drive was connected as a Secondary Master. Please note that on some motherboards (for example, manufactured by Abit), CD-ROM drives and the like are detected only when the BIOS is set to Auto for a given channel (the vast majority of boards work fine if set to None), and on boards with Award BIOS 6.0 You should simply set the value to “CD-ROM” for the desired channel. After this the download begins operating system. All our further narration applies to the most common (so far) OS - Windows 98.
Now the system has booted, and you can open its properties window. In the "Devices" section you can see that the drive has been successfully installed and identified. No additional drivers are needed. The system determined it using a special firmware that is “hardwired” into the drive’s storage device (if you are still using Windows 95, it may be time to update the OS - otherwise you may need DOS drivers, which does not have the best effect on the operation of the device and the entire system as a whole).
After this installation step, the drive will operate like a regular CD-ROM, without the ability to burn discs. In order for the drive to learn not only to read, but also to write, special software is needed. If you purchased the drive in Retail packaging rather than OEM packaging, you will find a CD with disc burning software in the box. This could be either Adaptec Easy CD-Creator, or NERO Burning ROM, or CeQuadrat WinOnCD, or some other (not as well-known as the first three). Following the attached instructions, install the specified program on your computer.
But not everyone is eager to purchase a CD-R drive in retail packaging. Many people buy in OEM packaging (it’s cheaper) without even thinking about the difficulties they may encounter. Firstly, these are additional searches software for recording a CD. Secondly, even after finding the software package, this program does not find your optical recording device and refuses to work (if this drive was released later than the program itself). This is where the questions begin...
The first thing you need to do if any CD burning program you choose does not see your disc is to go to the technical support website of your drive manufacturer. There are usually links to updated versions of the software in the Download section. After updating the software everything should work. But there is one “but” here too. If you purchased the wrong software package that came with your retail drive, you will not find an update for it. Then you should contact the software manufacturer’s website: has it made an appropriate patch for its program? Fortunately, today CD Creator and WinOnCD work on almost all modern drives (previously, models were sometimes released that were only compatible with own program records), but there is little pleasant in all this throwing around the Internet.
Updating the drive firmware version
Absolutely all CD-R drives (as well as CD-ROM or DVD-ROM drives) are equipped with a read-only memory chip that stores built-in firmware. It is from there that the system gets all the data about the drive. In addition, the firmware is responsible for the operation of the drive in various modes. Sometimes a particular CD-R refuses to write to a disc in one of the modes, but updating the firmware version can eliminate this shortcoming. On our CD you will find a large firmware database for popular (and not so popular) CD-R drives. Perhaps yours will be among them. Firmware files are located in Zip archives. Each of them contains brief instructions from the manufacturer for reprogramming. The firmware reprogramming process is quite simple. It resembles the operation of updating the system (or video) BIOS.
To identify the installed firmware version, use the CD-R drive diagnostic program - CD-R Diagnostic. You will also find it on our CD. In addition, the program can check the integrity of the data that you wrote to the CD (Fig. 1).
Rice. 1. The diagnostic program is presented on our CD. It will show which version of the firmware is “hardwired” into your drive, and will also help you verify the integrity of the data written to the CD.
Making a boot disk
Sometimes it becomes necessary to start the system from a boot disk. The volume of system software is growing by leaps and bounds, but once upon a time the entire system could fit on a regular floppy disk. Therefore, it is very useful to have at your disposal a system CD, on which, in addition to the system itself, you can also place computer scan tools, antivirus programs, useful utilities, etc. However, you, dear reader, first of all need to make sure that the ability to boot from a CD-ROM is supported by the system BIOS of your computer. Otherwise, further information will be useless to you. Note that all BIOS of modern motherboards have this capability (Fig. 2). By the way, if the installed version BIOS loading it doesn't support CD, so don't give up - maybe firmware will help new version(reputable motherboard manufacturers have made the appropriate firmware even for models produced in 1995-1996). Of course, if on the board instead of a well-known label, you don’t understand what is printed, and the manufacturer’s information sounds like “not a mouse, not a frog, but an unknown animal,” you should not hope for a painless solution to this problem.
Rice. 2. Before creating a bootable CD, make sure that this boot mode is supported by your system BIOS.
At the moment the download starts personal computer, if a boot CD was inserted into the drive and the corresponding option was specified in the BIOS (Boot Sequence: CDROM), a message will appear on the screen indicating that a boot CD has been detected. The CD drive (more precisely, the boot disk image) will be reassigned as drive A, and the three-inch drive will be listed as drive B (gaining access to the second drive, if there is one, is difficult in this case, but possible).
To create a bootable CD, we recommend using a CD-RW matrix. Errors that were not identified before creating the disc can be easily corrected in this case. However, when using a CD-RW disc, you can also stumble upon pitfalls: for example, many older CD-ROM models will not be able to work with such a disc. Reading CD-RW discs with a regular drive is called Multiread. If you want to make the most versatile boot disk, after final testing of the correctness of its creation, all the information needs to be transferred to a CD-R.
When you create a bootable CD, two files are written to it. The first is a directory, and the second is a sample disk from which to boot. When loading, you can emulate either a floppy disk or a hard drive. To do this, you must first create an image of the selected media.
Everything is simpler with a floppy disk. For example, in Easy program CD Creator already provides the ability to create bootable CDs using a previously prepared floppy disk. To access other files and programs of the recorded disc, you must provide system files CONFIG.SYS and AUTOEXEC.BAT floppy disk calls the CD-ROM drive driver (it is best to use the universal driver included with Windows) and the MSCDEX program, which must be located on the same floppy disk. If your computer has two drives and it is desirable to have access to both (despite the “moving” of letters), you should also consider loading the DRIVER.SYS driver from the CONFIG.SYS file (the parameters of this driver can be found in the help system or any DOS manual). After creating such a floppy disk, we recommend that you perform a test boot from it. If no errors are detected, the prepared floppy disk can be safely used to create an image.
Creating a bootable CD that completely emulates your computer's hard drive is a little more complicated. We will not consider such a specific topic here - those interested can find the necessary information on the Internet.
What determines the correct operation of a CD-R drive?
You should always remember that the flawless operation of a CD-R drive and a zero percentage of defects when writing discs primarily depend on the performance of the computer as a whole. Let's take a closer look at the reasons for possible CD-R drive failures.
If performance central processor is not enough, then it simply will not have time to prepare the data in a timely manner, as a result of which the recording speed may drop to 1X. We observed this picture when we tested CD-R drives (PL?3 2000). Remember the CPU Utilization chart?
Quantity random access memory also critical for a CD-R drive. If there is little memory, the computer will try to compensate for its lack by using special file swap, which will inevitably affect a sharp decrease in overall system performance. The amount of RAM recommended by CD-R drive manufacturers is from 32 to 64 MB. Moreover, these figures, as a rule, are true only for Windows 95 (for Windows 98, at least 64 MB of RAM is desirable, and for Windows 2000 - 128 MB or more). If your computer does not meet this requirement, you need to increase the amount of memory (especially since this will have a positive effect on other applications). Well, if all the money was spent on CD-Rs and there is nothing left for memory, you will have to master Linux - there is no other way.
You should also think about what kind of hard drive you have installed. Big time access time and low transfer rate can also have a negative impact when transferring data from it to the matrix. It should be noted here that this problem is inherent only in obsolete hard drives. And when buying a used hard drive, you shouldn’t believe the seller’s words that to prepare data for writing to a CD-R disk, the ideal solution would be to purchase a 540 MB disk. The most minimal requirements for parameters hard drive are: Transfer Rate - at least 800 Kb/s; Average Access Time - at least 20 ms. By the way, when connecting a CD-R drive to a computer, it is better that it is on a separate IDE channel and not on the same cable as the device from which the data for recording will come.
Immediately before the recording operation, you must check the integrity of the data using ScanDisk. Then it is advisable to defragment the data on the hard drive. Such steps will protect you from emergency disk ejection.
About the choice of "blanks"
 Very often on the covers of CD-R discs you can find an inscription that this disc is certified for a certain speed. This means that the manufacturer guarantees error-free recording at a given speed. But you cannot go higher than the certified recording speed. If the disc says 4X, then you shouldn’t record the disc at 8X (sometimes it works, more often it doesn’t), but below is welcome.
In general, if you decide to record a disc and know for sure that you have nowhere to rush, then burn the disc at a minimum speed of 2X. Reliability and quality of recording at this speed are 100% guaranteed. However, users of drives with a write speed of 8X or more can just as safely write discs at 4X. The fact is that these models are usually equipped with 4 MB of cache memory (twice as much as the previous generation and 4-8 times more than the first CD-R drives). This has a positive effect on the reliability of the recording.
Very often we are asked the same question: which CD-R discs are best to buy? If you are really interested in objective information, we recommend that you visit the special page. Here you will see dozens of tested CD-R blanks. You should also not neglect the websites of drive manufacturers: usually there is enough space there detailed information about which matrices are best to use on different speeds. These data are also obtained as a result of tests, but carried out by the manufacturer, so they do not require recommendations.
A few final words
We are not at all sure that all the questions you are interested in have been covered in this article. Write letters, ask about what was interesting to you. In the October issue of PL we plan to test CD-RW drives with a SCSI interface, and therefore all your wishes will be taken into account.
full-screen video than CD-ROM drives, bringing games to new level realism. In addition, it becomes possible to burn more entertainment or educational software onto fewer CDs. For example, electronic version Complete National Geographic magazine comes on either 30 CD-ROMs or 4 DVD-ROMs.
Third-generation DVD-ROM kits, such as the Creative Labs PC-DVD Encore 6X Dxr3 (shown in the pictures), have state-of-the-art features and can read regular CD-ROM discs. And with devices that include a PCI MPEG-2 decoder (for example, the Encore kit), you can also watch DVD movies both on your PC monitor and on your TV screen. Here's how to connect a third-generation DVD-ROM kit that includes a drive with the widely used IDE interface.
1 Prepare your system for upgrading. Connecting a DVD drive, MPEG decoder board and all the necessary software will significantly change the configuration of your PC. Therefore, even before starting work, to protect yourself, check whether the PC is working properly and whether the equipment does not conflict. Click the Start button and select Settings?Control Panel, double-click the System icon, or check right click Click on the “My Computer” icon and select the “Properties” menu item, and then go to the “Device Manager” tab. If you see Exclamation point next to any device, click the Start button again, point to Help, and look for the hardware troubleshooting section. In addition, conduct a complete backup information from the PC hard drive.
2 Install the MPEG decoder board. Turn off your PC and unplug the power cord from the outlet. Ground yourself - best done with a metal bracelet connected to a grounded metal object. Remove the PC case cover and find a free PCI slot. Remove the one behind it back wall PC case metal plate. Carefully insert the decoder board into the connector and, making sure that it is firmly seated, secure it with screws.
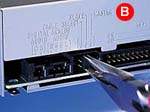
3 Connect the DVD drive. Modern motherboards have a primary and secondary IDE channel, each with its own connector (A). One cable connects the hard drive to the primary, and the other usually CD-ROM drive- to the secondary channel. Each of them can support two devices, and if possible, connect the DVD drive to the same cable as the CD-ROM drive. If this slot is occupied by another device, such as a tape drive or Zip drive, connect the DVD drive to the cable that connects the system board to the hard drive. Of course, this is only possible if one of the IDE cables has three connectors. Otherwise, use the cable that came with your DVD drive. Make sure the jumper located on the back of the DVD drive is set to the “slave” (B) position. If you need a carrier to fit the drive into your PC (for example, if you are installing a 3.5-inch drive in a 5.25-inch bay), install it. Insert the DVD drive into the bay (C) and connect the IDE and power cables (D) to the drive. Check to see if the colored wire (usually red) of the IDE cable is connected to the first pin of the DVD drive connector (note that it is labeled).
 |
 |
 |
|
4
Connect audio and video cables. From now on, you will have to master the profession of an electrician, that is, connect a lot of cables.  The connection process itself depends on the manufacturer of the kit (in this article we are talking about the Creative Labs PC-DVD Encore 6X with a Dxr3 decoder). Carefully read the User's Manual included in the kit and begin work in accordance with the given procedure:
connect the DVD drive and the MPEG card with an audio cable (to the Audio 1 In connector);
if the audio cable goes from the CD-ROM drive to sound card, then disconnect it from it and connect it to the Audio 2 In connector (second audio input connector) of the MPEG board;
connect the Audio out (audio output) connectors of the MPEG card and the Audio in (audio input) connectors of the sound card with an audio cable;
disconnect the cable going to the monitor from the graphics card and connect it to the lower connector of the MPEG card, intended for an external monitor;
connect with the included DVD-ROM video cable feedback MPEG and graphics cards;
If you want to watch DVD movies on your TV, connect one video cable from the upgrade kit (either an RCA or S-video connector depending on the characteristics of your TV) to the video output of the MPEG card and the video input connector of your TV;
If you have a stereo receiver or PC speaker system that can decode Dolby Digital Surround audio, use a cable not usually included with the DVD-ROM to connect the MPEG card and stereo device.
5 Install DVD drive drivers and software. Connect your PC to the network and turn it on. Windows systems 9x should detect your new drive and board and prompt you to install drivers. Insert the driver disc (floppy or CD) and follow the instructions that appear on the monitor screen. Then install the software included in the DVD Drive Upgrade Kit following the instructions in the User's Guide. You may need to restart your PC after this. Finally, check whether the new drive will read regular CDs and DVD-ROMs. If there are problems, such as the PC not being able to detect the drive or read the disc, turn off the computer and double-check all connections. (With so many cables, it is easy to make a mistake and connect one incorrectly.) If the problem cannot be resolved, contact service technical support developer of the upgrade kit. If all equipment is working correctly, turn off the PC and put on the case cover.
Installing a CD-ROM will not take much time if done correctly. Next we will look at how to install a CD-ROM using different types connectors: IDE and SATA.
Connecting CD-ROM using IDE
First, notice that there are three sections on the back of the CD-ROM. To install the CD-ROM, we need the two on the far right. The first one on the far right is for connecting power. The section located in the middle is needed to connect to motherboard.
Follow these steps to connect the CD-ROM:
- Open the system unit and secure it using CD-ROM screws.
- Take one of the wires coming from the power supply and connect it to the CD-ROM.
- Next, take a flat wire extending from the motherboard and representing a broadband bus. Connect it to the CD-ROM.
- Now all you have to do is turn on your computer and it will automatically detect the connected device.
Connection using a SATA connector
If your CD-ROM has a SATA connector, then you will of course need a special SATA cable. Therefore, before purchasing such a CD-ROM, make sure that your motherboard has SATA connectors. In general, the connection process is completely identical to the previous one.
You can check that the CD-ROM is properly connected to your computer without turning it on. To do this you will need to use a paper clip. Straighten the paperclip and insert it into the small hole on the front of the CD-ROM, which is usually located under the disc tray. Use a paper clip to press the button located inside. The CD-ROM should respond and eject the disc tray. Please note that these steps cannot be performed if the device tray is already loaded, as this may cause damage to the rotating disk.
I would like to point out that this instruction Suitable primarily for CD-ROMs manufactured after 2000. If you have an old CD-ROM model, we recommend that you seek the help of specialists to connect it to the power supply and motherboard. However, it should be said that such old CD-ROMs should be replaced with newer ones, since their operation may be incorrect and even pose a threat to the media.