Does your computer confuse you, steal your free time and cause a lot of negativity? There shouldn’t be any problems with this matter, because installing firewood on a computer is very simple. But even if you are an inexperienced user, it is vital for you to acquire these skills.
What are drivers?
First of all, you need to understand why you need to install drivers on your computer, and then I will tell you what to do if you don’t have them at hand. So, the driver is special program, which was created for only one purpose - to ensure compatibility between the operating system and specific device. Anything can act as such a device - LAN card, video card, printer, sound card... Any main and peripheral devices. They won’t work on their own, even if you dance with a tambourine! They require a kind of bridge in order to connect the hardware and software levels. Thus, there will be no firewood - there will be no stable working computer!
The easiest way to install.
Traditionally, drivers are installed on a computer from a special CD, which manufacturers put in the same box with the device itself. Remember that such software is designed for All this information is usually written on the disk itself. Therefore, when using too old operating system, you may experience compatibility issues.
The installation process itself is quite simple - insert the disk into the drive, then launch the installation program, click “yes” or “next” everywhere. After the application finishes running, you may need to restart your computer. That's all that is required from the user. The main thing is that you always have this precious disk at hand!
Standard Windows tools.
But what if you don’t have such a disk? It doesn’t matter where it went, but something needs to be done with non-working hardware. Now we will install drivers on the computer standard programs your operating system. Don't be scared, everything is very simple here!
First of all, you need to open “Device Manager”.

We use the following sequence of steps - “Computer” - “System Properties” - “Device Manager”, located on the left toolbar. This program will show you full list devices connected to your computer. Everything is organized into categories, so it will be easy to find the device you need. In addition, on a device without firewood will be indicated by a small special sign. Right-click one of these options, then select Update Drivers. In the next window there will be two installation options - automatic and manual.
Automatic installation drivers for computer involves connecting to the Internet and searching for optimal programs. All this is done automatically, but unfortunately, Windows does not always cope with this task. Manual mode should be chosen if you have a ready-made driver, which you need to install, but you don’t know how to do it. You only need to indicate the approximate path to its location. Although it will be much easier to just open this file and perform the installation as usual.
DriverPack Solution.
This is a real gift for those who do not like to independently sort through sites with firewood loaded on them. DriverPack Solution is used for automatic search and installation of drivers for any computer.

The program has a simple interface, has a sufficient set of functions, and has an advanced user mode with a bunch of settings. In addition to system software, DriverPack Solution can also update minor programs, but this is not our goal.
The working window consists of several tabs. By the way, here it is also possible to perform an urgent “ ” if, after a total update, the computer begins to behave inappropriately. In general, DriverPack Solution is capable of searching for software both over the network and through a ready-made application database. The utility works quickly and without brakes, believe me.
As soon as you click on the green button, a window will appear with a list of devices and applications installed on your machine. Check the boxes and let's get started! After installation, a reboot is required, after which everything should be fine.
Official sites.
And the last source of valuable firewood is the official websites of manufacturers. As a rule, any self-respecting manufacturer will post documentation and the drivers themselves on their website. Finding them is quite easy - you just need to type in the search engine “official website (and manufacturer’s name)” and follow one of the first links, then go to the downloads or technical help section. Next, you can specify a category of devices, for example, printers, then “shovel” the entire list of equipment under this brand and select yours. When you have found your device that you want to install on, select the type of operating system ( , ) as well as its bit depth. (32 bits, 64 bits) Download the drivers and perform the installation. If finding the equipment that interests you is not so easy, then you can use a special search engine, usually located at the top of the page.
Well, that's all, now you have acquired some skills that will serve you well more than once.
Below, you can watch a video that tells you how to install drivers yourself for free using DriverPack programs Solution. Have a nice work!
You have searched for a long time and found what you and your device need to print, show, hear, think, etc. and so on.
As a rule, all or most of the drivers are contained in ZIP or RAR archives.
ZIP and RAR archives- help to compress the information you need so that it can be downloaded as quickly and cheaply as possible.
To open/unpack ZIP or RAR archives, you should use special archiver programs that work with archives; you can view and learn more about archivers here (link to software).
Unpacking the archive
After you have installed all the necessary software, you need to unpack the drivers into a temporary folder on your hard drive (after successful installation, this temporary folder can be deleted).
After unpacking, you need to open the folder and make sure that all the files that were unpacked in the archive are located in this folder.
We find the readme.txt file, it will help us correctly install the driver for your device.
Typically, this file also provides recommendations for installing a driver for a specific type of Operating System, as well as links to the official websites of manufacturers and support services.
Driver installation
Usually, to install a driver on a particular device, you just need to use an automatic installer, which will step by step help you install everything you need for normal operation devices.
Almost all manufacturers call this assistant Setup.exe, less often Install.exe.
If such files are not in the folder where you unpacked the downloaded archive, you should use the operating system itself.
For example, to install a printer driver, you should go to “Start” - “Settings” - “Faxes” - “Install a new printer”.
This will open a step-by-step installer for new equipment, in our case a printer.
It will try to locate the driver for the device on its own.
If nothing is found, you will be asked to determine the location yourself.
In our case, this will be exactly the temporary folder into which you unpacked everything downloaded from the site.
Checking driver functionality
After you have done everything described above, you must check your device for functionality, that is, you need to print a test sheet, scan a page, etc.
If everything works fine, then the temporary folder can be deleted if you are sure that it will not be needed in the future.
If the device is unstable or does not work at all, then you should find similar drivers on the Internet and do the same with them as we told you above.
Computer articles
Radeon Software Adrenalin Edition 17.12.2 driver available
Radeon Technologies Group has prepared a new update for the driver and software package Radeon Software Adrenalin Edition with the index 17.12.2.
The second December issue does not contain any game optimizations and is called upon to correct big number problems seen in previous releases.
The list of fixes for the Radeon Software Adrenalin Edition 17.12.2 driver includes the following items:
The Video tab in the Radeon Settigns app may disappear on some Hybrid Graphics configurations after a system reboot;
- the system freezes when connecting an external video card running on AMD XConnect technology;
- low screen resolution may not allow you to scale the image;
- recording of the selected area via Radeon ReLive can continue even after the recording window is closed;
- problems during the game or when creating an Eyefinity configuration of three monitors;
- artifacts or flickering in the game Ark Survival Evolved when displaying performance information through Radeon Overlay in the Windows 7 operating system;
- blank screen on the FreeSync monitor Samsung CF791 when launching games in full screen mode;
- video stuttering in Netflix when playing through a browser or using the Windows 10 application;
- Radeon Overlay may disappear and appear during data updates;
- resetting color temperature settings may change the colors on the wrong display;
- possible artifacts in the game Star Wars: Battlefront II.
Intel introduced Gemini Lake generation processors
These are CPUs with very low power consumption, aimed at compact PCs, relatively budget models, hybrid solutions and various devices, where the TDP level is critical.
Gemini Lake processors replaced the Apollo Lake generation, which filled the niche of cheap laptops due to the almost complete absence of budget CPUs from older Intel families.
Gemini Lake is a successor to the Atom family, Intel just doesn't use this brand right now.
There are currently six processors in the new generation: a pair of Pentium Silvers and four Celeron models.
At the same time, three models conditionally belong to the desktop segment, and three to the mobile segment.
Models with the N index belong to the mobile segment, and those with the J index belong to the desktop segment.
All processors received a dual-channel memory controller with support for DDR4/LPDDR4.
The UHD Graphics 600 GPU contains 12 execution units, while the UHD Graphics 605 has 18 units.
The CPUs are produced using a 14-nanometer process technology and have the FCBGA1090 design, regardless of the platform.
Local Adaptive Contrast Enhancement (LACE) technology debuts in the processors.
Judging by the description, it is designed to adjust the image on the screen depending on the external lighting.
In addition, Intel claims that Gemini Lake processors are the first among the company's solutions to receive support for Gigabit Wi-Fi.
More precisely, the 2x2 802.11ac standard is used with channels with a frequency of 160 MHz.
You can also note support for HDMI 2.0 and image output in 4K at 60 fps.
The first PCs based on the new CPUs will appear in the first quarter of 2018.
ABOUT AMD processors Ryzen second generation
AMD plans to release successors to Ryzen desktop processors in the foreseeable future.
According to the leaked roadmap, the second generation Ryzen chips, also known under the codename Pinnacle Ridge, will debut at the end of February.
According to reports, the new processors will be manufactured according to 12-nanometer FinFET technical standards at GlobalFoundries facilities.
The older Ryzen 7 chips will hit store shelves first, and then in March AMD will release more affordable solutions for the Ryzen 5 and Ryzen 3 lines.
These “stones” will have an AM4 design and will be compatible with commercially available motherboards based on AMD chipsets 300 series.
It should be borne in mind that with the mentioned CPUs, new boards based on AMD 400 series logic will go on sale, relevant for those who are assembling a system from scratch or moving from older platforms.
The line of desktop processors for the mass AM4 platform may be headed by 12-core solutions operating at significantly higher frequencies than their predecessors.
In particular, the flagship Ryzen 7 2800X will operate at frequencies from 4.6 to 5.1 GHz in boost mode, while for the Ryzen 7 1800X they range from 3.6 to 4 GHz.
What’s important is that increasing the number of cores will not in any way affect the recommended cost of the new CPUs, which will be identical to the 8-core analogues already available for sale.
Now you have installed the operating system. But for all computer devices to work correctly, you need to install drivers. In principle, there is nothing complicated here if you have the disks that came with your computer.
1. Disk with drivers for motherboard.
2. Disk with drivers for the video card
We charge the disk with drivers for the motherboard, in the pop-up menu we look for the instAll or Express item. Chipset drivers will be automatically installed, integrated sound card, network card, RAID controller, usb controller. (Can be installed separately)
We confirm the automatic installation.

In the same way, we install drivers for the video card from a separate disk.
Now let's check if everything is in place. Right click Click on the My Computer icon on the desktop. In the pop-up menu, click the bottom line (already with the left button) properties
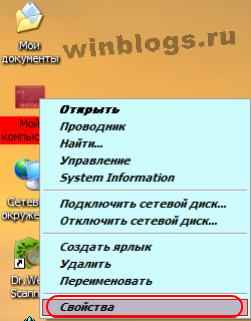
Here we are Properties of the system. go to the equipment tab and click on device Manager.
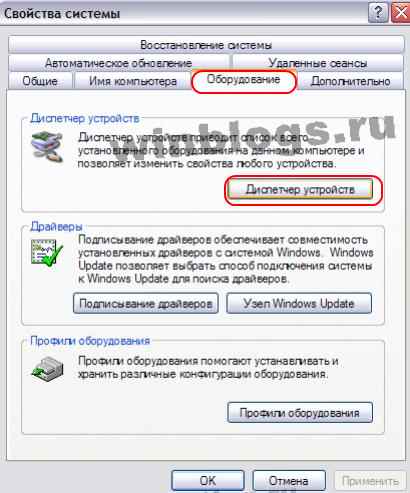
You should not have a single yellow question mark left in Device Manager. If the situation is as in the picture (without question marks), then all the drivers are in place.

If you don’t have any disks with drivers, and even if you did, they might already be out of date despite the fact that you just bought new computer, we will look for fresh stuff.
We connect to the Internet and go to the manufacturer’s website. Now almost all manufacturers have Russian versions of websites, for example asus.ru. there we will download the drivers latest issue. Well, as a last resort, use search engine, make a request download driversdevice name.
If you have neither disks nor the Internet, then only friends and acquaintances can save you :)
http://site/wp-content/uploads/2017/07/1-1.jpghttp://site/wp-content/uploads/2017/07/1-1-150x150.jpg 2017-07-15T06:32:26+00:00 website Windows installation How to install drivers Now you have installed the operating system. But for all computer devices to work correctly, you need to install drivers. In principle, there is nothing complicated here if you have the disks that came with your computer. 1. Driver disk for the motherboard. 2. Disk with drivers for the video card (adsbygoogle = window.adsbygoogle...websiteYou probably need to start an article on the topic “how to install a driver” with what a driver is and why it is needed at all. A driver is a special program that allows your operating system to work with a device. For example, a video card, modem, printer, network card and much more. In other words, everything you connect to your computer will not work unless you install a special driver for specific device.
A little background
Previously, although there are still such things now, users of the operating system Windows systems XP (of course, this includes all previous versions of the OS) we had to manually install each driver. That is why there arose various questions on this matter: “how to install the driver”, “where to get the driver” and others.
Let's consider this question - “how to install a sound driver?” To do this, you need the disk that came with the motherboard. In general, when purchasing any device, a driver disk should be included in the package.
If you do not have this disk for any reason (lost, it was not there when you purchased it, or it is damaged, etc.), you will need to determine the exact name of your video card and then download the corresponding driver on the Internet.
If you cannot determine the name, then take some Windows assembly, into which enthusiasts have built in a set of drivers and programs.
Current situation
The developers of Windows 7 have solved the problem of many people with installing drivers. Now, the drivers are installed automatically. The system determines which devices are available and installs drivers for them. We are talking about the most basic devices: video card, Sound Drivers for a modem, printer, etc. you will have to install it yourself.
How to install the driver manually?
There are several ways to install. First, we need to find a driver anyway. If there is no disk, then download it from the Internet. If you don't know the exact name of the device, then Everest. In it you can find out detailed information about your computer in general.
After we have found out the exact model of the device, download the driver. Next, let's proceed with the installation.
You can start the installation by clicking on the executable exe file. For example, setup.exe.
If you only downloaded the driver, then only that will be installed. But if you are using the disk that came with the device, then most likely you will be prompted to install some utilities, programs, components, etc.
If you install a driver on a video card, you will be prompted to install DirectX and PhysX.
If you just downloaded only the driver, then you will install only that and nothing more. Everything else will have to be hung separately.
How to install a driver using a file.inf?
You can also install using a special .inf file that stores installation information.
In theory, in order not to suffer for a long time with the installation, after downloading the driver, reconnect the device or restart the computer. As soon as the system sees the device without a driver, the installation wizard will immediately appear, with which you can easily install all the necessary files.
It can be done differently. Open the properties of your computer. There you need to find the item "Devices" or "Device Manager". We find the required device. It's easy to find because when a device doesn't have a driver, it displays a question mark.
Right-click on the mouse and select “Install driver” or “Update” from the menu that opens. Then everything will be simple (using the Driver Installation Wizard).
Follow the instructions of this wizard and you will succeed.
If you can’t install the driver, it means you downloaded the wrong thing (for example, for another operating system).