Do you want to record video from your computer monitor but don't know how to do it? This situation is familiar to many Internet users. Someone wants to shoot an online show on video, and someone wants to create their own video tutorial and post it online. But for all these purposes, special software designed to capture images must be installed on the PC. As you know, finding a lightweight, inexpensive and multifunctional program is not so easy.
Note. Thus, you can search notes and find specific parts of an audio or video recording. This is very useful for maintaining context between the recorded event and any reactions, thoughts, and ideas you had at any point during that event. This allows you to later look up notes for keywords or specific text associated with a specific entry.
Playing audio or video
For example, if you're dating and the speaker is explaining a complex workflow, you could record the presentation and then type "workflow" in your notes to indicate the subject of the recording. If the quality of your recordings does not meet your expectations, you can adjust the default sound and video settings. On the page containing the audio or video you want to play, do the following:
Help will come "Screen Camera". It will allow you to record a video of any resolution in a couple of clicks, and then edit it and upload it to well-known video hosting such as YouTube and Vimeo.
So, today we will tell you how to learn how to record video from a monitor in just 4 consecutive steps. All you need to do is follow our instructions.
Sharing audio or video recordings with others
Send audio and video files in an email message
Publication of pages containing audio and video files. To listen to shared audio or view shared video, recipients must complete the following steps. Screen recording, including audio, can help you present a game stream, show you how to complete a task on a computer, or create a presentation.You can also choose to record computer audio or record from a microphone. Adjust the rectangle window on the video, then play the video. The software has a screen capture tool and an encoder. Install the software as usual. It can also capture the entire screen area, making it ideal for tutorial videos. It has a user-friendly interface and various editing functions as well as recording functions. Go to Video Streaming and select Events.
Step 1. Step 1. Download the utility
First of all, download the Screen Camera program from . After downloading the distribution kit, the weight of which does not exceed 55 Mb, run the EXE file. Next, install the program on your computer, following the instructions Installation Wizard. For easier access to the application, it is recommended to place a shortcut on the desktop. You can get to work!
Video editing and noise removal
You will be redirected to the "Create an event" page. Not every screencast needs audio, but it really helps when you explain how. Finally, use this button if you want your screencast to include any sounds, such as music or sound effects. This will send audio directly from the computer's desktop to the screencast.
Once you empty it all out, you're ready to roll. Press the red button and you'll get a countdown to your entry. Now everything you say or do will be recorded on your computer! This is your chance to share your amazing knowledge with the world.

Step 2Set up the recording mode
Before you can record video from the monitor, you must set the image capture mode. Click "Create Video" in the main window of the program and carefully review all available modes: full screen, screen fragment and selected window. All of them differ in the main feature - the size of the area that is supposed to be fixed. Subsequently, it can be moved using the mouse cursor. Highlight the desired area with a handy arrow icon and click "Screen Recording". From advanced settings sound recording is also supported. Next, click "Record". To end shooting, use the "hot key".
You have technically filmed your first screencast. Now do it pretty and professionally. Go ahead and save your project before editing. Here are a few passes to help you get started. The T-key is what allows you to make cuts in your video's timeline. Let's say you've recorded some webcam video, but you don't want to see your face all the time. This may require resizing the video, but don't worry, it's very easy. Select the video layer and then hold down the shift key to lock the aspect ratio while resizing. You can easily resize in the video editor. . Just set it back to 100% and then you are ready to export.

Step 3. Edit the video
Equipped with a multifunctional built-in editor that allows you to process the created videos. First you need to save the project on your PC, and then go to the tab "Editing". There you can trim the extra fragment, add intros and outros, as well as overlay original music from the collection. The program also allows you to use your own audio recordings.
There are many options for screenshot software depending on your budget and overall needs. Screencasts are simple and great way creating tutorials. . Most of us have heard of, but what if you want to record a video of what is happening on your computer screen?
Whether you want to document the process or, here's how to record your desktop and share it. The difference between a screenshot and a desktop recording is simple but significant. You can even enable audio when you record your screen as a narration from your computer's built-in microphone or an external microphone, or you can record the system's audio system.
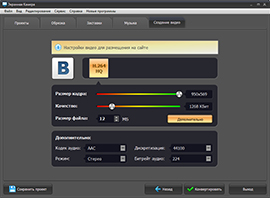
Step 4: Save the Project
"Screen Camera" can not only record video from the monitor, but also export finished videos to almost any acceptable format. To see all possible ways save, go to the tab "Creating a Video" To watch the video on PC, you can use the "Create Screen Video" function, which converts the video recording to AVI, MPEG, MOV, etc. Record video on DVD and play on a special player will allow the option "Burn video to DVD". And if you want to upload the file to YouTube, select "Publish to the Internet". Now you just have to decide on the save method, apply it, and wait for the video to be converted.
Open the screen recording software
Short, simple entries that don't require much editing can be done with something like. For longer or more complex entries that might require more editing, something like this would be better. Choose the software you will be using.
Select the area of your screen you want to record
For some things, it makes sense to record the entire screen. Now that you know what and where you want to record, go ahead and do it! If you're documenting a process, it's a good idea to have some notes about what you want to include and the order you want to include to avoid confusion. If you're talking about your entry, having a script, or at least some speaking points, is a good idea for you to say what you want to say the way you want to say it.
Platforms: Windows, macOS, Linux.
Cross-platform program with open source source code. Very fast and functional. After spending a few minutes getting to know the Russian-language interface, you can easily record the screen.
Simultaneously with the video display, you can record the sound of the microphone and overlay the image from the webcam. OBS Studio allows you to choose the resolution and recording format (FLV, MP4, MKV, MOV and others). In addition, she can broadcast videos on Twitch and YouTube, which is why she is very popular among gamers.
If you're doing a full-screen recording, it's a good idea to clean up your desktop a bit so it's not too crowded or you're not showing anything the whole world might not want to see. The same goes for bookmarks or browser history if you are going to transcode any activity in the browser. Once you've finished your recording, you'll probably want to edit it a bit. Even the most carefully planned recordings will have something you want to cut out, such as any wasted time at the start of the recording, or a section at the end when you click the mouse to stop the recording.
If you want to use the full potential of OBS Studio for game recording or other advanced tasks, you can find instructions on the Web to manual setting programs. They will help you achieve the perfect balance between speed and picture quality.
The only drawback that I want to note is the lack of a built-in editor. But if you need to trim or somehow change the finished entries, you can use special .
Once you're done editing, there's nothing left to do but share it with the world. You can also save the file to your local disk. If you want to record your narration after the fact, or want to throw in some wise music, you can do it! It also depends on your audience. Items meant for people outside of your company should probably be more polished than the ones you send to one of your employees.
- Be prepared to write down your time or two to get what you want.
- Almost everyone gets confused.
- If you are demonstrating a process, make sure the steps are clear and understandable.
2. D.U. Recorder
Platforms: android.
Very popular in Google Play screen recording software. She has the highest grades. In addition, DU Recorder is completely free and does not bother with ads.
In terms of functionality, DU Recorder is also doing well. You can simultaneously record video from the screen, camera, microphone and pause the process at any time. The program supports recording in resolutions up to 1080p at 60 frames per second.
How to make a video
Equipment Checklist: Skip this if you already have a webcam and microphone. You don't need anything fancy, but you will need both video and audio capabilities. The latest models include a built-in camera and microphone. . This section will only explain the technical aspects of recording.
The steps below also assume that you have met the above hardware requirements and software to go to the recording stage. If it's not good, just remove it and start. Don't worry - it's a common thing! No one was born with the ability to make the perfect record for the first time!
In addition, DU Recorder allows you to stream videos to YouTube, Facebook and Twitch. And thanks to the built-in editor, you can trim the finished videos and even turn them into GIFs.
Platforms: iOS 11.


It's good if you have a built-in microphone or one lying around. However, it includes many features; for example, you can make sounds louder, quieter, faster, and slower. Three seconds of blank tape? at the beginning and end gives you the opportunity to play with the edit and prevent the recording from starting or stopping too abruptly.
We always like to speak directly with our clients, but it is not always possible to have the conversation on site as physical distances, time differences and budgetary constraints stand in the way of a visit. Interviews with clients, experts or market research participants can be done so easily. If you record conversations as videos, they can also be used in marketing videos, internal presentations, market research, and more. quotes from experts are very well received by our experience in customer focused video.
In the latest at the moment iOS versions there is a built-in function with which you can record screen content and sound on your iPhone or iPad. Thanks to her, you do not need third party software or computer.
To enable you to use the recording function, add a dedicated button to the Control Center. To do this, go to the section "Settings" → "Control Center" → "Configure email. controls" and click the plus next to the "Screen Recorder" button. It will appear in the control center, where it can be used to enable the recording function.
Of course, you don't want this in all cases. So, if you are recording a live chat and want to edit it before posting, you will need external recording applications. Remember that in background. Heating or ventilation noise, fluorescent lamps, office chatter, street noise, dog huskies, etc. We want to eliminate as much as possible. Close your office door, stick a sign on the door "Please rest - make a note" and remind your co-workers to be especially quiet.
Technical Basics and Technical Tips
You may not be able to influence your conversation partner's equipment, but you should recommend a good microphone. Internal built-in microphones for laptops usually do not provide this good quality sound. Sometimes microphones are built into external webcams, which work very well. Headsets are good, but sometimes they look a little strange.
After a simple press on this button, recording starts without external sound, and after a long press, an icon appears to activate or disable the microphone. After pressing again, the entry is saved in the Photos application, where it can be edited.
Platforms: iOS 8-11 (via Mac), macOS.
A good microphone doesn't have to be expensive. Blue yeti. Before moving on, one more important point: check what is recorded by the audio system of the system. If you forget about it, then what you hear is not recorded - and that's when your interlocutor speaks!
As with integrated microphones, integrated cameras for laptops are only partially suitable. Insider review from my colleague. We reveal what hardware you need and show you what programs you need. The difficulty often lies in the details. Not all devices provide the necessary conditions for this.
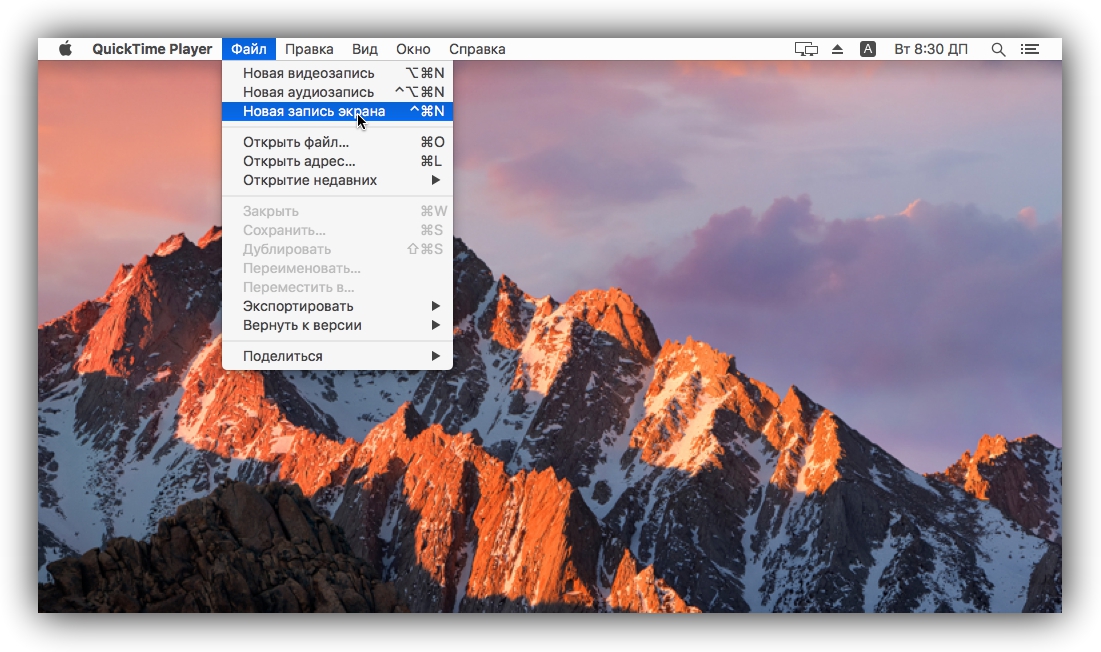
The QuickTime Player program, which can be found on any Mac computer, records both the screen of the Mac itself and the iOS gadgets connected to it. Thus, if you cannot write the content iPhone display or iPad using the built-in function, a bunch of QuickTime Player + Mac will help you out.
To record video from your Mac screen, open QuickTime Player and click "File" → " New entry screen." Then click on the arrow next to the red button that appears and select necessary settings sound. By clicking on the red button, you will start recording. You can stop it using the "Stop" button, which appears in the upper right side of the screen.
Recipient producers usually do not provide any software that can be used to convert video. You can only watch recordings through the receiver. With built-in hard drives, data can be transferred over the network. Also, not all devices offer network connection. However, this takes a relatively long time and is usually associated with significant quality losses.
Video production in the desired format
The biggest disadvantage: with all currently known devices, the recording is encrypted. Encryption is also tied to the device. Therefore, for users who want to create a video archive, these devices are not suitable. You can easily record an audiobook at home. We will tell you the best tips for recording a successful audiobook.
To burn iPhone screen or iPad, connect your device to your Mac using a cable, open QuickTime Player, and click File → New Video Recording. Then click on the arrow next to the red button that appears and select the desired settings. By clicking on the red button, you will start recording. You can stop it using the "Stop" button, which appears in place of the red one.
Platforms: iOS (via Windows PC or Mac).

If you can’t upgrade to iOS 11, and instead of a Mac you have a Windows computer, then simplest way record the screen of an iPhone or iPad - using the desktop program LonelyScreen.
When you run it on a PC and connect to it mobile device via a cable, it will be possible to display the image of the iPhone or iPad on the monitor. To do this, click in the control panel "Screen mirror" and select LonelyScreen. After that, to start recording, it will be enough to click on the red button in the program window on the computer.
There are no settings in it, everything is simplified to the limit. In addition, the program writes the sound of video and audio files, but does not perceive the microphone.
On the official website of LonelyScreen there are free and paid versions of the program, the differences between which are not indicated. But during the testing of the first of them, I did not find any restrictions. Unless LonelyScreen periodically offers to switch to a paid option.