Hello dear readers! In this article we will talk about the holy of holies -.
Although it is more correct to say here in the plural, since several model series of different years will be considered.
Perhaps you will have a question: "Why should I, simple user, to climb into the service menu? After all, it is very dangerous, you can completely kill the TV. "
And here it is difficult to disagree. Indeed, unless absolutely necessary, it is categorically not worth "rummaging" through the settings of the engineering menu. If you break firewood there without a clue, then maybe service center then do not take it.
From the above, the conclusion suggests itself: why go there and is it really that dangerous? Well, I asked myself, and I will answer myself.
So why are we going into the service menu Samsung TV:
- If you bought a TV set abroad (for example, in Poland) and there is no Russian language in it.
- If your TV set has Russian, but Smart TV is blocked, or Russian-language widgets are not available for installation.
That is, in the settings of the service menu, we will look for the Russian language (if it is absent) and remove the Smart Hub block.
Now about the danger: if you do everything exactly according to the instructions from the article, everything will be fine. You will happily use your "zombie box" for a long time. 🙂
As you already understood, the article will be mega-useful for people who brought their TVs from abroad. They are the ones who often face similar problems.
If you bought your "Male" from an official representative in your city, these problems should not threaten you. The seller has already done everything required settings.
After reading the article, you will find out:
So you bought a TV Samsung Smart TV somewhere abroad (usually in Poland), read about and now want to enjoy all the delights of "smart" technologies.
No problem, let's get started.
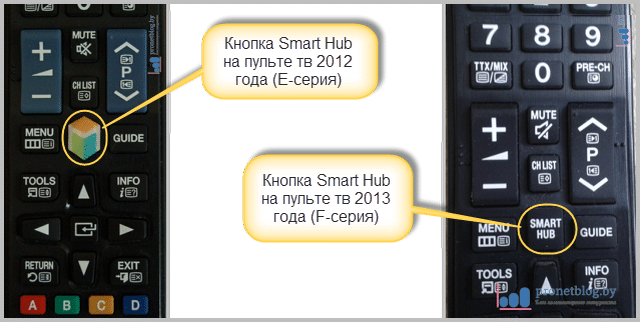
Turn on your TV and press the "Smart Hub" button on the remote control:
 At this step, you may have two paths of development of events.
First... When you start it for the first time, you might get a message like this:
This product and accompanying software and services (including Samsung Smart Hub) are specifically designed fore users residing in the EU.
As Smart Hub is geo-blocked for this particular product, Samsung Smart Hub may not be available in your current location.
This means that you have blocked Smart TV functions for your region. That is, according to the intention of the manufacturer, your TV should not have entered the country in which it is actually located.
If this is your situation, then don't panic. Everything is solved quite simply - in the course of the article, everything is told and shown.
If you did not receive such a message, but the full-fledged Smart Hub menu has opened, go directly to our writing. Everything is much simpler there. 🙂
So, when the TV set issues the message indicated above, the first thing to do is to check the presence of the Russian language in the TV settings menu.
We check on the example of Samsung UE40ES6100 (E-series 2012). Press the "Menu" button on the control panel:

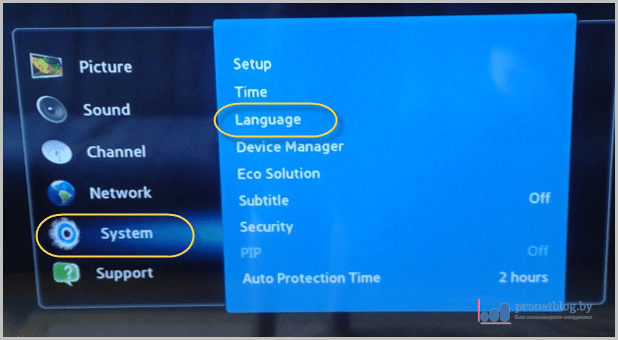
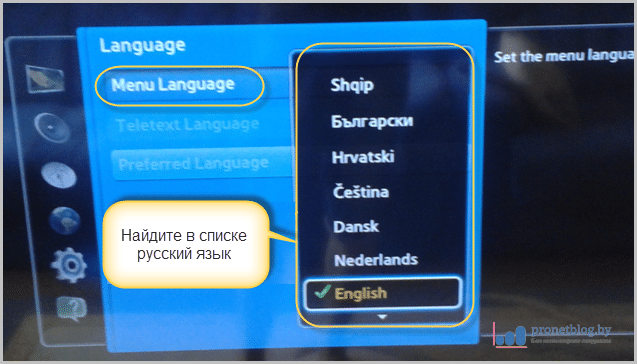
Then follow the path "System - Language":
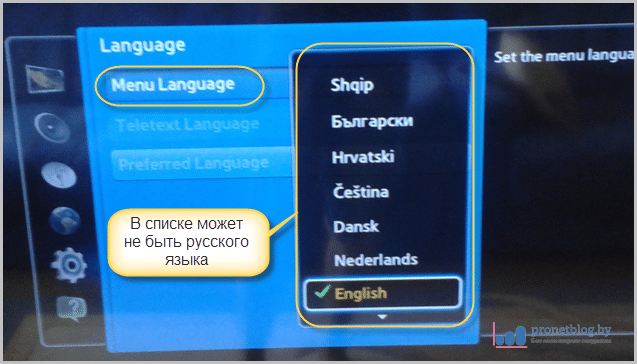
 Now look for Russian in the list:
If it still showed up (with Smart TV blocked), then the seller did not quite correctly set the necessary settings in the engineering menu for your actual region of residence. From here we conclude:
- If your Smart Hub is blocked, you must definitely change the region of the TV itself, using the CM settings.
- If everything works and there is a Russian language, it is not recommended to change the installed CM parameters at all.
Well, if there is no language, then you need to unlock the Smart Hub and change the region of the TV to yours in order to Russify it. And this is done, as mentioned above, only by changing the parameters of the engineering menu.
There are a few simple ways how this can be done. But depending on the build of your TV and the features of the firmware, the same method may or may not work on the same TV model.
That is why the author gives several ways. Use them in the order given in the article - from the most simple to the most complex. That is, we tried the first method, it did not work on your TV set, try the second and so on.
But before you start studying the Samsung TV service menu, carefully read the following parting words:
- All operations in the TV service menu, you do at your own peril and risk. Remember that any deviation from the instructions, or the wrong act of negligence, can kill your TV.
- If you are not confident in your abilities, or do not quite understand what is at stake, it is better not to try. The consequences can greatly upset you.
- If you nevertheless decided on your own, then set the parameters in the service menu strictly according to the instructions and take pictures of the initial view of the settings.
- In case you did everything according to the instructions, but nothing worked, read the comments to the article. Perhaps it is there that there will be a solution suitable for your TV.
If you are having difficulty determining the series and year of release of your TV, carefully read the article about. For a general idea of working in SM, watch carefully the video below:
Service menu Samsung TVs C-D-E-F series (unlock)
In order to unlock the Smart Hub and add the Russian language to the menu of TV models 2010-2012. ( C-D-E series) do the following.
Let's look at the example of the service menu of the Samsung UE40ES6100 TV.
Method number 1: using the TV remote control.
With the TV off, press the "Info - Menu - Mute - Power" button sequence on the remote control:
The TV turns on and the service menu opens.

To exit the engineering menu, press the "Power" button after turning off the TV:
Now turn on the TV again, press "Menu" on the remote control and follow the path "System - Language":
Now select the Russian language from the list:
Follow the path " Control - Sub option "and set the parameters" RS-232 Jack -Debug "and" Watchdog - Off ":
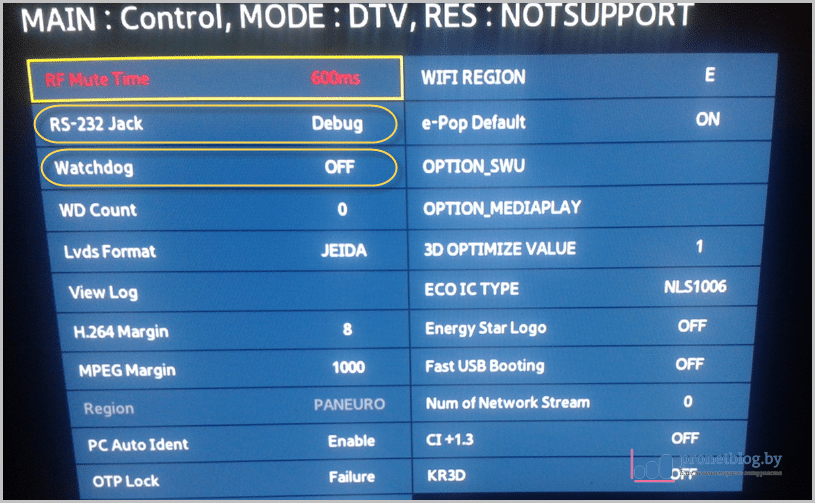
This will enable the service port and the error timer, which will automatically reboot the system in case of critical indicators.
But sometimes it happens that the "Local Set" parameter in the Samsung TV service menu is inactive and cannot be changed. The factory closes this feature in the firmware.
Well, let's try the next method.
Method number 2: using the software console ruSamsungTVCommunicator.
This method works on many models from 2011-2013. (D-E-F series).
This program allows you to fully control your TV from your computer. Also allows you to access the extended service menu. So, download the above application to your computer.
Naturally, the computer and TV set must be on the same network and see each other. How to do this correctly, we talked about in.
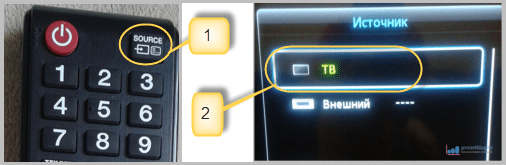
Turn on the TV and use the "Source" button on the remote to switch it to "TV" mode:
Go back to your computer. Disable antivirus (firewall) in order not to block the program when a TV is detected.
Now unpack the downloaded archive with the program and run it by clicking on the file "ruSamsungTVCommunicator.exe":

The application will launch and display several information windows in German. Agree everywhere, click "OK".
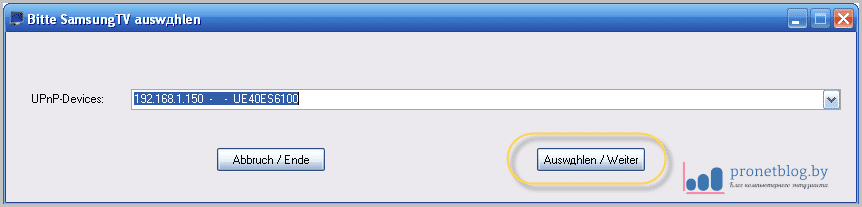
Then the program icon will appear in the system tray and will scan the TV for several minutes:

Wait for the completion of the output of the following message and press the "Weiter" button:
Now the file "ruSamsungTVCommunicator.ini" with the settings for connecting to your TV will be created in the folder with the program files:

Knowing these data initially, you can enter them in order to avoid a long scan when you first start the program.
Now go to the TV. You will see a request to add a new device on the screen. Click "Allow":

At this time, a virtual console will open on the computer. Click on it the sequence of buttons "Info - Factory":
 Try to press quickly. If the service menu does not appear on the TV, repeat the combination several times.
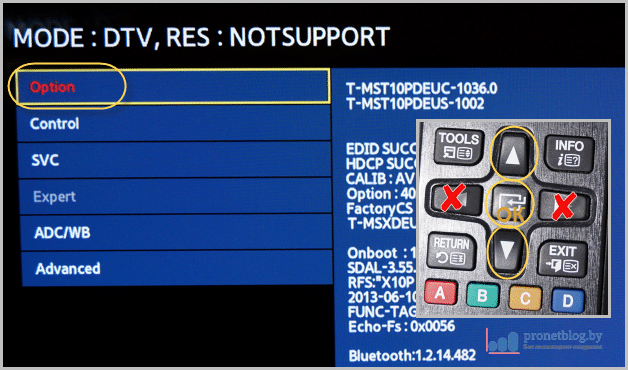
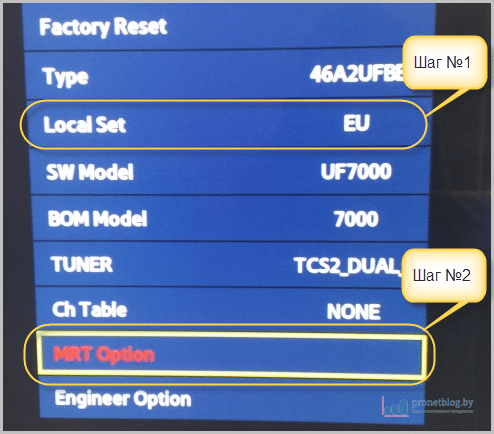
After the menu has opened, with the TV remote control, select the "up-down" arrows (only with them, the "left-right" buttons change the parameters) the "Option" item and press the "OK" button (central key):
In the "Local Set" item, instead of the "EU" value, set the "CIS_RUSSIA" parameter:
Now press the "Return" button on the TV remote to go back one step and reset the system settings by pressing "Factory Reset" then "OK".
At this step, the TV will reboot, then enter the service menu again.
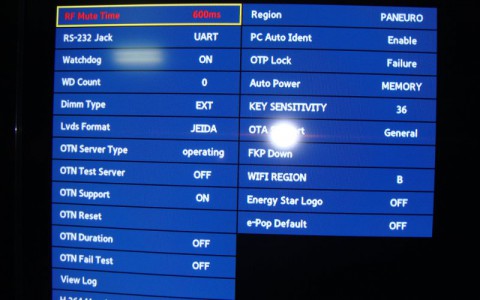
In order to add the Russian language to the TV menu, go to the "Control - Sub option" and specify the settings " Region - PANEURO "and" Language Arabic - CIS ":
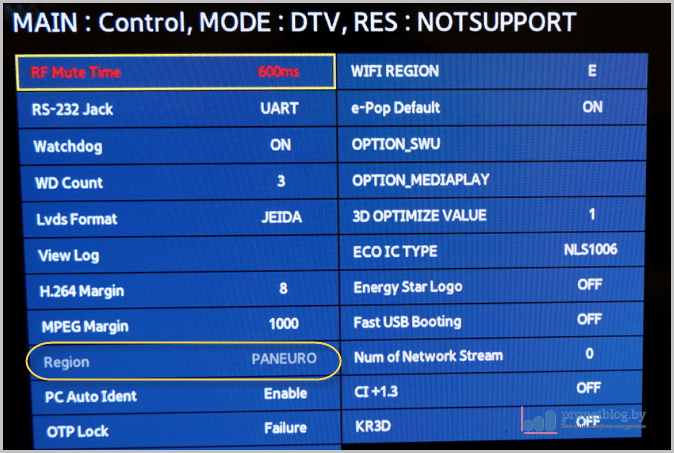
As you can see, in our case, when connecting with a software remote control, the second item is not available (it is simply not available in the menu).
Now we exit the service menu of the TV. Press the "Factory" button on the virtual remote control twice: 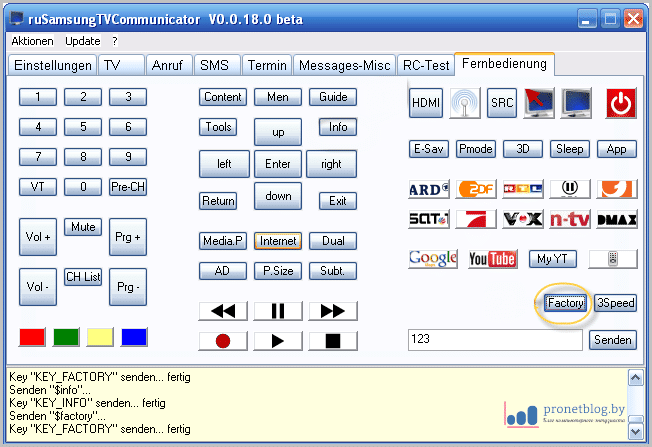
Follow the path " Control - Sub option "and specify the parameters" RS-232 Jack -Debug "and" Watchdog - Off ":
If, with this method of entering the service menu of your Samsung TV, the "Local Set" parameter is inactive and cannot be changed (they close the option at the factory), then go to the next method.
Method number 3: using infrared diodes and an old headphone cord.
This method is the most reliable. Calls up the extended service menu of TVs Samsung models 2010-2013 (C-D-E-F series).
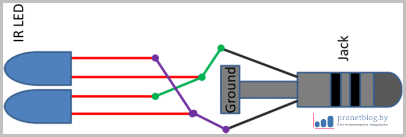
The bottom line is this. We take one LED (you can from an old unnecessary remote control) and connect its cathode to the right or left channel of the plug from the headphones (a regular 3.5 mm mini-jack.). We connect the anode of the LED to the mass of the plug.
This completes the installation work. See how it looks schematically:
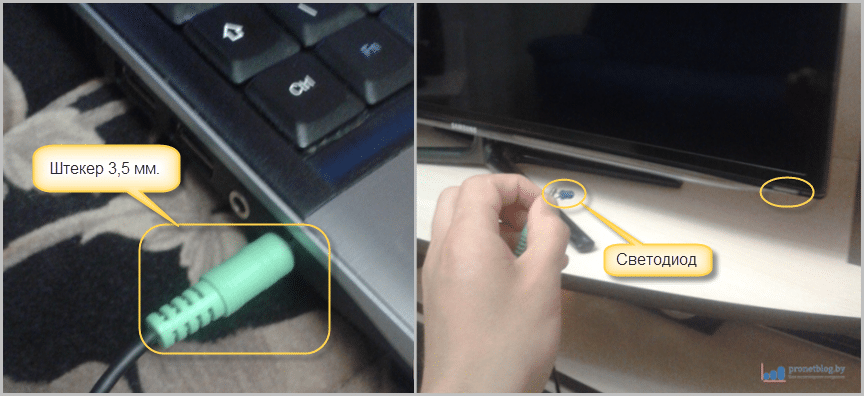
 In fact, everything was done without even a soldering iron. The author of the article took a mini-jack - mini-jack cord and simply attached the legs of the diode to the plug at one end.
It looks like this:

Workaround without a soldering iron:

Of course, you can solder it for convenience, but it is not difficult to hold for two seconds. And yet, wildly sorry, but in the photo the anode was mistakenly pressed against the sound channel by mistake. The mass is on the opposite side, under the thumb. 😉
As a cord, you can use a lot of options: just a plug from the headphones with a piece of wire, a 3.5 mm mini-jack cord - tulips, etc.
Is there some more second method manufacture of this device.
This time we take two LEDs and connect them in parallel according to the scheme: the cathode of the first - to the anode of the second, the anode of the first - to the cathode of the second.
Then we solder the whole thing to the audio channels of the plug from the headphones. On the diagram, the structure looks like this:
Of course, in this version you can't do without a soldering iron.
By the way, if there are no diodes at hand, you can try the option with a factory infrared blaster, which goes to some Samsung models:

It is easy to check the efficiency of this design. Insert one end of the cord into the audio output of a computer or laptop, attach the LED to the other according to the diagram.
Now any sound file, turn up full volume and aim the included camera mobile phone to the diode - it should glow.
Connect our simple design to your computer (laptop). Disable all equalizers in settings sound card and expose maximum level volume:

V Windows Player Media Player also set the sound to maximum, remove all equalizers, and disable repetitions:
Now we carry the whole thing to the TV. Turn it on and switch it to the "TV" mode with the "Source" button:
Point the LED at the TV receiver (the place where you poke the remote control). The distance should be 10-15 cm:
Run the "INFO_FACTORY_inv.wav" file from the downloaded archive in Windows Media Player. After that, the TV turns on and the service menu opens.
Select the "up-down" arrows (only with them. The "left-right" buttons change the parameters) the "Option" item and press the "OK" button (central button):
In the "Local Set" item, instead of the "EU" value, set the "CIS_RUSSIA" parameter.
After that, press the "Return" button on the TV remote to go back one step and reset the system settings by clicking "Factory Reset", then "OK":
The TV should now reboot itself. If not, turn off the "Power" button, and then go to the service menu again.
Follow the path " Control - Sub option "and specify the settings" RS-232 Jack -Debug "and" Watchdog - Off ":
Thus, you enable the service port and the error timer, which will automatically reboot the system in case of critical indicators.
That's all, the Russian language will become available in the TV menu and the Smart Hub will be unlocked.
Method number 4: alternatively with an infrared blaster, supplied with the TV. Quite often it works.
1. At the first step, with the TV off, press the "Info - Menu - Mute - Power" button sequence on the remote control. The service menu will open.
2. Now play the file "FACTORY + 3SPEED_inv.wav" from the previously downloaded service codes archive. In this case, the TV screen should blink. If this does not happen, repeat playback until you notice a blink. Then turn off the TV using the "Power" button on the remote control.
3. Now press the "Info - Menu - Mute - Power" button combination again to call the engineering menu. But now, in the "Option" menu, the "Local Set" item, which we need so much, should become available for editing. 🙂
1. If the first time you did not succeed ("Local Set" did not appear), repeat the whole process again. Sometimes, for some reason, it doesn't work the first time.
2. If, while playing the file "FACTORY + 3SPEED_inv.wav", the TV switched to test mode(the screen will alternately blink in different colors), do not be alarmed. Just push up the joystick on back wall telly and everything will pass.
3. If, when using a blaster, the TV does not react to codes at all, then the built-in sound card of your computer does not have enough power. Alternatively, connect it through acoustics with a built-in amplifier.
(unlock)
This manual is valid for 2014 TV models.
So, to enter the TV service menu Samsung H-series, you need to use homemade remote control on two diodes, or with an infrared blaster from the TV set.
How to make such a remote control is described in great detail in the topic of changing the region on TVs of the E and F series (spoiler above). There is also a link to download the archive with sound service files that you will need in the future.
By the way, it is the "self-made" LED remote control that is preferred with this method of entering engineering menu as the blaster on some TVs does not fire.
If you have a tablet or an android smartphone at home, then good exit can serve as software for these devices.
Step # 1... With the TV off, press the "Info - Menu - Mute - Power" button sequence on the remote control:
The service menu will open, but not the extended one. The items required for the Russification of the TV will not be available in it. And now a very important parting word:
Before you change anything in the CM, immediately take a photo of the initial settings of the "Option" and "MRT Option" sections.
Step # 2... While already in the service menu, aim the diodes (or blaster) at the TV receiver and run two files from the archive in Windows Media Player: "INFO_FACTORY inv.wav" and "FACTORY FROM REMOTE":
Playback should be looping, without pauses. As a result of these actions, the service menu should become extended. That is, the "Local Set" item and the necessary lines in the "MRT Option" are activated.
If, after playing the above beep codes, the extended engineering menu still does not open, try the following alternatives:
- Play in the "TV" mode ("Source - TV" button) a couple of files "INFO.wav + FACTORY.wav".
- In the "TV" mode, press the "INFO" button on the remote control and immediately play the file "FACTORY_from_REMOTE_inv.wav"
- The third option is alternative way input using the factory IR blaster from the TV set (method No. 4 under the spoiler above).
In practice, quite often, even for TVs of the same series and country of production, they fit perfectly different ways... Therefore, everything is decided here only by experience. And if one doesn't fit, move on to the next.
Step # 3... Use the "up-down" arrows (only them. The "left-right" buttons change row values) select "Option" and press "OK" (center button):
Now in the "Local Set" item you need to specify the value, depending on the region of destination of your TV, namely:
- If your Smart Hub starts up, skip the "Local Set" item altogether. In this case, it is not recommended to change its value.
- For TV from Asia and European (series for Poland and Finland), with a blocked Smart Hub, specify the "ЕА_CIS" (CIS_RUS) parameter.
- On TVs for other regions, do not apply the above values yourself. There may be problems.
With this parameter, you indicated to the TV the profile of the digital tuner settings for a specific region and added the ability to install a Russian-language package. The prefix "СIS" means the CIS countries.
Now exit "Option" with the "Return" button on the remote and enter the "MRT Option" menu. In it, set the following settings: 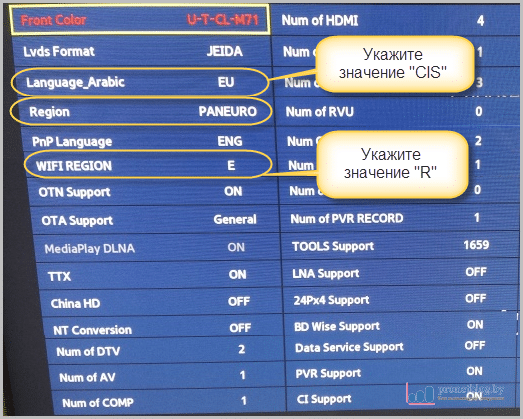
On the HU TV series, the "Region" and "Language_Arabic" items are not available for editing. If you have just such a situation, then skip them and do everything further exactly as indicated further in the article.
At this step, be sure to go to the second stage of the settings and follow the instructions "Setting up digital channels".
Service menu for Samsung H-series TVs(digital channel setup)
After changing the TV region (Local Set) and adding the ability to select the Russian language, be sure to check the digital channel settings.
To do this, go to the service menu along the "Option - MRT Option" path and check the following parameters:

For the HU series, it is imperative to compare all the available items in the "MRT Option" section with the original values in the photo and set them again if changed.
For a more complete understanding of the essence of the issue and the algorithm of actions, look at an example of a successful setup of a Samsung UE55HU8500LXXH TV, one of the forum users samez.eu:

After that, press the "Return" button and return to the first page of the service menu and select the "Option" item:

Now press "Factory Reset" and "OK" (center button of the remote control):

At this point, the TV should automatically reboot. If not, turn it off with the "Power" button on the remote control, and then re-enter the service menu.
Follow the "Control - Sub option" path and specify the "RS-232 Jack -Debug" and "Watchdog - Off" settings:
Thus, you enable the service port and the error timer, which will automatically reboot the system in case of critical indicators.
This concludes the Samsung TV service menu! The Russian language will become available to you and the Smart Hub will be unlocked. Dialogue will begin initial setup... For Polish TV, in the Smart Hub region selection window, select "Others".
If, as a result of the above settings, your remote control stops working Smart Touch Control, hold down the "Return" and "Guide" buttons at the same time:
![]()
The TV will then re-detect and everything will work again.
Second way... When, when you turn on the TV for the first time, there is a Russian language and when you press the "Smart Hub" button, the Smart TV menu starts. It is very good:
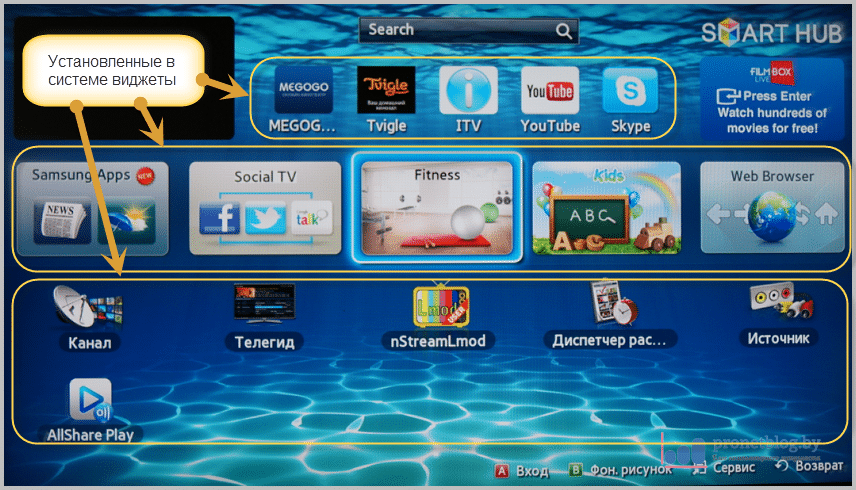 Now take a close look at the screenshot above. You see, Russian-language widgets are already installed here, such as Megogo, Tvigle other.
This means that in this case Smart TV is unlocked. And if you read carefully, then remember that all applications are geo-dependent and are installed, depending on the specified region in the settings.
If you have already automatically installed widgets in Russian and there are a lot of them in the store Samsung Apps, so you don't have to read further.
But quite often a situation arises when a TV purchased in an online store already has Russian menu, and Russian-language Smart TV applications are not available for installation.
The reason is in the incorrectly exposed region. To check this setting, select the correct link, depending on your TV model.
(for E-series)
While in the "Smart Hub" menu, press the key combination on the TV remote in sequence:
Rewind >> | 2-8-9 rewind |<<
After that, a list with a choice of countries will open. Select "Russia", or yours:
 Then click the "OK" button.
At this stage, the settings for changing the Smart TV region are over!
Change the Samsung Smart Hub region. Add Russian widgets(for F-series)
Press the "Source" button on your TV remote control and select "TV":
![]()
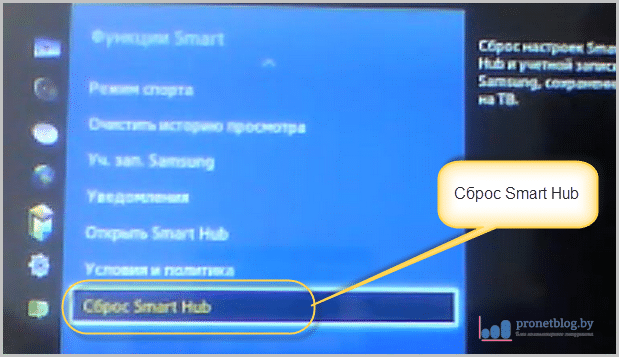
Then follow the path "Smart functions":

 After the reset is complete, click "OK":
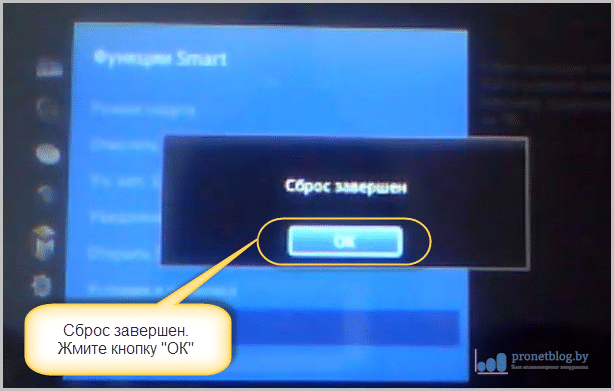
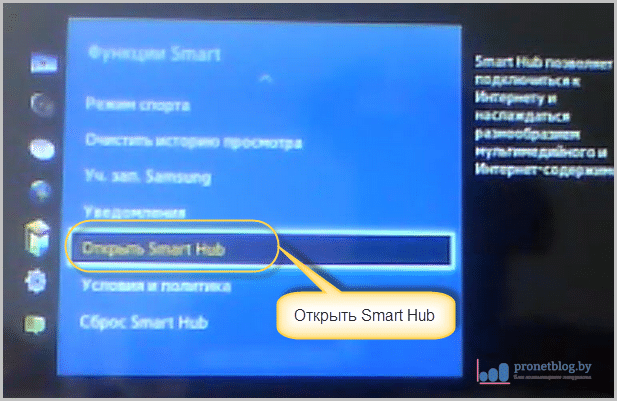
Now, without leaving the menu above, click "Open Smart Hub":
 Go to the "Smart Hub" accounts:
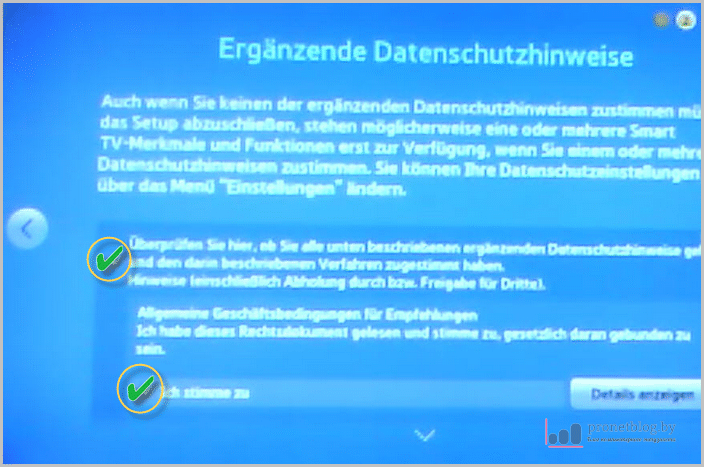
 Press the big button and move through the menu to reach the Smart Hub Terms and Privacy Policy. Check two checkboxes:
 Now, after you have put the second checkbox, press one of the combinations of buttons below on the TV remote control:
Rewind >> | 2-8-9 rewind |<< Mute / Return / Vol+ / P^ / Mute

After that, a menu with a choice of countries will open. Select "Russia", or your own:
 You will then be taken back to the Smart Hub Terms and Privacy Policy.
Again, check the two checkboxes for consent and click "Next":


That's all! The work on setting up Smart TV is completed.
At the time of this writing, only such could I "dig" on the net, on one of the popular forums. I will give a link to it below.
P.S. And at home my parents have an F-series TV set, but I still can't get to them. 🙂
Change the Samsung Smart Hub region. Add Russian widgets(for H-series)
The method of changing the region for the 2014 H-series is completely identical with the 2013 F-series models. Only the appearance of the menu has been changed.
Therefore, we provide instructions with screenshots using the F-series as an example, and do not be intimidated by minor differences in menu design.
Press the "Source" button on your TV remote control and select "TV":
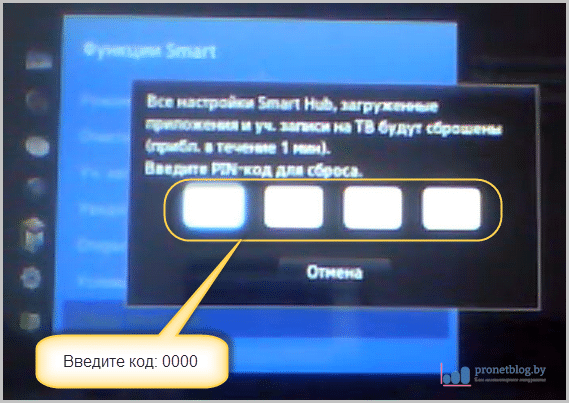
 Then follow the path "Smart functions": In the menu that opens, select "Reset Smart Hub": Enter the security PIN (default is 0000): The reset process starts. Wait for it to end:
After the reset is complete, click "OK": Now, without leaving the above menu, click "Open Smart Hub": Then go to "Smart Hub Accounts":
Press the big button and move through the menu to reach the Smart Hub Terms and Privacy Policy. Check the box for consent:

Now, after you have checked the checkbox, press one of the button combinations below on the TV remote control:
Rewind >> | 2-8-9 rewind |<< Mute / Return / Vol+ / P^ / Mute
A menu will appear with a selection of countries. Select "Russia", or yours:
 At this step, all settings are completed!
After you have activated the instructions for changing the Samsung Smart TV region, the required widgets will automatically begin to be installed.
Also, the Samsung Apps store will add apps that are available for your region. You can choose and install.
That's all in principle. Thus, by setting Samsung TV service menu, you can say, you saw your pet from the inside. 🙂
By the way, do you want to know more about your TV set? Then welcome to the samez.eu forum. The author of the article also learned a lot from there.
Well, now everything is set up! As you can see, everything turned out to be quite simple. It remains to wish you a pleasant viewing!
And finally, watch the video as a reminder that you need to work very carefully in the service menu, otherwise the consequences may be like this.
P.S. The latest and most up-to-date information on TVs 2015 (J-series) is located. Please read who needs it.
Over time, some of the TV's parameters change. This is due to aging of parts, deterioration of the emissive properties of CRTs, external factors, for example, exposure to electromagnetic fields. Therefore, it often becomes necessary to carry out certain settings on the TV, even if it is working properly. These settings include: restoring the white balance, setting the brightness adjustment range, centering vertically and horizontally, adjusting the geometric dimensions of the raster, adjusting the color purity, adjusting the image focus, setting the AGC threshold, etc. Before making the settings, you should demagnetize the kinescope. If you need to replace electronic components, pay attention to the Dalincom online store, where a wide range of microcircuits, transistors, varistors, relays, thermal fuses, quartz resonators, etc. are provided.
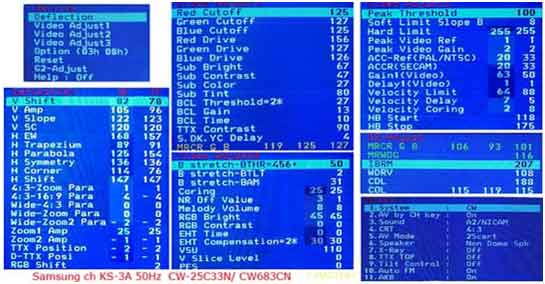
Each of the settings has its own characteristics. Let's consider from beginning to end the process of their implementation for SAMSUNG 2039 TVs. It should be noted that the described settings are applicable to other SAMSUNG models, made on the KS1A chassis, with 14-, 20- and 21-inch CRTs.
The setup process begins by entering Service Mode, sometimes referred to as Factory Mode. It is also required to enter it when replacing the IC902 memory chip of the TV and CRT.
The service mode is entered from the remote control. remote control(Remote control). To do this, perform the following operations (by pressing the appropriate buttons and selecting a mode):
1. DISPLAY> FACTORY.
2. STAND-BY> DISPLAY> MENU>> MUTE> POWER ON.
The message "SERVICE (FACTORY)" will appear on the screen. The service mode has sections: ADJUST (Settings), OPTION (Options), RESET (Reset).
Access to the setup mode is provided by selecting the corresponding menu item by pressing the VOLUME buttons. In this case, a list of settings is displayed on the screen, the selection of which is carried out using the channel switching buttons (s, t). After selecting the desired setting, you can change it up or down using the volume buttons. To exit the service mode, press the "FACTORY" or "POWER OFF" button again. The settings are selected in the following order:
SCT> SBT> BLR> BLB> RG> GG> BG> VSL >> VS> VA> HS> SC> SDL> STT> SSP> PDL >> NDL> PSR> NSR> AGC> VOL> LCO> TXP.
Purpose of settings, ranges of their change and default values (factory settings) are shown in the table. Column "OSD" - the names of the settings displayed in the On Screen Display.
| OSD | Setting purpose | Adjustment range | Default value |
|---|---|---|---|
| SCT | Subcontrast | 0…23 | 13 |
| SBT | Sub-brightness | 0…23 | 9 |
| BLR | Black level (R channel) | 0…15 | 9 |
| BLB | Black level (channel B) | 0…15 | 7 |
| RG | Video amplifier gain R | 0…63 | 32 |
| GG | Gain of video amplifier G | 0…63 | 25 (fixed) |
| BG | Gain of video amplifier B | 0…63 | 31 |
| VSL | Vertical tilt | 0…63 | 19 |
| VS | Vertical offset | 0…63 | 38 |
| VA | Vertical size | 0…63 | 40 (fixed) |
| Hs | Horizontal offset | 0…63 | 30 |
| SC | S-correction | 0…63 | 9 |
| CDL | Cathode voltage level | 0…15 | 9 |
| STT | Sub color tone | 0…7 | 3 |
| SSP | Subclarity | 0…7 | 0 |
| PDL | PAL signal delay | 0…15 | 15 (fixed) |
| NDL | NTSC signal delay | 0…15 | 10 |
| PSR | Subcolor PAL | 0…23 | 2 |
| NSR | Subcolor NTSC | 0…23 | 5 |
| AGC | AGC response threshold | 0…63 | 23 |
| VOL | Volume preset | 0…63 | 10 |
| LCO | Turning on the IF filter when receiving a signal from the SECAM-L system | 0…1 | 0 |
| TXP | Teletext location | 0…15 | 9 |
In the service mode, through the table for selecting optional settings, you can change the values of some parameters (the recommended values of options are given in brackets):
Turn on low noise amplifier - LNA (ON);
Selecting the signal receiving system - SYSTEM;
Audio section operation mode - AUDIO (MONO);
Selecting the TV output interface - JACK (RCA);
Selecting the display mode on the screen - ZOOM (NOR / ZOOM / 16: 9 - normal / enlarged / 16: 9);
Mode selection automatic shutdown power supply - AUTO POWER (ON);
Filtering the second IF signal (sound) - 2 nd SIF (ON);
Switching on "hotel mode" - HOTEL MODE (OFF).
The SBL option must be off (OFF) and the BKS option must be on (ON).
The RESET mode allows all parameters to be automatically set to default. Wherein automatic modes are set to OFF, and the contents of the tuner settings are erased.
Let's consider the procedure for adjusting some parameters.
1. Checking the high voltage level. First, check the supply voltage "B +", which should be +125 V. Then connect a digital kilovoltmeter to the second anode of the kinescope, turn on the TV and set the brightness and contrast levels to minimum (achieve zero beam current). In this case, the high voltage should be 27.5 kV. After that, the brightness and contrast are increased to the maximum. The high voltage level should not change.
2. Adjust the focus of the image. A black-and-white signal is sent from the generator of test signals and the focus control is used to achieve a clear image of the lines in the center of the screen.
3. Adjusting the voltage at the cathodes of the CRT. It is necessary to connect the oscilloscope probe to the GK terminal of the CRT panel. Thereafter, a grayscale signal is supplied from the test signal generator. Pressing the "P" button on the remote control sets the standard image size. The variable resistor Screen VR on the fuel assembly is used to set the signal swing to 120 ± 2.5 V (Fig. 1).
4. Adjustment of color purity. before starting this operation, warm up the TV for 20 minutes. Loosen the screw that secures the magnet block (Fig. 2). A white field signal is supplied from the output of the test signal generator. With the help of an external coil, the kinescope is completely demagnetized. Adjust the contrast and brightness to the maximum. By moving the magnets forward or backward along the neck of the tube, a vertical green stripe appears on the screen (Fig. 3). Carefully slide the mixing block. Slowly moving the block of magnets forward, achieve a uniform color of the vertical green stripe and temporarily fix the block of magnets. Alternately, turn on only the blue and only red guns, check the purity of the color of the red and blue fields, respectively. The block of magnets is finally fixed.

5. Adjustment of information. warm up the TV for 20 minutes. A mesh field signal is given. By rotating the rings of the 4-pole magnets, the blue and red vertical lines in the center of the screen are brought together (Fig. 4). By adjusting the brightness and contrast, the best image clarity is achieved. By varying the angle between the 4-pole magnets, the best alignment of the blue and red vertical lines in the center of the screen is achieved. Rotating both rings of magnets simultaneously and keeping the angle set between them, they align the blue and red horizontal lines in the center of the screen. The 6-pole magnets are rotated in a similar way, achieving the alignment of the red-blue lines with the green ones. It should be remembered that changing the angle between the magnets allows you to reduce vertical lines, and their simultaneous rotation - horizontal. Repeat the adjustments if necessary.

6. Setting the AGC response threshold. To do this, in the service mode, the AGC value is set equal to 23.
7. Setting the color pre-adjustment signals. When performing this operation, the PSR and NSR values must be set to 2 and 5, respectively.
8. Adjustment of the geometric dimensions of the raster. Produced in the sequence: SC> VS> HS. A test chart signal is applied to the TV. Set the S-Correction signal value (SC-S-Correction) to 9 for 20 "and 21" CRTs and 0 for 14 "CRTs, and the VA signal value to 40. By changing the VSL (Vertical Tilt) setting, set the size the raster so that four divisions are visible below the circle (Fig. 5). then adjust the VS parameter (vertical shift) so that four divisions are visible above the circle (Fig. 6). Finally, adjusting the HS parameter (horizontal size), set the right and left borders of the image (Fig. 7).
Instructions
Log in to the service menu TV Samsung. If you have SCV11A, TVP3350, TVP5350 or TVP5050 models, then on the remote control, press the StandBy - P.Std - Menu - Sleep - Power On buttons in sequence. After that, the screen will display menu Adjustment. This means that you were able to enter the service menu TV... If you have model CK5038 ZRTBWCX on SCT11B chassis, press the following command sequence: STAND-BY - P.STD - HELP - SLEEP - POWER ON.
For model CS7272 PTRBWX on SCT 51A chassis, press PICTURE OFF –SLEEP - P.STD - MUTE - PICTURE ON buttons in sequence. If your model TV CS 2139TR, CS-25M6HNQ, CS21A0QWT, CS-21D9, CK-564BVR, CS-21S4WR, CZ-21H12T, or CS-21S1S, then click the hidden button, and then very quickly the following sequence: Stand-By - Pstd - Help - Sleep - Power on. For models made on the KS1A chassis: STAND-BY, then press DISPLAY, then MENU - MUTE - POWER ON.
Enter menu TV Sony models KV-C2171KR, KV-X2901K, KV-X2501K, KV-X2581KR, KV-M2540K, KV-X2581K, KV-M2541K, KV-X2981K, KV-X2101K or KV-X2981KR, using on screen , 5, VOL +, TV, right upper corner screen TV the inscription TT should appear. If you have KV-M2101, KV-M2170, KV-M2171 or KV-M1440 models, put your TV into standby mode, then press the following sequence of buttons on the remote control: ON SCREEN DISPLAY - 5 - VOLUME + - TV.
Enter menu TELEFUNKEN, THOMSON, BRANDT, FERGUSON, SABA, NORDMENDE TVs running on an ST92T93J9B1 or ST9093 processor using the following method. Using the remote control, put the TV into standby mode, turn it off with the mud switch.
Then press the blue button labeled VT, turn on the power switch. Then press the VT button again. As a result, a table with the words Setup, Video, Geom will appear on the screen. This is the service menu... To exit this mode, click the STAND-BY button.
Search for a key combination to enter the service menu TV at http://master-tv.com/article/servise/. In the upper part of the window, click the first letter of the name of your TV, then select the manufacturer and a specific model from the list.
The service menu of the TV serves to additional settings parameter of receiving data and transmitted image. There are several combinations to activate it, suitable for different models.
You will need
- Remote control.
Instructions
Pay attention to the release time of your TV model. It is possible that if the model was released relatively recently, there are slightly different codes for it. This is due to the fact that this menu is constantly being finalized, and in the course of release by the company Samsung new TVs, they are installed specific program, which is launched using different combinations on the remote control.
Take the remote control, quickly and consistently press the following buttons: MUTE-1-8-2-POWER ON. Please note that it is best not to allow a break between pressing the buttons for more than 1 second, since the combination can simply be reset. If you pressed the wrong button, wait a few seconds and start over.
If successive pressing of the above buttons did not give any results, use another code to enter the service menu of the Samsung TV. This can be the combination info-menu-mute-power, which is most typical for devices already outdated models TVs.
Any TV, including those that are not smart TV devices, have a service menu that controls vital settings. In particular, the size of the image horizontally and vertically, brightness correction, and other parameters that can seriously affect the operation of the device. Therefore, if you do not understand how and what to do, it is better to leave this service altogether.
It is not surprising that the service menu on Samsung TVs is usually called extended, because it is used if you need to make serious changes in the operation of the TV itself. And to use it, you need to have a special remote control. Moreover, it is important that it is “native” for the TV, that is, it comes with it. Otherwise, even if you get into the menu, it will be difficult to be there, since the control is not reliable.
What are the functions of the Samsung TV service menu
As already mentioned, ordinary user it is not recommended to experiment with the service menu on Smart TVs, including Samsung K series or any other series, even J. It's not that it's a whim of the developers. On the contrary, users can press the wrong key on the remote control, and all settings will fail, which will lead to a complete loss of the normal performance of expensive equipment.
But in the hands of the master who entered the service menu of TVs, it can turn a standard Smart TV into almost a home theater. Nevertheless, sometimes such settings can be opened completely by accident, by involuntarily pressing some key combination. If this happens, then you can change:
- The spectrum of the image, for example, by choosing a green palette or red, in connection with which, the picture on the screen will become a country. Few people want to watch TV in this format.
- Screen image size options. It may turn out that the picture will not occupy the entire screen, but only half of it, moreover, from below, from above or from the side. The picture can break into pixels, and suffer other, unpleasant changes.
- Naturally, the service menu of a Samsung TV can change the sound parameters, making it so that even at the highest volume, the device is barely audible. Or it uses various sound effects, due to which an echo may appear, acoustics will increase, which also does not contribute to a comfortable viewing of content.
- In addition, once in the service menu of a Samsung TV, you can enable and disable various built-in functions.
 In general, if the user needs to change any automatic settings, then this is done right here.
How to get into the service menu of Samsung 6 TV
In order to go to the service menu, you need to perform a few simple manipulations. But they are only available if there is a remote control. For some models, a standard remote control is suitable, like for Samsung 5, or you will have to use a special remote control, which is not included in the kit, and you will need to buy it separately. But this is not a problem, because there are many service shops.
- Take the remote control and press the following sequence: info - menu - mute - power;
- Having learned how to enter the service, you need to wait a couple of seconds, since the TV, after pressing the specified combination, will reboot to display the necessary information;
- After that, the incoming person must learn to move in such a way that they do not accidentally change the settings. If you need to change something, you must press "Enter" and only then enter the amendments;
- Go to "Control", "Cloning" and so on;
 It is important, before finishing the work in the "Hotel Option" section, to mark "OFF" in order to save some functions from failures. And also, since the user has entered the menu, and knows how to enter here at any time, you still need to understand how to exit and not damage the settings. This is done in this way:
- You can exit by turning off the TV normally;
- Then go back to MENU-SYSTEM, and see what has changed;
- If all is well, we entered without any problems and are satisfied with the settings, which means that you can continue to use the TV with an updated menu.