How to replace your laptop keyboard yourself.
There are 2 ways:
- Take your laptop to a service center, leave it for a couple of weeks and pay 4-5 thousand;
- Buy a keyboard for your model on our website and change the keyboard yourself;
The first method is the simplest, so let's take a closer look at the second.
First, you need to remove the keyboard. In principle, this procedure is quite simple and can be carried out for the vast majority of laptops at home without additional study of special literature. But this is for the majority. For some models, this procedure looks much more complicated.
It should be noted that the procedure for removing the keyboard depends on the design of the laptop rather than on the manufacturer. With the exception of Sony and Apple. Other manufacturers use standard solutions, which greatly simplifies the process of removing the keyboard. So, let's look briefly at the options for removing the keyboard.
The most common dismantling option is to remove the panel above the keyboard.
The panel can simply be held on by clips - then you just need to pry it off with a screwdriver,
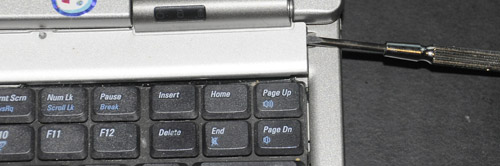
Or it can be additionally secured with screws on the back of the laptop - they must first be removed.
After removing the panel we will see the following picture.
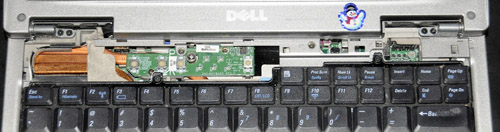
The keyboard may be attached with screws - unscrew them.
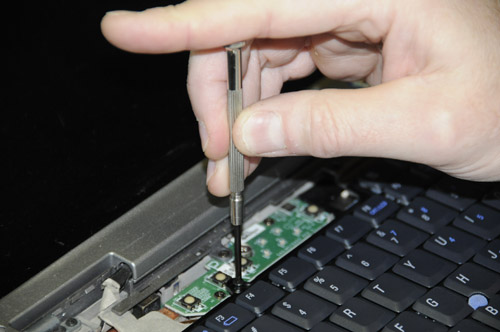
Lift the keyboard and disconnect the cable
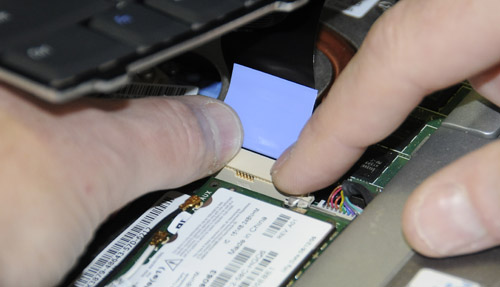
As a rule, the keyboard is connected to one of two types of flat connector, differing in the way it is “opened”. The connector consists of a fixed part into which the cable is installed, and a lock-seal plate. Devices of the first type are opened by sliding the sealing plate forward, after which the cable easily comes out of the connector.
In those related to the second, the plate must be carefully lifted up by the corners protruding along the edges.
Let's look at less common cases.
The panel above the keyboard may look like this:

Then pry it off with a screwdriver from the side of the keyboard, as shown in the figure.
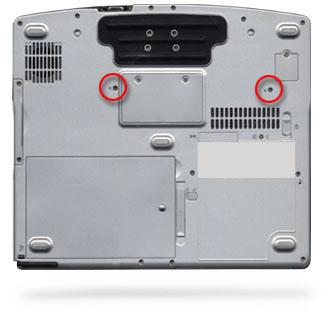
The keyboard can be screwed onto the back of the laptop.
![]()
In this case, the screws can be found by the inscriptions KBD or keyboard.
It also happens that the top panel is simply missing as a class. Then there are two mounting options. The keyboard is only secured with screws from the bottom of the laptop. Or it is fixed with special clamps along the edges and screws at the bottom. For example, on some Compaq models

The keyboard is secured with four latches that can be moved with a screwdriver or even a pencil.
Expensive exclusive models may have their own special mounting scheme, so you need to be especially careful and, if you have the slightest doubt, stop working on your own and contact a service center.
.
Quite often laptops have problems with the keyboard. Some keys may stop working, and sometimes the keyboard fails completely. In such a situation, it is easier to replace the keyboard with a new one, but if this is not possible, then you can try to repair it, but I must say right away that this is not very easy and there may be no guarantees of success.
To do this, first of all you need to remove the keyboard from the laptop. It is attached either using plastic latches around the perimeter of the keyboard or secured with screws in the upper part. There are also combined options. If the keyboard has latches, then use a small flat screwdriver to press them out one by one and at the same time lift the keyboard using a spatula screwdriver. Sometimes the keyboard is fixed with screws under the top bar, then first remove the bar by gently pressing it out.
Then unscrew the screws, disconnect the cable and take out the keyboard. Next, remove all the keys from the keyboard. We do this carefully without applying strong force, so as not to break the plastic parts of the elevators and key mounts. To remove the key, we try to hook it with some thin tool from different sides, and it should quite easily detach and jump out of the mount.
After dismantling the keys, you need to carefully remove all fastening parts and elevators. Then the film matrix is pulled out of the housing. We wash the matrix and keyboard body in warm soapy water, then rinse in clean water and dry for several hours. Then carefully separate the film matrix into three parts. In case of severe contamination, rinse again in warm water and dry thoroughly. Using a magnifying glass, try to find damaged tracks, check suspicious places with a multimeter for resistance.
If the resistance is higher than a few ohms, then you can try to restore the damaged conductors using a special conductive glue or a conductive marker, applying it over the damaged areas. To do this, you can use automotive conductive glue to restore heated car windows, Kontaktol-A, but it is more convenient to use a conductive marker, I ordered these from the Ebay auction.
After the procedure for restoring the tracks and checking with a multimeter, you need to glue the matrix films and put the keyboard back together.
This type of repair makes sense if there are a few minor damages to the paths. If there are several damages, then the probability of success will be significantly lower.

After a small bronze figurine fell onto the laptop keyboard, one of the buttons bounced off, I decided not to get involved with those fighting in three roads for my services service centers, but change the laptop button yourself. After a short search, I found a place where I could order a new keyboard button for only 100 rubles and a diagram with service instructions to familiarize myself with the internal structure of my laptop.
Of the broken parts, it was the plastic “Elevator” button that I replaced, in accordance with the photographs:
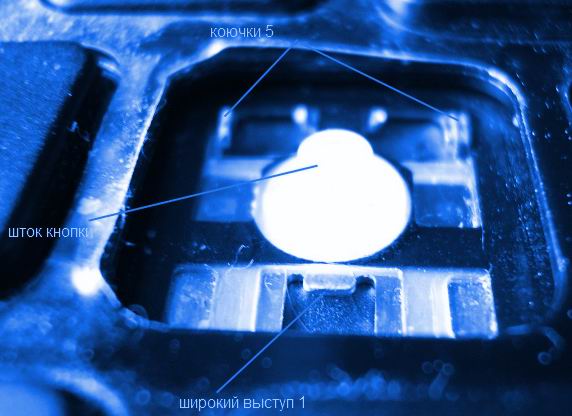

The algorithm for replacing the “elevator” button is as follows: first place it under the wide protrusion, then lightly press on the elevator and snap it under the hooks. After this, the key will first sit with its corners on the pins, and then the stands must be pressed until it clicks

There are two keyboards, one filled in black and one that is serviceable, but white (I couldn’t buy a black one), so I decided to swap the contact pad.
We begin disassembly from the reverse side, to do this we carefully pry out each key that is held in place by latches, then pull out the backing with the rubber buttons from the board. Next, we hook and remove the substrate directly with the graphites. It's glued on top. It is very easy to damage this film, so it must be peeled off carefully. The keyboard cable matches this film.
This is the film with the cable that we need, because most likely it is the fault, especially when the laptop is flooded. In addition, a film is glued to the bottom so that liquid and debris that gets through the keyboard do not fall on the laptop board. The film must be carefully peeled off because it will still be useful. The frame is held on the keyboard by plastic sealed rivets. We carefully cut them off with a scalpel, but at the same time leave a little plastic so that we can melt them again with a soldering iron. We detach the backing and align the pins on the frame so that they fit into the holes on the keyboard. Otherwise, this frame will constantly peel off. Disassembling another keyboard occurs in the same way and reassembling in the reverse order, if there are any unclear points, watch the video.
Laptop keyboard contamination is probably the most common common problem for the average user. Many people may accidentally spill various liquids on the keyboard: juices, tea, coffee, beer, and the like. Also, over time, crumbs, hair, pet hair and other small particles accumulate under the keyboard buttons, which begin to create obstacles to the normal and comfortable operation of certain areas of the keyboard. Today we will look at practical examples of cleaning a laptop keyboard yourself.
A broken keyboard on a laptop occurs for several reasons:
- flooding with liquid;
- contact pads have worn away due to age;
- electronics burned out;
- Some keys are broken.
In the first three cases, replacement with a new one is required (price from 2 to 4 thousand rubles depending on specific model), in the latter case there is a chance to fix it. Each gadget only has its own keyboard model.
Laptop keyboards are non-separable structures: several layers are soldered together. When they talk about repairing a laptop keyboard, they usually mean replacing individual keys, or even replacing the entire device at once. Of course, in the early days of laptops, when keyboards were not sold separately, some craftsmen removed all the keys, separated the soldered layers, restored the electrically conductive paths and soldered everything back. exceeded the cost of a new keyboard several times, and the reliability of repairs was extremely low. Such repairs can only be made once for demonstration purposes. For this reason Nobody does general keyboard repairs these days..
We select and replace keyboards for specific laptops. Make a request through the online form, indicating the exact email, we will definitely respond to you with availability and price. If on this moment a suitable device is not in stock, we will write about the possibility of delivery and timing.
Let's take a closer look at repairing individual keys on a laptop keyboard.
If a key breaks, the following options are possible:
- the key is damaged;
- fastening is broken;
- the metal hooks on the base of the keyboard to which the plastic brackets are attached are damaged;
- electronics burnt out, breakage or short circuit in conductors.
In the last two options, the entire keyboard will have to be replaced. The first two are suitable for repair.
Laptop keyboard buttons have several mounting options. Keyboards can be used for one laptop model different manufacturers, their button fastenings may differ.
A key consists of a plastic button, a plastic mechanism (often called hinges, brackets, or lift mechanisms), and a rubber cup. The whole thing is attached to a base that has metal hooks to hold the staples. Each base has its own bracket. Basic fastenings are varied. Here are just 2 examples of hook placement.
The top photo matches the bottom brackets.
Here's another mounting option.

Mounts on one keyboard are divided into standard (letters), large (Enter, Shift), medium ( Ctrl, Alt), small (F1-F12, PgUp), and each of the groups has options.