System Restore is one of those computer functions that I think everyone should know. After all, sometimes, even an experienced technician cannot always determine for what reason a particular computer failure occurred. However, the developers of the Windows system foresaw this and it was for such cases that they came up with such a function as,system rollbackuntil she was fine.

In what cases is it necessary to perform a Windows system restore?
I won’t go far and give an example from my own situation.
One day it happened that I had a “fly” Microsoft program Office Word, some kind of glitch occurred in it, and it stopped starting! This was really a problem for me, because I work in this program very often and my husband, I had a licensed program. That is, I lost not only the program, but also the money I paid for it. At first, I started to panic, but one computer geek I know tells me: “ Why don't you do a system restore?", I speak - " Will she help get the program back?", He - " Certainly!" I thought, trying is not torture, in extreme cases, I have nothing to lose. In the end, I completed Windows 7 system recovery, and lo and behold, the program worked!
So you can do a system rollback not only when you installed something wrong (until now I only used it in such cases), but also when some serious program crashes.
On what principle does system rollback work in Windows 7 and Windows XP?
The principle of system recovery is quite simple. Your Windows OS makes system restore points. What are these dots?
Points are a conditional name, because in fact, a recovery point is a saved copy of the system at the moment when your system is working normally and without errors. That is, the OS itself remembers its normal operating state and makes a note to itself that if some kind of failure occurs, or if we install something wrong on our computer, it should return to such and such a point . I hope the answer is clear. By the way, this answer may lead to another question: where does she store a copy of the system? And really, where, who knows, there are several such copies, where do they all fit? Let's figure it out.
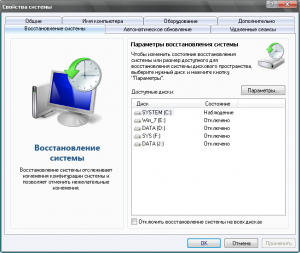
To do this, let's go back a little to the time when you just installed Windows on your PC. Most often, during installation, disk space divided into two partitions (if you have one partition, be sure to split it, I told you how to do this in the article How to partition a hard drive into partitions) one system and the other for everything else (games, movies, your videos, photos, etc.) P.). But, if you have ever noticed, several gigabytes disappear somewhere after installation. Those. for example, when I bought a computer, it was stated that HDD has a capacity of 720 gigabytes. Now look at the picture below.
One disk has a capacity of 98 gigabytes, the other has 600, for a total of 698, that is, 22 gigabytes have disappeared somewhere. It is these 22 gigabytes that are the very memory in which all my system restore points are stored. By the way, this is not the limit, on many computers much more disk space is allocated for this matter, for example, on my laptop, which I bought not so long ago, as much as 40 gigabytes are allocated for the “Windows 7 System Restore” function!
Well, now, let me tell you how to roll back a Windows 7 and xp system. By the way, if you noticed, I say either rollback or recovery, don’t be alarmed, they’re the same thing. So let's get started.
How to perform a system restore on Windows 7 and Vista?
Since these two OS System Restore happens the same way, then I will show everything using the example of Windows 7.
- First you need to click the Start menu and select All Programs.
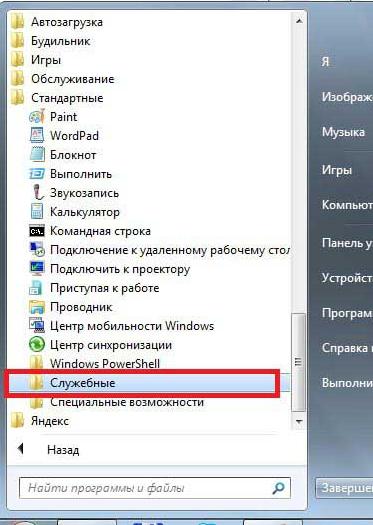
- After which, almost at the very bottom you will find the Standard item. Once you find it, open it.
- In the Standard item, again almost at the very bottom, there will be a Utilities tab.
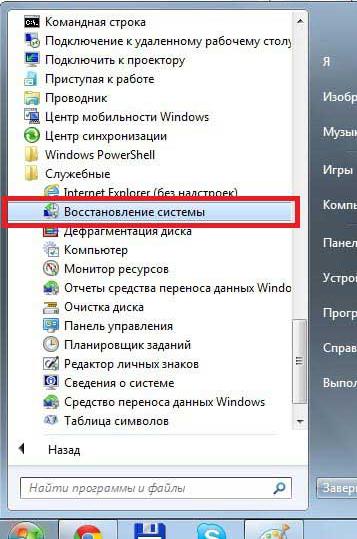
- By opening this folder, you will see the long-awaited System Restore item. Click on it.
- After which a small window will appear on your monitor: Start System Restore. I won’t show it to you, because... It loaded very quickly for me and disappeared, I didn’t even have time to take a photo.
- Now the main program window will open, click next.

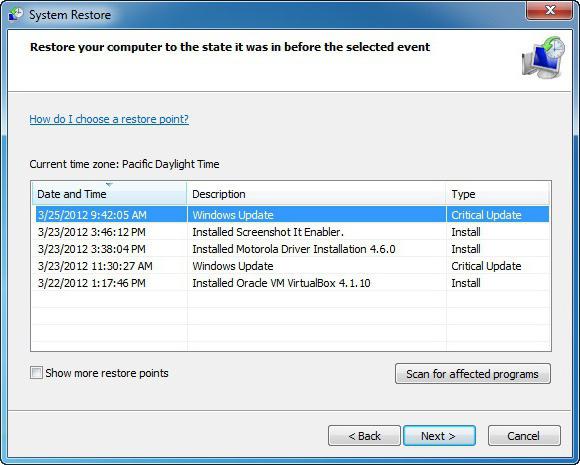
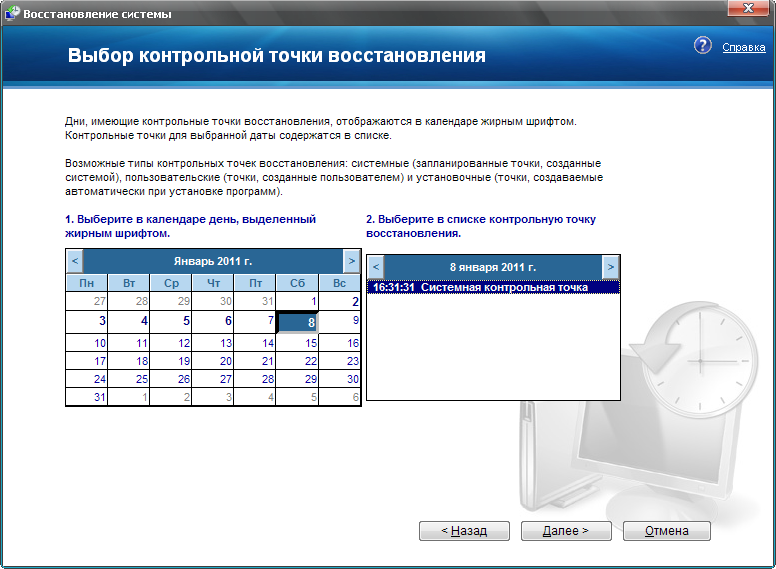
- After which a window should open where you can select the recovery point for the number you need. By the way, if you click on Show other recovery points, you will see all the points for all the numbers that are on your computer.

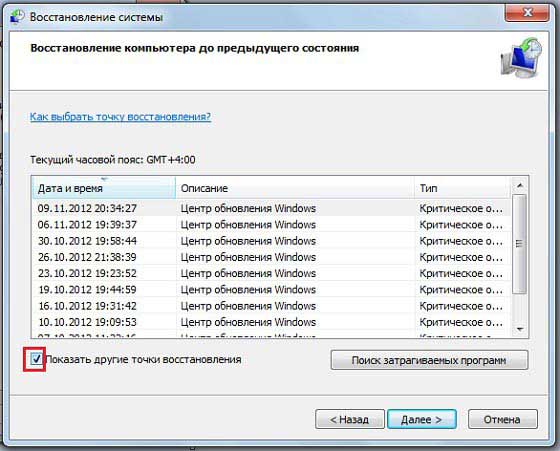
A small digression. If you see in the screenshot above, under the Description heading, the reason why the restore point was made is written, this reason is “Windows Update”. Those. if after the update some strange errors began to appear, or the OS began to take longer to load, then you can do Windows 7 system rollback before it worked without this update. But the reason for the appearance of the point can be not only the update, also, in this line you can see the inscription “Planned recovery point” or something like “Install SUCH PROGRAM”, “Remove SUCH PROGRAM”. Of course, in place of SUCH PROGRAM there is the name of some serious program, like Microsoft Office Word.
We're distracted, let's continue
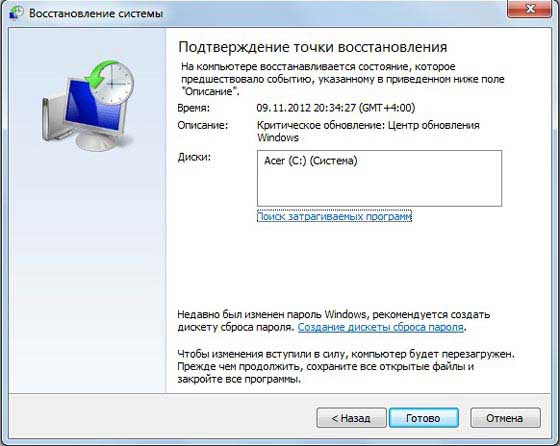
After which, the process itself will begin. Do not restart your computer until everything is finished. At the end, the computer will reboot and you should see a window indicating the successful completion of this special operation.
IN windows vista everything is almost the same. Only the first window that opens is very different.

How to restore windows xp system?
To begin with, I would like to warn owners of computers that have older versions of Windows XP installed, they may not have such a function as System Restore.
Unfortunately, I can’t show you with screenshots how to perform the same operation in Windows XP. But I know for sure that it is done in the same way, i.e.: Start -> All Programs -> Accessories -> System Tools -> System Restore. As you can see, everything is simple, then you just need to choose for what number you want to do it Windows xp system rollback, and then the process itself will go on.
Let me take my leave with this.
P.S. For clarity, I recorded a video lesson; it lasts only five minutes, so watch it to reinforce the material.
The article was taken without changes from the site " Computer is easy" in compliance with all reprinting rules specified by the author.
Windows XP contains a huge number of settings, configurations and registry entries that determine the functioning of the system. If as a result of a failure or action malware some part of Windows will be damaged - problems may arise with the correct operation of the computer. Most users in this case simply reinstall the OS. However, this is not a very convenient option. You will have to reinstall everything software and customize your PC to suit your requirements. It is much better to do a rollback or .
What it is?
System rollback is the restoration of certain computer parameters. The user can create a so-called control point, that is, remember the state of the computer at the current moment. If something goes wrong in the future, Windows XP can always be restored to a saved state.
The checkpoint stores registry entries, all configurations of the system and its modules and installed on this moment updates.
Media content, user files and documents, game and program settings cannot be saved. Thus, Windows XP rollback is not used for recovery deleted photos or successful software configurations.
If you want to protect your personal information from viruses and accidental deletion, it is best to make backup copies or backups of files.
They can be stored on the same hard drive as cloud storage or on a regular removable flash drive. In the event of any accident, you can simply copy the created backup to restore lost data.
How to make a checkpoint
Before you roll back Windows XP, you will need to create control point systems. The OS periodically creates such checkpoints on its own, but it will be useful to create an additional one before installing dubious software or working with the registry. This can be done using standard utility, preinstalled in all versions of the system:

Now, if necessary, you can easily roll back Windows status XP to stable.
How to rollback
This operation is performed through the same interface as the creation of new return points. To work with the utility, you must be logged into Windows XP as an administrator.

Once the process is complete, your computer will restart and the changes will take effect.
If you are not satisfied with the result, or you made a mistake in specifying the checkpoint, you can cancel the last Windows XP rollback. This action can be done using the same interface:
1. Open the OS Recovery program. 
It often happens that after downloading some malicious program or a file infected with a virus, important system data is damaged or deleted, as a result of which the PC begins to work worse or not work at all. In this case, a rollback will help correct the situation.
What is it?
Rollback (the system name for this function is data recovery) is a return operating system to a restore point that was created before the problem occurred due to damage to the OS or its individual components. There are plenty of reasons why it could be damaged:
- A system file can be “eaten” by a virus, after which the OS refuses to work. Or it is simply infected with a virus program, after which it is blocked or deleted by an antivirus.
- An important component was deleted by the user accidentally or out of ignorance.
- There was an installed third-party program that harmed the operating system.
- The downloaded Windows updates began to conflict with the old ones, as a result of which the computer began to slow down and work worse.
We can say that a rollback is like for the user, because it is able to return Windows 7 to its normal state. In this case, you do not have to reinstall it.
Restoring the system
Go to Start // All Programs // Accessories // System Tools and click on “System Restore”.
If you are interested in which programs will disappear, click on the “Search for affected programs” button. We move on and begin the rollback. This will put the OS in order, but some utilities or drivers will need to be reinstalled.
Via Safe Mode
It often happens that some error occurs during startup, so it is not possible to load the desktop and roll back the settings. Therefore, you can log in using
We restart the computer and before loading Windows 7, press the F8 key. It is worth noting that on some laptops the F1-12 keys are activated only in combination with the Fn switch button (in most cases you can find it at the bottom left). In this case, you should hold down Fn and press F8.

From the list of functions that appears, select “ Safe mode" Don't be afraid of a screen resolution of 600x400 or 800x600, this is normal. Next, find the program in “Start” and follow the previous instructions on how to rollback.
Using a boot disk
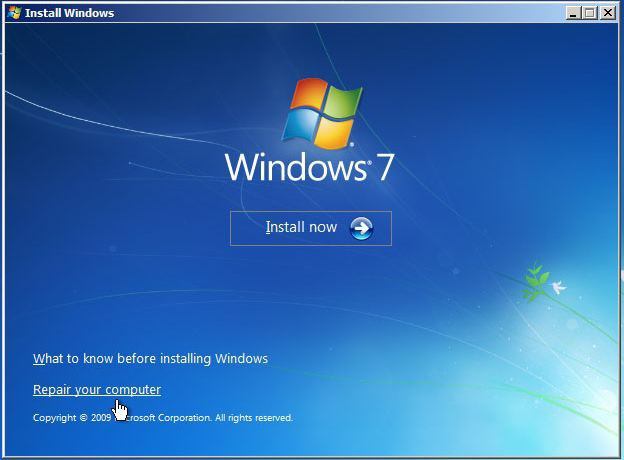
It happens when you can’t log into your computer using “Safe Mode,” and, accordingly, it’s impossible to roll back. This can be solved quite simply by using a boot disk. All you need is to have it. We insert boot disk into the disk drive, reboot the computer. If the drive is not a priority, that is, it is not in first place in the priority startup list, go to the Boot section in the BIOS and put it in first place, save and exit from there. When the Windows 7 “installer” starts, set the language to Russian (although another is possible) and click on the “System Restore” inscription located at the bottom left. From the list, again select “System Restore”, after which we go through the already known procedure and roll back updates and settings.
By the way, if there is bootable flash drive, the treatment procedure is the same, only you will need to put it in the download priority.
Create a restore point
It is possible to restore the computer's operation only if there is a saved one. If it is not there, this is a problem, since it will be impossible to roll back. Therefore it is necessary to create it.
Right-click on the “My Computer” shortcut (if there is no such thing on your desktop, then open the “Start” menu and do it there) and select “Properties”.

In the "Toolbar" with right side Click on the “System Protection” section and look at the plate where the disks are displayed.

If there is an inscription “Enabled” next to some disk (mostly the system one), then there is no need to worry, since there is a function for saving the return point. If it’s “Disabled”, click “Configure”. There we put the switch on the item “Restore system parameters and previous versions files". And from below we select the size of the disk space (it is advisable to take at least 1.5-2 GB). Click “Apply” and “OK”. You can also create a return label manually. To do this, click “Create”, name it somehow, and you’re done.
Now a copy of the system will be saved from time to time, and it will be possible to roll back. It's a good news. But there is a small nuance. Protection settings will be saved primarily before installing some programs and will be constantly replaced when there is not enough space for new saves. Therefore, it is better to allocate 5-10 gigabytes for this operation (it all depends on the capabilities of the disk), so that there are more tags with an earlier date in the list for return.
Automatic creation
You can ensure that recovery data is saved strictly according to schedule. The easiest way to do it is this way:
- Press Win+R or open “Start” and write “Run” in the search.
- Write taskschd.msc in the line and click OK. The scheduler will open.
- In the tree on the left side, open Library\\Microsoft\\Windows\\SystemRestore. Double click on the SR file.

- Go to the “Triggers” tab, select the one you need and click edit. Here we configure the schedule at our discretion (for example, set one trigger to be created weekly every Saturday at 0 o’clock, and the second - when the computer is turned on).
- Next, go to the “Conditions” tab and set up some conditions for creating an automatic save point. If you don't need them, you can disable them.
Now you don’t have to worry about having a restore point or how to roll back the system to Windows.
Restoring (rolling back) Windows XP
1. IntroductionThe more you work with Windows, trying to get the most out of it and customize it to suit your needs, preferences and tasks, the more it confirms the half-joking concept that Windows should be considered one big glitch. After all, it often happens that a function that worked great yesterday, today either doesn’t work at all, or works completely differently than before.
Each Windows problem caused objective reasons: changes in Windows registry, in system files, settings, boot options, drivers, the consequences of malicious and simply poorly written programs. Even small changes to the system can make it impossible Windows boot XP, one of the most stable Windows in the world. That’s why in the section (Frequently Asked Questions) questions often arise about what to do if something in the system suddenly begins to work differently than before.
In some cases, you can assume the source of the problem, check, find and eliminate it, but very often it turns out that it is faster and easier to reinstall the system than to waste time studying registry errors (the size of which is usually about tens of MB), system files, their versions, system settings, etc.
Reinstalling Windows XP, if you have its distribution kit at hand and some experience, usually takes no more than an hour. However, installing additional drivers, programs, setting them up, as well as organizing work in accordance with user preferences may take more than one hour, and possibly more than one day. This procedure is routine, and you can simply forget what these or those settings and parameters were before.
This article contains information on ways to return the system to a previously known good state, with the desired settings and in full accordance with individual preferences. This procedure is usually called “system rollback” (in English - “rollback”) or “system restore”. Below we consider rolling back changes to Windows XP (hereinafter we mean Windows update XP 32 bit Professional SP2), as the most popular home PC system.
Windows Vista, released at the end of 2006, did not live up to expectations and turned out to be less reliable in terms of data storage security, as a result of which it is not optimal. Release next Windows versions for home PCs, which is currently codenamed Windows Vienna, is planned for no earlier than 2010. Therefore, it is obvious that Windows XP will remain relevant at least until 2010-2011.
2. Built in Windows programs, used for recovery
Windows has several such programs:
- System Restore Application- system recovery program, the full path to which C:\WINDOWS/System32/Restore/rstrui.exe(hereinafter in the text it is assumed that the system is installed in the “default” directory - on drive C: in the “WINDOWS” folder);
- Windows Backup Utility- archiving program Windows data, the full path to which C:\WINDOWS/System32/Restore/ntbackup.exe;
- System File Checker- a program located like C:\WINDOWS/System32/Restore/sfc.exe. Checks versions of protected system files, and, if they are replaced or damaged, restores the original files from a special folder C:\WINDOWS/System32/dllcache. You can read more about this program;
Dr. programs with a very narrow application profile.
Shortcuts to the first two of the above programs can also be found in the main menu (Start -> Programs -> Accessories -> System Tools), unless, of course, you deleted them from there. The original location of system recovery program shortcuts in the "Standard" menu group is deeply symbolic. It seems that when creating Windows XP already implied that problems and rollbacks in the system would be a frequent occurrence. Shortcut for System File Checker If desired, you can create it yourself in the start menu.
In addition, it is possible to restore the Windows configuration (but not the entire OS!) to the state it had at the time of the last successful boot. To do this, you need to press the "F8" key after turning on the computer, immediately before the moment when the Windows boot logo and the boot identifier line (a running white stripe at the bottom of the screen) usually appear. If you have several OS installed on your computer, then the “F8” key can be pressed when the menu for selecting an OS to launch appears. If the above steps are performed correctly, a menu will appear on the screen with a list of additional options boot Windows, in which you need to select " Last Known Good Configuration" and confirm your choice by pressing the "Enter" key. More detailed information O this method OS recovery can be read on the Internet at http://support.microsoft.com/kb/307852.
The described method helps if you have just installed:
A faulty driver that prevents normal loading of the OS;
- the second antivirus that began to conflict with the previously installed one, preventing it from working normally under the OS.
Strictly speaking, there is another Windows tool created for the most extreme case, when the problems are so serious that it is no longer possible to boot the system. This tool is the Recovery Console located on installation disk with Windows XP. However, the Recovery Console is too limited and only works from command line therefore it should only be used by qualified personnel. You can read more about the Recovery Console.
2.1. Program Windows archiving Backup Utility
Unfortunately, the means Windows Backup Utility very far not only from the ideal, but even from the wishes of an undemanding user. In practice, it can only be used as an archiver of individual user files. The archives obtained as a result of this program are saved in files with the "BKF" extension, which other programs cannot work with. There are other significant drawbacks, including the inability to restore the system from an archive when the latter “does not boot” and the low degree of data compression. Therefore, third-party archivers are much better suited for creating backup copies of individual user files - for example, the well-known WinRar, and the lesser known free 7-Zip File Manager.
2.2. Built-in system recovery program
(System Restore Application)
Archivers that are convenient for creating copies of user files cannot be used for Reserve copy current state of the OS. The reason, in particular, is that running Windows XP will not allow the archiver to read the contents of many system files to create them backup copy, not to mention replacing system files under the active OS. In addition, some files and system data are located in strictly defined areas hard drive; when restoring, their location must very strictly coincide with the original one (before restoration), and archivers do not have this ability.
Where archivers are unsuitable, system rollback (restore) programs work successfully. First of all, it is a program built into Windows XP System Restore Application, already mentioned above and described in detail.
Since the installation of the OS, the service Windows recovery(service name - srservice) is automatically included in working with hard disk partitions whose format is supported by Windows XP. During Windows operation this service tracks:
Changes in the registry and system configuration files;
Changes in OS modules, including changes that occurred as a result of installing system updates and patches;
Some other changes that Windows developers found necessary to monitor for later recovery initial state OS using System Restore Application.
If any of the above changes take place, the data necessary to undo them, original copies of files and additional service information are written to special folders named “System Volume Information”. Such folders are created in the root of each hard section disk that is being monitored.
See if it works for you System Restore Application, as well as manage this program, you can right-click on the “My Computer” icon, select “Properties”, and then the “System Restore” tab:
After a certain period of time, as well as during serious system events (more precisely, immediately before them), a so-called “return point” is created, relative to which changes are recorded. As a rule, such an event is installation (installation) new program or batch update.
The command to create a recovery point can also be called manually, specifying a description of this point, so that after a while you yourself do not get confused why the latter was created and what state the system was in at that time:
If necessary, you can return to one of the previously saved system states (to one of the saved restore points):


In this case, service data for recovery is read from the above backup folder (System Volume Information), and then Windows is put into a special state when some of its auxiliary functions are disabled and the protection of replaced system files is deactivated. Then the files and data needed for recovery are restored from the specified folder. After the computer automatically restarts, the system should (ideally) be restored to the state recorded at the specified restore point. However, the picture of the restored system obtained in practice does not always fully correspond to the desired one.
In particular, the cause of the errors is the not entirely successful idea of dividing files into “necessary” and “useless” (depending on their extension) for system recovery. This idea is as follows:
Files whose extensions correspond to user documents (for example, "DOC", "XLS", "PPT", etc.) are not tracked or restored;
Files whose extensions correspond to “system” files (for example, “EXE”, “DLL”, “SYS” and a number of others) are monitored, and all changes made to them are controlled, and when the system is restored, the latter are returned to their original state.
If you look at it, dividing files by extension can often lead to errors. Let's look at a small example of such an error: on Monday a system backup is created, and on Tuesday the user moves his office documents into a self-extracting archive, while deleting the source files as they are no longer needed. Then, for example, on Wednesday, the user notices errors in the operation of the computer and therefore decides to roll back the system state to the last known working state, i.e. to the restore point made on Monday. In this case, the archive with documents will be lost, and the original document files, as we remember, were deleted by the user himself.
Why did it happen? It's very simple: a self-extracting archive has the extension "EXE". According to this criterion, it is classified as a “system” file and, as a result, is deleted during system recovery, because in accordance with the rules described above, it is superfluous in the OS, because on Monday it was not yet there. Office files are not restored because their extension determines that they are not needed by the OS.
In such a situation, to restore documents, the user will need to return the OS state to the “future” - to the state on the environment, and then the lost archive will return. You will have to extract the original documents from it, and then, to restore the system to a working state, you can return to the “past” again - to the restore point containing records of the system state for Monday.
The system recovery program built into Windows has a number of other disadvantages, including the following:
After a system rollback, some types of files may have their duplicates; for example, in addition to the file “file”, “file(1)”, “file(2)”, etc. may appear in the same folder;
When running a service that monitors the system, additional computer RAM resources are used, which causes a decrease in computer performance;
Active operation of the specified service with hard drive not only slows down the work of other programs on the same disk, but also quickly leads to fragmentation of the latter, which leads to an even greater decrease in performance (this is especially noticeable on laptops, where hard disk performance is one of the bottlenecks);
If such global changes have been made to the OS that it has become impossible to boot, then you will not be able to use the recovery program.
It seems very risky to store the data needed to roll back the system in a folder located on the same partition of the same disk as the protected data. If there are problems associated with a violation of the file structure of the disk, the contents of this folder are likely to suffer the same problem as the files to be recovered. Therefore, it will be impossible to roll back the system to a working state using the program in question. A similar loss of data necessary for system recovery can also occur as a result of the destructive actions of viruses.
3. Conditions and means of reliable system rollback
So, rollback Windows systems XP implemented in System Restore Application, very far from perfect. But it can also be performed using other third-party programs. Most of these programs are created taking into account the above-mentioned shortcomings of the recovery tools built into Windows.
3.1. Separation of system and user data
To prevent the program from having to divide files into system and user files, which will inevitably lead to errors, the right to separate data should be given to a person. In practice, data division can be done like this: select a partition on a physical disk with a capacity of about 10-20 GB, which will be intended for use by the system (usually this is the system partition C:). In this case, another partition is allocated for the user’s files, for example, logical drive D:, or folder D:\ Documentation located on it.
The folder "My Documents" offered by the system, located on system disk, it is advisable to leave it in place. Let files and subfolders, which some programs like to leave in “My Documents” without the user’s knowledge, go there, and new folder The user's "Documents" will be automatically rid of such garbage.
To avoid confusion with two similar folders, you can remove the “My Documents” shortcut from the Desktop, and instead create a shortcut to the D:\ folder there. Documentation.
Office programs from Microsoft, system utilities, editors that do not take up a very large amount of disk space, as well as most other programs, can be installed on the system partition in the default folder - “C:\Program Files”. The exception is for programs that occupy a significant amount of disk space - approximately hundreds of MB or more. These include: games, voluminous reference books, and other “monsters” that occupy the hard drive, especially if the latter do not require storing their settings in the registry to operate. Such programs can be placed, for example, inside the D:\ folder Soft.
With this division for Windows rollback It will be enough to return only one small system partition to the desired state. This will take significantly less time than a full recovery, and will not affect either user data or programs on another partition. In addition, after the proposed separation, you can safely perform formatting system partition, And new installation systems to a clean partition without the risk of losing necessary files user. Such actions may be required, for example, if the file system on the system partition is corrupted or after an unsuccessful recovery.
3.2. Hard drive partitioning process
As noted above, for optimal system rollback, it is advisable to have a hard drive divided (i.e., divided) into several partitions. Additionally, you may need a separate partition to store system state backups.
To avoid possible data loss splitting hard It is advisable to split the disk into partitions before installing the system and before moving any useful data to it. For partitioning, the most effective, in my opinion, are programs Acronis Disk Director Suite 10 and Partition Magic version 8.0 or higher.
Even the most best program when partitioning, it is capable of making an error, which can lead to irretrievable loss of data. Therefore, in cases where partitioning has to be carried out in the presence of an installed “live” system, it is necessary to first create copies of all important files on additional external or internal media. Such media can be network or local disk, CD/DVD, flash memory, etc. Partitioning should only be carried out under the guidance of a person with the necessary knowledge and experience in the field of OS recovery.
When partitioning, the question often arises: which file system to choose for the partition - FAT32 or NTFS. From the point of view of storage security and optimality for most tasks performed under Windows XP, preference is often given to NTFS, as it is more modern, self-healing, and protected from the point of view of data access control. On the other hand, FAT32 is much simpler and preferable in terms of performance, especially in the case of an older computer with 128 MB of RAM or less. In addition, if the system cannot boot for some reason, access to data to correct problems on a FAT32 partition can be obtained using a regular MS-DOS boot floppy disk. In the case of NTFS, this will be more difficult to do, because will require running a cumbersome driver. At the same time, for a fully comfortable user experience with files, you will need a Live CD or DVD based on Windows PE(Windows Preinstallation Edition), which will perform a number of OS functions without requiring the latter to be installed on the hard drive, but its files will take up a considerable part of the computer’s RAM.
3.3. Third party programs system rollback (restore)
Writing system rollback (restore) programs is a responsible process, because... mistakes made during development can be very costly for users. Creating such programs requires the work of many specialists who have deeply studied the system and equipment, both in theory and in practice, so this task is only within the capabilities of leading large software companies and, as a result, there are not so many such programs.
You can identify standard functions that are found in all modern system recovery programs:
The ability to restore the entire system partition, or only selected folders and files, or only files;
Ability to create backup copies of system state on another (non-system) physical or logical drive, on the network, on removable media (CD, DVD, flash) with automatic splitting of these copies into parts;
Recovery from all of the above media types;
Supports all file systems used by common operating systems on hard drives: FAT16/32, NTFS, Ext2/3FS, etc.;
Possibility of data recovery even if the OS does not boot;
The ability to make a backup or restore (rollback) without installing the program - from a bootable CD that supports access to disks with file systems FAT16/32, NTFS, Ext2/3FS and CD/DVD-ROM drives;
The possibility of differential data copying, in which not all data is recorded, but only the changes made since the previous full data copy.
The table below is a list of some well-known OS recovery programs given at the time of writing this article (December 2007 - January 2008):
Program name | Price | Developer's website |
Paragon Drive Backup 8.51 | ||
Acronis True Image Home RUS 11.0 | ||
Manufacturers ShadowUser pay attention to main feature your program: the ability to create a “layer” between the file and operating systems. When activated ShadowUser file changes are written to free place on the disk, and after a reboot they can be destroyed. That's why this program It is more suitable for using the computer in Internet shops, for those who like to experiment with various “experiments” on the system, as well as for using the computer by a child or other person who cannot ensure the safety of important data on the hard drive.
ShadowUser, like the more famous program Norton GoBack, uses free space on protected partitions to store your recovery data. System recovery tools like ShadowUser, have a number of the above-mentioned disadvantages of the recovery program built into Windows, the main one of which is the slowdown of the computer when the OS is running due to the continuous recording of all changes that occur.
As can be seen from the information provided on the developer’s website APBackup, the program, frankly speaking, is weak, and even uses ZIP files to store copies of the system state, which is clearly not intended for this purpose. The program installer available for download is very small (size is just over 3 MB), so it will be easy for everyone to check in practice the validity of my opinion about the program. Numerous other programs of this kind, which are only more or less successful archivers, are absolutely unsuitable for complete OS recovery.
4. System rollback using an example Acronis True Image Home
Job Description Below Acronis True Image(we have considered the version of Acronis True Image Home 10, which in the following text we will simply call " Acronis") has much in common with the work of other programs, such as, for example, Norton Ghost And Paragon Drive Backup.
Work with Acronis It is especially convenient due to the fact that the program has an interface and built-in reference materials in Russian. It also adds special functions that Russian-speaking PC users need. For example, in cases where the program is launched from a bootable CD without the need to boot into Windows, a switch for Russian and English keyboard layouts appears on the screen, very similar to the switch found in Windows.
By examining the main menu of the program below, you can familiarize yourself with its main functions:
A PC user who has some experience with other similar programs can easily start working with Acronis immediately after installing it on Windows OS, because The program interface is intuitive, and the execution of individual functions is carried out using thoughtful step-by-step “wizards” that will not allow the user to “go astray.” Convenient "wizards" are used even in loading cases Acronis from a CD or from a security area. However, due to the responsibility of the assigned tasks, it is necessary to study the functionality of the program in more detail using, for example, reference materials built directly into Acronis.
4.1. Creating a copy (archive)
First task Acronis- creating a backup copy of the OS. The backup copy of data created by the program is called an “archive,” so we will continue to call it by this term throughout the text.
The archive can be created in the “background” mode - without interrupting the operation of the system and individual programs. In this case, the “control point” for the created archive will be considered the state of the OS immediately at the moment when the archive creation process starts in the Acronis program. Therefore, changes made (for example, adding or deleting files) that will be made after the specified point are no longer made to the created archive.
We suggest copying "My Computer":

In the next step, select the partition with the OS:

Next, indicate the location where the created archive will be saved. This could be another partition of the same hard drive, another hard drive, a place in network environment, removable media, a place on the Internet accessible via an FTP connection, or a security zone (about the security zone - see paragraph 4.3 of this article):

Next, you are asked to choose to create a full, incremental or differential archive:

A “full” archive contains all the copied information, and an “incomplete” (differential or incremental) archive contains only changes that occurred in relation to the previously created full archive. Therefore, these archives will occupy a smaller volume compared to a “full” archive, which is their advantage.
In incremental archives, each new archive adds another file to the existing “chain”, taking into account the entire logical sequence of previous archives. Therefore, to restore from it you will need the original "full" archive and all previous "incremental" archives.
The differential archive contains all changes that occurred after the full backup was created. Therefore, incremental archives will take up less space than differential ones, and to restore from a differential archive you will only need this archive and the original “full” archive. In addition, restoration from a differential archive will be faster than from an incremental one.
If from the moment of complete archiving until the moment of creating an incomplete archive on the copied disk partition, the defragmentation program works seriously, then the location of the files will be greatly “shuffled”. Therefore, the "incomplete" copy will be comparable in size to the "full" one and, therefore, will lose its advantages. Taking this into account, it is more rational to create a new “full” archive.
Next, you are asked to select copying parameters (in my opinion, in most cases it is better to leave them “by default”) and enter a comment for the archive. After clicking the "Proceed" button, the archive creation procedure starts.
It should be noted that the creation of archives in Acronis produced very intelligently. For example, paging and hibernation files, which do not carry useful information. The copied data is compressed (“by default”), which makes copying even faster than without compression. To completely copy the system partition, which takes up about 5-10 GB of space, a few minutes are enough.
4.2. System recovery (rollback)
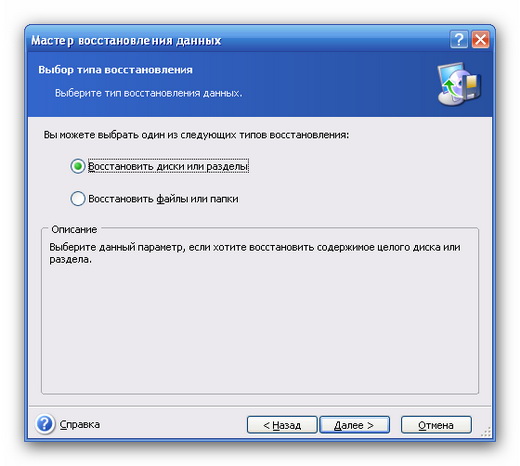
After selecting the recovery command, you are prompted to specify the location of the archive from which you want to restore data:
In this case, you can choose to restore disks, only certain partitions, or individual files on them:
If you need to view or copy separate files archive, it is more convenient to do this by simply opening the archive file from under Acronis, after which you can “enter” this archive as a regular folder. Moreover, you can connect an image of a partition or disk located in the archive. As a result of the connection, a new virtual disk with content archive image, which is practically no different from ordinary (real) disks or partitions in its operation, but will be read-only. This disk will exist either until the image is disconnected through the program Acronis, or until the computer is rebooted.

Please note that in addition to restoring the system partition, it is also possible to restore the MBR ( Master Boot Record - home boot entry). Acronis True Image includes the MBR in the archive, despite the fact that the user did not issue such a command when creating the archive. Obviously, this unplanned user action occurs for the following reasons:
The MBR occupies an obviously insignificant size in the archive, while its copy contains critical data about the disk;
MBR corruption leads to serious consequences. In most cases, after such distortions, to restore system functionality, partition recovery alone will not be enough and preliminary MBR recovery will be required (this is where a copy of this record, prepared in advance, comes in handy Acronis True Image).
MBR recovery can (and should) be done only if the data in the MBR is obviously erroneous. It is important to remember: if during the period from the moment the archive was created to the moment the recovery procedure was launched, the position of the partitions on the physical disk changed, then restoring the previous MBR will most likely lead to damage to the partitions whose physical location on the hard disk has been changed.
Select the desired system partition as the recovery location. You can restore a partition to a place other than its “native” location, if there is enough free space for this in the new recovery location.
In subsequent dialog boxes you can change the type of partition to be restored, the space before and after the partition to be restored, assign a letter to the partition (a new name), and also change some other parameters. In all these windows, the parameters initially correspond to the initial properties of the partition - for example, the previously existing partition type and its letter (name) are indicated. Therefore, it is not advisable to make any changes to the parameters (relative to the parameters initially set in the dialog boxes) unless absolutely necessary.
While Windows continues to run, it is impossible to recover the partition on which its files are located (the system partition). Therefore, while the OS is running, actions to restore it can only be planned. After clicking the "Proceed" button, the computer will restart; while in RAM component will be loaded Acronis, which works without the need to boot Windows, which will carry out the planned recovery actions.
Restoring a system partition with occupied space of about 5-10 GB takes approximately 5-15 minutes. Then you need to reboot the computer again, after which the restored OS will be ready for use.
4.3. Using Acronis Secure Zone and booting the program from a CD
Security zone Acronis- this is a place on a physical disk that is a partition that is not connected to the OS. It is inaccessible to Windows (“invisible”), so the risk of intentional or accidental deletion, as well as modification of the data contained on it by the user, other programs or viruses, is practically excluded.
How can I Acronis works with security zone? A special driver is used for this Acronis, which allows you to access data on a disconnected partition, bypassing OS tools. Theoretically, it is possible to create a virus that contains a driver similar to that used in Acronis so that the virus can gain access to the security zone. However, information about the emergence of viruses with such capabilities has not yet been recorded in any of the official sources. The fact is that driver development is technically complex, and creating such viruses is practically pointless. After all, it is easier to develop malicious code that deletes all information from a physical disk (all partitions along with all the data on them), which will be no less “effective” than creating a highly specialized virus with a complex driver.
In the security zone you can store not only archives, but also files necessary to download the program itself Acronis without using Windows. If this function is enabled, then when the computer starts, you will be prompted for a few seconds to press the "F11" key to boot Acronis. If the "F11" key is not pressed, Windows will begin loading.
Implementing this feature requires changes to the MBR. Such changes may be blocked if modification of the MBR is prohibited in BIOS settings. In addition, incorrectly changing the MBR can lead to complete loss of data on the computer, so this type of procedure must be performed with extreme caution.
Another dangerous operation performed Acronis- this is the creation of a safety zone, because in this case, a new partition is formed either by allocating part of the space occupied on the hard disk by existing partitions, or by using the space remaining unallocated among partitions (unformatted areas). Those. In fact, a new disk partition occurs. Possible negative consequences of errors during partitioning have already been discussed in paragraph 3.2 of this article.
Download option Acronis from CD without need Windows startup very useful in cases where for some reason the latter turns out to be inoperative. In this case, using Acronis It is also possible to restore a damaged MBR. As with booting from a secure area, the user will be presented with window interface, very similar to the one implemented in Acronis for Windows XP. The main menu and the order of individual operations are also very similar to those implemented in Acronis for Windows.
5. Conclusion
In some cases it is enough to use standard program recovery built into Windows XP, especially in situations where user data, settings and system performance are not very important for the person working at the computer (for example, if the computer is used as a gaming machine).
In those cases when the system operates under conditions of frequent experiments and can be damaged at any time, or when fast and more reliable recovery data, paid third-party programs are used. In such cases, to increase performance and avoid duplication of copy functions, it is advisable to completely disable standard system recovery along with the corresponding Windows service. It should be borne in mind that working with such programs requires special care and caution, and the user, of course, must be competent in this matter and have a clear understanding of what the program he is using does and how it does it. Otherwise, recovery attempts are more likely to result in data loss than useful results.
No recovery (rollback) method guarantees a 100% recovery result. Therefore, in all cases, it is necessary to regularly archive user data on external media information.
The last non-obvious tip: before restoring data, it is advisable to make an additional copy of the current state of the OS. If this precaution is taken, it will always be possible to return to the state that existed before recovery. This can be very useful in the event that the rollback procedure suddenly went wrong, and further aggravated the current situation.
In case of failures and errors, to return the operating system to its previous state, Windows XP has a built-in system for archiving the registry and system data. And although it is imperfect in many ways, it often helps solve problems. The name in English is System Restore Application, which means system recovery program. Often the process of restoring a system to its previous state is called " System rollback". The program can be accessed in different ways. The first thing you need to do is check if you have it turned on system recovery system. To do this, click right click on the “My Computer” icon (see note at the end) and in the drop-down menu select “Properties” at the bottom. In the window that opens called
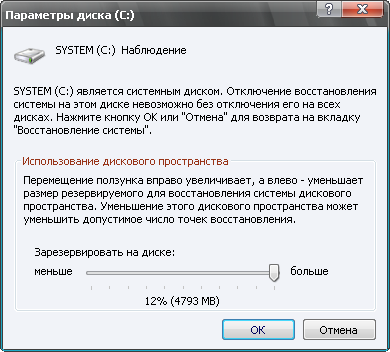
“Properties” select the “System Restore” tab at the top. The window has a list of disks and if the recovery system is enabled, then next to each entry there should be the inscription “Monitoring”. At the bottom there is the inscription “Disable system recovery on all disks”; if the system is turned on, there should be no check mark next to the inscription. When you select a disk and click the “Options” button, a window of the same name will open in which you can disable system recovery on this
disk. Here you can also use the slider to change the disk space allocated for archiving. System Restore creates so-called system restore points. By default, restore points are created periodically and when
important system events, for example: installation of programs, drivers, package updates. You can create your own restore points. It is especially useful to do this if you intend to perform dubious actions in the system, the positive outcome of which is not certain.
There are several ways to use the recovery system. The first way, through help and Windows support. To do this, click the start button and in the menu on the right, click “Help and Support” and on the right we find “Undo changes using System Restore” and click on this inscription. The “System Restore” window opens where you can select
"Recovery
earlier state of the computer" or "Create a restore point", select what you need and click "Next". If you selected "Recover more than
early state of the computer" will open a corresponding window with a calendar where you can select a recovery point by date or time and click "Next" to continue the recovery. When choosing

To create a recovery point, in the window that opens, you need to enter the name of your point and click “Next” it will be created.
Sometimes “Help and Support” is missing from the Start menu, then you can try calling it with the F1 key. If this does not help, then you most likely have the Help and Support service disabled. You can read how to deal with services
You can open the “System Restore” window by following the path, Start > All Programs > Accessories > System Tools > System Restore.
 Note: Sometimes users, not knowing how to display a full-fledged “My Computer” icon on the desktop, pull out the shortcut (the one with the arrow). Then, when you select "Properties", the shortcut properties window opens, and this is not what we need. To solve this problem, you need to go to the “Start” menu and right-click “My Computer”, and then as indicated above. Or display a full-fledged icon on the desktop. You can read about this