Sending a letter to yourself in the future or immediately means that from your e-mail address you send yourself a letter to the same e-mail address, for example, from the e-mail address Nadezda @yandex.ru you send a letter to the same Nadezda address @yandex.ru.
And you will receive this letter either immediately, or it will arrive in the future, more precisely, it will arrive in the planned year, month, day and hour.
You can send yourself a letter from almost any mail: Yandex.Mail, (mail.ru), Google mail (gmail.com), Rambler.Mail, etc. But a simple question arises:
Why write letters to yourself?
There can be many options, I’ll give you 5 (five) of the most common ones, why sometimes it’s still worth doing this:
- Reminder letter
Remind yourself of an event or something that needs to be done by opening your mail and seeing a reminder letter there. This type of reminder will suit some people.
- Checking the functionality of your mail
As you know, letters should:
- send from e-mail and
- accepted by e-mail.
If at least one of these basic functions of mail is broken, then we can assume that you do not have mail. A letter sent to yourself will help you check the operation of your mail (any of your mailbox): whether letters are sent from there and whether they arrive.
From this site, users sometimes prefer comments rather than comments. And this is understandable, but it can be annoying when you write a long answer in a response letter, sometimes inserting explanatory links, and in the end you receive a message: the letter cannot be delivered because the recipient’s mail does not accept letters. In this case, when the mail for some reason does not accept letters, the user would have a chance to see my answer in the comments on the site, but he is waiting for a letter from me in his mail.
- Checking what the recipient of your letter will see in the letter
You can check in what form the other person will receive the letter. The check will be as correct as possible provided that the other person (the recipient of the letter) uses mail of the same type (for example, the sender and recipient of the letter both use Yandex.mail).
- Sending files to yourself
 To send a file to yourself:
- you need to write yourself a letter, for example, from the email address Nadezda @yandex.ru,
- in this letter,
- send a letter to the same address Nadezda @yandex.ru.
This is convenient if you sent the letter while at home, but opened it at work and read or saved the attached file. Or the letter was sent to yourself from a laptop, and then opened on a tablet, and the attached file can then be viewed and saved on the tablet. At the same time, you don’t need flash drives, you don’t need Clouds, however, you need the Internet. The method of transferring files may be a little outdated, but for some it is more familiar.
- Letter to your future self
Why is such a letter needed?
As I already mentioned, for near future a letter to yourself will be useful as a reminder of a certain event, for example, congratulating yourself on your birthday or a reminder that you need to congratulate someone else or do some other useful thing.
For distant future a letter to yourself will probably be more interesting in order to check or compare plans, dreams, forecasts, events, etc. Then, upon reaching a certain age or event, having received your own letter, there will be something to remember, compare with past events, rejoice, think, and perhaps draw some conclusions for yourself.
You can send a letter to the future not only to yourself, but also to another recipient, who is entered in the “To” field. For example, it could be a birthday greeting so that the recipient receives it on time, no matter what.
How to send a letter to your future self
6 in Fig. 1 - click on the clock located next to the “Send” button,
7 in Fig. 1 - click on the “today” command. A calendar opens to select the appropriate date for sending a letter to yourself:
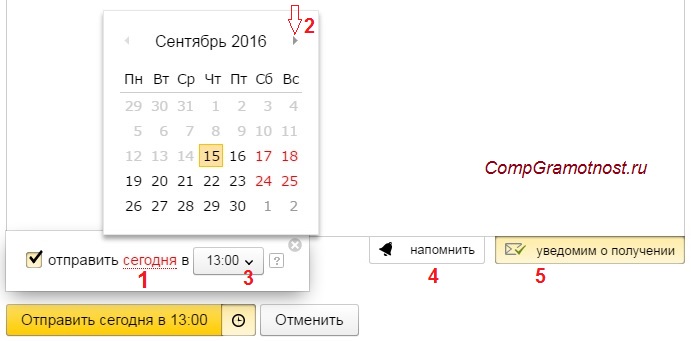
Rice. 2. Set up the date, time of sending and notification of delivery in the letter to yourself
1 in Fig. 2 - After clicking on the “today” button, a calendar will appear.
2 in Fig. 2 - Using the calendar, by sequentially clicking on the small triangle, you can select the month, year to send a letter in the future. Then click on the number. This will set the date the letter was sent.
3 - You can select the time to send the letter.
4 - If you click “notify of receipt”, then after delivery (at the time it is delivered) you will receive a message stating that the letter has been received.
5 in Fig. 2 - The “Remind” button is useful if there is a need to remind you that a response to the letter you sent has NOT been received. By clicking on the “Remind” option, you can configure exactly when to remind: if you do not receive a response within 1 hour to two weeks.
When all the settings for receiving letters in the future have been made, click “Send”. The message “The letter was sent successfully” arrives.
How to delete or edit a letter to your future self
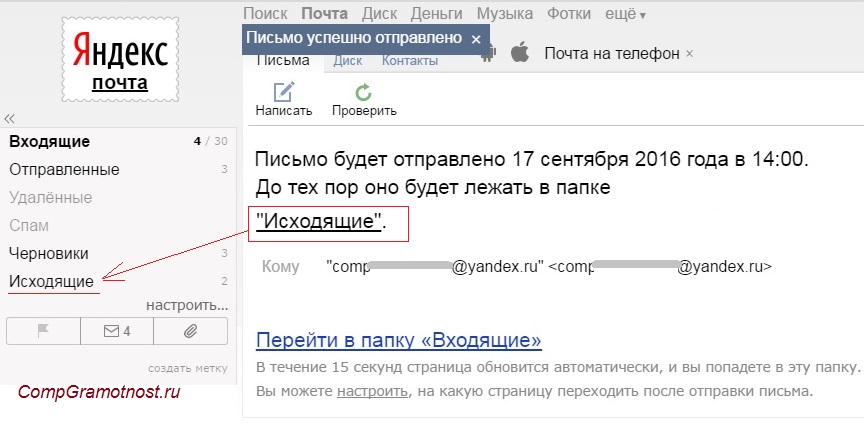
Rice. 3. The letter to yourself will be in your outbox until the scheduled date of sending.
As can be seen in Fig. 3, the letter to yourself in the future will be stored in your mailbox, namely, in the “Outbox” folder.
The advantage of this is that you can go to your Outbox at any time to edit or delete a letter to the future.
Some disadvantage is that you need to monitor the status of your mail: due to spam, overflow or other reasons, the mail may and then the letter will never reach you in the future.
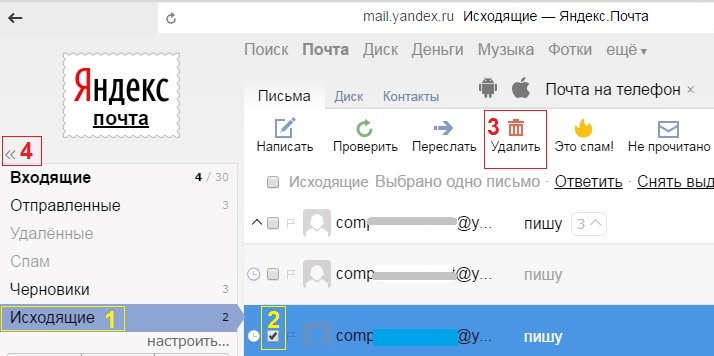
Rice. 4. How to delete or edit a letter to your future self in Yandex.Mail
To delete a letter to the future, you will need:
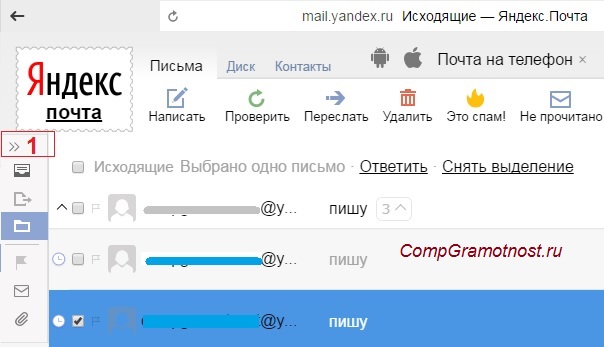
1 in Fig. 4 - Go to Yandex.mail, to the “Outbox” folder,
2 - check the box next to the letter to your future self that you decided to delete,
3 in Fig. 4 - think and click “Delete”.
The letter to my future self has been deleted.
Where did the folders in Yandex.mail go?
The question is not entirely on the topic of the article, but it is relevant for inexperienced Yandex users. There is a “secret” button in Yandex.Mail, thanks to which folders in Yandex “disappear”.
Rice. 5 Secret button for hiding folders in Yandex.mail
The situation “folders are missing in Yandex.Mail” occurs if button 1 in Fig. 1 was accidentally pressed. 5. Compare it with button 4 in Fig. 4. One click on this secret button minimizes (hides) folders in Yandex.Mail, another click returns the folders to their place.
Do you write letters to yourself? I ask you to vote, and in this way I will receive feedback from you:
You have probably already noticed thatupon receiving letters from some authorsin the “to” section there is a list of several dozen emails of different people. Moreover, neither you nor these people gave their consent for these emails to be “exposed.” Naturally, some of the recipients will unsubscribe from this mailing list (we are all tired of the flow of spam to our emails). But one thing is certain - all recipients will treat the author of the newsletter as an unprofessional person. And they are unlikely to agree to accept his offer.
How can you do it so as not to send a letter to each addressee separately and at the same time “not to shine before everyone else”?
Almost any email service allows you to do this.
Let's consider this opportunity using the example of the most popular email address for business mailings: gmail.com
Typically, you use the Compose window to send an email. By clicking on it, you see a new “New message” window, into which you insert everything that is necessary to create and send the letter itself.
We usually insert the emails of our recipients into the “Recipients” window.
Copy means "exact copy". This field is used when you simply want to send an email to someone who is not the primary recipient. This way, you can keep the person in the loop while letting them know that they don't have to respond to the email. But all recipients of this letter see each other’s addresses (and even names).
BCC means "an exact hidden copy." It works the same as Cc, but this field hides all recipient addresses.
Thus, using this field is one of the best ways to send a letter a large number people and maintain confidentiality. This means you won’t ruin your relationship with them. Using this feature, you can insert up to 30 emails. This means that with one click of a button you can send this letter to 30 recipients at once, without showing their emails.
And, if necessary, you can insert a picture into the body of the letter ( 4 ) or attach a file ( 5 ).
It is this mail that gives maximum amount editing capabilities.
Similarly, you can send a letter to several recipients at the same time via yandex.ru mail.
Click on “Write” and then in the “To” window ( 1 ) insert the email of the first recipient, and then select the “Copy” function ( 2 ) or "Bcc" ( 3 ). Depending on whether you want all recipients of your letter to see all emails or preserve their right to confidentiality of addresses, select one of the functions. To add each next email to the list, you need to click on the button with the image of a man with a plus sign in front of it ( 4 ). Then you can select your regular recipients from the drop-down list or enter their emails manually.
Pictures can be downloaded from Yandex Disk and files can be attached as usual.
Click on the “Write” button, a window appears in which when you click with the mouse in the “To” window ( 1 ), a drop-down list appears with a list of your regular recipients ( 2 ). You can choose from this list what you need. Or just insert the desired email destination manually.
Instructions
Go to your mailbox and create a new one letter. Enter the first letter of the address, and you will see a list of recipients whose mailbox name begins with it. Select the desired email from them and click on it. The address will appear in the corresponding window and comma after him. Repeat the data entry for the remaining recipients in the same way. Add the subject of the message, the text of the letter itself and the necessary attachments. After you complete the registration, click the “send” button. Yours letter all owners of the listed will receive postal addresses. True, each of them will know that he is not the only recipient.
Take advantage of the address book features. Different mail services implement this service in their own way, but according to the same logic. At the end of the "to" line there is an icon representing an address book. Addresses to which you have already sent messages are automatically added to it. Click on the symbol to see the entire list. Check the boxes next to those you want to add as recipients of this letter. Click the "add selected" button. The marked addresses will appear in the “to” line.
Enter the required data manually. You will have to do this if you have not sent letters to these addresses before. Each of them must be separated by a comma and a space. For example: [email protected], postnam@mail, [email protected].
Please note that a maximum of 25 addresses can fit in the address bar. If you intend to send this message for a larger number of persons, use the “cc” and “bcc” fields.
Add recipients to the Bcc line if you want to prevent other recipients from knowing you're sending it. letter not only them. A line will appear if you click on the “show all fields” sentence or on the corresponding inscription above the “to” line. This method has a significant drawback: recipients may not receive your items. Robots postal systems, fighting spam, delete such letters.
Go to your mailbox settings and create letter template with a text that you want to send to many recipients. Now manually create for each address letter, enter the recipient and select a subject. You just need to enter it once, and then it will appear in the drop-down line. Attach the file if necessary and click "send". This method allows you to avoid spam filters and make it seem like you are writing to this person. At the same time, it minimizes the amount of manual work.
Take advantage special programs for mass mailing of letters. They allow you to send up to several hundred messages per minute and simplify all stages of writing letters as much as possible. Choose the program that suits you best and download it from one of the thematic sites.
Bulk mailing – the ability to send a letter immediately several recipients - especially useful when you need to send congratulations or invitations, or send out a press release. Many mail servers have this function, and to use it all you need is an Internet connection.
Instructions
To send a letter at the same time several addressees who are already in your contacts list, open your email (algorithm for sending letters several addressees identical in many email programs). Click on the “Write a letter” tab and fill in the fields to create a new message: its subject and the text itself.
Select the "Add" link or image notebook. Thus, you will download a list of your address book, in which you can check the boxes of those to whom you need to send a letter. Click on “Add” again or simply click on the free field.
A list of all entered addresses will appear in the “To” address line. Click on "Send" and users will receive your email. However, in addition to the letter, they will see the addresses of all other recipients in the “To” line.
If you want to hide from your recipients that you have used the bulk email feature, use one of two methods. After filling out the subject and body of the email, enter the recipient's name in the "To" cell, and then click on the "Bcc" link. An additional empty field will appear under the cell, in which select the desired recipients using the previous method. Click on “Submit” again. Your letter will be sent to all recipients, although this does not guarantee that it will be received. The robots of many mail systems consider such letters as spam and are often deleted.
To avoid your email getting caught in the spam filter, send messages via “Draft”. Enter the subject and text in the appropriate fields, and then click the “Save as Draft” link. Go to the "Draft" section on the left side of the page and click on the saved letter. You will see a letter template that does not include the recipient's address. Manually enter the desired email and click on “Submit”, then return to the “Draft” section and repeat the procedure for each new user.
Video on the topic
Sources:
- how to send a letter from a draft in 2017
It happens that you need to send several messages at once. This is usually how jokes, announcements and other information are distributed. There are special services and programs for this. They will send your messages in a jiffy.
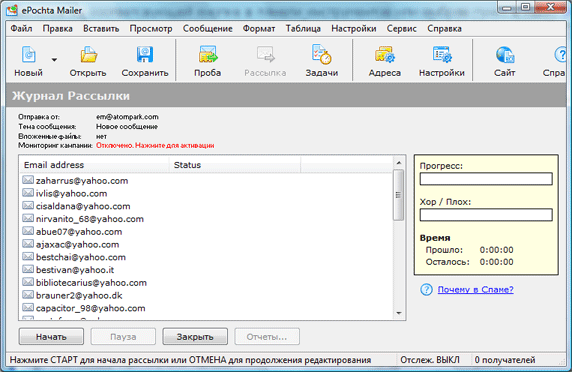
You will need
- - computer;
- - Internet;
- - ePochta Mailer 4.2 program
- - in addition, the ePochta Subscription Manager program
Instructions
For example, you can register on the website pistonposter.сom. This service works stable. Here you have the opportunity to create your own projects or blogs. Go to the "Projects" section. Enter your text that you plan to distribute. You can also find the Action option, under which there are several icons. Select a leaf image. The Send Message window will appear. Specify where and to whom your letters, and click the “Submit” button.
IN social network Vkontakte can also be sent to several at the same time messages. To do this, go to the “My Messages” section and click on the “Write a message” button. Enter the text you need and in the “Recipient” field select those of people to whom you want to send your letters.
In order to remove many unnecessary messages from a mailbox, the user needs to perform a number of actions. The initial action will be authorization user in the electronic system mail. To do this you need to open the main page your mailer, and then enter your username and password in the authorization form provided by the resource. After you fill out these fields, click on the “Login” button. So you will find yourself in personal account your mailbox.
After successfully logging in to the search engine, you need to do the following. Go to view your incoming messages. To do this, find the corresponding link on the page, and then click on it. You will be redirected to a page that will display all incoming letters . If you pay attention to decor, opposite the topic of each incoming message, you will be able to see empty cells.
By clicking on these cells, you will mark certain letters. If you need to mark all incoming messages on a page at once, you will see a separate box at the top. Check the box - all inboxes that you see on the page will be automatically marked.
Specify the “Delete” command in actions with incoming messages, after which, confirm the deletion of the corresponding team. You can delete from twenty to fifty emails at a time. You may have to repeat all the above steps more than once to completely delete all mail.
There are situations in life when we need to send letter By e-mail not immediately, but after a certain time. Some of mail servers, for example, Yandex, allow you to send letter automatically. How exactly to do this?

Instructions
Login to your mailbox at Yandex. To do this, enter in the field address bar your Internet browser www.yandex.ru. On home page of the site on the left side is located mail, enter your username and password to log in to your email.
A page with incoming letters will open in front of you. Just above the letters there is a “Write” button - click it.
Now write it yourself letter. First, indicate the mailbox address of the person you are talking to letter you send. Next, indicate the subject of the letter; it should reflect a summary of what you are writing. Finally, enter the text of the letter in the largest window. If you want to arrange your letter somehow in a special way, on the right click the “Apply” button letter" Clicking this button will open the text formatting panel. If you wish, you can check text check for spelling errors by clicking the “Check Spelling” button. If you need to attach any files to the email, click the “Attach Files” button, upload them from your computer and attach them to the email. You can also set one of the additional functions, for example, notification of receipt of a letter, SMS notification of the recipient of receipt of a letter, etc.
Now comes the fun part. When you have finished working with yourself letter m, you need to send it. So that it is sent to the recipient automatically, i.e. not immediately after you wrote it, but after a certain time, below the text of the letter, find the inscription “Send today to...”. Check the box next to it to activate it this function. Set the exact date and time of sending. By clicking on the icon with a question mark, you can read help for this function. Attention: sending a letter can be postponed for no more than one year from the current date. Once the entire process is complete, click on the “Submit” button.
E-mail in Russia is now very actively used in private correspondence. In Western Europe and North America, already a decade ago, this method began to be practiced not so much in private correspondence, but for the exchange of business information within various organizations. And since quite often it was necessary to send messages to several colleagues at the same time, email programs quickly received additional function, which simplifies the solution of this problem. Modern postal services inherited and developed the mechanism for sending messages to several recipients simultaneously.

You will need
- Mail program or access to a mail service
Instructions
If to send emails you are using an application installed on your operating system(For example, Microsoft Outlook or The Bat!), then run it and create a message that you want to send to multiple recipients.
List email addresses all recipients in the "To" field. Type them on one line, separated by a comma and a space. You can use a semicolon (;) instead of a comma. If all the addresses you need are in your address book mail client, then instead manual entry you can use it. Depending on the program you are using, this action can be organized in different ways - for example, in The Bat application, click on the icon on the right side of the “To” field, and then in the window that opens, drag all the necessary addresses from the left field to the right. Another option is to check the checkboxes of the desired list lines, and then click the right arrow button.