Hello admin! I have a router at home and to it wireless network Wi-Fi connected laptop with Windows 10, everything worked fine until yesterday, until a friend came to me with his laptop and also installed Windows 10. We decided to connect his laptop to the Wi-Fi wireless network of my router, entered the security key, but nothing happened, Win 10 installed on my friend's laptop began to display an error: "". I decided that all this was due to the data encryption specification of my wireless network - WPA2-PSK and changed it in the router settings to WPA-PSK, and left the encryption type AES, then saved the changed router settings, after that the Wi-Fi wireless network stopped see my laptop too, now it also gets the error "Cannot connect to this network".
What to do? On the Internet, it is advised to enter Network settings -->Managing Wi-Fi network settings-->Known Network Management, and forget the created Wi-Fi network, then reboot and reconnect to your Wi-Fi network. Unfortunately this doesn't help.
"Can't connect to this network" error in Windows 10
Hi friends! Let's get straight to the point, all the explanations in the course of the article, I'm sure it will be clearer.
If you connect your laptop to a wireless network WiFi router, the error is: "Cannot connect to this network",
This usually happens in two cases.
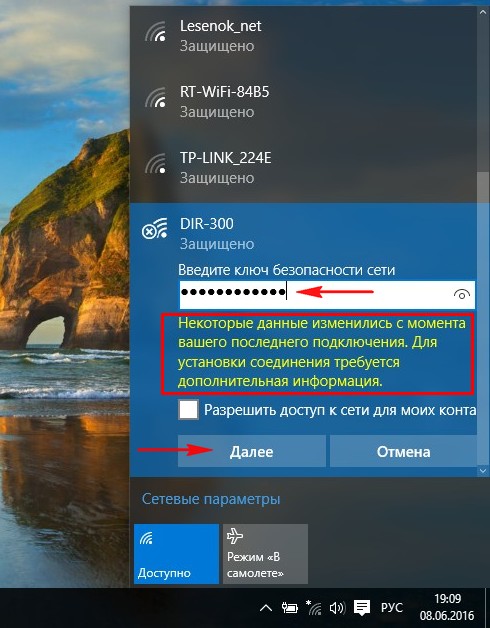
1. In the router settings, you changed WPA2-PSK) or you changed the network security key, and then, as if nothing had happened, decided to connect to the networkWi-Fi of your router.
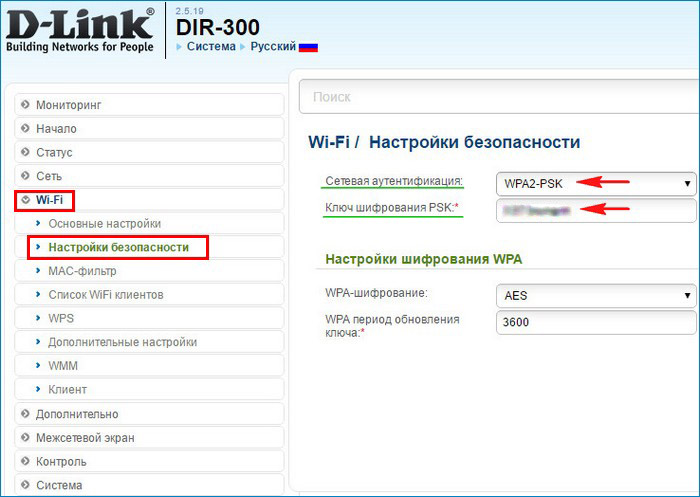
In this case, a message will definitely appear: “Some data has changed since your last connection. Additional information is required to establish a connection » . You will have to enter new key security, if you changed it, if you did not change it, then enter old key and press"Further ", the laptop will automatically seewireless network encryption specification (WPA-PSK or WPA2-PSK) and encryption type(in most cases AES) and then connect to Wi-Fi networks.
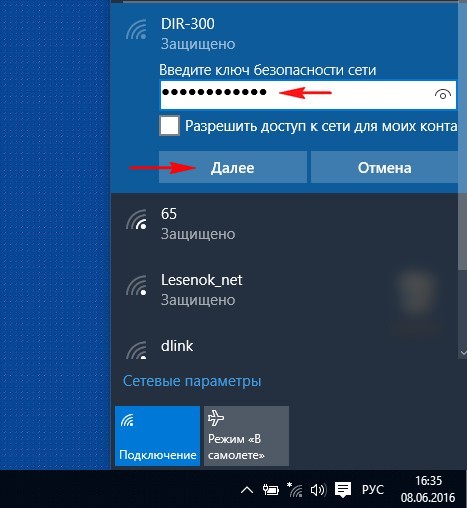
2. Or you came to visit someone with your laptop and wanted to connectto someone else's Wi-Fi network. In this case, you just need to enterthe security key that the hosts will tell you.
But it often happens that in all of the above cases, the laptop cannot automatically connect to the Wi-Fi network and the error “ Protected. Can't connect to this network”, the field for entering the security key does not appear! What to do then?

Friends, you just need to “forget” this network and then reconnect to it, almost always, when you connect to the network again, the laptop will automatically see another wireless network encryption specification (WPA-PSK, WPA2-PSK) and encryption type(AES), and then connect to a Wi-Fi network (you will need to enter the network security key). If that doesn't help, there is another way.
So first "forget" the network.
Click the left mouse button on the icon wireless connection in tray.

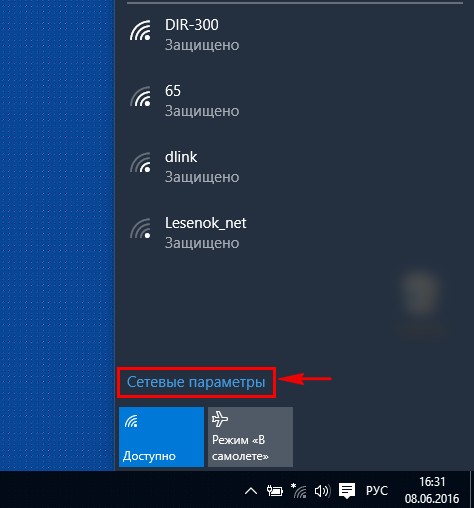
Click on the "Network Settings" button.
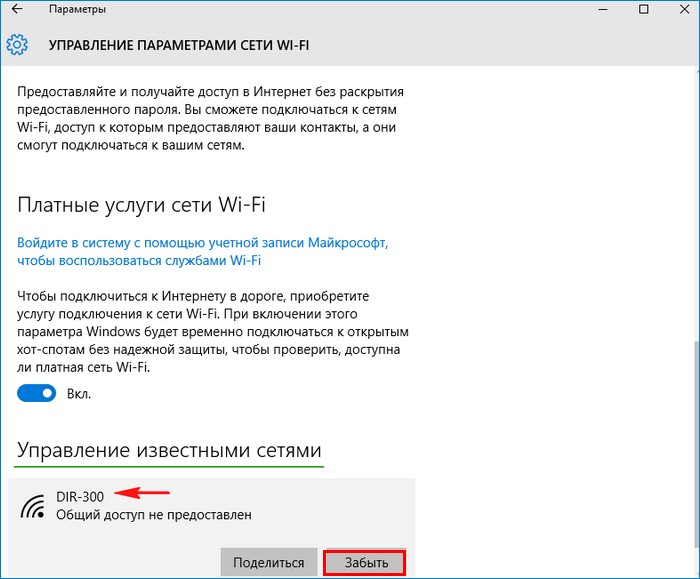
"Manage Wi-Fi network settings"
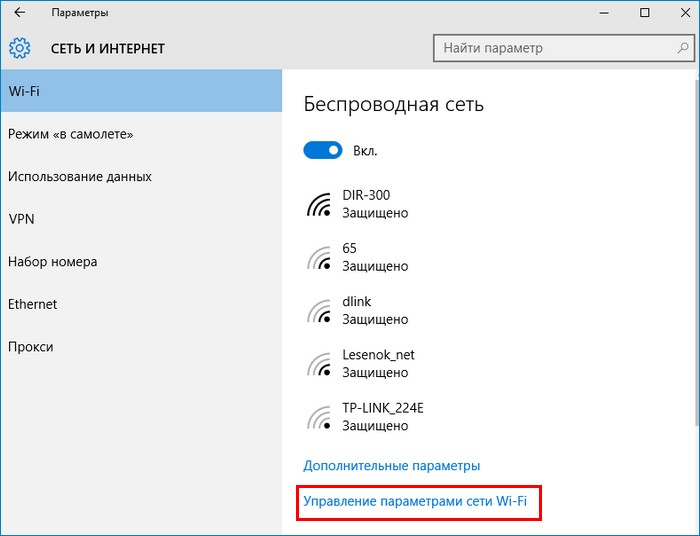
This window will contain a list of saved wireless networks. Left-click on the network, when connecting to which you get the error " Can't connect to this network” and click the “Forget” button, and the parameters of this network will be deleted.
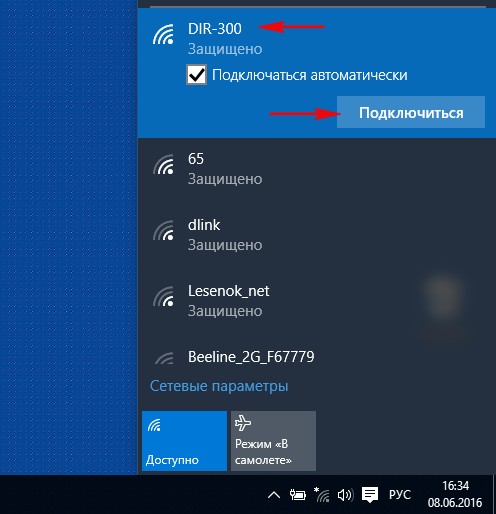
Now left-click on the wireless connection icon in the notification area.
Select our network and click "Connect".
Note: If your network is not in the list of networks Wi-Fi, then you need to restart the laptop.
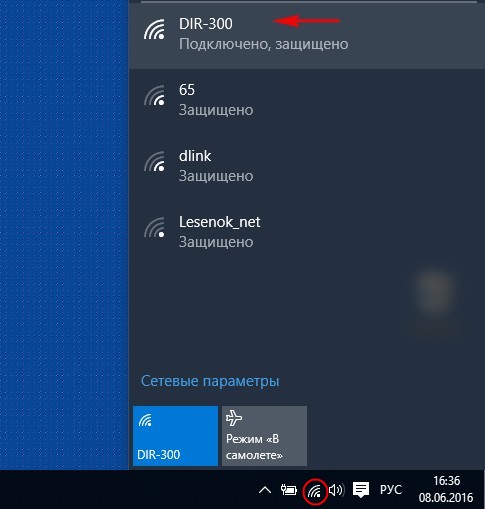
That's it, we're connected to our Wi-Fi network.
But such a favorable outcome does not always happen. It often happens that checking network requirements takes forever, and the wireless icon in the tray eloquently indicates that we don’t have the Internet now.
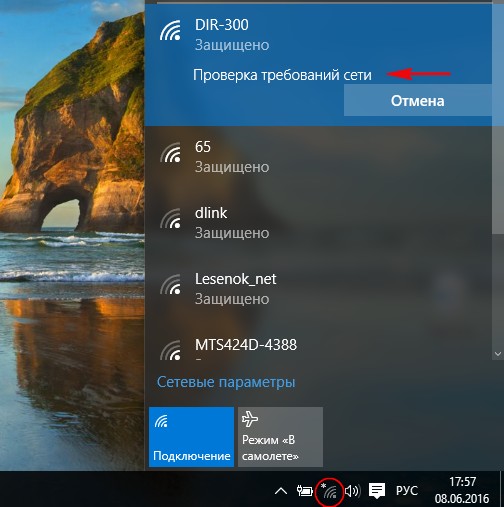
In this case, go to the Device Manager and expand the item "Network adapters", then click on our network adapter Wi-Fi and context menu choose" Delete".
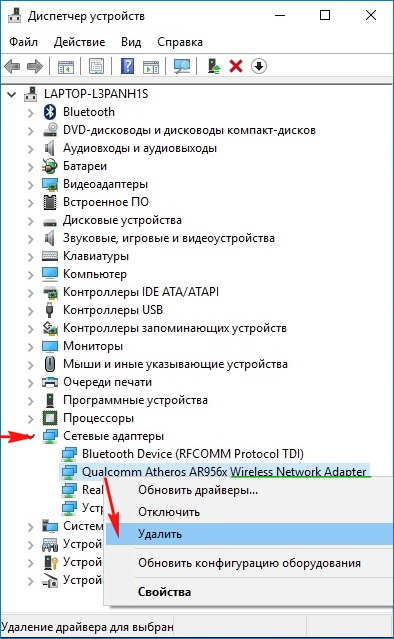
The Wi-Fi network adapter has been removed.
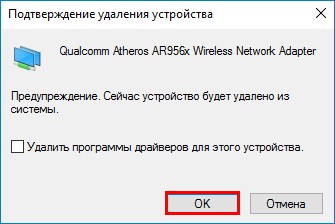
We reboot the laptop, the driver is automatically restored, then we calmly connect to our virtual network WiFi. If reinstalling the network wifi adapter does not help, then reset your router to factory settings, you can do this according to our articles from.
Whether you're using your iOS, Mac, or Windows device to connect to one of Apple's digital content stores, you may be plagued with "Unable to connect to iTunes Store' or 'Unable to connect to App Store". This can happen at any, even the most inconvenient moment when you are trying to use the App Store, the iBooks store, and even iTunes.
Can't connect to iTunes or the App Store on iOS: what to do
If you're having trouble connecting to the App Store, or any of Apple's other online digital content stores through any of your iOS devices, be it iPhone, iPod, or iPad. There may be many reasons why this is happening. Sometimes it could be a wireless network issue, a disconnected internet cable, or it could be because the drivers aren't up to date. You can follow the steps below to help resolve these issues.
Check date and time settings
If the date and time on the device is turned off, Apple digital content stores will definitely not like it. To check your date and time settings, you need to do the following:
Make sure you have the latest version of iOS installed
Another thing you can check is to make sure your iOS version updated. To do this, check for updates, this can be done by following the instructions below.
Make sure you have a good data connection
If you are using Wi-Fi, make sure you are connected to correct network Wi-Fi by going to "Settings" and opening the "Wi-Fi" item, as well as whether your signal is strong enough.
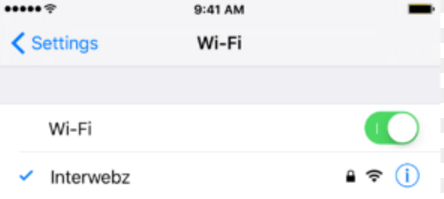 Checking wifi settings connections
 If you are using cellular communication, check if you have cellular data set up in Settings > Cellular and make sure your signal is strong enough for a decent network connection. You should use LTE if possible, as it usually has the best data rates.
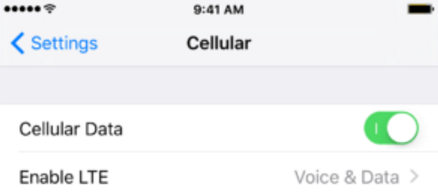 Enable the use of Cellular
 Disable active VPNs
If you are using a VPN that may be blocking Apple's Digital Content Stores, then you should disable the VPN immediately from Settings > VPN to see if you can connect or not. If everything works after you disable your VPN, then the VPN has been your problem all along.
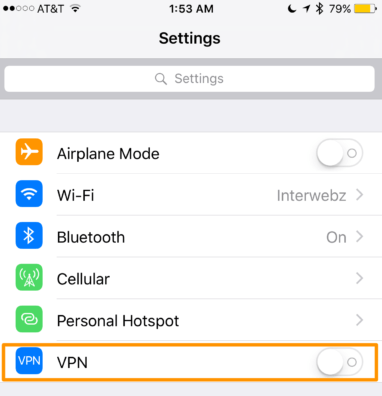 Turn off VPN
 Do other devices on the same network have the same problem?
You can check if the problem is only with your device or if the problem is with Apple servers by checking another iOS device or another Mac or PC to see if those computers are also having connection problems. If the problem is present on all devices, then it is most likely that the Apple servers are out of service, and you should try again later.
Make sure there are no problems with the router.
You should never rule out what's wrong with your wireless router may have problems. If you see endless error messages, you can also try resetting your router, and thus resetting your internet connection, and that might solve the problem.
Can't Connect to iTunes or App Store on Mac
As on iOS devices, you may experience similar connection issues when using the Mac App Store, iBooks Store, or iTunes Store. Here are a few steps you can take to fix connection issues on your Mac.
Make sure your software is up to date
The Apple OS X operating system uses two key applications to connect to the web, namely, online digital content stores - Safari and iTunes. If you are using an outdated version of these software products, Apple may block their connection to digital content stores, in terms of security.
You can make sure both are up to date by launching the Mac App Store and clicking the Updates tab, then install updates if necessary.
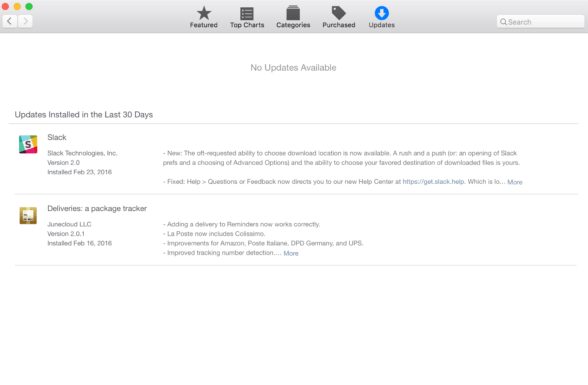 Go to the "Updates" tab
 Make sure your firewall isn't blocking Apple Digital Content Stores
Mac users have access to firewall settings, but only for incoming connections. third party software a firewall such as LittleSnitch will allow you to block outgoing connections. Make sure your incoming and outgoing connections allow you to use the Mac App Store, iBooks, and iTunes.
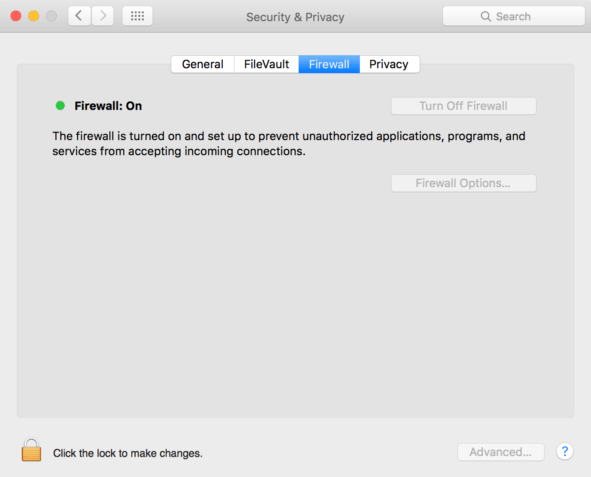
To check for OS X firewall incoming connections, you can launch the System preferences app from the Menu Bar, then click on the Security & Privacy panel and open the Firewall tab. Here you can unlock the firewall settings and click the "Firewall Options" button to configure the allowed and blocked options.
 Unblock firewall settings
 Make sure VPNs aren't blocking access
As with iOS, you can check to see if your Mac is connected to a VPN that might be restricting access. Generally, VPN software is accessed from the menu bar when it is in use.
 Check if Mac is connected to VPN
 Reset your router or modem
Because Mac computers can use wireless or wired connection to the internet, you can try resetting your wireless or wired router, this may fix the problem.
Sometimes, problems with the router can be the cause of iTunes Store and App Store connection errors.
Check Apple Server Status
To find out if the issue is with Apple servers and not Macs, visit the System Status web page and it will alert you to any malfunctioning Apple systems. If all items are marked green, then the problem is most likely related to your computer, and not to the servers.
Can't connect to iTunes or the App Store on Windows
If you're having trouble connecting to the iTunes Store on your Windows PC, you can follow some of the steps below and hopefully this will solve your problem:
Make sure iTunes is up to date
Since Apple is quite strict about updating software in a timely manner, the problem may be due to an unsupported version of iTunes. Make sure your computer has latest version iTunes.
Check network settings
Your network connection may be causing you to be unable to connect. Try to make sure you're connected to the correct Wi-Fi network, or check if your router is working. You can reset your router if necessary.
Make sure proxy or VPN is not giving you problems
As mentioned in the iOS and Mac troubleshooting steps above, VPN servers and proxy servers can cause connection issues with certain servers. Try disabling them and try connecting to the iTunes Store again.
Check your antivirus software
Some antivirus software may flag iTunes as a third-party unsafe program and may block its Internet access privileges. Since antivirus software is a common sight on Windows, this is a great place to check.
Check Apple Server Status
Just like Mac users, Windows users can visit the Apple Server Status web page to see if any of its services are disabled during a connection attempt.
iTunes and App Store connection errors can occur at the most awkward moment when you are trying to download a new game or update an application, it is always a pain and anguish. Fortunately, and this problem is completely solvable, there are many ways to find the cause of its occurrence and effectively eliminate it.
If you can access websites, continue to the next step.
Step 2: Make sure your computer is connected to the Internet.
In Windows XP, click Start, select an item Run, enter the command ncpa.cpl and press the key ENTER.
Start, select field To start searching, enter the command ncpa.cpl and press the key ENTER.
In Windows 7, click Start, select field Find programs and files, enter the command ncpa.cpl and press the key ENTER.
Click right click click on the connection name and select State.
If the computer is connected, in Windows XP the connection status will be displayed as Connected, Included, or Authentication completed successfully. AT Windows Vista and Windows 7 state IPv4 will be displayed as Internet.
If the computer status does not indicate a connection, right-click the connection and select To plug, allow, Authenticate or To correct.
Step 3: Restart your computer.
close everything open programs and restart your computer.
Step 4: If you still cannot connect to the Internet, check your connections.
If you are using a dial-up connection, check the connection of the telephone cord to the jack and the modem.
If you are using a cable modem, check the cable connection to the modem and the connection between the modem and the computer.
If you are using a cable modem or DSL router, check the connections to the router and computer. Try disconnecting and turning off your router and modem. Wait a few minutes, then connect your modem first, wait one minute, then connect your router and restart your computer.
Step 5: Use the Windows Network Diagnostic Tool
For computers running Windows Vista and Windows 7
In Windows Vista, click Start, select field To start searching, enter the command ncpa.cpl and press the key ENTER.
In Windows 7, click Start, select field Find programs and files, enter the command ncpa.cpl and press the key ENTER.
Right click network connection which you want your computer to use to connect to the Internet, select Diagnostics and follow the instructions on the screen.
If you are using a cable modem or DSL router, check the connections to the router and computer.
Try disconnecting and turning off your router and modem. Wait a few minutes, then connect your modem first, wait one minute, then connect your router and restart your computer.
For computers running Windows XP
In the window Control Panel select component , then click Network Diagnostics.
If item Network and Internet connections not displayed on Control panels, press the button Start, and then select Help & Support. On the page Help and Support Center In chapter Job selection select item Using utilities to view information about your computer and diagnose problems. In the left column of the Utilities page, select Network Diagnostics.
Step 6: If you still can't connect to the Internet, contact your Internet service provider or company that provides Internet access
Article, I promised to talk about how to get rid of a similar error in operating system Windows 8, or Windows 8.1. The error “The network settings saved on this computer do not match the requirements of this network”, which appears on Windows 7, looks and sounds a little different on Windows 8. It sounds like this: “Cannot connect to this network”, but it looks like this:
Since the error itself and its solution are different, I decided to write a separate article for Windows 8. In which I will tell and show how to get rid of the error “Cannot connect to this network”, which appears when trying to connect to Wi-Fi, or when connecting automatically.
Of course I don't know everyone. possible causes where this problem occurs (probably even the Windows developers themselves don’t know them 🙂), but I know one reason for sure. And it's the same as on Windows 7.
As a rule, this error appears after changing the settings of a wireless network to which the computer was already connected. Now I will explain a little more so that you understand what the problem is. We have a computer that runs on the operating Windows system 8, or 8.1. He is connected to some WiFi networks and works successfully (of course, if there is no) . And the next time you turn on the computer, you see the inscription “Checking network requirements” and then the error Cannot connect to this network.
Most likely, someone or you yourself changed the wireless network settings on the router. Password, encryption type, security, etc. The settings for this Wi-Fi network that were saved on the computer simply do not match those on the router. Here is the error.
Solution: Can't connect to this network
You just need to forget this network and re-establish the connection. In Windows 8, this is very easy.
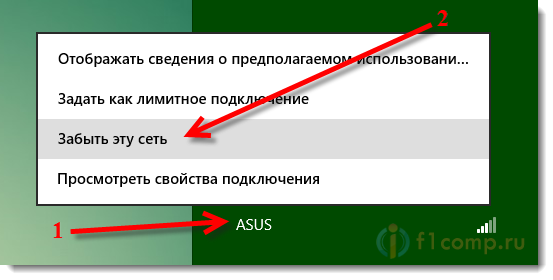
Click on the network icon in the notification bar. A panel will open on the right, on which right-click on the network to which the eight does not want to connect. Select an item “Forget this network”.
 Reopening the list available networks, click on our network and select connect.
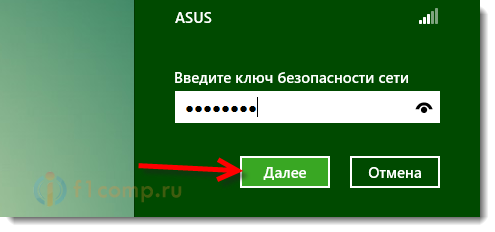
 Specify the network password and click Further. If you have changed your password, you must enter a new one. If you changed your password and forgot it, then try. Or make sure your password is correct.
 Everything is working. Status Connected, no error.
If something does not work, write in the comments, I will try to help. If you know other solutions (or reasons) for this problem, you can share in the comments, we will be grateful!