Viewing previously entered Apple ID information and changing it is quite simple, and the process itself does not entail any unnecessary movements on your part. All you need to know is this mailing address- aka account ID and password.
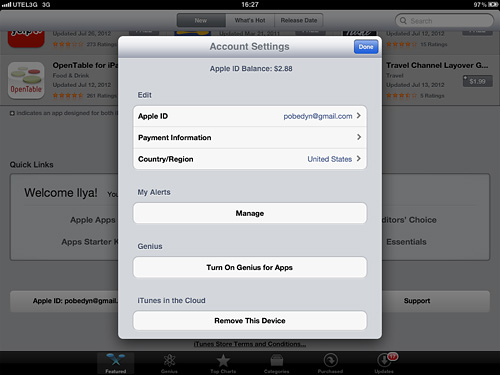
To view information about your Apple ID, you need to open either iTunes app on iPad or AppStore. IN open program We go down to the very bottom and see the Apple ID button: [email protected]. By clicking on it, the application will ask what actions we will carry out with the account. In our case, we are interested in viewing it, so we click View Apple ID. After entering the password, the application kindly allows us to access the profile.

Here you can change your Apple ID information and almost everything that was entered during registration. So, you can specify additional email address, passwords and security questions. Or, you can change one of these parameters. You can also change your payment information by selecting all system options. In addition, in this window you can change the settings for your country.
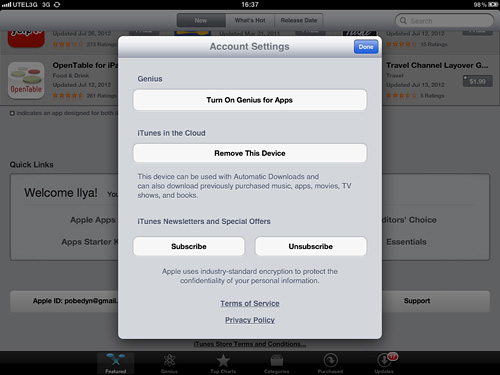
Here we can subscribe or unsubscribe to advertising letters from Apple, in which the company will notify you about the latest news and the availability of unique promotions. In addition, you can separately enable Genius for applications: according to your download history, Genius will generate a list of applications that is interesting to you. By the way, Genius works just fine, and gives reasons for each choice: having selected an application, it is shown which of your applications the choice was made on.
When changing settings, you should still remember Apple's desire to make your account as safe as possible. Therefore, if you change your password, do not forget that the new password must contain at least one capital letter and number.
There are actually plenty of users who have been using an iPad 2 or other tablet for months, but don’t know what an ID is. They are unaware that they are depriving themselves of many functions. Moreover, they paid a lot of money for this by purchasing a tablet. If you are one of these users, be sure to study this material to the end. Today we’ll talk about how to replace the ID on an iPad and reveal many of the secrets of this process.
Let's try to understand the reason for this misunderstanding. In fact, in most cases, simple laziness is to blame. The user simply does not want to figure out how this is done. So it turns out that when purchasing a device, the user gives the right to some person from the store to enter their symbols when registering an account. This information is usually not provided to the legal owner of the gadget. The result is the presence of a device on which it is impossible to install new software or erase the old one.
How can I correct the situation and create an account? Read detailed instructions Further.
Register ID number
To customize the tablet to your needs, you will have to register. To do this, follow 3 simple steps:
1 Register ID number (new). Let us remind you once again that this step is of strategic importance for the settings new iPad. This is easy to do. All you have to do is go to the Apple company’s online resource and fill out the required form. If you already have an account, proceed directly to the second step. 2 Enter the characters of the ID number for cloud services. In the tablet settings there are at least 2 fields where you need to enter this data. The first is the “cloud” section. If you went there, but saw an account that was not yours, then it’s time to make a call to the former owner of your device. This is the only way you will find out the password. Without these symbols, you will not be able to log out of your account. As soon as you find out the password, scroll to the very bottom of the display and click on the exit element. After that, follow the steps to log into the cloud. 3 Enter the ID symbols - numbers for stores from Apple and iTunes. This is also done through the settings. The entire procedure is identical to the first step - no passwords are required. Click on your account and select exit from the pop-up window. Then enter your account information into the appropriate sections and confirm your login.What will you get as a result? Full access to the “cloud”, where you can store files with a total volume of up to 5 GB, and other services. iCloud provides the ability to create a backup on Apple servers and exchange contacts, notes and other types of information with all your Apple gadgets. Agree, this is very convenient.
In addition, the option to search for a tablet will also become available. Be sure to activate it. If you suddenly lose your device or it is stolen from you, you can install the block on the gadget remotely. It will also be possible to erase all data from the device’s memory or discover where it is currently located.
What did you get as a result? In the tablet settings, account information and ID numbers were indicated that must be used when purchasing software. Now all purchased programs will be linked to this number. Moreover, this applies to both free and paid software.
Let's say you purchased a paid program, then deleted it, and now you want to download it again. You can do this in no time, and you don’t need to pay anything again.
Removing work ID number
Very rarely do users resort to this step. But nevertheless, sometimes such a measure is necessary. For example, when selling your device. Therefore, we will analyze step by step how to perform this procedure. And it is done in four different ways.
Removal via support
This method is the only one that allows you to delete an element permanently, without hope of recovery. Other methods only slow down the action, but do not delete the account. Although the result for the user is almost the same in all cases. So it's up to you to decide.
So, for final removal, follow this algorithm:
- Go to the Apple resource online, contact support.
- Enter the required information into the pop-up form. Write a request to English language. If you don’t know him, use an automatic translator. Usually this happens, the main thing is that the meaning is clear.
- Send a message by clicking on the appropriate button.
After some time (up to a month), a message from the service will be sent to your e-mail technical support. It will contain a link to erase your account. You need to go through it and delete your account. It will no longer be possible to create a new account using this e-mail in the future.
Changing e-mail on the ID number management page
To get almost the same result as with the previous method, try to “freeze” the ID number by changing the e-mail. This is done through sequential execution of the following steps:
- Go to the Apple resource on the network.
- Entering Apple ID into the search bar.
- Click on the control point.
- Opening an account (all information about the name, main and alternative addresses will be provided here in case you lose your account).
- Change of current e-mail. For example, you can add several numbers between letters. The three circles that pop up during changes should be green.
- Saving changes.
From this moment on, the ID number becomes tied to a new address, which, in principle, does not exist. The old e-mail can be successfully used to create a new account. As you can see. Everything is simple and takes no more than 5 minutes.

How to Remove an ID Using iTunes
This method is also similar to the previous one, but there are still some differences. The steps this time will be as follows:
- Opening the program iTunes Store and go to your account.
- Selecting information about her. All the necessary information will pop up. Various changes can be made according to the objectives.
- If the user’s plans include using the current e-mail without deleting the account or creating a new one, but with the same data, you should simply change the current address to another. But it must exist in reality, otherwise nothing will work.
In addition, in the settings you can delete devices linked to your account. Either all at the same time, or each separately. To do this, in the details section you need to click on the item to deauthorize all content. Or click on the delete option next to the name of the gadget for which we want to unbind.
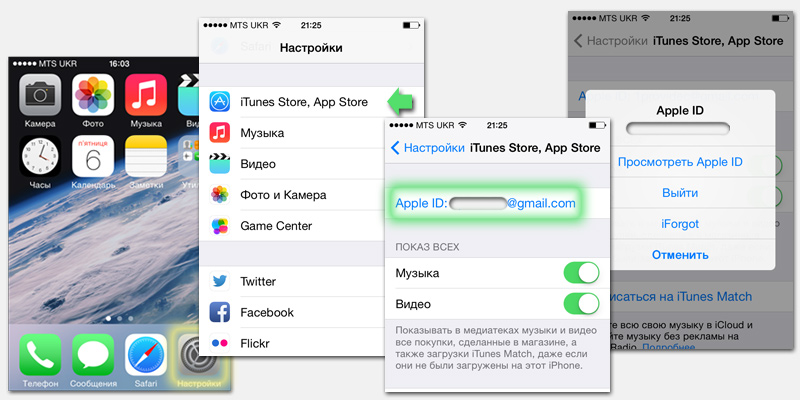
How to remove an ID number directly from your gadget
The method allows you to quickly erase the ID number from any tablet and more. You can safely use it for iPhones and other Apple products. After completing all the steps, the device will be in new condition.
So, follow these steps:
- Go to settings on your home screen.
- Select "iTunes Store" App Store».
- Click on the button with the ID number.
- Among other inscriptions, select the exit.
Now you know how to change Apple ID on your iPad, and in more than one way. On any iPad model, you can change these characters or remove them if necessary. Moreover, deleting an ID, as you can see, is even easier than changing it. Removal is required when the tablet actually has two users. That is, when the user purchased not new device, on which the previous owner did not erase the ID. Then you will need to delete the symbols and create your own account. The simultaneous existence of two accounts on one Apple device is impossible.
If you find an error, please highlight a piece of text and click Ctrl+Enter.
Changing ID in the App Store
As a rule, the user specifies a valid email address to which he has access as an identifier. The change is possible to any other email address, except the one to which another Apple ID is already registered.
To change the identifier, exit the store and all other services that use the current identifier. Now go to the following address: appleid.apple.com. On the right is a blue “Manage Apple ID” button. Click on it and see the login form. We authorize and look for the “Apple ID and main e-mail” option. Click “Change” and enter the email address that we would like to use as an identifier in the future. We save the changes and wait for an email from the support service. To confirm, follow the link in the body of this letter. Now go to appleid.apple.com again and try to log in with a new identifier. All that remains is to update the information for all other Apple services that will use it.
So, we found out how to change the ID in the App Store. In fact, everything is quite simple, the main thing is to be extremely careful.
How to change ID and log into the App Store under a different account
To change the identifier to another one that has already been created, you can use the device itself. Go to the store application through the settings of your smartphone, tablet or player and click on your ID. You may need to re-authorize. Now click “Exit” and go to the App Store again through the settings. Enter another ID and password, and then click the login button. So, we logged in with a different account.
By the way, you can create a new ID from here, through the store menu on your device. In this case, we will be interested in the “Create a new Apple ID” item. As already mentioned, the new e-mail address used should not have previously been used as an identifier.