It seems that I installed the latest Windows and after all, about the expediency of innovation, I will have to do something after Windows installation 10!
Yes, you have to, but how could it be without it!
Probably not so hard to guess that we start with installing drivers.
This is not even discussed, the need arose, we install it! But the need arose, you new Windows! Installing drivers, this is very important even after installing Windows 10, I advise an integrated approach with the Driver Pac Solution program.
How to work with her?
Yes, it's simple, just run the program once and automatic mode she will pick up required drivers for your computer. Note that there is online version Driver Pac Solution, interestingly, the online version installs everything it sees fit.
What does it mean?
In addition to the drivers, you will be prompted to install software, which is already included in the assembly. And this means that in the online version, installation occurs by default, and in software product you can specify options.
And so, we downloaded the program (https://drp.su/download.htm), then run it as administrator Driver program Pack solution.
1. The driver installation dashboard will appear.
2. Information will be collected automatically
3. The program will prompt you to install and update the drivers.
4. Click, Update all or Install and update.
After these steps, start the installation with the button, Start installation.
It seems everything, but for the changes to take effect, we restart the computer, or restart when it suits you, but until you restart, the drivers will not be updated.
It looks like you've done one thing, what's next?
But there is another danger, this is your blog! Again, protecting your computer is a guarantee that your wordpress blog will be protected from hacks and malware.
And what is it, the blog is on the server! Like a different garden, although mine. Everything is very simple. If your computer is infected with viruses, trojans and similar evil spirits, then through an FTP connection they can get straight to your blog.
We read about it and do it.
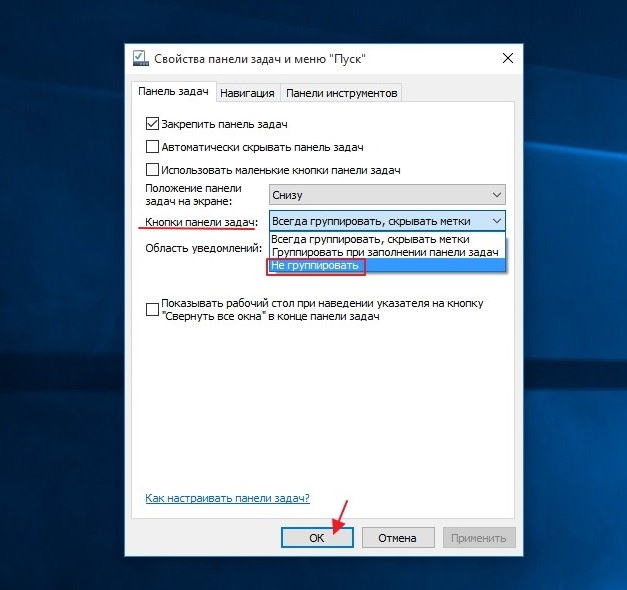
Let's start by going to… Taskbar properties and menu Start.
Choose a section... Taskbar buttons, put ... Do not group and press OK. This is done for easier navigation in the taskbar. After that running programs or open folders will not be grouped.
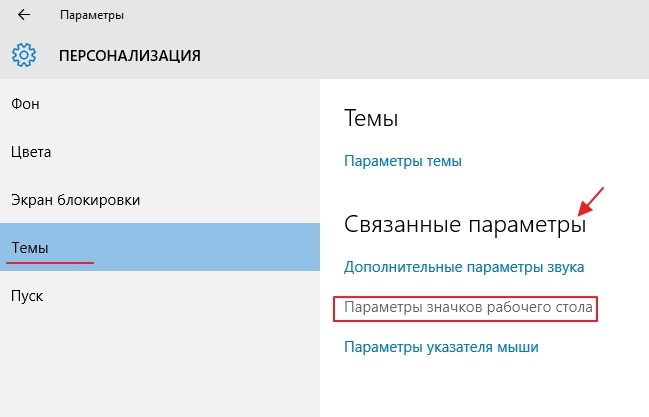
 Let's go to the section... Personalization. More tab... Themes and in the related parameters, click on the tab ... Desktop icon options.
 Check the boxes as shown in the figure below and click OK. And oh you miracle, desktop icons appeared on the desktop. 🙂
![]() Then you can go to the Control Panel, and there we select the category section and ... Large icons or small icons. It's up to you.
Then you can go to the Control Panel, and there we select the category section and ... Large icons or small icons. It's up to you.
Entering the section... Power supply and click on... Display off setting. In the power management settings tab... Turn off the display, choose the mode to your liking and needs, but I advise you to click on ... Never and of course save the changes.
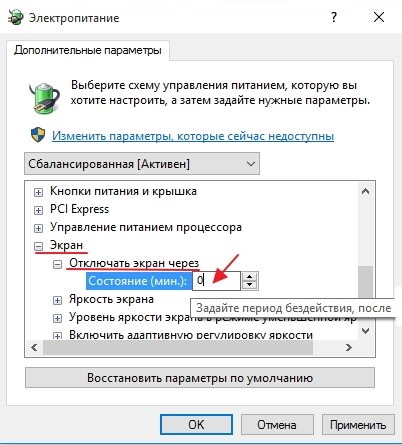
 Let's go to the section... Screen… turn off screen through… State(min). Set the value to zero or whatever you prefer. But I advise you to put zero.
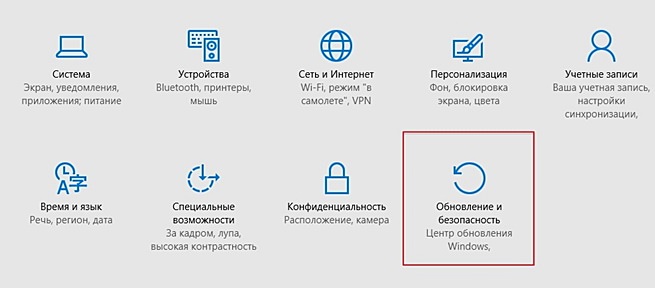
 Looks like these little things are done. What's next? But what, we return to the desktop and again enter the bookmark ... Personalization and boldly enter... Settings. In the settings, select the section ... Update and security.
 In the center windows updates go to tab... Extra options, marked with a red box in the figure above and after entering, press Extra options
. We put a solid checkmark in front of ... Postpone updates.
In the center windows updates go to tab... Extra options, marked with a red box in the figure above and after entering, press Extra options
. We put a solid checkmark in front of ... Postpone updates.
 So the People, Friends, and Colleagues on computers and sitting on the wordpress needle, I perform such actions on my computer every time I switch to new version Windows or reinstall. And I advise you so!
Anyway, I will give you advice about one very good program called IObit Uninstaller which removes other programs, it is completely free. It might even come in handy. (http://ru.iobit.com/advanceduninstaller/)
Good luck Friends!
The new "OS" called Windows 10, as you know, is available on the official Microsoft resource as a means of updating an existing system to the tenth version. But the so-called "clean" installation with the initial partition formatting is not provided at all. In other words, just putting the "top ten" on a computer or laptop will not work. Let's see what a clean installation of Windows 10 after the upgrade is, since it is the system upgrade that is the main condition from scratch.
Windows 10 installation options
Before proceeding to the technical issue of installing this OS, you should consider installation options. IN this case it is believed that the "top ten" can be installed after the update Windows versions 7 and 8 (meaning the update packages for the systems themselves), you can install the "top ten" again after the old system has been updated to version 10 directly on the running system, or you can reinstall from scratch if for some reason "Windows" 10 does not boot in terms of an incorrectly occurring installation process.
Now the second two options will be considered, since the installation of the “tens” does not present any particular difficulties. It is important to remember that in any case you will need a flash drive or a disk with a recorded distribution!
Why you may need to reinstall Windows 10
Many users may have a logical question: why reinstall the "top ten" if it already works? The point is that at regular update Windows 10 inherits all the flaws of the previous system, does not fix bugs system registry, does not remove computer junk, many programs. For example, programs or device drivers installed to the G8 simply refuse to work, etc.

There are a lot of reasons why installing Windows 10 after updating (updating) the "seven" and "eight" does not suit the user. In terms of installing a clean system from scratch, Windows 10 itself looks more preferable, however, like any newly installed system. It is clear, after all, that immediately after installation, complete order reigns in the system, and it, as they say, “flies”. Freezing and braking begin much later, after contamination of the "OS" unnecessary programs who often work in background, their incorrect deletion, when a bunch of garbage remains, when a huge number of duplicate files appear on the hard drive, etc.
Clean install of Windows 10 after update: revert to original state
So, for starters, consider the option when the "ten" has already changed the old system, borrowing from it all the parameters and settings. First we need to use the Reset Computer to initial state.
You can do this in the simplest way in a directly functioning OS. To do this, use the settings section located in the Start menu, where the recovery option is selected in the Update and Security section (on the left in the panel). On the left of the screen there is a line for returning the terminal to its original state, and below it is the “Start” button, which you need to use.
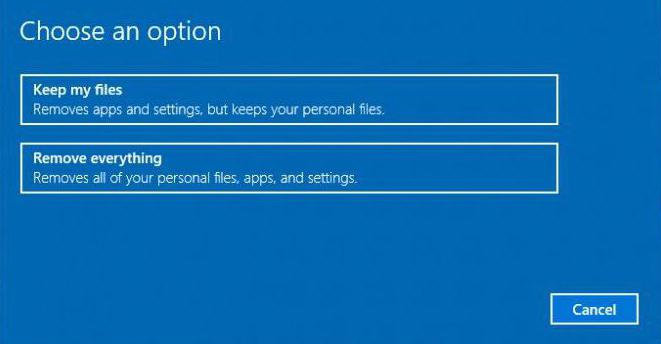
Further, if we are wondering how to perform a clean installation of Windows 10, note that it is clean, in the next window you must select complete removal everything that is on the hard drive, but if desired, some important information can be saved (selection of the first line). However, in this case, we will proceed from the fact that we do not need files or programs.
A list of programs to be cleaned now appears. Click the "Next" button, and in the new window - the "Reset" button. This is followed by a reboot of the computer terminal or laptop, and then the so-called clean installation of Windows 10 after the update is automatically activated. But it's too early to rejoice. It also happens that there may be problems with the return (more on that later), and the question of how to activate Windows 10 after a clean installation deserves special attention. This stage must be approached with particular responsibility.
Activation after update
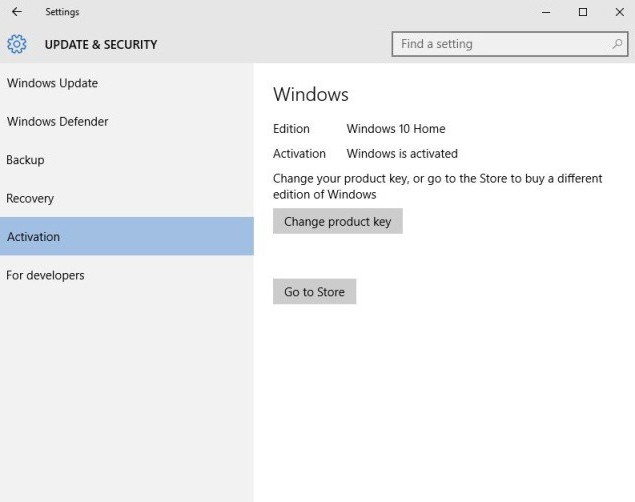
At the end of the installation process, you will need to log into your account (this is natural). Next, we call the computer properties menu (the icon on the "Desktop") and look at the description. As you can see, the product is not activated. So a natural question arises: how to activate Windows 10 after a clean installation? But after the update, the system wrote that everything was in order with the activation.

That is why, before re-installing the system, you should first download a small utility called ProduKey in advance (until the return to its original state has been made). When launched, it will show all Microsoft keys, including the Windows activator. It needs to be written down.
Using the old key
Now, in a clean system, in the details window, look for the activation line, and then click the change product key button.
Enter your key and confirm activation. But not everything is so simple when you need to solve the problem, 10 after the update, if the above method did not work and errors occurred.
If Windows 10 won't boot
As is already clear, in some cases the system may issue a warning that some problems have occurred. How to perform a clean install of Windows 10 in this case?
To begin with, we boot from a disk or flash drive containing the distribution package recorded from the image. At the first stage, as usual, a window for setting the primary parameters (language, date format, money, keyboard layouts) appears, after which we proceed directly to the installation, but only here we select system recovery.

Next, from the proposed actions, select diagnostics. Then - the return of the computer to its original state, and then - the removal of everything that is. Ultimately, an OS selection window will appear, where Windows 10 will be listed.
In the next step, it is best to select the line to clean only the disk on which the system is installed, and then use a simple file deletion. Now we confirm the start of the return process.
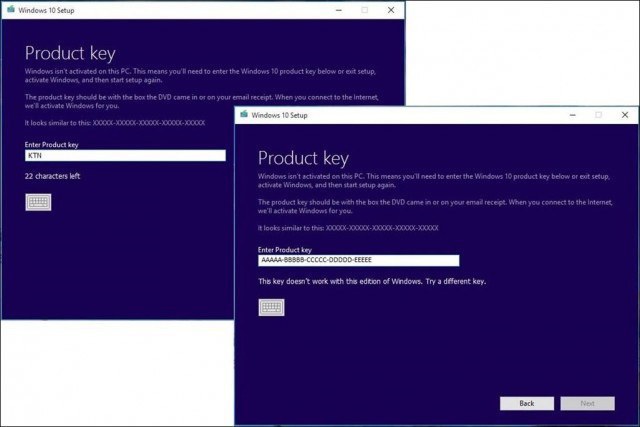
After rebooting (perhaps several times), when the restore process is completed, a welcome message will be displayed, and then a prompt to enter the product key. There is one point here. The fact is that the product key, according to Microsoft, is sent to a user who has an "account" who downloaded the system image from the official site. You can also enter it (if available). In this case, the prompt for entering the key will appear twice. But, in principle, this action can be skipped (postponed) and use the method described above for already completely installed system. Next, you must agree to the legal issues and use the default settings for installation and configuration. If necessary, to enter the system, you need to enter your username and password, which were registered with Microsoft.
Instead of an afterword
It is hoped that now it will become clear to many what a clean installation of Windows 10 after the upgrade is. If you look, there is nothing particularly complicated here. True, there may be problems with activation keys, but you can either get them officially from Microsoft, as the developers themselves say, or use a lot of keys from world wide web, but no one can give a guarantee that such a password will work. So it's better to use the official code, especially since it is "attached" not only to account user, but also to the ID of the computer or laptop. And in the world, if someone does not know, two identical identifiers (ID) do not exist at all.
You have installed Windows 10 and are looking forward to trying it out new system clicked on reload. It is interesting to find out how much space the new OS takes, what programs it offers by default, what advanced system configuration is capable of.
The start screens changed each other, but Windows does not start and does not work. Instead of a desktop, you see or something similar. Thus, after installing Windows 10, you received some kind of global error that prevents the system from starting correctly.
What is the reason
If the newest operating system doesn't work for that. Among them:
- incorrect operation of hardware drivers (often video cards, less often other components);
- damage system files(in case of updating Windows from an old version);
- program conflict (also when updating).
By the way: this can happen due to the connected second monitor (in this case, the image simply does not work). Therefore, if this is your case, turn off the second display and reboot. May I help.
If there is only one monitor and the system is not working, the first thing to take care of is to try to start the freshly installed OS in safe mode. From there it will become possible customization Windows settings.
But first, some experts recommend checking if the problem is the result of a malfunctioning video card driver. In this case, the system starts up, just does not display the picture on the display. And since it is fully functional, you can load the desktop and do some manipulations blindly.
Worth trying to reboot. This can also be done “barbarically” - by clicking on a button, but it’s better to do the following, carefully monitoring which keys you press:
- Click on Backspace a few times.
- Enter the password to log in to the system (you may need to switch the layout - the key combination Win (with the Windows logo) + Space should work).
- Wait a minute or two (for the OS to boot to 100% if it starts at all).
- Press Win+R to launch Command Prompt.
- Without touching the mouse, type the command shutdown / r from the keyboard and press Enter.
- Wait 10 seconds and press Enter again.
If the problem was really the video driver, the computer will restart and you will see a working screen (probably). In such cases, the cause is a conflict with the so-called fast Windows startup 10 and the only way to avoid repeating the error is to disable it, replacing it with a normal startup and full shutdown of the PC.
If nothing happens when doing the above manipulations, you can take a chance and turn off the PC by holding down the power button. If the image appears during the restart, do not delay for later, launch the control panel: there you will find the settings for the actions of the power buttons (in the “Power Options” section).
How to Start Windows in Safe Mode
Safe mode is called so because in it the system loads only programs from Microsoft itself and nothing else. By starting the system in safe mode, you can remove the “wrong” video driver or other program that you think may be causing the operating system to start up conflicts.
It's good if Windows 10 greets you with a visual error message, and not just a black screen. In the first case, you can enable safe mode visually, and in the second, again you have to act blindly. You need to know the exact places of all buttons and inscriptions in order to navigate with arrows and how many times to press the "Enter" key.
And maybe you have? Then the task is simplified and the system startup setup becomes closer. Boot from the media and on the start screen of the installation, hold down the key combination Shift + F10.
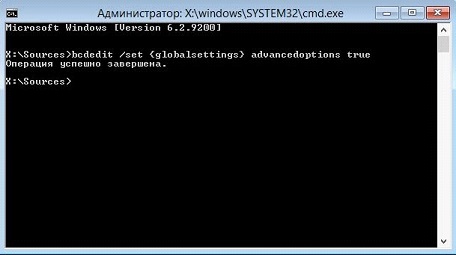
will start. Use the bcdedit /set (globalsettings) advancedoptions true command.
Reboot. The entrance to will be available by pressing the “4” or “F4” key. Command: bcdedit /deletevalue (globalsettings) advancedoptions - cancels the changes made earlier (additional boot options will not appear at system startup).
This setup is not so easy if you do not have bootable media, and the picture on the screen for some unknown reason does not work yet. Do it step by step (the places of settings and lines, in theory, are always the same - only the last steps differ):
- After booting up the system with a black screen, press Backspace several times.
- Now press Tab 5 times and Enter 1 time.
- Click the up arrow.
- Hold down Shift and click
- Wait at least a minute.
- Click the down arrow 3 times and press Enter 1 time.
- Press the down arrow 2 times and Enter 1 time.
- Click the left arrow 2 times.
- 1 down (if you have BIOS) or 2 times down if you have UEFI and Enter.
It will reboot and this time you should see alternative boot options. Since normal boot does not work for you, use safe mode with networking. In it, you will have access to the Internet and you can try various variations of fixing problems with loading fresh Windows.