Computer in operating room Windows system- a complex and complex system, like a single organism. Installation Windows devices - difficult process. Each component must be combined and become familiar with the computer hardware using special software called a driver. Without this, the equipment and computer simply will not be found mutual language and will not be able to work together. This article describes how to install components using standard Microsoft tools.
These are devices that connect to the hardware expansion bus, for example, video cards, network cards or hard drives. This installation requires manipulation internal components computer, so it is recommended that someone with experience, although usually not difficult. If we do this ourselves, we must follow the hardware manufacturer's instructions step by step in terms of safety and handling of components, of course this will need to be done with the hardware turned off.
This technology is to transfer the entire responsibility to the operating system, that is, the operating system is responsible for detecting a new device and installing the appropriate drivers so that its performance is optimal, it is also responsible for detecting if we remove any device, in this case sometimes remove the drivers .
When installing Windows devices It should be remembered that all equipment is divided into two types:
- Plug-n-play. Literally translated as “plug and play.” Based on the name, it becomes clear that these components do not require additional customization. Just connect the connector and the system will automatically detect and configure. Most peripherals work on this principle: mice, keyboards, gamepads. However, it is worth noting that for some additional functions equipment (special buttons, etc.) still requires installation of drivers, which are included in the kit.
- The second type requires accompanying programs. This utility utility introduces components to software and “explains” how to work with it. Therefore, without software they can be recognized as unknown. If the peripheral is completely new, then it should be accompanied by a disk with official software. The OS will ask you to insert the disk. Mostly additional software is required output devices(monitors, printers, etc.).
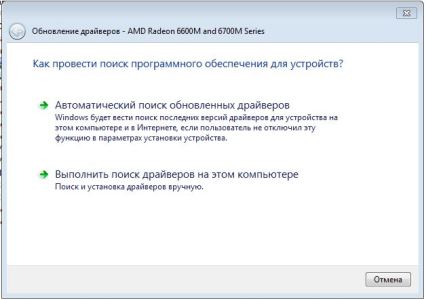
First way
The devices manufactured today are what we will see in this section. A speech bubble with text will appear in the notification area. Your new equipment is installed and ready to go. In some cases, such as monitors or mice, these snacks may not appear. We can also choose to download drivers from the manufacturer's website so that we can make sure they are the most up-to-date. In that case, you ask us. Then the following window will appear.
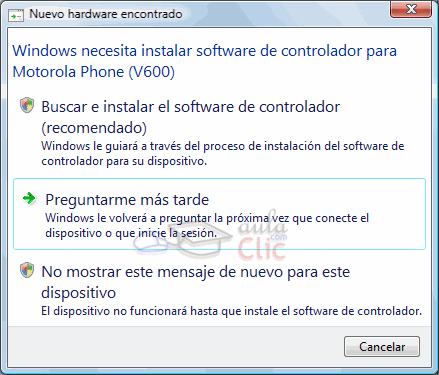
Please remember that we will not be able to use the hardware until your drivers are installed. You can practice the exercise step by step. If this fails, we can install it with the help that we will find if we find it in the search box in the Start menu.
About all operations with connected Windows tools Notifies correctly via messages in the Start Panel.
After connecting to the computer, the OS begins to automatically select the necessary software, if required. The operating system has a certain database of drivers that the computer accesses first. Having gone through all the options and not finding a suitable one, the OS will issue a notification that the software search was unsuccessful. After this, you should start searching for software on the Internet.
In this window we find all the equipment installed in the equipment. At this stage we will not dwell on this element in detail. We are interested in a master that includes the installation of old equipment. To run it, we select the device we want to install, we display the Actions menu and select the Add legacy hardware option.
The wizard allows us to search for a device or select it from a list. When Hardware not found, it is an imaging device such as a scanner or camera, we can install it by typing “View scanners and cameras” in the Start menu search box. From this window we will click “Add device” and a wizard similar to the previous one will open.
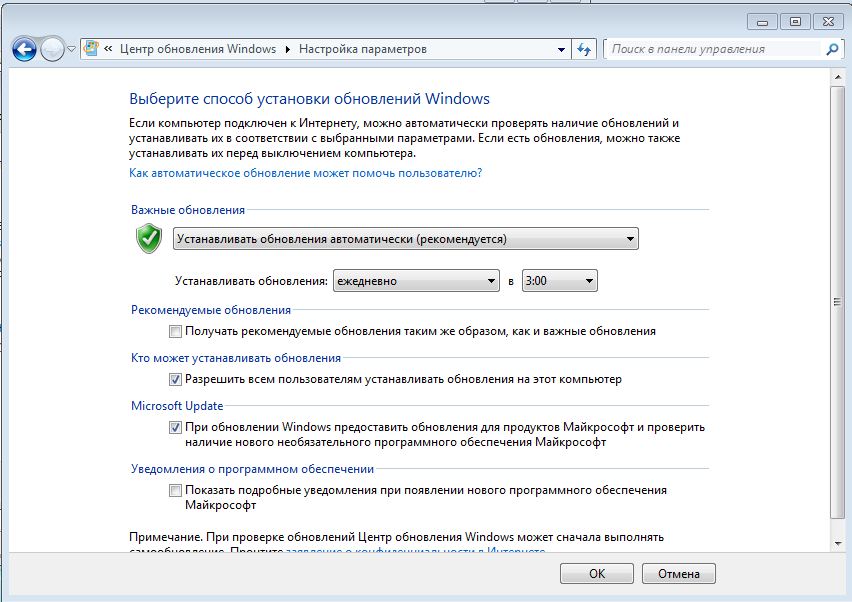
The driver database will be updated automatically Windows update, which monitors the latest patches and packs for the installed OS. You can enable the update as follows:
- Go to the control panel through the start menu;
- Next, click on “Turn automatic updates on or off”;
- open the first list and select “Install updates automatically.”
device Manager
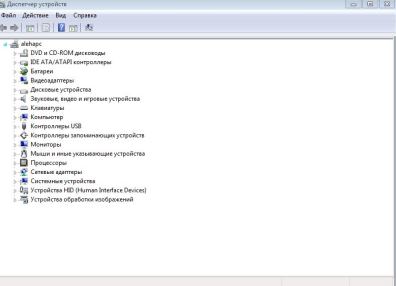
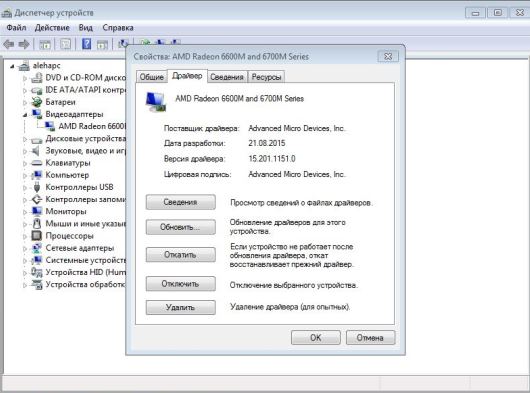
We have already commented that we can use it to add legacy hardware, but the capabilities of this window are much broader since it is a utility that allows us to manage all the hardware installed on the computer. Device Manager looks like this.
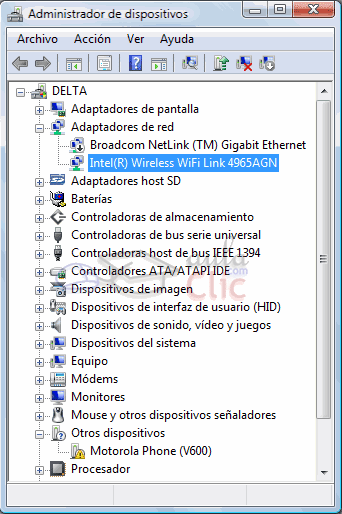
A list of connected devices, grouped by type, is displayed in the list. By clicking on the sign, we expand this branch. We can try to restore it using admin tools. We found a toolbar with icons. They all correspond to the Actions menu.
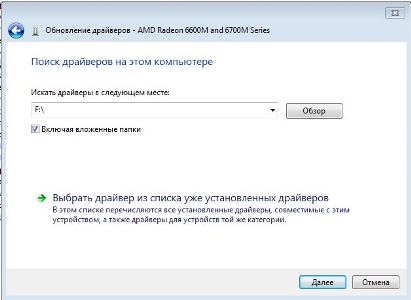
If you downloaded the required software from the Internet yourself, you must specify the folder with installation files in the installation wizard. If the utility is suitable, the program will install it. Official accompanying utilities have a digital signature, which indicates authenticity. Software downloaded from the Internet may not have one. Because of this, the OS will warn that the publisher of the utility cannot be verified. Do not be alarmed - this does not mean that the driver is malicious and will disrupt the operation of the computer. Most likely, the developer does not use in his software digital signatures. Therefore, it is recommended to download programs either from official websites or from trusted sources in order to avoid viruses and other performance problems.
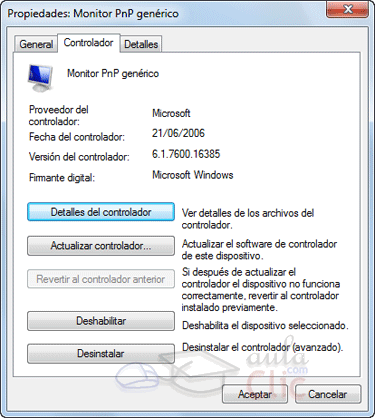
Device properties are displayed on several tabs. Depending on the device we consult, we will have more or less information and options. We have a number of actions: “Enable”, “Delete”, etc. which we see in the device manager. This means that if, for example, we updated a driver and the new one gives us problems, we can go back to to the previous driver.
- The General tab displays general information about the operation of the device.
- In the Details tab we will find more extensive and technical information.
- In the Controller tab we can see the device driver details.
- The only new action is to return to the previous controller.
Second way
The installation wizard will prompt you to search for the necessary utilities on the network. This can be done with an active Internet connection. Within a few minutes, the installer will search for the necessary utilities, and then report the result. If the driver installation was successful, Windows will display a message at the bottom of the screen in the Start bar.
View and install new graphics drivers
We can try to solve it in several ways. To resolve or use these features, you may need to update your graphics card drivers. This article describes how to do this. On your desktop, hover your mouse in the lower right corner to open Enchantments. Click the "Check for Updates" link in the left pane and wait for the search to complete. If available additional updates, click More Available Updates. When prompted, restart your computer.
- On the Home screen, tap Desktop.
- Click Control Panel in Settings.
Old equipment
Installation output devices and inputs released before the release of Windows 7 may become problematic. The fact is that modern operating systems are incompatible with older versions of drivers, and the software that came with the kit was not designed for an OS that had not yet been released at that time. To eliminate this reason, you need to look for the driver on the manufacturer’s website. It is possible that over time the developers have added support for new operating systems.
Using the system update tool provided by your computer manufacturer
You may need to use one of these tools to update your graphics drivers. Just search for one of these tools in your Start menu. Some possible search terms are the name of your computer manufacturer or general terms, such as "update", "maintenance" or "driver". Open the tool and apply any available updates.
Using your distribution's standard update process
If the updater is missing, an update is missing, or updates do not fix your problems, continue to the next section. If your distribution's default update process does not provide you with latest drivers, you may need to find other package repositories for your distribution.
There is a special wizard for installing old equipment. To avoid searching for it in the Control Panel, just type hdwwiz in the search bar in the Start menu. After this, follow the assistant's instructions.
Condition tracking
To check status and diagnose problems core Windows devices There is a special tool that you can access as follows:
Using the latest graphics drivers
You can also install a generic graphics driver from the graphics card manufacturer's website. As a rule, these drivers are always available in the most latest version and are designed to work in the most different systems. Hardware acceleration is not available for third-party graphics cards. After downloading a graphics driver, the installation wizard may prevent you from installing it because your current driver is configured by your computer manufacturer. Warning. Some computer and video card combinations may cause problems with generic versions of software drivers.
- Right-click on the Computer shortcut;
- open computer properties;
- In the left column, select Device Manager and click on it.
The window that opens presents a list of all components connected to the PC, from the processor to gamepads. All components are distributed by type and purpose, which makes finding the required item very convenient. Here you can monitor the status and performance of each of them. The list of functions and capabilities of Device Manager includes:
- Software update;
- Connecting and disconnecting peripherals;
- Search for new equipment;
- Technical information.
If there is a yellow question mark next to the equipment, then you should try updating the software. To do this, right-click and go to properties. An exclamation point means there is no installed software. You can also select the desired item and in the top control line, in the Action item, select “Update drivers”. After this, the program will offer to update the software automatically or manually (i.e., the methods described above).
If the utility is not found or is not installed, you can try connecting the component again. To do this, you need to remove the component and then click on the “Update hardware configuration” button. The system will search for connected input or output devices and provide a list.
Properties
In the manager you can view the properties and descriptions:
- The General tab contains the name and current status. You can read about the cause of the problem here. If everything is in order, the message “Device is working normally” will be visible. If there is any problem, the notification box will definitely notify you by writing possible reason, error code and solution;
- the first tab contains all the information: software version, developer, release date. Also here you can carry out all operations with this tool: update, delete and rollback. The last function is very convenient. If, when installing new software, the equipment stops functioning, you can use this feature to restore previous version software.
Diagnostics
If you are unable to determine the cause yourself, you can use Troubleshooting. To do this, in the control panel search, enter "Troubleshooting". This assistant will analyze the condition of the components and help resolve problems.
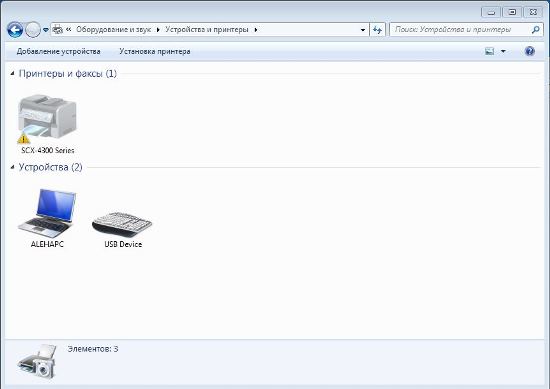
Printers and scanners
There is a separate section for them. You can find it in the control panel. “Devices and Printers” displays all connected peripherals associated with the output (various MFPs). Also shown here are those connected via USB input phones, cameras and so on.
The principle is the same as in Device Manager. A component that conflicts with the system is marked exclamation point. The remaining components are displayed without additional symbols, which means they are working properly. On the faulty printer, you need to right-click and open Troubleshoot. After which the program will try to find the problem and troubleshoot.
Bottom line
Windows OS is friendly to inexperienced users and provides a complete set of diagnostic and troubleshooting tools. Moreover, she does this, most often, on her own, in automatic mode, which makes the task even easier for an inexperienced user.
You can also use third-party utilities to search for software and causes of malfunctions, or programs from the equipment manufacturer. This guarantees the reliability and performance of the PC. However, most problems can be solved using the standard tools described in the article.
Launching the Found New Hardware Wizard tool on operating systems Microsoft Windows All versions occur automatically when the necessary devices are connected. However, it is possible to manually launch the selected utility.