Windows 7 includes a huge assortment of drivers for hardware that existed at the time of release. operating system, however, over time, more and more devices are being released different manufacturers, and each requires its own driver. The first rule of installing computer hardware is never to use the disc that came with the device. Straightaway
open the manufacturer's website and download latest version drivers. In general, installing devices in Windows 7 is a simple and straightforward process ... when it works, of course. If something does not work out, it is useless to rely on the help of the operating system.
You probably already found the Add a device link on the Devices and Printers page of the Control Panel. However, as much as you'd like to click on it and go down the easy path, that's not what you want. Any modern device, if it works correctly, is recognized by the operating system immediately after connection (in some cases immediately after Windows boot). After seeing the new hardware, Windows completes the installation process on its own. Never try to outsmart the operating system and do it your own way - such experiments always end in tears.
So what do you do if Windows fails to detect a new device? First, open the Troubleshooting page in the Control Panel, click the Hardware and Sound link, and select Hardware and Devices to open the Hardware Troubleshooter. Click the Advanced link, clear the Apply repairs automatically check box, and click Next.
After a short introduction, a window will appear asking you to select the necessary corrections from the list. If none of the entries match exactly your problem, clear all checkboxes except Scan for recent hardware changes, and click Next.
The same can be done faster: open the Device Manager with the devmgmt.msc command or through the Control Panel and select the first item in the list ^ 1 v (your computer name). Now choose J Scan for recent hardware changes from the Action menu and wait a bit.
If the equipment is not automatically recognized, it is very likely that it is not well connected. For example, in the case of a USB device USB port may be disconnected or damaged; try connecting the device to a different port. Also check BIOS settings to make sure all required ports are enabled.
When you install new hardware into your computer, Windows startup the system automatically detects its presence and tries to install what is necessary for its operation. However, if for some reason automatic detection of new hardware did not occur, you can run the hardware installation wizard yourself. It should be noted that most often very old or very new devices are not automatically recognized. Older devices don't support auto-detection, and newer devices are simply not known to Windows XP because they've been around since the system was released. Sometimes some exotic devices that are not widely used cannot be recognized. Also note that some devices may not be compatible with Windows XP. In this case, nothing can be done, and you will not be able to install the device. If the device is supposed to work in principle Windows system XP, but the necessary drivers were not installed automatically, you should use the services of the Add Hardware Wizard.
Open the control panel and select the link Printer and other equipment(Printer and Other Hardware), then in the taskbar select the link Equipment installation(Add Hardware). The first dialog of the hardware installation wizard will appear (Fig. 16.21).

Rice. 16.21.
Click the button Further(Next) to continue working. A search will be performed for installed hardware, and the results of this search will be displayed as a list in the next dialog of the Add Hardware Wizard (Fig. 16.21, right). Devices that don't have drivers installed or that don't work properly have a question mark in this list. Selecting such a device and pressing the button Further(Next), you will continue the wizard in the mode of updating drivers for hardware. If you are adding new equipment, then select an item Adding a new device(Add New Hardware Device) and click the button Further(next). The following wizard dialog will appear, prompting you to automatically search for new devices (Fig. 16.22). Automatic search mode is offered by default and is marked as recommended for use. However, if you know exactly the model of your device, you can select it from the list, thereby not wasting extra time searching. If the switch is set to automatic search mode and the Next button is pressed, the following dialog will display a progress indicator illustrating the search process (Fig. 16.22, right). When the search is completed, its results will be displayed in the wizard's dialog.


Rice. 16.22.
Sometimes the program cannot automatically detect a new device. In this case, press the button Back(Back) to return to adding mode selection and set the switch to Selecting equipment from the list(Manually Select from list). Now press the button again Further(next). The following wizard dialog will appear, displaying a list of device groups (Fig. 16.23).

Rice. 16.23.
Select the group that your device belongs to from the list. If there is no such group in the list, select the element Show all devices(List All Devices). After selecting a device group, click the button Further(Next) to display the next wizard dialog (Fig. 16.23).
The dialog contains a list of manufacturers and a list of models of the selected equipment group. First, select the manufacturer of your equipment from the list of manufacturers, and then select its model from the list of models. Please note that the zzzz icon is located to the left of the modem model names. . This is a digital signature icon, indicating that the work this equipment tested on Windows XP. It may happen that you do not find your equipment in these lists. Then you will have to use a floppy disk or CD, which should be included with the equipment. To use a floppy disk, press the button Install from disk(Have disk). A folder and drive selection dialog will appear. Insert the floppy disk that should be included with the hardware and click OK to close the dialog. If the device driver is on a CD, enter the drive letter in the input box, and then click OK. In the file selection dialog that appears, select desired file and press the button Open(Open) to open the file and close the search dialog. A new dialog will appear showing which device drivers are on the disk. Select the device driver and click OK to continue with the installation. Depending on the type of equipment being installed, several more dialogs of the installation wizard may appear to specify the specific parameters of the equipment. When the wizard finishes, the new hardware will be installed on your computer, and you can start working with it.
After installing a new driver, even if you did everything right, the hardware may not work properly, or the system will become unstable. The Windows XP operating system allows you to cancel the installation of the device driver and return to previous driver. To return to the previous working device driver, right-click on the icon on the desktop My computer(My Computer) to display the help menu. From this menu, select the command Properties Device Manager(Device manager). Next, select the device whose driver you want to return from the list and click the button Properties(Properties). In the dialog that appears, select the tab Driver(Driver) and click Driver return(Rollback Driver). The previous version of the device driver will be restored.
When you update device drivers, the system remembers the last working driver. This happens automatically during every boot of the Windows system. If you have problems with the new drivers and cannot boot your system to check in the driver, you should use the Last Known Good Configuration tool. To do this, during boot, press the Щ key on the keyboard to select special boot modes. In the menu that appears, select the configuration called Last known successful(Last Known Good). The computer will boot successfully and you can decide what to do next while already working in Windows.
Add Hardware Wizard in Windows 7
To install a device that Windows 7 cannot recognize and install automatically, use the Add Hardware Wizard.
open Start -> Control Panel -> Device Manager. In the Device Manager window that opens, right-click on the name of your computer (the topmost line) and select the item in the context menu Install old device.
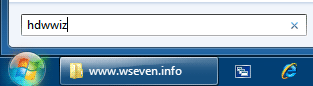
Another way to launch the Add Hardware Wizard is to open Start, type in the search box hdwwiz and press Enter.
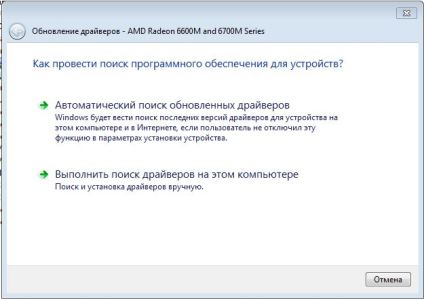
The Add Hardware Wizard window will open and after clicking the button Further you will be presented with two options:
- Search and automatic installation equipment;
- Select hardware from the list and install it manually.

If the equipment is found, then click Further and follow the wizard's instructions to install the driver. If the equipment could not be found, then you will see the following window:


If your device is not listed, double-click Show all devices(top point) and wait until Windows 7 creates a list of all devices for which there are drivers in the database.
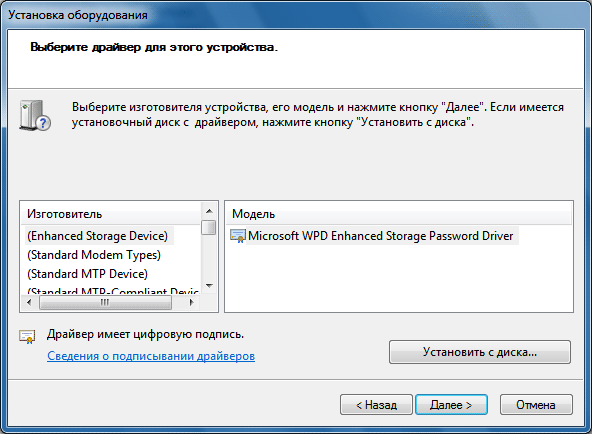
If your device is not in this list, then click the button Install from CD...

Now press the button Review and point to the drive or folder where the device driver file (.inf file, not .exe) is located. The folder with the .inf file can be located either on removable media as well as on the hard drive. Click OK and follow the instructions in the installer.
Note. A digitally signed driver is a driver that has been tested for compatibility with Windows 7. Installing a driver that is not digitally signed may cause operating system errors (optional, but sometimes it happens). Therefore, be sure to create a system restore point before installing the device.
If after installing the device Windows 7 started to work with errors, then you need to roll back or remove the device driver, then turn off the computer and disconnect the device from the motherboard. If a device that is not compatible with Windows 7 is embedded in motherboard, then after uninstalling the driver, disable this device in the BIOS.
Practical task.
1. Start your work computer.
2. Make sure that the devices suggested by the teacher are not registered in the system. Make a list of suggested devices.
3. Connect the devices to the computer one by one. Record the automatic connection progress of the device.
4. If the device does not connect automatically, use the hardware wizard. At what stage did you have problems? Record your progress.
5. Look in Device Manager to see what your connected devices look like. Write down their statuses.
6. Fix in writing which drivers for devices are missing.
A computer on the Windows operating system is a complex and complex system, like a single organism. Installing a Windows device- difficult process. Each component must fit together and get to know the hardware of the computer with the help of special software called a driver. Without this, equipment and a computer simply will not be found. mutual language and cannot work together. This article describes how to install components using standard tools from Microsoft.
When installing Windows devices It should be remembered that all equipment is divided into two types:
- plug-n-play. Literally translated as "plug and play". Based on the name, it becomes clear that these components do not require additional setting. It is enough to connect the connector and the system will automatically detect and configure. Most peripherals work on this principle: mice, keyboards, gamepads. However, it should be noted that for some additional features equipment (special buttons, etc.) still requires the installation of drivers that are included in the kit.
- The second type is vital for accompanying programs. This utility "introduces" components to software and "explains" how to work with it. Therefore, without software, they can be recognized as unknown. If the peripheral is completely new, then a disk with official software should be attached to it. The OS will ask you to insert a disk. Basically, additional software is required output devices(monitors, printers, etc.).
First way
About all operations with connected Windows tools regularly notifies through messages in the start panel.
After connecting to a computer, the OS starts automatically selecting the right software, if required. The operating system has a specific database of drivers that the computer accesses first. After going through all the options and not finding a suitable one, the OS will issue a notification about an unsuccessful software search. After that, you should start searching for software on the Internet.
Update the driver database will help automatic update Windows, which keeps track of the latest patches and packs for the installed OS. You can enable the update as follows:
- Go to the control panel through the start menu;
- Next, click on "Turn automatic updates on or off";
- open the first list and select "Install updates automatically".

If the required software is downloaded from the Internet on your own, you must specify the folder with installation files in the installation wizard. If the utility is suitable, the program will install it. The official accompanying utilities are digitally signed, which indicates authenticity. Downloaded software from the Internet may not have one. Because of this, the OS will warn that the publisher of the utility cannot be verified. Do not be afraid - this does not mean that the driver is malicious and will disrupt the computer. Most likely, the developer does not use in his software digital signatures. Therefore, it is recommended to download programs either on official sites or from trusted sources in order to avoid viruses and other performance problems.
Second way
The installation wizard will prompt you to search for the necessary utilities on the network. This can be done with an active Internet connection. Within a few minutes, the installer will search for the necessary utilities, after which it will report the result. If the driver installation was successful, Windows will display a message at the bottom of the screen on the start bar.
Old equipment
Installation output devices and input released before the release of windows 7 can become problematic. The fact is that modern operating systems are incompatible with older versions of drivers, and the software that came with the kit was not designed for an OS that had not yet been released at that time. To eliminate this reason, you need to look for a driver on the manufacturer's website. It is possible that over time, developers have added support for new operating systems.
There is a special installation wizard for old equipment. In order not to look for it in the control panel, just enter hdwwiz in the search bar in the start menu. After that, follow the instructions of the assistant.

Status Tracking
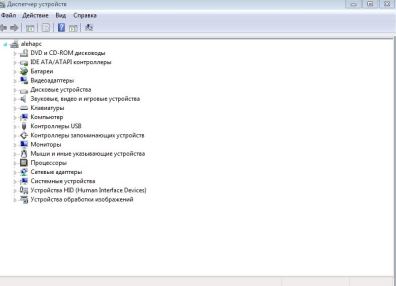
To check status and diagnose problems basic Windows devices there is a special tool, which can be accessed as follows:
- Click on the shortcut Computer with the right mouse button;
- open computer properties;
- In the left column, select Device Manager and click on it.
In the window that opens, a list of all components connected to the PC is presented, from the processor to the gamepads. All components are distributed by type and purpose, which makes the search for the required item very convenient. Here you can monitor the status and performance of each of them. The list of features and capabilities of the Device Manager includes:
- Software update;
- Connecting and disconnecting peripherals;
- Search for new equipment;
- Technical information.
If there is a yellow question mark next to the equipment, then you should try updating the software. To do this, right-click and go to properties. An exclamation point means no installed software. You can also select the desired item and in the top control line, in the Action item, select "Update drivers". After that, the program will offer to update the software automatically or manually (that is, the methods described above).
If the utility is not found or not installed, you can try to connect the component again. To do this, you need to remove the component, and then click on the "Update hardware configuration" button. The system will search for connected input or output devices and provide a list.
Properties
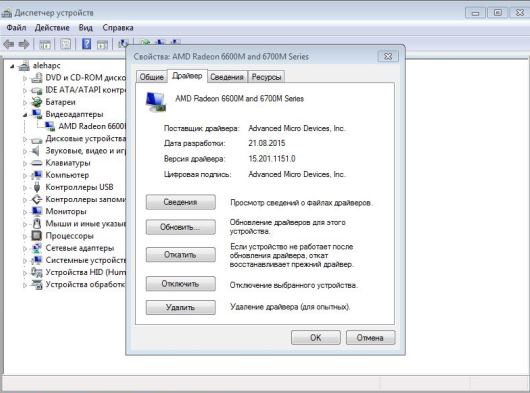
In the dispatcher, it is possible to get acquainted with the properties and description:
- The General tab contains the title and current status. You can read about the cause of the problem here. If everything is in order, the inscription "The device is working properly" will be visible. If there are any problems, the notification window will definitely let you know by writing possible cause, error code and solution;
- the first tab contains all the information: software version, developer, release date. Also here you can carry out all operations with this tool: update, delete and roll back. The last feature is very handy. If during the installation of new software, the equipment ceased to function, using this feature you can restore previous version software.
Diagnostics
If you cannot determine the cause yourself, you can use Troubleshooting. To do this, in the search for the control panel, enter "Troubleshooting". This assistant will analyze the status of the components and help you deal with problems.
Printers and scanners
There is a separate section for them. You can find it in the control panel. "Devices and Printers" displays all connected peripherals associated with the output (various MFPs). It also shows connected via USB input phones, cameras and so on.
The principle is the same as in the Device Manager. The component that conflicts with the system is flagged exclamation mark. The remaining components are displayed without additional signs, which means that they work properly. On the failed printer, right-click and open Troubleshoot. After that, the program will try to find the problem and fix the problem.

Outcome
Windows OS is friendly to inexperienced users and provides a complete set for diagnosing and fixing problems. Moreover, she does this, most often, on her own, in automatic mode, which further simplifies the task for an inexperienced user.
You can also use third-party utilities to find software and causes of malfunctions, or programs from the hardware manufacturer. This ensures the reliability and performance of the PC. However, most problems can be solved using the standard tools described in the article.
Running the Found New Hardware Wizard tool on operating systems Microsoft Windows of all versions occurs automatically when the necessary devices are connected. However, it is possible to manually launch the selected utility.