This documentation has been archived and is no longer maintained.
Installation software
Updated: December 2008
Applies to: System Center Configuration Manager 2007, System Center Configuration Manager 2007 R2, System Center Configuration Manager 2007 R3, System Center Configuration Manager 2007 SP1, System Center Configuration Manager 2007 SP2
A task sequence step allows you to specify the Configuration Manager 2007 package and program that you want to install as part of the task sequence. Installation of the package program will begin immediately, without waiting for the policy polling interval.
Task sequence step Install software performed only in standard operating system and does not run in Windows Preinstallation Environment (WinPE).
You can configure the following settings.
Name Specifies a short, user-defined name that describes the action that is performed in this step. Description Allows you to specify more details about the action performed at this step. Installing one application Configures a task sequence step to install a single application. This step will wait for the application installation to complete. To specify the Configuration Manager 2007 package that you want to install, click Review. If Configuration Manager 2007 R2 is installed, you can select the Configuration Manager 2007 R2 Application Virtualization package when selecting a package. Use the drop-down list to select the program to use to install the package.The program you select must meet the following criteria.
- It should not initiate a reboot on its own. The program should prompt you to reboot using standard code reboot - exit code 3010. This will ensure that the reboot is processed successfully at this task sequence step. If the program returns exit code 3010, the internal task sequence engine will reboot. After a reboot, the task sequence will continue automatically.
- Only after user login
- Execute with user rights
- It must be run as the local system account, not as the user account.
- It should not interact with the desktop. The program should work without notifications or in automatic mode.
see also
For more information, see the Configuration Manager 2007 Information and Support page.
To contact the documentation development team, use the email address
Before downloading some programs from the Internet, in order to ensure that the programs download correctly, you may be prompted to disable your installed antivirus software. If you intend to download software from the Internet, then you should read the installation instructions to see if you need to disable protection from viruses. If this step must be completed before downloading, you need to follow these steps to disable antivirus protection to install the software correctly. After you download the program, you will need to do a few things to make sure your computer stays safe and secure.
Instructions
1.Open your installed antivirus program from the taskbar. Click right click mouse on icon.Some antivirus programs will require you to open the software to stop it.
2.Select “Stop protection”. Although each antivirus protection may have a different stop protection, they will have some wording that means "stop protection". After stopping the protection, check it to be sure.
3.In the lower left corner, click on the “Start” button, then click on “Control Panel”, and then click on the “Security Center” button.
4.Look at your "Security Center." It will show that your virus protection is disabled. If you need to turn off the firewall, you can do this by clicking at the bottom of the page " Windows Firewall". This will open a new window that allows you to select “Off” to disable the firewall.
5.Complete the download and enable antivirus protection by clicking on the icon on the desktop or selecting your “Start” button, then “Programs” and click on antivirus software to protect your computer.
6.Enable the firewall in the "Security Center." Run virus and anti-spyware scans to ensure your computer remains safe and free from spyware and viruses.
Flash has been an indispensable tool for creating presentations, games, websites, animated films and other add-ons that require rich multimedia content for quite a long period of time.
As a rule, browsers install the Flash player automatically; it is recommended to update the program regularly, since Adobe is constantly improving its development.
If, when opening any sites, video is not displayed and it is impossible to listen to sound files, then most likely you do not have the Adobe Flash Player (or an outdated version is installed). Therefore, you need to download and install latest version this program. It would seem that there is nothing complicated about this, but it turns out that many users have problems installing a flash player.
How to install Adobe Flash Player correctly will be discussed in this article.
H To install Flash Player, follow these steps:
1 . Make sure your computer matches system requirements for Flash Player
2. Before installing the flash player, you need update your browser to the latest version , otherwise, the Adobe Flash Player you downloaded will not install.
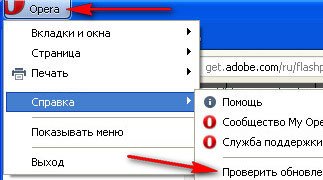
IN Opera browser, for example, this is done like this: Move the mouse over the browser menu located on the left top corner, right-click once and select from the drop-down menu Reference->Check for updates. If there are updates, they are installed, if not, then your browser version is the latest.
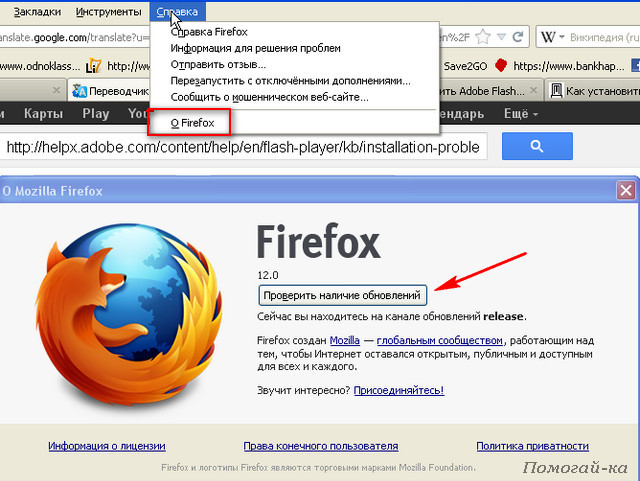
For browser Mozilla Firefox You can check for updates like this: Help → About Firefox → Check for updates
3. Download the latest version of Flash Player
The most important! You only need to download Adobe Flash Player on the official Adobe website: http://www.adobe.com
In the lower section "Download"
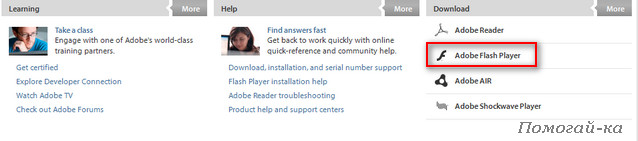
press "Adobe Flash Player":

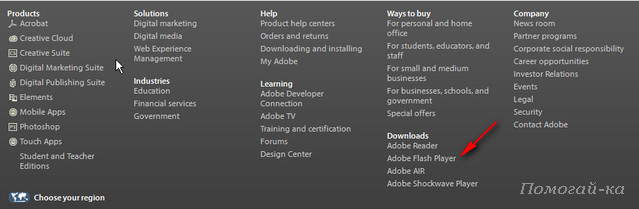
If for some reason you see another page of the Adobe.com website, then in the “footer” of any page there are links to download a flash player:
If Adobe Flash Player was already installed on your computer, you need to check that you have the latest available one installed Flash version Player on this page adobe.com
The following window displays installed version Flash Player and your operating system:
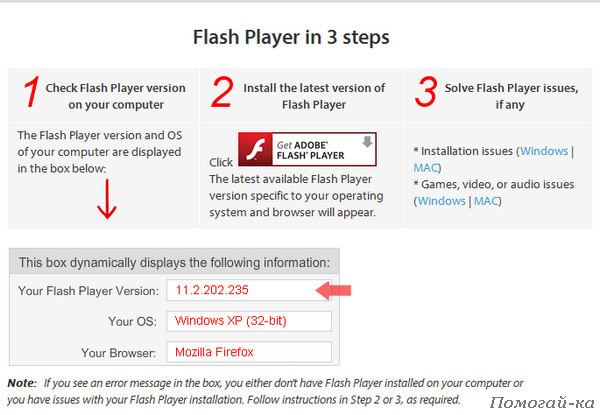
For those who are not familiar with English:
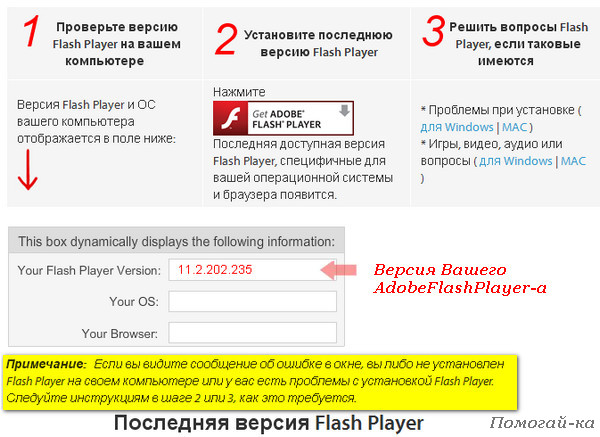
If Flash Player is not installed, you will receive an error message.
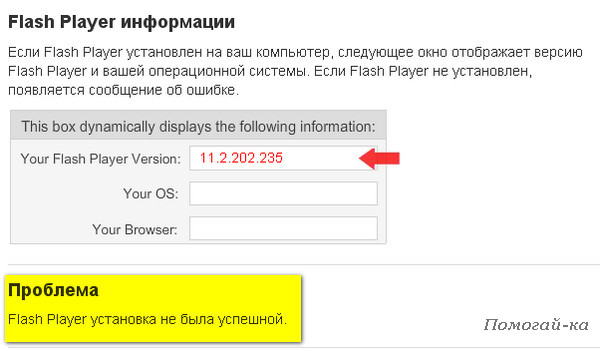
Note: It is possible that the version number in the picture is different from the version you installed. At the momentlatest version of Flash Player for Windows, 11.3.300.265:
In order for Flash content to be displayed correctly, you need to update the Flash player to the latest version. To do this, it is best to delete the previous one.
So, in order to download the flash player, use the direct link of Adobe Flash Player and you will be taken to the Russian-language download page.
Check that the downloaded file matches the type of your operating system and browser

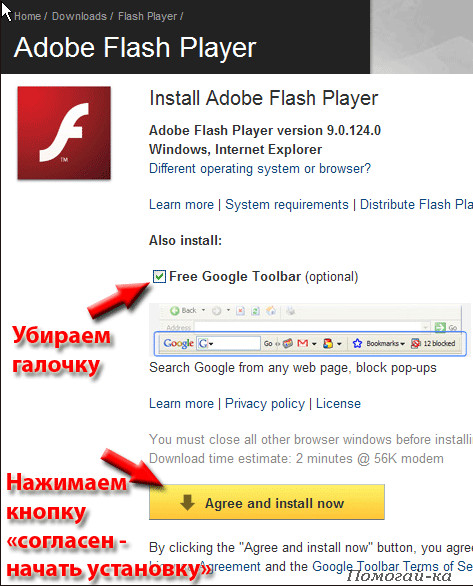
Note: you will be prompted to install a browser in parallel Google Chrome or McAfee Security Scan Plus:

If you do not need the proposed application, then uncheck the box. "Include in download":

4. Install Adobe Flash Player according to your browser type
For Mozilla Firefox browser
Click on the button Download on the download page of the Russian-language site (see link above) - on the official site it’s this button:
![]()
1. When the file open dialog box is displayed press the button Save File:


for a suggestion where exactly you can choose the Desktop:
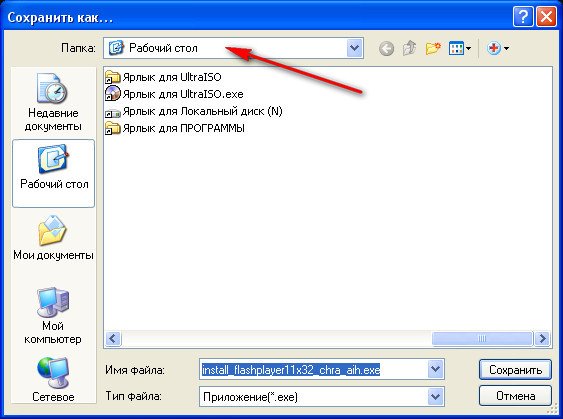
Here is our downloaded original Adobe Flash Player, on the desktop:

To start installation double click on the Flash Player icon.
2. If you have downloaded installation file install Adobe Flash Player without prompting to save, then in the "Downloads" window d Double-click the file name:


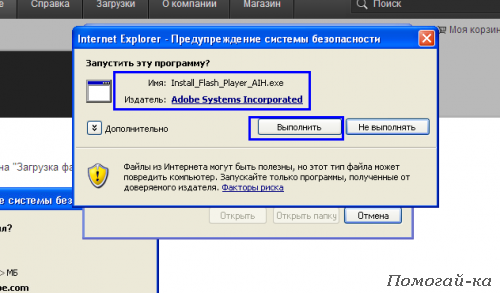
3. When a security warning appears , press the button Run:
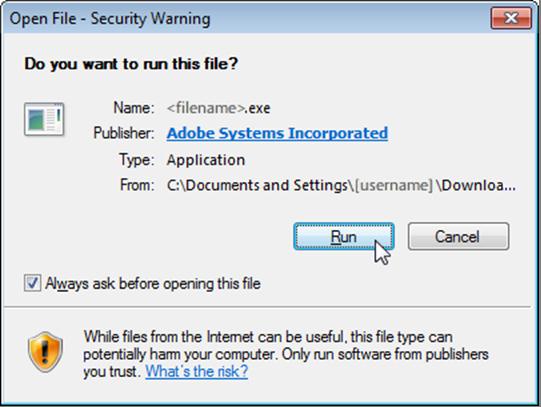
or Yes :
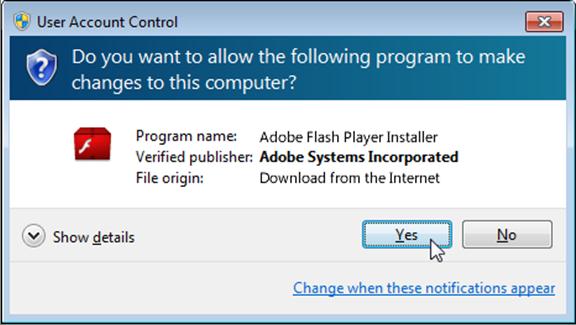
Note: Please note the publisher before agreeing to installation
Before you run it, you need to close all browser windows, for its successful integration.
If this is not done, the installation will pause with the error:
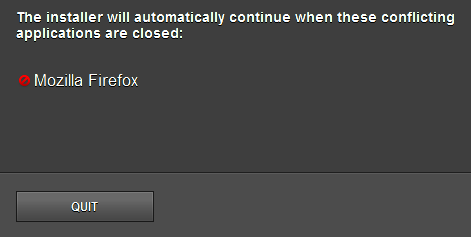
If this window appears, close Firefox. The installer runs automatically after Mozilla Firefox is closed.:

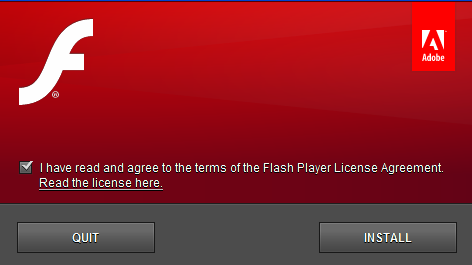
After successful installation, select the update method. By default the option is selected automatic update ( P When you select this option, the flash player is updated without your intervention when a new version is released). Adobe recommends using this option to Flash updates Player.

But you can choose others:
![]()
Click the button Ready. That's it: Adobe Flash Player is installed on your computer.
Sometimes Adobe Flash Player installed as a browser add-on Mozilla Firefox. In this case, appears at the top of the browser warning "Firefox is warning you that this site (get.adobe.com) is asking you to install software on your computer"
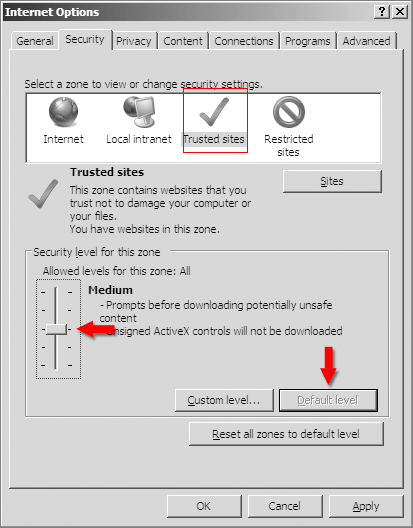
Note: If you are using Internet Explorer 9 must be disabled ActiveX filtering :
In Internet Explorer, select Tools>Security. If ActiveX filtering is checked, uncheck it:

Quit Internet Explorer, and then restart it.
After pressing the button Start installation(or Download) sometimes an information window pops up - we get rid of it by checking the box and clicking on "Close":


And below you will see the version of your Flash Player and your operating system.
PS. For any reason, if the installation fails, Adobe Flash Player must be removed from your computer:
Then restart your computer and re-download and install Adobe Flash Player
Based on materials from helpx.adobe.com, remontcompa.ru, www.dmosk.ru
Well, that seems to be all. Somehow the article turned out to be voluminous.
But, in principle, downloading and installing Adobe Flash Player is not difficult, the main thing is to do everything slowly, consistently and correctly.
Instructions
Log into the operating system with an account that has administrator rights. Open the "Run" utility in the "Start" menu and enter gpedit.msc in the line, press Enter. In the user configuration window that appears, select the menu called "Administrative Templates", and then go to the components.
In the management console, select the "Banned or allowed snap-ins" setting, then find the options group policy. In the snap-in extension, specify the “Not specified” parameter next to each position. After you set the default settings, installation of programs will be available to users of limited accounts.
Translate account to administrators, however, after this, in addition to installing and uninstalling programs user Other operations will also be available. To do this, open the “Control Panel” and go to the “User Accounts” menu. Select the one you need using the mouse and select change account in the menu.
After that, click the “Make computer administrator” button. Save the changes and re-login, check if the given user computer function of installing and uninstalling programs and other functions.
If you want to configure the security settings of your computer in a special way, read articles on this topic, for example, this one: http://stfw.ru/page.php?id=8718. When setting a specific configuration for a particular operating system user, remember that in some cases the setting cannot be changed without changing the account type. So if you, for example, create an account with limited rights for children, think carefully about each component of the settings that may be needed in the future.
Currently, there is a huge variety of computer programs. With their help, you can edit text, music, video files, exchange messages online, and even make calls to the other side of the world.
Instructions
Purchase or download from world wide web program installation file (distribution). It always has the extension ".exe". The distribution kit can be called by the name of the program itself or (which is more common) “Setup.exe”, “Install.exe”.
Complete the form if the installation wizard prompts you to do so. Most often this is your full name, e-mail, country of residence.
Next, the wizard will ask you to specify a location to install the program. By default, programs are placed in the “C:\Program Files” folder. It is not recommended to change it without special reasons. Click "Next".
A selection window will appear - create/not create quick launch shortcuts, or whether to place the program shortcut on the “Desktop”. Make your choice and click “Next”.
A program installation indicator will appear on the screen. If any other windows appear that require selection, leave everything as it is (by default). When installation is complete, click Finish. The program is installed. Look for the shortcut on the “Desktop” or in the “Start” button menu.
Video on the topic
In the operating room Windows system 7 provides the ability to flexibly configure the rights of each user. The administrator sets a list of actions that are allowed to the user in the system, and only the administrator can change this list. Installing programs is an action that affects the security of the system.

You will need
- - administrator rights.
Instructions
Log into the operating system as the “Administrator” user. To do this, you need to know the password for the administrator system account, and enter it when Windows startup. Typically, this data was installed by the user when the computer was first started, for example, when installing the operating system. If you do not have administrator rights, disable this account or try to recover the password.
Launch Local Group Policy Editor. To do this, enter the command gpedit.msc in the “Run” line and confirm its execution by pressing enter on the keyboard. This way you will issue a command to the operating system using the command line. On the left side of the window, expand “User Configuration” - “Administrative Templates” - “System” and go to “Run” only those specified Windows applications. Double click on this text to start the service.
The settings window for this service will open. Set the switch to “Enable” and then click on the “Show” button. The Output Contents window opens. Here you need to specify which programs the user can run. So, if you specify a strict list of exe files that a user is allowed to run, running setup.exe or any other installation will be beyond his capabilities.
It is also worth disabling the ability to make changes to the registry, launch applications from the command line, and launch from help. These services are interconnected, however, turning off one does not turn off the other. You will be able to set different rights for the software. If you have a large number of programs on your computer, view and delete unnecessary ones so as not to take up memory.
Sources:
- installation ban windows programs 7
Tip 4: How to prevent users from installing programs
Computer security or local network may be jeopardized by incorrect actions of employees. In this case, it becomes necessary to prohibit the installation of programs by insufficiently qualified users.
Instructions
To set such a ban, you will need administrator rights. Assign rights to each user in the system. To do this, call command line by pressing Win+R and entering control userpasswords2. Check the user account and click Properties. In the “Group Membership” tab, set the “Access Level” switch to the desired position.
In the command line, enter secpol.msc and confirm by clicking OK. In the management console window, expand double click Software Restriction Policies snap-in. If a system message appears indicating that the policy is empty, from the Actions menu, select Create Policy.
In the “Object Type” section, double-click “Assigned File Types”, select files with the LNK extension in the list and click “Delete”.
In the same section, expand the “Enforced” item and assign the application of restriction policies to all program files and for all users except local administrators. Confirm by clicking OK. Expand the “Security Levels” folder, double-click “Not Allowed” and in the properties window click “Default”.
To prevent launch installed programs, open the “Additional Rules” snap-in and call up the drop-down menu on the right side of the screen by right-clicking the mouse. Select Create Path Rule. In the rule creation window, click the “Browse” button and specify the path to the folders in which the programs are installed.
Now you need to configure permissions for these folders. Expand the folder and in the “Tools” menu, select the “Folder Options” command. In the “View” tab, uncheck “Use simple sharing...”
Right-click on the folder icon and select the option " General access and safety." In the “Security” tab, mark the users one by one and in the “Permissions” section, check the “Allow” checkbox next to the “Read” item. Click "Advanced". In the window additional parameters In the “Permissions” tab, select the user group and click “Edit”. Use checkboxes to indicate the actions that this group is allowed and prohibited from performing.