- Part 1: Recover Data from iOS Devices
- Part 2: Recovering Data from Backup iTunes copies
- Part 3: Recover data from icloud backup
Part 1: Recover directly from iPhone, iPad and iPod touch
Wondershare Dr.Fone for iOS allows you to recover deleted contacts, Messages, Call History, Messages, Calendars, Reminders and Safari Bookmarks from iPhone 5S/5C/5/4S/4/3GS, iPad Air, iPad mini 2 (mesh), iPad mini, iPad with mesh display, new iPad, iPad 2/1 and iPod touch 5/4, new iPad, iPad 2/1 and iPod Touch 5/4. Meanwhile, you can use it to scan your camera roll, photo stream, photo library, attachments and voice memos that exist on your device.

Let us know if you have any questions or if we forgot to add. Enjoy the fact that your data is now safe and if you encounter any problems, you now have your data backed up. We'll show you in this guide how to do it. Free program can be downloaded from this site. We'll move a little closer to the Advances table. Then click "Import" and select our latest backup. Depending on how much time has passed since the last backup, this could take 30 seconds or a decent chunk of time.
Note: Do not use your device if you have lost data on it. Any operation on the device can generate new data, which can overwrite lost data and render it unrecoverable.
1
Connect your device to your computer
Launch the program on your computer and connect your device (for example, iPhone 4). Then you will see a window on the right.
Either way, that's all you've done. Of course, be sure to pay attention to the password you use for the encrypted backup. 
Depending on how long it has been since the last backup, this may happen quickly, or it may take several hours. You should see backup details including time and size.
Note: If you are using an iPhone 4/3GS, iPad 1 or iPod touch 4, you can switch to "Advanced Mode" with the button in the lower right corner.

2
Check your device for lost data
You can simply click on the "Start Scan" button to immediately scan your iPhone, iPad or iPod touch.
In that textbook both possibilities are considered. The Browse Device screen appears. Then, within that backup, select Contacts. In the left column you'll see your contact groups, followed by a column that lists all the individual contacts within that group, and on the far right your contact details.
Select an export option from the buttons at the bottom of the window. Do you have questions that are not covered here? Feel free to contact us if your problem persists. During data transfer, please do not disconnect your phones. You will see all your contacts there.
Note: To enable "Advanced Mode" for deep scanning of your iPhone 4/3GS, iPad 1 and iPod touch 4, follow the description in the window.
3
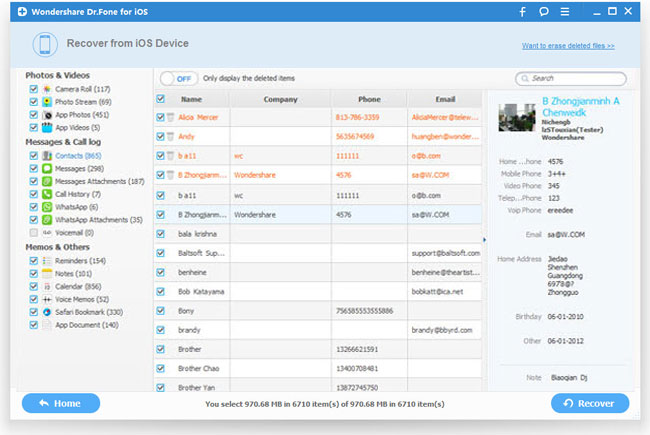
View and recover data from your device
The scanning will take some time. Once it is completed, you can see the scan result generated by the program. All lost and existing data on the device is displayed in categories. Select the menu on the left side and view the content one by one. You can check any item and save it on your computer by clicking on the "Recover" button.
Just follow the link and read more. And, fortunately, there was never a need to restore the device. But what if something goes wrong? And now it's resolved, it's time to share my solution. Select your device and open the Services app.
This will show two so-called documents: “games” and “internal”. Now select the backup destination and wait until all the files are copied to that location. This file contains the world name. Changing this file does not change the name inside the game. But this file is useful for determining the world name. Recovery is the opposite of backup. A message appears indicating that the folder already exists. Select "Replace" and wait until all files are copied to your device.
Note: If you try to restore text messages and iMessage, a pop-up window will ask: restore to computer or restore to device. If you want to restore these messages back to your iOS device, click the Recover to Device button.
Part 2: Extract iTunes Backup to Recover Data for All iOS Devices
This data recovery mode allows you to recover not only the existing backup data, but also the data that was deleted from the device before you made the backup, if it was not overwritten.
There is no need to restore the entire backup. Just remember that the Games folder is the main folder. Before restoring, you can delete or even duplicate worlds in the Games folder. Well, stop worrying because like most things in life, there is a simple solution.
Transfer app and game data
Disconnect your old device from your computer, then connect your new device and find the app you want to transfer to your new device using the same steps as above. Find the Documents folder for the app on the new device and copy all the data in the Documents folder on your desktop to the new device. Copy the folder to your desktop. . There are several things that can go wrong when you use this method to transfer app and game files. You must remember that different applications use different files saving, so you may have to tweak the above steps and copy multiple files, or sometimes even a single file.
Note: Do not sync your device with iTunes when you realize that you have lost data, or the iTunes backup files will be updated after syncing if you want to restore them through this recovery mode.
1
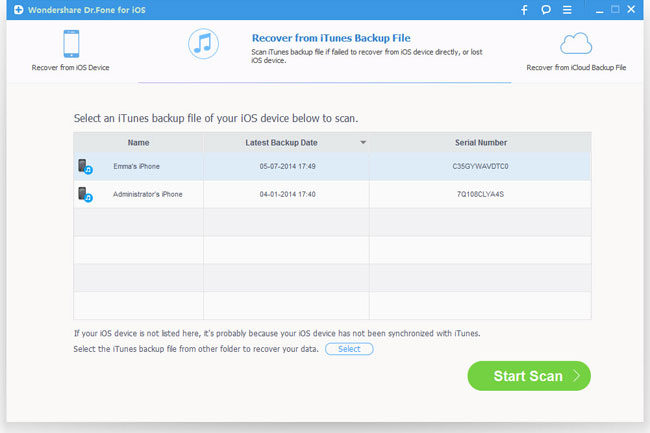
Select iTunes backup to extract and scan it
When you start the program, recovery mode will start from your iOS device (default mode). Switch to "Recover from iTunes Backup File" at the top of the main window and you will see a window on the right.
The method should work for most applications, but just in case, here are some additional tips. Sometimes you may have two separate versions of an application, but you will still be able to transfer data between them. Not all apps save their files in the Documents folder, and in those cases, try copying the Library folder in addition to the Documents folder. This may be automatic, or you need to enable the feature in the app settings. Start by turning on your new device. If you've already finished setting up your new device, you'll need to remove it.
Here, all iTunes backup files from your iPhone, iPad and iPod touch that have never synced with iTunes on this computer will be automatically found and listed. Select the one you need and click the "Start Scan" button to extract it.
You can now transfer your apps backup to your new device by following the steps below. So, it is safe to say that between all the above methods, your app and game data should never be lost.
Select files to transfer
It supports data transfer between various types cell phones, even if they are on different platforms. Download this amazing program and then install it on your computer. The program will recognize your devices as soon as possible and show the type transferred file in the middle of the main window, such as contacts, videos, music, photos, call logs and text messages, applications. 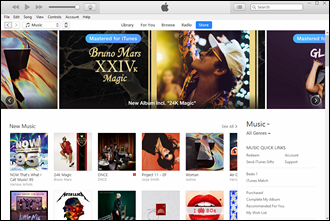

Restoring from a backup is different from restoring the software completely.
2
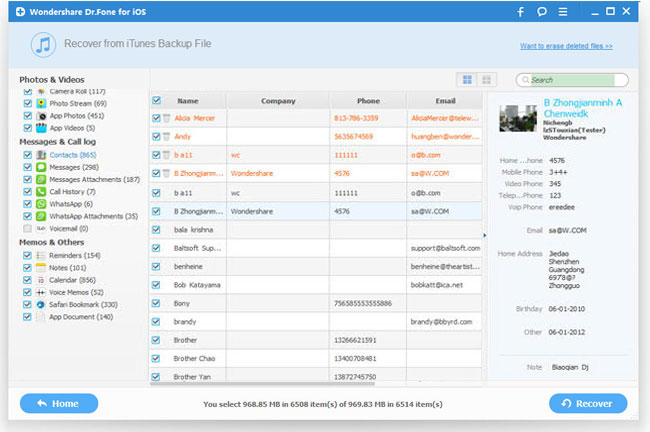
Preview and restore previous data
After a few seconds, all the data in the backup will be extracted and displayed in categories. You can view them one by one before restoring. Then, you can selectively mark and restore the ones you want by clicking on the "Recover" button below.
Note: The data displayed as a result of the scan includes deleted and existing items on your device. Each of them has its own color. If you want to separate them, you can use the button at the top: Only display the deleted items.
Part 3: Recover Data from iCloud Backup for Any iOS Device
Didn't find data from your iOS devices and reserve iTunes file? There is a third way: restore from backup iCloud copies. This will allow you to view and restore all the data in your iCloud backup. Therefore, do not back up your device with iCloud immediately when you discover data loss.

1
Select recovery mode and sign in to iCloud
After launching Wondershare Dr.Fone for iOS, select the recovery mode "Recover from iCloud Backup Files" at the top. Then, you will see the window below. Enter your iCloud account and password to sign in.
Note: Wondeshare takes your privacy seriously. We never keep a record of any of your Apple login information or content during any sessions.
The scan will be completed within a few minutes. Once it stops, you can view almost all the data in your backup iCloud file, such as contacts, messages, photos and more. Check them one by one and check the correct box. Then click on the "Recover button" to save them to your computer with one click.
Note: Before exiting the program, you can return to main screen to delete downloaded iCloud backups from your computer so that others have no way to access them. Then sign out of your iCloud account.
Many users don’t even think about it, and simply rebuild their device, and then rack their brains and wonder – where did all the contacts, messages, settings, applications go? Fortunately, in latest iTunes number 11, this process is automated and you don’t need to think about it. But what if you just don’t like the design of the new combine and want to stay on your old favorite iTunes? In this case, you will have to make a backup copy manually. You can also hide everything in iCloud. So, let's try to figure out the possible backup options...
Let's start with the fact that there are two ways to save an iPhone backup.
1) On a computer with using iTunes
2) In the cloud, on Apple servers via iCloud.
What is more convenient, everyone chooses for themselves. Simultaneously: both in iTunes and in iCloud backup copy iPhone cannot be stored!

In old iTunes
This is done quite simply, you just need to follow these steps:
1) connect your device to your computer
2) select your device on the left in the partition selection column
3) in the device window that opens, scroll to “ Backup”
4) Select the copying path: either it will be iCloud or a classic copy on your computer
5) wait for the backup process to complete

In the new iTunes
In the new iTunes version 11 (if you have it installed and you turned off auto-backup and forgot to do the last one), you only need to:
1) connect the device to the computer
2) select the device at the top right by its name
3) click on the Backup button

Where is iPhone backup stored on computer:
This location depends on the operating system installed on your computer:
Windows XP: \Documents and Settings\Username\Application Data\Apple Computer\MobileSync\Backup\.
Vista or Windows 7: Users\Username\AppData\Roaming\Apple Computer\MobileSync\Backup\.
Mac OS: \Users\Username\Libraries\Application Support\MobileSync\Backup.
Backup to iCloud
You can enable iCloud backup in iTunes or even on the iPhone itself. Open “Settings” – “iCloud” on your phone and turn on “Copy to iCloud”.

From now on, backups to the Apple server will occur every day without your participation.
But for this you need:
1) Connect to the Internet via Wi-Fi.
2) Connect iPhone to a power source.
3) Screen lock.
You can manually create a backup copy yourself. To do this, connect your iPhone to the Internet via Wi-Fi. Open “Settings” – “iCloud” – “Storage & Backups”. Select “Create a copy”.
How to restore an iPhone backup
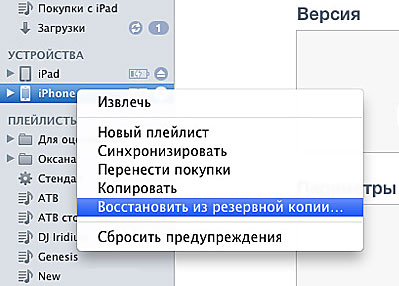
In old iTunes.
In the right sidebar, select your iPhone. Click the right mouse button on this item.
In the menu that appears, select “Restore from backup”. Specify the desired iPhone backup. Click “Restore”.
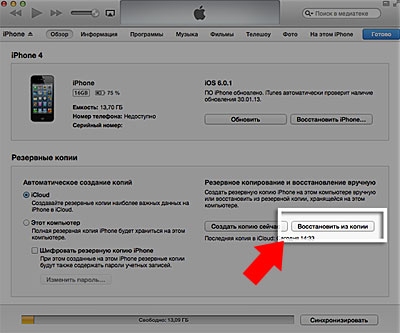
IN new iTunes.
In the lower right corner, click the device button. Go to the Review tab. Click “Restore from copy”.
Transfer data from iPhone
But this was only one of the options.
Option number two is a situation where you can’t make a backup through iTunes, but you need to do it.
Attention - for the method described below you will need installed jailbreak on your device. This method is not exactly a method, but only an opportunity to save the remains of Pompeii under various force majeure circumstances.
So, if iTunes does not want or cannot perform a backup, but it is very necessary, then the following will help to get out of the situation to some extent:
1. Contacts – var/mobile/Library/AddressBook. (backup copy iPhone contacts. There are two files in the folder, save both.)
2. SMS – var/mobile/Library/SMS.
3. Mail – var/mobile/Library/Mail.
4. Notes – /var/mobile/Library/Notes/.
5. Programs from App Store should be in iTunes, if not, click on iTunes on iPhone right click mouse, then – “Transfer purchases”.
6. Programs from Cydia will have to be reinstalled. You can save a list of them using AptBackup by installing the corresponding application from Cydia.
7. Photos are located in var/mobile/Media/DCIM.
8. Music must be in iTunes, if not, copy using file manager(and just don’t try to copy it back to them later, it will ruin your media library on your phone and you’ll only have to restore it complete update libraries).
9. Ringtones must be in iTunes, if not, copy them using the file manager for iPhone (don’t even try to copy them back later, it will ruin your media library on your phone!)
10. Calendar – /var/mobile/Library/Calendar.
11. Bookmarks, history – /var/mobile/Library/Safari.
12. Bookmarks from Safari in the form of icons on the desktop /var/mobile/Library/WebClips.
On all folders from the Library transferred manually, it is necessary to check the rights (0700 Owner – mobile, Group – mobile), and on the files themselves that are inside (0644 Owner – mobile, Group – mobile). If the rights are set correctly, then the contacts will be saved normally and there will be no crashes.
Now, having learned how and where to make a Backup, you will no longer be afraid of losing data when you change your phone, or in a situation where you made a mistake when speeding up iOS or improving the iPhone battery.