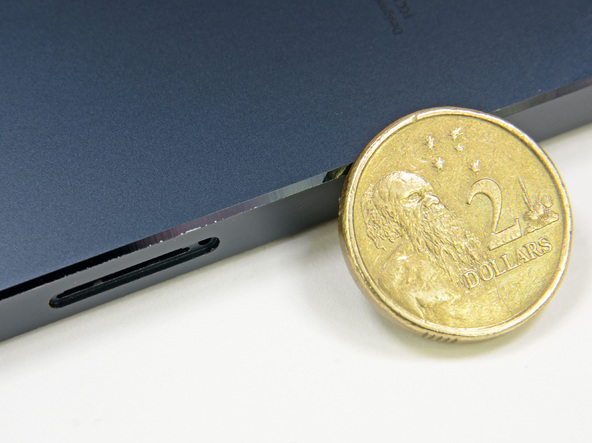
If modern schools were so modernized and fashionable that arithmetic was taught not from standard textbooks, but from Apple’s inventions, for example, from the iPhone, schoolchildren would know for sure that after one comes a three, then the letter G, then again a three and G, then again letter designation, but already S. Next would be lined up in a row: four, another four, then four S, five, five with the suffix S and five with the afterword S... Phew.. rather complicated system, right? It’s good that the corporation from Cupertino does not yet lay claim to the education sector and is content with achievements in the IT field.
Why are we talking about this in an article on the topic “how to disassemble an iPhone 5S”? So that you understand that there are much more difficult things than dismantling an iPhone yourself according to our instructions. With the help of this guide, you can easily and quickly disassemble the iPhone 5S into screws and cables.
To begin with, our prices for services are iPhone service 5S
| iPhone 5s repair | Price, rub. |
|---|---|
| Replacing the display | 2900 |
| Replacing the touchscreen (screen sensor) | 2900 |
| Replacing the back cover | 2490 |
| Firmware and software repair | 890 |
| Replacing the battery (battery) | please clarify |
| Repair after moisture ingress | from 800 |
| Replacing the microphone | please clarify |
| Replacing the charging connector (bottom cable) | please clarify |
| JailBreak iOS 7.x.x (jailbreak) | 900 |
| Other services | call |
| Unlocking iPhone 5s | please clarify |
| Phone diagnostics | For free |
| Activation of iPhones requiring ZIP code, social security number (SSN), etc. | please clarify |
| Trimming nano-SIM | 150 |
To work you will need the following tools:
- A set of screwdrivers for repairing mobile devices. Make sure that the diameter of the tools included in the kit matches the screws screwed into the smartphone;
- Small sucker;
- Small plastic mounting spatula;
- iOpener. For those who are not yet in the know, let us explain: this is a truly masculine accessory from Apple, originally intended for safely opening beer. Did your eyebrows shoot up in surprise? We understand, but we urge you to wait a little. You will soon understand why we need this branded opener.
Let's start dismantling the iPhone 5S.
We suggest you go over again technical specifications smartphone. What do we have here? Apple processor A7 with 64-bit architecture, innovative M7 motion coprocessor, 16, 32 or 64 GB of internal memory depending on configuration, 4-inch retina display with 326 pixels per inch, 8-megapixel main camera and 1-megapixel front camera for FaceTime video calling ,2 megapixels, fingerprint scanner in the HOME key. And all this power and performance, dressed in dark gray, silver and gold, you want to take apart? Get started! But we are not responsible for your actions.

Apple, as before, is trying to prevent possible disassembly of the iPhone 5S by all means. It must be said that if you came unprepared without the set of screwdrivers that we talked about at the beginning, you would be faced with an insurmountable obstacle in the form of firmly screwed screws. However, thanks to us, you know how to overcome them. Without fear, unscrew all the screws holding the case in place.

Have you unscrewed all the screws holding the panel in place? So let's get to the fun part! If you have previously had to disassemble an iPhone, then you are familiar with the mechanism for removing the display using a suction cup. However, in the case of the 5S, we would advise you to help yourself a little with a plastic spatula to avoid falls and broken screens.

If you're careful and patient enough, your efforts will pay off in a big way: the iPhone 5S display will start to peel off like clockwork. However, if you slightly lift the retina component, you will see that a wire extends from its lower part connecting the fingerprint scanner and the Lightining port. This feature assembly makes our task a little more difficult, since if we pull the suction cup too sharply, we risk inadvertently damaging the cable. Obviously, this cannot be done, otherwise the wire will need to be replaced.

But we are not dummies, so we do everything carefully and carefully, avoiding the dangers and pitfalls of disassembling the iPhone 5S on our own. Using the same plastic spatula, we separate the cable from the touch scanner.
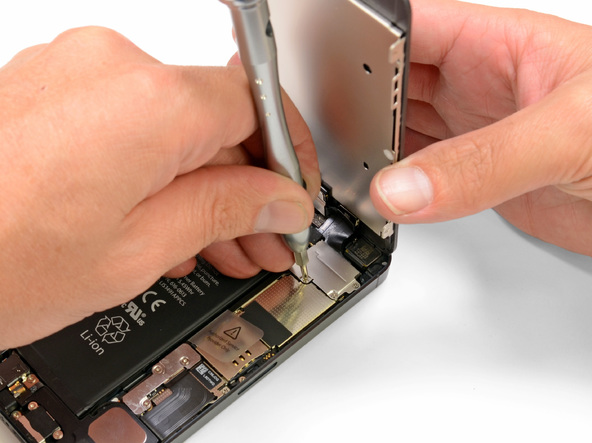
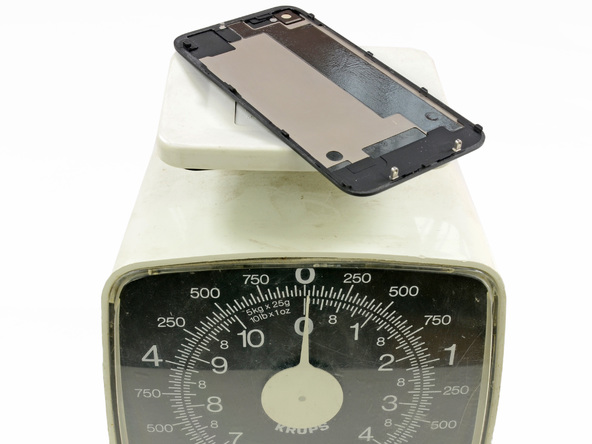
We can finally take a full look inside iPhone device 5S. At first glance, it is clear that compared to the iPhone 5, no fundamental changes have occurred. The most striking difference between the iPhone 5S and its predecessor is the disappearance of the battery removal tab.
Using the plastic spatula we already love, we open the metal latches and begin to butt with the battery. Why butt heads? Because due to the abundant adhesive layer and the absence of a battery removal label, it seems that the manufacturer wanted to definitely stop disassembling the iPhone 5S at this stage. Surely the insidious plan was this: even if we get to the battery, we will forever get stuck in the glue on which it is planted, and give up without even seeing the thinnest hair of Munchausen (read: an ejection tag) to pull it out.

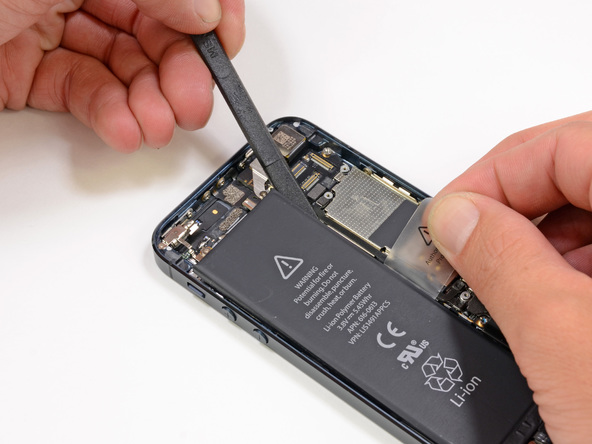
But the wrong ones were attacked! We found a way out of the situation and removed the battery using the same iOpener, like real men.
If you suddenly have excess glue, then during initial disassembly you can simply remove the adhesive grooves, creating new ones during reassembly.

Once you have removed the battery, you can begin removing iPhone screen 5S. You just have to disconnect the cables with a spatula front camera, image processor and LCD panel, and voila - the retina display is removed without any problems! Please note that there has been no progress, regression, or even any significant changes in the 5S display compared to the five. The screen has not become larger or smaller, and still has the same quality characteristics. No surprises.

Now we quickly remove the fingerprint scanner from the HOME key. What an exciting moment... Externally, the touch user fingerprint recognizer is nothing special. But the technology contained within is amazing. Let us bring you up to date: about a year ago, a company from Cupertino acquired a patented technology from Authen Tec, according to which the scanner “photographs” your finger, but does not send its image to Apple. In addition, thanks to the sapphire glass shell, it is preserved for a long time and is practically impossible to disassemble by researchers like you and me.

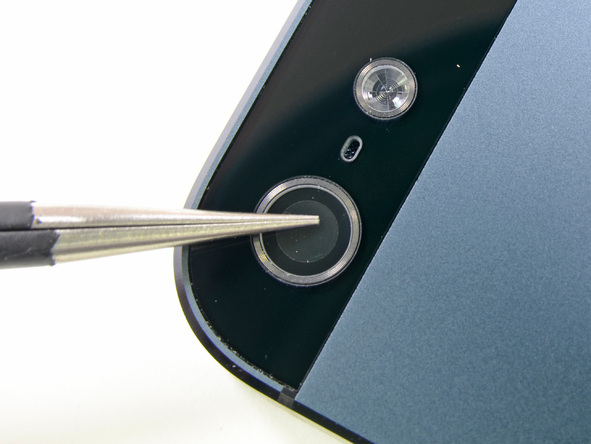
Let's move on to the main camera. As you can see, the marking reads: “DNL333 41WGRF 4W61W”. How, is the camera really the same as in Sony? Jim Morrison says no. Allegedly, only the letter designation is the same, but the filling is completely different.

In general, you can notice that the internal iPhone design 5S is simple and concise. There are far fewer vulnerable cables and connecting cables that can be damaged by one careless movement.
We got to the wi-fi module. Labeled as Murata 339S0205, the module is absolutely the same on smartphones with different amounts of memory. Sometimes, however, there are differences in several symbols, which probably means different manufacturing plants.

We study with trepidation the IC characteristics of the iPhone 5S:
- Qualcomm PM8018 RF power management IC
- TriQuint TQM6M6224
- Apple 338S1216
- Skyworks 77355
- Avago A790720
- Avago A7900
- Apple 338S120L
- SK Hynix H2JTDG8UD3MBR 128 Gb (16 GB) NAND Flash
- Broadcom BCM5976 touchscreen controller
- Texas Instruments 343S0645 touchscreen interface
Now they are all at a glance.

We continue to study the specifications of the iPhone 5S. On the inside of the logic board we read: Apple A7 APL0698 SoC, Qualcomm MDM9615M LTE Modem, Qualcomm WTR1605LLTE/HSPA+/CDMA2K/TDSCDMA/EDGE/GPS transceiver. These long, complicated names just mean the processor is labeled and the presence of the long-awaited motion processor.

It's time to deal with another feature of the 5S model, the A7. Along with the fingerprint scanner, the A7 processor is one of the main iPhone differences 5S from iPhone 5C. Apple says that the performance of the A7 processor is twice that of the A6, so users for whom device power is a priority will choose not the 5 or 5C, but the iPhone 5S.

This increase in performance is associated, firstly, with the 64-bit architecture, and secondly, with the replacement of obsolete ARMv7 components with the ARMv8 set. ARMv8 was designed specifically for 64-bit architecture. What is especially valuable is that it increases the productivity of the gadget without impacting time battery life. Since the technology has only recently appeared in mass products, we cannot yet tell in more detail what its internal structure is.


Now comes the front camera, which we use for self-photos or for communicating through video applications. After everything we've done so far, removing it is a very simple task since there's nothing holding it in place other than a couple of screws. Let's take our screwdriver and get to work!

Bottom part iPhone cases The 5S has a lot in common with the iPhone 5. However, when you dismantle the device, you will definitely notice that the speaker is much easier to remove. Along with it, the headset jack, microphone, and lighting port are removed. Also easy and painless.

We are forced to resort to such “assembled” extraction of a group of components at once, since they are interconnected and do not represent separate modules.
Another hardware update iPhone 5S - double flash. Inside the camera there are white and yellow LEDs, designed to balance colors when shooting at night and protect users from taking Casper-style shots.

So, it's time to sum up some results of the analysis of the iPhone 5S. Firstly, we were convinced that, as in other branded devices, the screen is removed almost first of all, which means it can be replaced quite easily.
After several years of using an Apple smartphone, people are starting to wonder: how to disassemble the iPhone 5? Someone will ask: why is this necessary? There are quite a few reasons that motivate iPhone fans to do this. They can be listed almost endlessly, but we will describe only three of them, because one way or another, that’s not what you’re here for.
The first reason is to give your device a unique, fresh look. The fact is that over time, the back panel on your iPhone can get pretty frayed. And if you have black iPhone version 5, then paint problems will definitely force you to do this.
The second reason is scratched protective glass, which prevents the sensor from working properly. The third reason is problems with the hardware. Poor battery condition, faulty Home and Power keys, or even a broken screen.
Professional Tool Set
All these problems make us think about whether to take the iPhone to a service center or disassemble the device ourselves. A trip to the service center can hit your wallet. After all, you will have to pay for the materials and the work of the master. Doing disassembly yourself is not as difficult as it seems, and besides, you can save a lot of money on it. In this article, you will learn how to disassemble the iPhone 5 and iPhone 5s yourself.
So, before you begin the disassembly procedure, you must stock up on time and the necessary tools for this. A regular screwdriver is not enough here. You can buy tools for disassembling an iPhone in an online store. After purchasing all the necessary tools, you can start working.
First, turn off the device. You start the same way as in the case of the iPhone 4/4s: unscrew the 2 screws at the bottom of the iPhone 5 case. For the iPhone 5s, the disassembly procedure begins in the same way.

We take the suction cup and, with its help, lift the screen. Next, we move away the structure with the screen, but not completely. Only the part where the Home button is located. For iPhone 5s you will need to disconnect the cables that lead to the motherboard from touch sensor ID. Top part remains connected to the rest of the smartphone with a small cable.

Having placed the screen unit vertically, unscrew the screw that holds the cable fastening. Use a plastic spatula to disconnect the cable. The screen unit is now detached from the body. If there were problems with the Home button or the cause of disassembly was a faulty speaker, screen sensor, or broken glass, then we continue to disassemble the screen unit.

To replace the speaker, you will need to unscrew 2 screws and disconnect the contacts from the screen unit. The speaker is now ready to be replaced. We remove the Home button from the bracket and replace it if it was faulty. In order to replace the glass or screen, unscrew the screw of the metal base. After this, nothing prevents you from replacing the screen or broken glass.

In order to replace Home button in iPhone 5s, also known as Touch ID, you need to pry it off with a rubber spatula and carefully remove it.

If the problem was in the battery, the board, or you want to change the color of the case, then we continue the process of disassembling the iPhone 5. To replace the battery, you need to disconnect the cable from the board with a plastic spatula. Next, use the same spatula to pry up the battery and pull the plastic tab (on the iPhone 5s, Apple abandoned this label). We extract battery and we replace it.

The battery in the iPhone 5s can be removed immediately after disconnecting the Touch ID cable and the cable connecting the battery to motherboard without completely removing the screen unit.

Next, we proceed to dismantling the motherboard. However, there is no significant difference between the iPhone 5 and iPhone 5s. To do this, you need to disconnect the antenna connector module from the motherboard, which is located at the bottom. The next step is to unscrew the screw securing the board to the case. After that, at the top of the smartphone we find the screws that attach the contacts to the inner wall of the iPhone 5 case. We unscrew them. The motherboard is completely free and can be removed.

If necessary, you can disconnect the camera by unscrewing 2 screws. If it was damaged or faulty, repair or replace it.

Next, we continue dismantling the bottom module, which includes a headphone jack, earpiece, bottom microphone, Wi-Fi antenna and Lightning connector. This is not difficult to do, but it will require some effort, since the entire structure is secured with glue. You can also disconnect the Lightning connector if there is any problem with it and replace it.
iPhone 5 disassembly instructions
Disassembling an iPhone 5 may affect a number of parts. There is a whole list of parts that can be replaced when disassembling the phone. Among them:
- Audio control and power button cable;
- Display block;
- Speaker;
- Front clip panel;
- Battery;
- Front panel;
- Home button;
- Home button rubber cable;
- Connection cable;
- LCD protective panel;
- Lighting jack and headphone port;
- Motherboard;
- Power button;
- Rear camera;
- Screen;
- Back cover;
- Screen protection;
- SIM card;
- SIM ejector lever;
- Speaker housing;
- Vibrator;
- Volume control;
- Wi-Fi antenna.
As we can see, the list is impressive. Let's look at the disassembly using the example of the necessary replacement of the audio control and power button cable.
So let's start with an inspection. If the screen is cracked, cover the glass when you make the repair; this will prevent future destruction of the display and will not hurt your hands.
Apply overlapping strips of clear packing tape to the display surface until you have covered the entire surface. This will contain glass shards, maintaining structural integrity, while you lift and remove the display. Wear glasses to protect your eyes from glass flying out during repairs.
Video instructions for disassembling iPhone 5 with your own hands
Attach the suction cup above the home button. It is necessary that the bowl completely covers the display so that the seal becomes airtight.
When opening a phone with cracked glass, carefully peel a couple of strips of packing tape across the front of the phone and release any air from under the film.
While holding the phone down on one side, pull up on the suction cup to slightly separate the front panel assembly. Apply firm, consistent effort. The display unit is attached much more tightly than most devices.
Using a plastic screwdriver, begin to pull the back cover down, away from the display unit, while you lift the suction cup.
Locate the clips that hold the front panel assembly in place. You'll probably need to use a combination of a suction cup and a plastic screwdriver to loosen the front panel assembly. Lift the sides of the front panel by removing the clips on both sides.
Once you have released the clips on the bottom and sides of the panel assembly, remove the bottom section. Slowly lift the panel assembly from the front until it reaches approximately a sharp corner.
Unscrew the 1.2 and 1.6 mm screws without touching the front panel wire bracket to the motherboard. From the front, disconnect the panel cable bracket. Using a plastic screwdriver, remove the 3 front panel wires: Front camera, sensitivity cable, LCD sensor and digital cable. Remove the front panel.
Remove the 1.8 and 1.6 mm screws securing the bracket metal battery from the motherboard, and remove it from the iPhone. Remove the battery.
Using the tip of a screwdriver, pull the data antenna cable disconnect above the speaker shell out of its socket on the motherboard. Remove the 1.5 and 2.3 mm screws and bracket from the top.
Interconnect cable on top;
Cable button with connectors;
Bottom interconnect cable.
Disconnect the parts in the following order:
2 screws 1.3 mm from the inner upper part of the housing wall;
1 1.2mm screw remaining in the middle of the motherboard bracket;
Bracket for the middle section from the motherboard.
Use a special screwdriver to pry the light cable connector out of the motherboard socket and pull the cable back and to the side.
To understand how the iPhone 5 is disassembled, you will need a few more shenanigans. Click on the SIM card output on right side iPhone using a curved paperclip to open the SIM card slot. Remove it.
Remove the 2.3mm and STANDOFF 2.7mm screw while holding motherboard. Turn the motherboard assembly towards the battery side rear housing. Using the tip of a special screwdriver, tear out wifi cable antennas from the socket on the underside of the motherboard. Pull out the motherboard connector. Using the tip of a screwdriver, lift up the rubber bumper, it is located below the power button.
Remove the 1.6mm and 1.9mm screws and the 2.9mm STANDOFF screw from the metal bracket between the rear flash and the camera window. Remove the metal power button bracket. Use the tip of a screwdriver to flip the metal bracket over while holding the power switch.
Press down on the power button on the front of the phone with the tip of a screwdriver, then remove the power button. Unscrew the 2.3 mm, 1.7 and 1.6 mm screws, securing the vibrator and vibrator bracket from the housing. Remove the 1.5 and 1.8 mm screws while holding the volume button and the ringer mute bracket on the side of the back cover:
We disconnect the bell switch using the usual method. Next, disconnect the volume buttons. Next is the power button bracket. Disconnect the cable from the glue. Continue to disconnect the audio control cable upwards from the back of the case.
Now you know how to disassemble an iPhone 5. Not difficult, right? ☺
iPhone 5s users, after several years of active use of the device, sometimes try to disassemble it. At the same time, it is not enough to figure out how to remove the cover from the iPhone; you need to be able to navigate the “stuffing” of the device. How to disassemble iPhone 5S - one of the most popular versions mobile gadgets from Apple - see step by step instructions below.
If you are wondering how to disassemble an iPhone 5 and change the case, you need to prepare special tools. Every home probably has its own set of miniature screwdrivers, but they won’t fit. Replacing the case on iPhone 5, 6 and other versions of Apple gadgets requires the use of special tools that can be easily found in online stores. That's what they're called - iPhone disassembly kits.
Replacing the case on an iPhone 5S will require the use of the following 4 tools:
- Pentalob - five-blade screwdriver.
- Phillips screwdriver.
- Vacuum suction cup (without a suction cup, replacing the case on the iPhone 5C is unlikely to be possible).
- Plastic spatula (or something similar).

How to disassemble iPhone 5 and how to open the iPhone cover
In iPhone 5, replacing the case is possible not only in conditions service center. You can easily use iPhone 5 at home, as well as other, more advanced models - 6, 7.
iPhone 5C model disassembly, steps:
- The first step is to unscrew the screw at the bottom of the gadget’s body. Devices version 5 and above use so-called pentabolt bolts to prevent the user from disassembling the phone themselves. Earlier models used Phillips screws.
So, you need to unscrew the two screws at the bottom of the phone panel. If you don’t have a special screwdriver, you can use a flat tool, sharpening it on the sides. But keep in mind that if you do not use tools specifically designed for disassembling the iPhone, the bolts may be misaligned. Therefore, before disassembling the device, stock up on additional Phillips head bolts.
- Take a vacuum suction cup and lift the screen, carefully helping yourself with a spatula. What is a spatula used for? To avoid damaging the screen. So, for this purpose you could use a screwdriver, in which case the chances of damaging the display would be increased.
- Carefully lift the screen from the Home button side.
- Again use a Phillips screwdriver and remove the two bolts that secure the screen. Using a spatula, divide the body into 2 parts.
- Unscrew the Home button. And then remove it from the device.
- At the top of the smartphones there is a camera, speaker and proximity sensor. But before doing this, you need to carefully remove the mounting plate.
- Then you need to finish disassembling the front panel by removing the metal protection.
- Now you can start disassembling the iPhone case. And the first thing you need to do is remove the battery so as not to expose yourself to the danger of electric shock. To do this, you need to disconnect the cable from the board. This is done using the same shovel.
Keep in mind that the battery is glued and requires some effort to remove it from the phone. However, securing the battery with glue is not strong, and even with light force the battery will come out of the case.
- Get the camera. This is quite easy to do, since, unlike the previous smartphone model from Apple, the camera is not attached to the body in any way.
- Remove the motherboard. To do this, you need to unscrew the screws and contacts under the rear panel. Here you can see that the board is attached quite firmly. But after unscrewing the bolts, it is easily removed from the device.
- Delete protective film processor and remove it.
- Remove the Wi-Fi antenna, headphone jack, and speaker from the device. All parts are attached to the body sufficiently big amount glue. To remove them, you need to carefully remove the adhesive mass.
- Remove the remaining parts - Wi-Fi antenna, similar GPS device, vibration motor for calling.
- That's it, the procedure called iPhone 5 disassembly, and the answer to the question of how to open the back cover, is completed. By remembering these simple instructions, any user will be able to understand how to replace the case on the iPhone 5s. You can assemble the iPhone 5S case by following these same instructions in reverse order. When you turn on the gadget after assembly, you will need to unlock the device by entering a password.
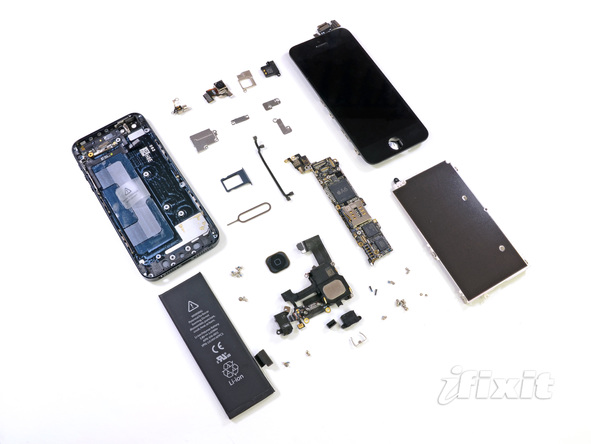
This is what a completely disassembled iPhone 5S looks like:

As you can see, disassembling the iPhone 5 with your own hands is not a very difficult task, and can be done by anyone who has at least a little knowledge of technology. Replacing the case on the iPhone 5, when necessary after it is damaged, which often happens after 2-3 years of use, can also be done by the owner of the gadget himself. But if you are afraid of damaging some parts of the iPhone case or its internal elements, it is better not to risk removing the back panel and opening the “filling”. Let the iPhone 5, 6 or other version of the gadget be replaced by a service center specialist.
Replacing the case on iPhone 5: errors
If replacing the case on iPhone 5 and later models - 6, 7, etc. is carried out not by a specialist, but by the user himself, various types of errors may occur that can disrupt the functionality of the gadget. To avoid them, you need to familiarize yourself with the basic rules before disassembling the device.
In a situation where the replacement of the iPhone 5C case will be done by the device owner himself, the following must be taken into account:
1 If the owner has firmly decided to change any part of his gadget, he must be sure that he has the necessary knowledge and skills, and also carefully study the instructions for disassembling the iPhone. This rule must be followed regardless of which version of the gadget will be disassembled - the fifth iPhone, 6, 6S or others - older or newer versions. If you have the slightest doubt, it is better to use the services of a professional technician. 2 All work must be carried out carefully and slowly. The parts inside the iPhone are very fragile, and any careless movement can cause them to break.
Attention, 6th generation iPhone! Let's call it... iPhone 5! This model was announced on September 12, 2012. It comes in black and white colors and capacity options of 16, 32 or 64 GB. Now get ready for the disassembly of disassemblies - we are disassembling the iPhone 5!
This guide is a translation of the article: http://www.ifixit.com/Teardown/iPhone-5-Teardown/10525/1.
Warning
This article is not a guide to action! All responsibility for collecting and disassembling your device lies with you.
Many manufacturers do not bear warranty obligations if the device has been disassembled by the user. If you do not want to lose the warranty for your device, check the terms of the warranty in the documentation or with the device manufacturer.
Tools used
| PH00 |
It's early morning in Australia, and we're heading to the office of the Australian online store MacFixit, where we're going to disassemble the brand new iPhone 5. Many thanks to this store!

So, iPhone 5 is here with all its “heavy artillery”:
- 4 inch Retina display display with a resolution of 1136×640 pixels (326 pixels/inch)
- Apple A6 SoC
- 8MP iSight camera
- 8-pin Lightning connector
- support wireless communication 4G LTE
- mobile operating system iOS 6

The iPhone 5 cannot be confused with the iPhone 4 or 4S. On the outside we see big changes.
The most noticeable thing is that instead of a large 30-pin dock connector, there is now a miniature Lightning connector at the bottom of the phone.
The headset jack has been moved to the bottom of the iPhone, next to the updated microphone grille - now it's in the form of rows of holes, rather than a slot covered with mesh.
Also notable is that instead of a steel surround, the 4S now has a slate-colored pickguard with beveled edges adjacent to the front and back panels.

Terrible five-blade propellers! It's good that we have a special screwdriver to deal with them.
It's incredibly convenient that Apple has been using screws with the same five-prong slot in the iPhone 4 and 4S models for 2 years now. Alas, the shafts of the new screws are different.
The solid back panel is reminiscent of the iPhone 3GS, with the same square edges as the iPhone 4, but with a beveled edge.

What is it? Vacuum suction cup? Such tools have not been required to disassemble an iPhone since the 3GS!

Since the front panel of the iPhone 5 is removed first, replacing cracked glass will be easier than usual. Thanks Apple!
For comparison: it took us 38 steps to remove the module iPhone display 4S. So there is a possibility that new iPhone will prove to be the most repairable of all.

The display connector is firmly secured to the system board with regular Phillips screws.
We unscrew them, pry off the connector with a special plastic spatula and disconnect the display.
The simple removal of the display module reminds us of disassembling the iPhone 3GS.
Rejoice, display breakers and repairers!

Removing the front panel of the iPhone 5 reveals many enticing details inside.

So what do we see? Larger battery? Antenna connectors? Speaker? Cameras? Vibrate alert? Home button?
Don't be afraid, everything is in order; We will definitely take a closer look at each of the components as we extract them.

As always, the first step is to disconnect the battery to avoid electric shock.
The battery connector is secured to the system board using 3 #00 Phillips head screws and a metal retainer.
Hmm, this reminds me of something...
Model 3GS! It was easy to remove the display module, but the battery was a real hassle. And in models 4 and 4S it took 38 steps to remove the display module, but the battery is easy to remove. I would like to believe that Apple engineers began to meet our wishes, allowing us to remove the display module And battery in a couple of steps.

We take a special plastic spatula and use its flat end to pry up the battery, which is glued to something.
For the iPhone 5, Apple chose a different battery, with higher voltage and slightly larger capacity compared to the iPhone 4S. Let's compare the battery characteristics:
- iPhone 5 battery: 3.8 V – 5.45 Wh – 1440 mAh. Talk time: up to 8 hours for 3G networks. Standby time: up to 225 hours.
- iPhone 4S battery: 3.7 V – 5.3 Wh – 1432 mAh. Talk time: up to 8 hours for 3G networks. Standby time: up to 200 hours.
- Battery Samsung Galaxy S III: 3.8 V – 7.98 Wh – 2100 mAh. Talk time: up to 11 hours 40 minutes for 3G networks. Standby time: up to 790 hours.

On the back of the battery we see the inscriptions “MFR Sony” and “Battery cell made in Singapore”. After a little googling, we come to the conclusion that the battery is most likely made by Sony.

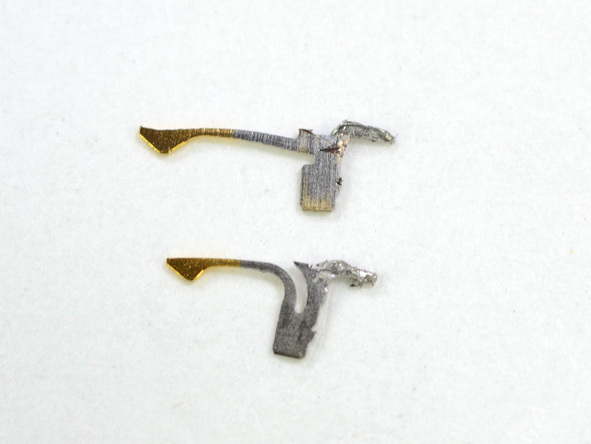
Inside the iPhone 5, all sorts of metal surface contacts are visible.
Spring contacts are easy to repair, but all parts must be carefully cleaned before reassembling the product. If you touch the contacts with oily fingers, it may cause component failure.

This contact connects the metal frame of the front camera with the metal frame of the main camera on the back side. Maybe this frame serves as some kind of antenna? Well, time will tell.
Speaking of antennas, we just disconnect the antenna connector near the battery from the motherboard using a plastic spudger.
IN iPhone models 4S there was an antenna in this place cellular communications. But we can only be sure as we further disassemble it.

At the top of the case we see several antenna connectors screwed tightly to the inside of the case.

We release them and, finally, we can pull out the detached motherboard.

The motherboard is removed along with the 8-megapixel iSight camera, leaving a few components in the rear of the case - the modular design principle wins again.
1 point for ease of repair.

We were told that if we diligently worked late into the night, we would be given a choice of our favorite drinks at the end of the showdown.
Then the drinks were quickly removed...
...and put it in the refrigerator!!!
We are happy until we drop.

Many components removed along with the motherboard are secured using screws and holders.
Apparently Apple takes great care to ensure that all connectors are tightly secured and do not become loose over time. Well done Apple.
Before we continue: a huge thank you to our colleagues from the Chipworks portal for staying with us past midnight and helping us identify the chips on the motherboard.

The lower part of the motherboard is replete with components:
- Skyworks 77352-15 GSM/GPRS/EDGE power amplifier module (circled in red)
- RF antenna switching module SWUA 147 228 (circled in orange)
- UMTS Power Amplifier/Duplexer Triquint 666083-1229 WCDMA/HSUPA (circled in yellow)
- Dual-band duplexer module Avago AFEM-7813 LTE B1/B3 PA+FBAR (circled in turquoise)
- Skyworks 777491-158 CDMA Power Amplifier Module (circled in blue)
- Power amplifier Avago A5613 ACPM-5613 LTE bands 13 (circled in pink)
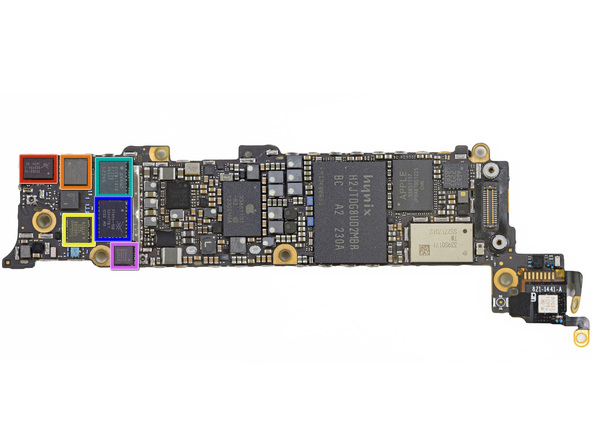
More chips from the lower part of the motherboard:
- Qualcomm PM8018 RF power controller (circled in red)
- Hynix H2JTDG2MBR 128 GB (16 GB) NAND memory (circled in yellow)
- Controller Apple power supply 338S1131 Dialog (circled in orange)
- Low power three-axis gyroscope STMicroelectronics L3G4200D (AGD5/2235/G8SBI) - the same as in the iPhone 4S, iPad 2 and other leading smartphones (circled in blue).
- Wi-Fi module Murata 339S0171 (circled in pink)

- Apple 338S1117 – unknown on given time chip (circled in turquoise). Inside we see the integrated circuit of the Cirrus Logic device, but it does not look like an audio codec.

And now the most important thing: the A6 processor.

The A6 processor is Apple's first custom-designed SoC based on the ARMv7 architecture.
According to Chipworks, the B8164B3PM marking (in the red frame in the picture) indicates a 1 GB Elpida LP DDR2 SDRAM memory module.
Not long ago, Apple decided to reduce chip orders Samsung memory. Is it time to invest in Elpida? Or is Samsung working on the next phone model? Think what you want.

Apple 338S1077 Cirrus audio codec close-up:
Why is it even needed? In short, it is a chip that encodes and decodes analog sound signal V digital signal and vice versa using analog-to-digital and digital-to-analog converters.

Chips on the system board. Just like ants on a log.
- STMicroelectronics LIS331DLH (2233/DSH/GFGHA) Powerful 3-Axis Linear Accelerometer with Ultra-Low Power Consumption (outlined in red)
- Texas Instruments 27C245I SoC touchpad controller (circled in orange)
- Broadcom BCM5976 Touchpad Controller (circled in yellow)
Instead of a single controller, Apple opted for a two-chip solution to control a larger screen, a la the iPad.
- Apple A6 processor (circled in turquoise)
- Qualcomm MDM9615M LTE modem (circled in blue)
- Qualcomm RTR8600 multi-band/multi-mode RF transceiver, same as the Samsung Galaxy S III (outlined in pink)

iPhone with 4G connectivity? It's more likely than you think.
We can now confirm that the Qualcomm MDM9615M is a 4G LTE modem that supports this new feature.
What will this newfound power be used for? Well, time will tell.
Nearby we found a Qualcomm RTR8600 multi-band/multi-mode RF transceiver. The RTR8600 works together with the MDM9615 chip to support multiple frequency bands, including 5 UMTS bands and over 5 LTE bands and 4 EDGE bands.

Let's take a closer look at the Broadcom BCM5976 trackpad controller.
Apple uses the same chip to control the trackpad in MacBook laptop Air. Here it works in conjunction with a Texas Instruments touchpad controller to process the Retina display signals.

Having completely disassembled the system board, let's return to the back of the phone case.

No amount of glue is scary for our plastic spatula!

We remove the Lightning connector module, which includes a headphone jack, earpiece and bottom microphone.
It looks like this module also has built-in wifi antenna. iPhone 5 now supports the 2.4 GHz and 5 GHz bands using a single antenna.

One of the three iPhone 5 microphones is removed along with the Lightning connector module.
We can safely assume that the microphone located at the bottom of the device is used for voice commands and calls.
The other two microphones at the top of the phone are still waiting their turn.

The Lightning connector looks so small that a 30-pin dock connector could easily swallow it:

There are 8 pins clearly visible on this new Lightning connector. Although the official Lightning connector pinout has not yet been published, we can confidently say that one of the wires is used for power and one for ground. As for the other six, we can only guess.

Apple says the Lightning connector is completely digital. However, they also claim that the iPhone 5 supports VGA analog audio and video output, so there is a possibility of some kind of digital-to-analog conversion in the cable.

Upon further examination of the Lightning connector, we see neatly placed contacts and a cable retainer.

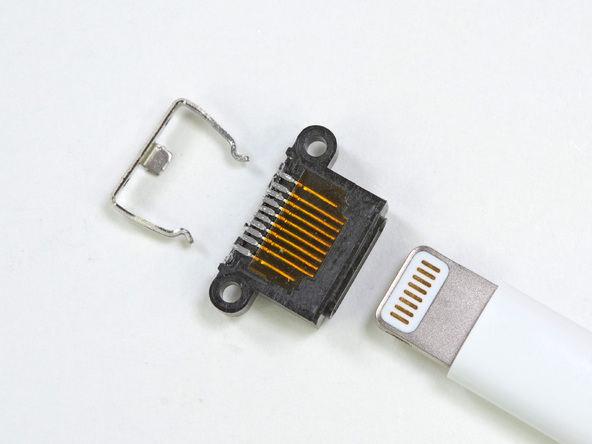
Each contact is resilient and gold-plated at one end to ensure good conductivity between connector and socket.
Although there are still a few components left in the lower part of the case, it is impressively lightweight.
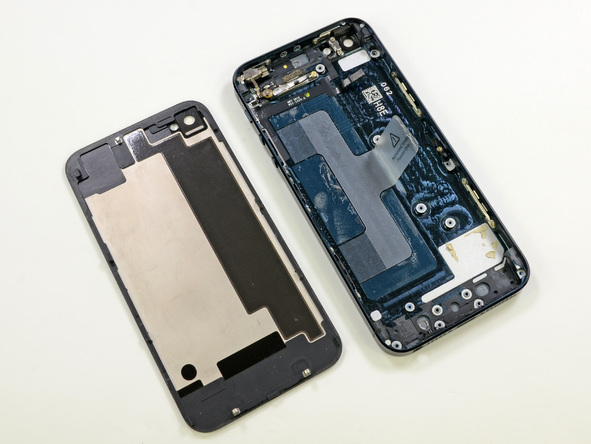
Using high-precision technical scales we have established that all rear end The iPhone 5's body weighs only slightly more than the glass back of the 4S alone.

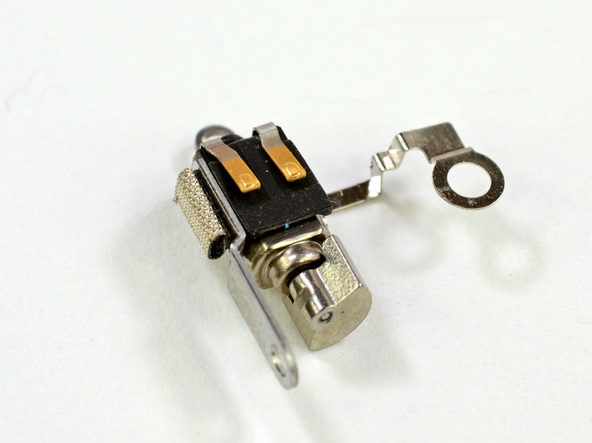
The vibrating alert's pressure contacts mean that replacing it does not require unsoldering or prying off small connectors.
Unlike the iPhone 4S, which featured a linear oscillating vibration alert, Apple has returned to a counterbalanced rotating design.
We've been praising Apple for introducing a quieter, less annoying linear oscillating vibration alert, and now we're perplexed why they went back to the old one.
The earpiece is easily removed: you need to unscrew 2 screws and disconnect the spring contacts from the display module.
The iPhone 4S speaker was glued to the fragile power button cable, and removing it required a lot of effort. And now it can be easily detached from the display - hurray, another plus in terms of ease of repair!

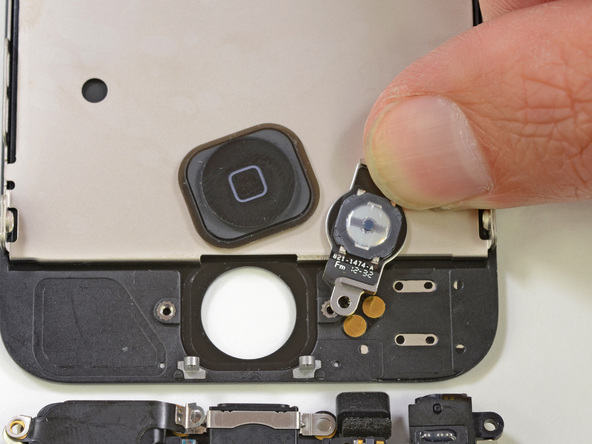
The new version of Apple's classic home button, the Home button, features a built-in metal holder that we hope will add significant strength to the much-used button.
Many iPhone 4 and 4S users encountered a problem with the Home button, but did not dare to repair it. The new design should not only make the Home button more durable, but also make it much easier to replace.
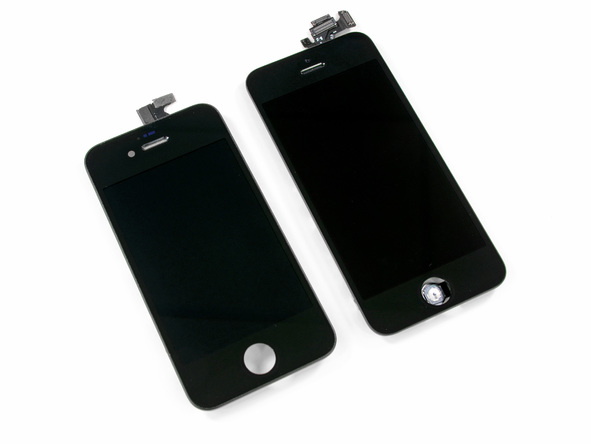
Let's put the display modules of the iPhone 4S and iPhone 5 side by side for comparison:
At first it seemed to us that this metal plate was part of the display module, but as soon as we unscrewed a couple of screws, it came off.
Most likely, this plate is used for protection and heat dissipation. The spring contact near the screw suggests that this plate may also serve as a ground connection.
We were asked if this plate was made of liquid metal. Sorry to disappoint you guys, but it doesn't look like an amorphous alloy. In terms of its properties - resistance, magnetization - the plate is very similar to stainless steel.

At the request of readers, we will check how susceptible the black coating of the case is to scratches.

We found that the end coating is quite durable, but the beveled edge is easy to scratch and leaves a shiny mark.
Moral of the story: be careful, or buy a phone case. Well, or just don’t worry and be free like the wind.

Although it is difficult to discern the external differences between this camera and last year's model Sony has significantly improved its performance, including low-light shooting and 40% faster image recording. On the picture iPhone camera 5 is on the left:

Will your photos come out as well as those in an advertisement for a new phone? And it’s up to you whether your photography will advance beyond table photos.
Apple is very proud that the new updated camera uses a sapphire crystal.
Since sapphire is a very durable material, it would make sense to use it as the outer element of the camera.
We tried scratching the transparent lens cover with steel tweezers - not a single scratch!
Although this does not prove that the protective cover is made of sapphire, it is really means that it is very durable and not susceptible to scratches.
After some thought, we decided that tweezers were not a reliable enough test for a lens cap.
We began to furiously scratch the phone with sandpaper and a bunch of keys. Back panel The iPhone 5 didn't survive this attack well, but the lens cover remained crystal clear. Wow!

We found them! As Apple promised, there are a pair of microphones at the top of the device.
First we found a front-facing microphone - perhaps for video chatting via the FaceTime camera and speakerphone.

And from the back? It looks like a three microphone system! The rear microphone works in conjunction with the main camera to record audio for videos, and is also used to suppress background noise during calls.

Ease of iPhone 5 repair: 7 out of 10(10 points means maximum simplicity).
- We are very glad that when disassembling the Phone 5, the display and glass are removed first. Most iPhone problems are caused by a broken front glass.
- After removing the front panel, it is easy to remove the battery; you just need to pry it off.
- The iPhone 5 still uses special pentalobe screws on the surface of the case, which makes the device more difficult to open.
- Front glass panel, Touchpad and LCD display are a single component, which increases repair costs.
- Many small components are soldered to one cable, which increases the cost of repair if one of them breaks.