Every user of office programs for working with text has, in one way or another, encountered the problem of extracting an image from a document. Often this was not a problem, but it could happen that it was impossible to extract the picture. Right-clicking on it did not prompt us to save it as a picture.
Fortunately, regardless of whether you use Microsoft Office or Google Docs, there is a great one-stop solution that you can use to save any image in any document.
How to Save Images from Google Docs
If in Google Docs, when saving an image from a document, you tried the simplest option: clicked on it and did not find the “save image as” option, then you need to do the following:
- Go to menu " File»> « Download How> Web page (HTML)."
- Open ZIP file, which was saved on your computer.
- Inside this zip file you will find a folder called " Images" It contains all the images that were in your document.
How to Save Images from a Microsoft Word Document
In some versions of Microsoft Word, you won't be able to simply click on an image right click mouse and save it on your computer. If suddenly you are using this version text editor, then you should follow these steps to extract the picture from Word document:
These simple steps can help you improve your skills in using office applications, increase your productivity and make many tasks easier.
Video: How to save a picture from a word document
In already finished Microsoft document Word may contain various images that may be needed for other purposes. Therefore, there is a need to extract such information into separate graphic files.
There are several options for solving the problem.
1. Taking a screenshot.
The easiest way to get a picture from a document is to take a screenshot of it.
You can copy the contents of the screen using the standard Print Screen key (the entire screen will be on the clipboard) or the combination Ctrl + C (only the image will be on the clipboard). Next paste into new file Paint program, which has the ability to trim off excess and make some graphic adjustments. After formatting, the image is saved in *.bmp, *.gif, *.png, *.jpeg.

In recent Windows versions There is a built-in application for creating screenshots – Snipping Tool. This program allows you to select the contour tracing mode (rectangular, arbitrary).

When you click the “New” button, you need to select the desired part of the image. The application has simple functionality for editing images and saving in *.png, *.gif, *.jpeg formats.

There are other programs to achieve similar goals. Eat free services and paid. There are enough paid options convenient application– FastStone Capture. Using this utility, you can make various screen capture options, followed by graphic editing and saving in different formats, including *.pdf.
2. Word functionality in latest versions.
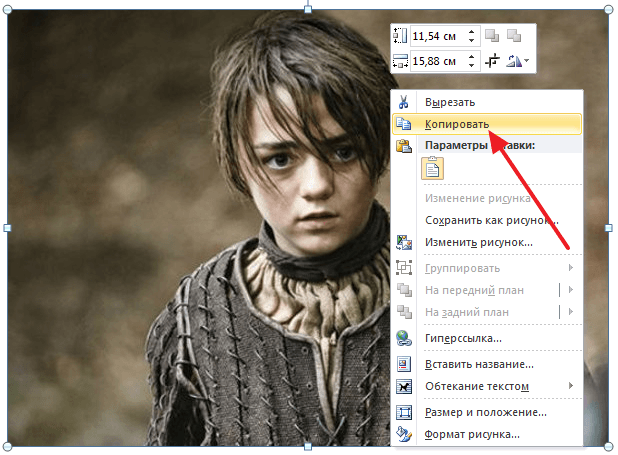
Versions of Microsoft Word 2010 and Microsoft Word 2013 provide standard saving of images through the “Save as Picture” context menu.

When you select this item, a standard file saving dialog box opens with a choice of format.

3. Saving a Word document as a WEB page.


4. Opening a Word document using an archiver.
Microsoft Document Word format*.docx is very close to an archived file in its structure. If you open it using archiving programs (for example, WinRAR or 7-Zip), you can also get a separate graphic file.
Using the context menu, *.docx is unpacked into the specified directory, in which the necessary images will be in the word/media subdirectories.

5. Open a Word document using a file manager.
Applications like Total Commander or Far, allow you to open *.docx as an archive. By selecting required file, you must press the key combination Ctrl + PageDown. After this, the word/media subdirectories will be available.

6. Using the Picture Manager.
In the latest versions in Office package another application has been added - Picture Manager for working with images.
If you select a picture in a Word document and copy it using the Ctrl + C key combination, you can paste it from the clipboard into the Picture Manager program via the context menu or the Ctrl + V key combination.

To save the image, you need to use the “Export Pictures” menu. An additional menu will open to specify the file format and name, image size, and working directory.

How to extract pictures from Word into Paint
To save a picture in the Paint graphic editor, you will need to right-click on the picture, and then select the “Copy” context menu item, or press the keyboard keys “Ctrl” + “C”.
Open Paint program.
Then right-click in the program window. Using the “Insert” context menu item, or using the keyboard keys “Ctrl” + “V”, paste the picture into the Paint program window.
Next, from the Paint program window, you can save the image in the desired location. graphic format on your computer.
opening a picture in paint
Saving images from Word to Microsoft Office Picture Manager
To save images from Word, you can use the Microsoft Office Picture Manager program, which is part of the Microsoft Office suite.
Copy the image to Word program and then paste it into the window Microsoft programs Office Picture Manager.
Next, click on the “Export drawings” link, which is located on the right side of the program window.
Select the format, name and folder to save the drawing, and then click on the "OK" button.
After this, the picture will be saved in a folder on your computer.
Save a drawing from Word to PowerPoint
Copy the image from the Word document.
Open PowerPoint, and then paste a picture into the program window.
Next, right-click on the image to context menu select “Save as picture...”.
save as picture
IN modal window Explorer, select a location to save the picture on your computer.
To pictures from the Internet
- How can I save an image on my computer?
- How can I find the source of an image on the Internet?
In this article we will try to deal with these problems and learn to overcome these small obstacles.
For example, we will use browser Google Chrome
.
Image size
First we need to find out whether the image what we want" download».
If picture has increased, then it is this enlarged version that needs to be saved. That is, they first increased it and then saved it.
Right-click on the photo or drawing you want to save from the Internet to your computer. A list (menu) will open.
From this list you need to select the item called “ Save drawing as..." It may also be called “Save Image...” or “ Save drawing».

Click on this item with the left mouse button. A small window will open.
In this window you need to select where you want to save the image from the Internet. For example, Local disk D.
How can I save an image on my computer?
There is nothing difficult here, however, users very often ask this very question.
If we find a picture that suits us on the Internet, we first open the picture in full size, and then right-click and select “Save picture as.”
After downloading the file, we can click on the " Show in Folder” and immediately see the downloaded pictures.

How can I find the source of an image on the Internet?
In order to find source image, open new tab in the browser, select “Pictures”, “Search by image”.

After that we need the tab " Upload file", "Choose File".

Select the desired file and click " Open».

Thus, we upload a picture from our computer, and the browser will give us all similar pictures to the one we uploaded. That is, this is a simple search by image.

We can also find the source of the image if we indicate link to this file.
It will be easier if, when hovering the cursor over the image itself, we press the right mouse button and select from the drop-down menu copy image URL.
After this, we again create a new tab, select “Pictures”, “Search by image” and “Specify link”, here we paste the link that we copied earlier, click Enter or a blue box that says “ Search by image».

And finally, another way is to simply dragging an image to the browser.
The result will be absolutely the same as with the above methods of saving a picture to our computer.
How to use the developer tools?
We need a tool tab " Network» Google browser Chrome. Here we click on the icon with the image of a funnel (“ Filter»), « Images" to display only pictures.

Consider the fact that no need to abuse copying pictures or photographs from websites, because each image or photograph has an author who may have copyright and then you may have extra problems, but we’ll talk about this in other articles.
The choice is always yours!
I KNOW YOU CAN!
“The highest praise for an artist is when you forget about praise in front of his work.”
(Gotthold Ephraim Lessing)
When working with text documents Often there is a need to save a picture from Word in JPG format. If you are also faced with this task, then this article should help you. Now we will describe several ways to save pictures from Word.
Method No. 1. Save the picture through the context menu.
After this, a window will open in which you need to select a folder to save the picture, the JPG file type and enter its picture name. After this, you need to click on the “Save” button.

As a result, the image you saved in JPG format will appear in the folder you selected.
Method number 2. Copy the picture.
If you need to transfer a picture from a Word document to graphics editor, for example, in . The easiest way is to just copy the image and paste it into the desired program. To do this, right-click on the desired picture and select “Copy”. You can also simply select the picture and use the keyboard shortcut CTRL-C.
After the picture has been copied, you need to go to the graphic editor and paste it using the “Paste” command or the CTRL-V key combination. After inserting a picture, you can save it in JPG or any other format.
Method No. 3. Extract pictures from a DOCX file.
If you need to save a large number of pictures from one Word file, then the previous methods will not be very convenient, since they require a lot of manual work. But, there is another option. You can save your document in DOCX and . This is possible due to the fact that the DOCX format is a ZIP archive in which the text is saved as XML, and the pictures are saved as regular ones. JPG files.
To open DOCX as an archive, you will need . For example, you can use free archiver 7zip. After installing it, you need to right-click on DOCX file y and select the menu item “7-zip - Open archive”.
Please note that if you do not have the "Open Archive" menu item or you cannot install the archiver, then you can change the file extension from DOCX to ZIP and open the file manually. In this case, the file will open even without an archiver, since operating system Windows can open ZIP files like regular folders.

After this, the 7zip program will open the DOCX file as an archive. In this archive you need to go to the folder /word/media/.

This folder will contain all the files from your document. They will be saved in JPG format.

In order to extract files from the archive, you just need to drag them from the 7zip program to any folder. For example, on the desktop. You can also use the "Extract" function. To do this, click on the “Extract” button and specify the folder where you want to transfer the JPG files.
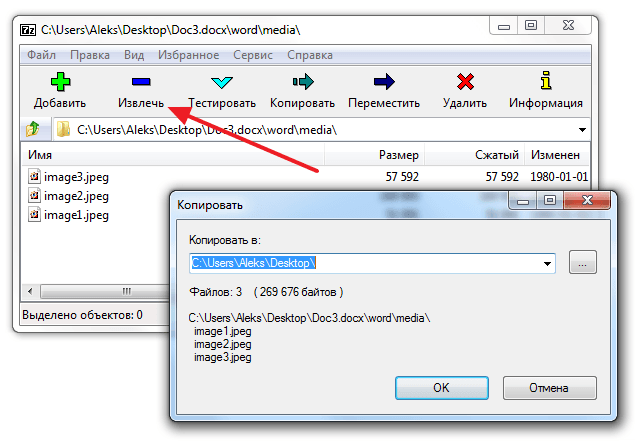
After selecting a folder and clicking on the “Ok” button, the JPG files you need will be unpacked.
So that a drawing drawn in the Paint program can then be opened on a computer, you need to specify a folder for it. Then it will be written there in the form separate file, which can not only be opened, but also placed on a flash drive or sent over the Internet. This procedure is called saving.
Many people do not save the drawing while working, but do it at the end. The fact is that when you try to close the program, having already drawn something in it, a window pops up in which the computer “asks” whether to save the changes.
If you click on the “Yes” button, a window will open where you will need to select a location for the drawing, give it a name and click the “Save” button.
If you click on the “No” button, the computer will close the program along with the drawing, and you will no longer be able to open it. That is, the image will disappear forever. And if you click on the “Cancel” button, the Paint program will remain open along with the drawing.
But it’s better to save it in another way. And not at the very end of the work, but from time to time. Because if there is a power surge or the computer freezes, the drawing may not be saved on the computer. This means you will lose it.
How to save a drawn drawing - instructions
Click on "file" on the left top corner programs.
IN new version program, instead of the “File” inscription there will be a button like this:


A new window will open. In it, the computer prompts you to select the place where you want to write the drawing. pay attention to top part. This is where the computer is going to send it.
In the example in the picture, this is the “Pictures” folder (My Pictures). But, in general, it’s better not to store it in it important information, as it may suffer if there are problems with the computer. Therefore, if something is dear to you, it is better to put it somewhere else. For example, to some folder on Local Drive D, if it exists, of course.
This means that in the window, instead of the “Pictures” folder, you need to select Local disk D. To do this, click on the “Computer” (My Computer) sign on the left side.
Or 
And after that, inside the window (in the white part of it) open the desired Local disk, that is, double-click on it with the left mouse button.

If you want to put the drawing in a folder, open it in the same window (click on it twice with the left mouse button).
After you have chosen the place where you want to save the drawing, you need to pay attention to the bottom of the window - to the “File name” item.
The name under which the drawing will be saved is written here. In the example in the picture, this name is “Nameless”. If it doesn't fit, you need to delete it and type a new, suitable name for the file.
And also pay attention to the field just below. It's called "File Type". By clicking on this field, we can select the appropriate format for the drawing or leave everything as is.

![]()
Now you can close the Paint program and try opening the drawing file on your computer. To do this, go to the place where you saved it. There should be a file there with the name you typed or the standard name "Untitled".