Here’s a seemingly simple question: how to make a frame in Word? One of my friends, in all seriousness, began to create a huge table on the entire page in order to draw up the borders and these same frames.
Of course, it will cope with its task and at the end we will receive a document with the boundaries we need, however, as in many situations with Office, we understand... all these crutches until the first serious document. There are enough in Word powerful tool to work with frames, so we won’t reinvent the wheel and look at how it works.
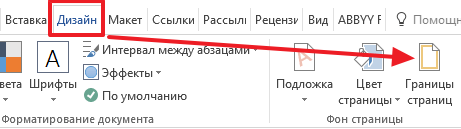
Before we start, I want to tell you about some features Microsoft Word. We will need the “Design” tab - this is relevant for Word 2013-2016, in earlier versions (2007-2010) it was called “Page Layout”, there are no other important changes.
In this post we will look at how to make a frame around text or for the entire document
How to make a frame in Word for an entire document
To create a frame, go to the “Design” (“Page Layout”) tab and click on the “Page Borders” button.

In the “Type” category, we note that we need “Frame”. Choose which one, thickness, color (you can even choose an ornament) to your liking and select the “Apply to entire document” option (but most likely it will already be checked by default) and click OK
I would like to draw your attention to the fact that you can choose which sides the frames will be on. (it’s not entirely clear why, but I think you can come up with a purpose for this functionality yourself)

If you need to draw a frame on a specific page, the sections will help us! Take it out desired page to a separate section and select “Apply to this section.”
How to make a frame around text in Word
If you don’t want a frame for the entire page... but just need to frame part of the text with a frame, then you can do this in a couple of clicks. On the “Home” tab there is a button for creating frames, just place the cursor in the required paragraph and select the frame that suits you.

This method is certainly good, but it does not have flexible settings - all frames will be simple solid lines
The “Borders and Shading” button on the “Design” tab (“Page Layout”) will help us create frames for a specific paragraph more functionally, as in the first point. Go to the “Border” tab and select “Apply to paragraph” - essentially everything is the same as in the first paragraph about the border for the entire page with the only difference - we apply it to a specific paragraph.

Well, you understand - you can adjust the thickness, color and other parameters yourself to your taste...
conclusions
In this simple way we were able to make a frame in Word! There is absolutely no need to fence in various tables and try to design them when Word has powerful functionality for working with frames... and taking into account the knowledge of sections, you can create miracles of design in a document.
Good day, dear readers of the site!
The time has come when the ability to work in batches Microsoft Office and in particular in word it has become as necessary as reading and writing. Let's look at one of the many questions about working with this wonderful program and learn how to make a frame in Word that will make the text more beautiful.
In this article we will work in Microsoft Office 2013.
How to make a beautiful frame in Word
First of all, open a Word 2013 document with text in which you need to make the appropriate changes. Go to the tab Design.

After this, on the right top corner click on the icon Page Borders. A window opens Borders and Shading. There are a bunch of different settings here, first let's do everything simply - learn how to make a frame for the entire text of the page.

Choosing a type Frame, then set Apply to the entire document (if we want to apply to the entire document) and click OK.
Now let's start getting twisted and making a more beautiful version (especially since there are a lot of settings - choose according to your taste and color).

Now we will improve. Let's create a colored outline for the paragraph. We do everything the same way: open the document, go to the bookmark Design. We put cursor on the paragraph we want to format. In the window that opens, go to the tab Border.

Notice the bottom right corner, which shows that any changes will be applied to the paragraph. On this tab you can select.
- no - there will be no frame;
- frame;
- shadow;
- volumetric;
- another.
Please note that all changes are immediately visible in the diagram on the right. Choose Frame. Select the type (click on the corresponding icon)

Choose a color. To do this, in the section Color, click on the small triangle. In the menu that opens, click the mouse and select the color we need (for example, red).

In chapter Width choose the size in points. To do this, in the section Width Click on the appropriate item. Let's look at the changes on the right. If everything suits us, then press the button OK.

That's all, where the cursor was, there was a beautiful paragraph outline.
And what is needed in order to do all this not in one paragraph, but in several? To do this, select the text we need.

Back on the tab Design click the icon Page borders. Go to the tab Border and click type Frame. 
Select the color and width and press the button ABOUT TO.

All these actions can be seen on video.
The desire for decoration is inherent in human nature itself. As for MS Word, you can decorate your document with an appropriate frame through a number of simple steps. Of course, all the delights of decorative work in Word do not end with frames alone. This section is dedicated to frames and only to them.
Solution for Word 2010
Frame in Word 2007

- On the toolbar, go to the “Page Layout” tab.
- In the “Page Background” section, select “Page Borders” (in the picture on the top right).
- The “Borders and Fill” window will appear in front of us, where on the “Page” tab on the left side we select the “Frame” section.
- On the right side of this section, select the type, width, and color of the frame. We also indicate to which part of the document the frame should be applied.
- "OK". Framed document.

Setting a frame in Word 2003

- On the toolbar we find the “Format” tab.
- Click and open “Borders and Shading”.
- Go to the “Page” tab, where we also select the frame, line type and width. We indicate which part of the document we apply to.
- "OK".

If the frames suddenly seem unnecessary to you, or there is a need to modify them, using this algorithm you can delete them (in the “Borders and Fill” - “Page” section on the left side, simply select “No”) or modify them (in the same place).
Conquer Word and see you again!
If there is a need to make a frame in Word, most users follow the most obvious path - they create a huge table that spans the entire page, inside which they place the text. But, despite its simplicity, this method of creating a frame is not very convenient. Especially if there are other tables in the text.
Instead, it's better to use a tool called Page Borders. With it, you can make a frame in Word for all pages of a document, only for individual pages or even for individual paragraphs of text. You can find out how this is done in this article.
How to make a frame in Word 2007 and 2010
If you are using Word 2007 and 2010, then to make a frame you need to open the “Page Layout” tab and click on the “Page Borders” button. If you have Word 2016, then the “Page Borders” button must be found on the “Design” tab.
The Borders and Shading window will then appear. Here you need to select a frame and click on the “Ok” button. After this, each page of the document will be framed.

If necessary, you can make the frame the way you need. In the Borders and Shading window, you can select the border type, color, and thickness.

If you only need to add a frame to certain pages then you can break Word document into several sections and then apply the frame only to those pages that are needed.

How to Make a Border Around Text in Word
If you don't need to make a border around the entire page, you can make one around a paragraph of text you select. For this Place the cursor on the paragraph around which you want to make a frame, click on the “Page Borders” button and go to the “Border” tab.

A quick way to create a frame around text
There is also a faster way to make a frame around text in Word. There is a button on the Home tab that users usually don't notice.

This button allows you to quickly create frames around text. To do this, just place the cursor on the desired paragraph of text, click on this button and select the appropriate frame.

How to make a frame in Word 2013 and 2016
If you have Word 2013 and 2016, then the frame is added in exactly the same way as described above. The only exception is the “Page Borders” button will not be on the “Page Layout” tab, but on the “Design” tab.
Otherwise, the process of creating a frame is exactly the same as in Word 2007 and 2010.
MS program Office Word has rich functionality. Not every user knows about full list opportunities text editor. Moreover, we often forget about the simplest options, for example, how to insert a frame in Word. This is especially true when editing creative works. This is exactly what we will talk about now.
Making a design in Word 2003 is quite simple:
- select a page by simply clicking on it;
- select a section Format on the top of the toolbar;
- select a sub-item from the list that appears Borders and Shading. A window of the same name will open;
- go to the second tab Page, choosing required parameters for the frame.

You can change the color and line thickness. WITH right side buttons mark the sides on which the frame will be. In point "Type" You can select line shapes - dotted, double, solid. Paragraph "Drawing" will help you choose a framing option. If you need to move the frame along the edges of the sheet, you should tap on the key "Options" on the lower right side.

How to insert a frame in Word 2007, 2010, 2013
In the 2007 release, the software interface was transformed. Here the algorithm of actions will be like this:
- first, look for the section at the top "Page layout";
- secondly, press "Page Borders".

Starting from version 2013, you will find this button in the section "Design".
The window that opens is similar previous versions. There are all the necessary parameters: color, type, line width, the ability to select a design with a duplicate of the picture, as well as the sides on which the frames will be.

We use the picture
You can design a document not only with special templates, but also with images. This will make the design more expressive and interesting. To do this, simply upload the element you like in the desired format.
The larger the size of the object, the better it will appear on print. Then insert the downloaded image onto the sheet. To do this, use the “Insert” menu, the “Drawing” item, or you can simply drag the file into the program window.

In the window that opens, go to the “Wrapping with text” subsection and select the “behind text” option. This way, the image will not cover the typed text, but will appear in the background. In addition, it is not tied to the edges of the page; you can move it to the very edge. If it does not fit in size, you can stretch it by the “corners”, they will be active. The dots in the corners change sizes, maintaining proportions, and on the sides they stretch horizontally and vertically.
Frame in Word around individual text
Inserting a design near a specific area is quite simple. The steps are almost the same as those described above:
- go to the section "Design";
- tap "Page Borders";
- in the menu that opens, go to the section "Border";

- press the button "Frame", "OK".
If you want to frame another paragraph, simply select it before following the instructions above.
Do not forget that you can change the type, size, appearance, drawing, location of the frame, it all depends on your wishes. The principle of installing this element is the same for all editions of Word, the only difference is in the arrangement of the elements. If you wish, you can easily cope with this; to do this, you just need to follow the instructions described above.
Now you know how to insert a frame in Word. In the article you will find options for all versions of the editor. Good luck!