Many users who are not particularly knowledgeable about the settings of primary input/output systems quite often come across the Legacy USB Support item among the huge number of various parameters. Nobody really understands what it is in the BIOS, why this option is needed, since its default value is usually set to Auto. However, sometimes you need to change this parameter. That is why it should be given special consideration.
Legacy USB Support - what is it?
If we talk about the function itself based on its name, it is not difficult to guess its purpose. It is enough to simply translate this term from English. The interpretation of this option assumes support for devices that connect to a computer or laptop through the appropriate interfaces and ports, just at the level of the primary system, as was originally provided for all other hardware connected to the motherboard.
But if we say that this is Legacy USB Support, in this particular case we are talking exclusively about peripheral devices (mice, keyboards, etc.). Sometimes this parameter may also apply to removable storage devices. And although this is not directly stated, quite often problems associated with the fact that some types of flash drives are not detected when installed as the first boot device are eliminated by activating this option. However, as practice shows, these are isolated cases, and they are mainly associated with devices from little-known manufacturers or specific equipment that is not initially supported in the BIOS.
How to enable Legacy USB Support?
Now a few words about what actions can be performed with such parameters. To get started, just look at its original default value. This is usually the automatic support selection option (Auto).

But what is it? In Legacy USB Support, if you expand the list of all possible options for setting values, you can see both activation (Enabled) and disablement (Disabled). What is it for? Only so that the user can choose whether he needs such support. Of course, in the case of flash drives, if they are not detected even if they are first inserted into the port, after which the computer is turned on and then entered into the BIOS settings, activating this parameter is mandatory. Roughly speaking, you need to first insert the flash drive into the USB port, and only then turn on the power for the download to begin.
Is it advisable to enable this option?
But, since enabling the option is mostly associated with peripherals (most often, as already mentioned, with mice and keyboards), many users have legitimate doubts about activating it. Is the system itself unable to identify such components? It goes without saying that if we are talking about an operating system in which installed drivers are responsible for the operation of such devices, there should be no questions. But few people pay attention to the fact that when support is disabled, such devices become inaccessible the moment they turn on the computer or laptop (even before the main operating system loads).
In other words, an external USB keyboard cannot be used even to enter the BIOS settings. That is why it is not recommended to completely disable this option under any pretext. By and large, it is better not to change the automatic value for selecting whether to enable or disable support at all! But if you are working with outdated modifications of Windows, such as the network version of NT, this option must be enabled.

When it is deactivated, quite often it will be possible to observe a loss of functionality of peripheral devices, which will be indicated in the equipment properties in the “Device Manager” (the device is disabled, it needs to be turned on, etc.). The saddest thing is that there is no way to activate disabled devices in the manager in such a situation.
Results
What is Legacy USB Support, apparently, many have already figured out. As for the main conclusion that can be drawn from all of the above, it should be noted that it is better not to change the default value of automatic activation or deactivation if the specified support is needed, otherwise you will not be able to enter the primary system later. You will have to additionally connect old PS/2 keyboards and mice. But what should you do if your laptop doesn’t have such sockets, the main keyboard is out of order, and the USB ports don’t work when support is disabled? Here's your answer!
The security mode in UEFI, or security boot, provides startup protection on a laptop or desktop computer: it blocks access to changing the boot priority from a CD/DVD, USB drive (including the ability to use the OS from a bootable USB flash drive), prevents attempts installation of an unlicensed, unauthorized OS, unauthorized intervention in the boot shell. In such situations, when loading, the message “secure boot violation” appears on the display, indicating that it is impossible to modify the boot in the BIOS (in BIOS), UEFI.
To remove this blocking, you need to disable the corresponding options in UEFI. After disabling protection, you can change the boot priority from disks and USB flash drives, as well as install any OS distributions.
This article will tell you how to disable secure boot in boot shell options. It describes in detail how to turn off the protection mode on devices of popular brands, and how to find out using the system settings whether Secure Boot is enabled.
Checking whether a function is active
You can find out the boot protection activation status in two ways:
Method number 1: in options
1. Press the “Win” + “R” keys together on the keyboard.
2. In the Run panel, type msinfo32, press Enter.
3. Find the “Loading Status” option. View its value: "Off." - protection mode is disabled, “On” - included.

Method number 2: in the Powershell console
1. Run the utility:
- open the Start menu;
- in the search bar, enter the name of the utility - powershell;
2. Click the utility line that appears in the Start panel list.
3. In the console, enter the command - Confirm-SecureBootUEFI.
4. Press "Enter".

5. The system will immediately display the protection status after entering the command: True - enabled, False - disabled.
How to open UEFI/BIOS settings
To deactivate Security Boot, you first need to open the UEFI or BIOS boot shell. This procedure can also be performed in different ways:
Method No. 1: using “hot keys”
Restart the OS. Press "Del". If logging into the shell failed, then another hotkey is used to enter boot settings mode. This could be “F2” or the combination “FN+F2” (on a laptop).
Note. The BIOS button may be indicated on the monitor during system startup.
Method No. 2: standard OS option
(option for 8/8.1)
1. Activate the slide-out panel (on the right side of the screen).
2. Go to: Settings → Change settings... → Update and... → Recovery.
3. In additional add-ons, set the restart mode to “Settings via UEFI”.
4. Activate the "Reboot" command.
Disablement Guides
ASUS motherboard (PC)
1. Restart your PC. Press the “Del” or “F2” key (depending on the specific ASUS model). When the shell is displayed, press "F7", "Advanced Mode" will be displayed.

2. In “Boot”, click on the “Secure Boot” line.

3. In the settings panel, set “Other OS”.

4. Go back to “Boot”, Compatibility Support Module (CSM).

5. Enable the Launch CSM option: set its line to Enabled.

6. In “Boot Device Control” set the value to “UEFI and Legacy …” or “Legacy OpROM …”.

7. Below in the list, in “Boot ... Devices”, select “Both, Legacy ... first” or “Legacy OpROM ...”.

All. The setup is complete. Protection is deactivated. Press “F10”, confirm the modification of the settings. Reboot your OS.
Asus laptop
1. In the boot shell, in Security - Secure Boot, set it to “Disabled”.

2. In “Boot” - Fast Boot, change the parameter to “Disabled”.

3. Save the options configuration (F10), reboot. Open BIOS.
4. In Boot - “Launch …” change the value to “Enabled”.

5. Save the changes and reboot the OS.
Asrock
1. In UEFI, open “Security” (the “Shield” icon in the top menu).

2. In “Secure Boot”, move the switch to “Disabled”.
3. Press "F10" to save the settings. Restart your PC.
Gigabyte
1. In UEFI, open the “... Features” menu.

2. Set options:
- Windows 8 Features - Other OS;
- Boot Mode Selection" - "Legacy only" / "UEFI and Legacy" (possible options);
- Other PCI Device ROM Priority - Legacy OpROM.
3. Save the modifications made using the “F10” key.
MSI
1. In the shell menu, go to: SETTINGS → Boot.

2. In Boot Mode Select, change the parameter to “Legacy+UEFI”.
3. Press F10 to save changes to options.
Toshiba
1. In Security - “Secure Boot” set the position to “Disabled”.

2. Go to the shell: Advanced → System Configuration.

3. Find “Boot Mode” (it can also be called OS Mode Selection) and set its switch to the “CSM Boot” position (alternative names for the parameter are CMS OS, UEFI and Legacy OS).

4. Activate the command to save settings using the “F10” key. Restart the system. Now you can use boot disks and flash drives, as well as install any OS.
HP
In HP Pavillion laptops, to deactivate you need to perform a few additional settings:
1. To enter the UEFI-BIOS during the reboot process, press the “F10” key (in some models: ESC → F10).
2. In the shell, go to: System Configuration → Boot Options.

3. Change the position of the following options:
- Secure Boot - Disabled (disabling protective mode);
- Legacy support - Enabled (enable compatibility with other OS).
5. For the new settings to take effect, activate saving the parameters using the F10 key.
6. Reboot the OS. Once the system restart is complete, a warning will appear and a request to enter the specified code (displayed in the line ... to complete the change). Type it and press "Enter". The laptop will automatically reboot.

To change the boot priority in order to use the installation USB flash drive when turning on the laptop, go to the start menu (ESC key) and make the necessary settings in the “Boot Device Options” section (F9 key).
Samsung
1. To go to the UEFI-BIOS shell, press the “F2” key while starting the laptop.
2. Go to the “Boot” panel, place the cursor in the “Secure Boot” line.

3. In the submenu, change its parameter to “Disabled”.

4. At the warning message, select OK (confirm the change).

5. After disabling the protection, the “OS Mode Selection” item will appear in the same list. Set the CMS OS (or UEFI and Legacy OS) parameter in it.
6. Save your settings changes (F10).
7. Restart the laptop and go into the UEFI-BIOS again.
8. Go to: Security → Set Supervisor Password. Press “Enter”, enter the previously set password. In subsequent fields, press “Enter” without entering any data.
At the "Changes...saved" message, use the Enter key again. Now the password has been reset and you have access to activate/deactivate Secure Boot protection.
Lenovo
- Enter the UEFI console using the F2 key or the Fn+F2 combination (depending on the model).
- Open: “Security” section → “Secure Boot” option. In its column, put the value “Disabled”.
- Save the option value (press F10).
Dell
In Dell laptops equipped with the InsydeH2O shell, deactivation of protection is performed as follows:

- The menu opens: Boot tab → UEFI Boot subsection.
- The “Secure Boot” line is set to “Enabled”.
- The settings are saved and the laptop restarts.
Bottom line
As you can see, the principle of disabling Secure Boot protection on different models is almost the same, with the exception of only some nuances related to the location of the menu and additional add-ons. Even if this review does not include the model of your PC or laptop, use the basic algorithm to deactivate the protective boot option. Namely: entering the UEFI shell → disabling Secure Boot (+ on some computers, enabling compatibility with other OSes) → saving the created shell configuration → rebooting the system.
Successful and quick computer setup! Be extremely careful when changing the value of options in the UEFI console.
UEFI Secure Boot- This is a standard protection on the BIOS, which limits the ability to launch USB drives as a boot drive. This security protocol can be found on computers with Windows 8 and later. Its essence is to prevent the user from booting from the Windows 7 installer and below (or an operating system from another family).
This function can be useful for the corporate segment, as it allows you to prevent unauthorized booting of your computer from unauthorized media that may contain various malware and spyware.
Ordinary PC users do not need this feature; on the contrary, in some cases it can even interfere, for example, if you want to install Linux together with Windows. Also, due to problems with UEFI settings, an error message may appear while working in the operating system.
To find out whether you have this protection enabled, you don’t have to go to the BIOS and look for information about this, just take a few simple steps without leaving Windows:

Depending on your motherboard manufacturer, the process for disabling this feature may look different. Let's consider options for the most popular manufacturers of motherboards and computers.
Method 1: For ASUS

Method 2: For HP

Method 3: For Toshiba and Lenovo
Here, after entering the BIOS, you need to select the partition "Security". There should be a parameter "Secure Boot", opposite which you need to set the value "Disable".

Method 4: For Acer
If with previous manufacturers everything was relatively simple, then initially the required parameter will not be available for making changes. To unlock it, you will need to set a BIOS password. You can do this using the following instructions:

Computers are developing more and more every day and this allows them to work even better and more reliably. Many have probably already heard about BIOS, and if you have already installed Linux, then you probably know what it is and have already had configuration experience. You've probably noticed that the BIOS is difficult to configure and use. This is low level software and has remained unchanged for the past two decades. Because of this, BIOS technology can now be considered outdated and in need of replacement.
The new system - UEFI will eventually replace the BIOS, but, like most new technologies, its implementation is moving very slowly and for a long time. Users are missing out on the importance of a low-level operating system, which is exactly what UEFI is trying to address. In this article we will look at the difference between uefi and bios, try to find out which is better, bios or uefi, and also determine which is better to use.
BIOS stands for Basic Input / Output System or in Russian - basic input and output system. This is low-level software that provides a layer between the computer hardware and the operating system.
The BIOS starts as soon as you turn on the computer, checks and tests the hardware, and then loads the operating system boot loader.
The BIOS board is built into every motherboard and, in addition to preparing BIOS hardware, can be useful in a number of other cases. Since BIOS is independent of the operating system, you can access its settings without having the OS installed. In addition, you can configure various hardware parameters - processor and memory frequencies, operating voltage, latency, and so on. This allows you to fine-tune your computer and get maximum performance.
Generally speaking, this is all that the BIOS does, there is only a pseudo-graphical interface, key controls and only hardware settings. The BIOS bootloader takes from the master boot record - MBR, and there can only be one bootloader. Naturally, there can be no talk about choosing a bootloader.
What is UEFI?
UEFI, or Unified Extensible Firmware Interface, is based on EFI - a development by Intel, which is designed to replace BIOS. The EFI standard has been developed over the past few years and has already begun to gain more popularity as manufacturers begin to use it on their devices instead of outdated BIOS technology.
UEFI supports all the features that were implemented in the BIOS, as well as many new features, which makes it the best solution for use on modern computers.
Here, in addition to initializing the equipment, reading settings from non-volatile memory and launching the bootloader, a large number of functions are supported. We can say that this is a low-level operating system. This is the main difference between bios and uefi. There is support for hardware drivers, and hence support for a mouse and graphics card; there is also a full-fledged console with support for launching applications, networking, and working with equipment. To the point where you can not only copy and move files on supported file systems, but also play discs or music if supported by EFI programs.
Although it has a significant advantage over BIOS, UEFI has some limitations on 32-bit processors. 64-bit processors fully support UEFI, but 32-bit processors do not support some functions and the operating system must emulate the BIOS environment for them in order to work normally.
On many devices you can now use two legacy bios or UEFI modes. During this process, many useful functions are lost. CPU makers and operating system developers are working together to fix this problem, and they're doing a good job.
Determining the UEFI or BIOS used on your computer is very simple; you can simply look at the computer's setup interface before booting. I think you will already understand everything here.
Which technology is better?
The old BIOS technology has been the industry standard for the past twenty years and during this time it has not seen many changes due to limitations such as only one megabyte of memory, 16-bit instructions and an MBR disk partition table that supports maximum 2 TB hard drives. and no more than four sections. Twenty years ago this was quite enough, but by modern standards such restrictions are too strict.
In addition, the flexibility of UEFI is necessary for technologies available now or those that will become available in the future. The BIOS limit of one megabyte created a lot of problems for hardware developers, but now there is definitely enough space to load device drivers.
UEFI is modular and, thanks to the GPT partition table, can support 128 partitions up to 8 exabytes in size. It also provides tighter integration with the operating system. A very important component of UEFI is increased security. This is an important difference between bios and uefi. Users can only install registered operating systems. Each operating system is given a key built into its boot loader, and the UEFI system reads that key and compares it to its database. If this key is not in the database, the operating system will not be allowed to boot. This could cause many problems with Linux distributions, but the problem has been resolved. In addition, users can add keys to the database themselves.
Thanks to the modular structure of UEFI, new features can be added later and thereby expand the existing system. This makes such a system more promising and easier to use.
Newer UEFI systems are much easier to use and have a full graphical interface with a mouse pointer and intuitive menus. You get the opportunity to configure everything very simply. In addition, motherboard manufacturers can develop various UEFI software modules that will allow easy testing of various hardware.
Overall, when comparing UEFI and BIOS, the former wins due to its modularity, extensibility, as well as independent drivers and ease of use. It will be some time before users can choose BIOS or UEFI and the new technology will slowly replace the old one. More and more manufacturers are using UEFI on their boards and computers, and 32-bit processors are being used less and less. But as with all advancements in computing, the transition to UEFI will take a long time. You now know the difference between uefi and bios and can make the right choice when buying a new device.
Secure Boot in Bios with UEFI support
The Secure Boot secure boot protocol, based on special certified keys available only in Windows 8 and higher, will not allow you to install the operating system on your computer from any installation media other than media with “eight” or “ten”. Therefore, to start installing another system on your desktop computer or laptop, you will need disable Secure Boot in UEFI-BIOS.
The “Secure Boot” parameter, responsible for disabling the secure boot protocol, is in most cases located in the “Security”, “System Configuration” or “Boot” sections. But I want to say that to install, for example, Windows 7 on a new laptop with UEFI-BIOS, it will not be enough to disable only “Secure Boot” in UEFI-BIOS; you also need to enable compatibility mode with other operating systems.
The parameter responsible for this is called differently for all manufacturers: “Launch CSM”, “CMS Boot”, “UEFI and Legacy OS”, “CMS OS”. And it is located, overwhelmingly, in the “Advanced” section, and in it, in the “Boot Mode” or “OS Mode Selection” subsections.
On a laptop:
How to disable Secure Boot and UEFI on a Toshiba laptop
When booting the laptop, press the F2 key and enter the UEFI-BIOS. Go to the “Security” section and find the “Secure Boot” parameter, switch it to the “Disabled” position.
In this simple way we were able to disable Secure Boot in UEFI-BIOS. But that is not all. Now you need to enable compatibility mode for other operating systems. Go to the “Advanced” section, find the “System Configuration” subsection and go into it.

Here we select the “Boot Mode” or “OS Mode Selection” parameter, and switch it from the “UEFI OS” position (possibly “UEFI Boot”) to the “CSM Boot” position (possibly “UEFI and Legacy OS” or “CMS OS”) .

For the changes to take effect, press F10 and confirm saving the changes by selecting “Yes”. Reboot. Now we can load any operating system onto our laptop.
How to disable Secure Boot and UEFI on an HP laptop
Sometimes things are not so obvious. For example, on some HP Pavillion laptop models, you need to perform several additional operations to disable Secure Boot.
When booting the laptop, press the F10 key (possibly ESC, then F10) and enter the UEFI-BIOS. We go to the “System Configuration” section, find the “Boot Options” subsection and go into it.

Find the “Secure Boot” option and switch it to the “Disabled” position. On the contrary, we switch the “Legacy support” compatibility mode parameter with other operating systems to the “Enabled” position.

We respond to the warning with “Yes”.
For the changes to take effect, press F10 and confirm saving these changes by selecting “Yes”. Reboot your computer. After the reboot, a warning window appears with the warning “A change to the operating system secure boot mode is pending...”. In English, we are asked to enter code 8721 on the laptop keyboard (in your case, the code will, of course, be different) and press Enter. After this, changes in the UEFI-BIOS settings will be saved and the laptop will reboot again.

When you turn on your HP laptop, press the ESC key and you will be taken to the start menu. In it, select “F9 Boot Device Options” and, going to the boot menu, select the installation flash drive (already connected) or the installation DVD with the operating system distribution.
How to disable Secure Boot and UEFI on an Asus laptop
(Aptio Setup Utility)
When booting the laptop, press the DELETE key and enter the UEFI-BIOS. We go to the “Security” section and, having found the “Secure Boot” parameter, switch it to the “Disabled” position.

Then go to the “Boot” section and, having found the “Fast Boot” parameter, switch it to the “Disabled” position.

For the changes to take effect, press F10 and confirm saving the changes by selecting “Yes”. Restarting the laptop. We enter the UEFI-BIOS again. We go to the “Boot” section and, having found the “Launch CSM” parameter, switch it to the “Enabled” position.

Press F10 again and confirm saving the changes by selecting “Yes”. Reboot. When you turn on the Asus laptop, press the ESC key and get to the boot menu. In it, select the installation flash drive (already connected) or the installation DVD with the operating system.
How to disable Secure Boot and UEFI on a Samsung laptop
(Aptio Setup Utility)
When booting the laptop, press the F2 key and enter the UEFI-BIOS. Go to the “Boot” section and find the “Secure Boot” parameter.

Switch it to the "Disabled" position.

At the warning that the computer may boot with an error, press Enter.

In the same section below, the “OS Mode Selection” parameter will appear.

Switch it to the “CMS OS” or “UEFI and Legacy OS” position.

A warning will appear again about the possibility of the next boot of the laptop with an error. Press Enter. For the changes to take effect, press the F10 key and confirm saving the changes by selecting “Yes”. Restarting the laptop. Now we can load any operating system onto our laptop; if this doesn’t work, please contact ComprayExpress.
How to disable Secure Boot and UEFI on an Acer Aspire laptop
(InsydeH20 Setup Utility)
Press the F2 key when booting the laptop and enter the UEFI-BIOS. Here we go to the “Main” section and, having found the “F12 Boot Menu” parameter, switch it to the “Enabled” position. With this action, we allowed the laptop boot menu to appear when pressing the F12 key.

Next, go to the “Security” section and, having found the “Set Supervisor Password” parameter, press the Enter key. In the top field, set the password (we will reset it later) and press Enter. In the lower field, enter the same password and press Enter again.

At the “Changes have been saved” message, press the Enter key again.


For the changes to take effect, press the F10 key and confirm saving the changes by selecting “Yes”. Restarting the laptop. Since it makes sense to remove the password we previously set (the ability to disable/enable “Secure Boot” will remain), again using F2 we enter the UEFI-BIOS, go to the “Security” section and, having found the “Set Supervisor Password” parameter, press the Enter key . In the top field, enter the password we previously set and press Enter. In the second and third fields, do not enter anything, just press Enter.

At the “Changes have been saved” message, press Enter again. That's all! The password has been reset, but the ability to disable/enable Secure Boot remains. For the changes to take effect, press the F10 key and confirm saving the changes by selecting “Yes”. Reboot. Now we can load any operating system onto our laptop.
On a desktop computer:
How to disable Secure Boot and UEFI on Asus motherboard
When booting the laptop, press the DELETE key (possibly F2) and enter the UEFI-BIOS. Press F7 to go to “Advanced Mode”.

We go to the “Boot” section, find the “Secure Boot” subsection there and go into it.

Switch the "Secure Boot" option to "Other OS".

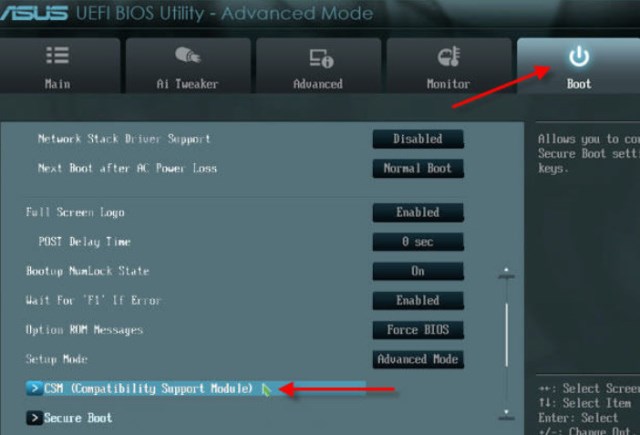
Switch the "Launch CSM" option to "Enabled".

In the additional options that open, select “Boot Device Control” and switch to the “Legacy OpROM only” or “UEFI and Legacy OpROM” position.

Go to the “Boot from Storage Devices” parameter and switch it to the “Legacy OpROM first” or “Both, Legacy OpROM first” position.

With these steps we were able to disable Secure Boot and enable advanced boot mode. For the changes to take effect, press the F10 key and confirm saving the changes by selecting “Yes”. Reboot. Now we can load any operating system onto our computer.
How to disable Secure Boot and UEFI on Asrock motherboard
When booting the computer, press the DELETE key (possibly F2) and enter the UEFI-BIOS. Go to the “Security” section and, having found the “Secure Boot” parameter, switch it to the “Disabled” position.

For the changes to take effect, press the F10 key and confirm saving the changes by selecting “Yes”. Reboot. Now you can load any operating system onto your PC.
Press the DELETE key when booting the PC and enter the UEFI-BIOS. We go to the “BIOS Features” section and, having found the “Windows 8 Features” parameter, switch it to the “Other OS” position.
Then switch the “Boot Mode Selection” parameter to the “Legacy only” or “UEFI and Legacy” position. And finally, switch the “Other PCI Device ROM Priority” parameter to the “Legacy OpROM” position.

To save the changes, press the F10 key and confirm saving the changes by selecting “Yes”. Reboot. Now we can load any operating system onto our computer.
How to disable Secure Boot and UEFI on MSI motherboard
When booting the PC, press the DELETE key and go to the UEFI-BIOS. Here we go to the “SETTINGS” section, go to the “Boot” subsection, and having found the “Boot Mode Select” parameter, switch it to the “Legacy + UEFI” position.

For the changes to take effect, press the F10 key and confirm saving the changes by selecting “Yes”. Reboot. Now we can load any operating system onto our computer.
Write in the comments if these instructions helped you solve the problem with installing the operating system on your personal computer or laptop.
If you have difficulties setting up the BIOS, you can contact us for advice or help from a computer technician. Call:
Vitaly Voshchatinsky. 2 years ago:
Thank you very much for the work done. But in my case, the Acer Aspire laptop is simply not able to change the BOOT MODE. Is there a solution to this issue?
Zoro Vitaly Voshchatinsky. 2 years ago:
Good day! And I have such a miracle)) Maybe they found a solution?
Vitaly Voshchatinsky Zoro. 2 years ago:
At the Vysera service center. oh acera. I was told. that this model has support only for Windows 10. I invited a guy through an advertisement and within 3 hours he installed Ubuntu 17 for me, but the computer does not turn off. then everyone will slow down. But you can physically turn off the power only by pressing the turn button.
Andrey. 2 years ago:
acer aspire laptop. I set a password and boor mode was not unlocked, only secure boot... I don’t know what to do next Max Chu
Andrey. a year ago:
Same problem. I don’t know what to do. Maybe only flashing the BIOS will help. but again how to do it. 10 does not allow me to install another version.
Denis Kuptsov. 2 years ago:
DUH THANK YOU SO MUCH!!! I’ve been changing Windows for myself and my friends for a long time! but once I decided to reinstall it on my laptop! and I thought I broke my computer)) damn what would I do without you))) I love you)))
Ivan Hello. 2 years ago:
Damn thank you! At least I turned off this security! I’m at work right now, so I can’t test whether the seven will work, but after my shift I’ll try.....Thank you very much. The site has been bookmarked.....
Dalai Lama. 2 years ago:
Thank you Bro for your efforts to help unreasonable users! I'm tired of looking for answers! Your article is great!
Irina Yusupova. 2 years ago:
I struggled and couldn’t figure it out, I already scoured the entire Internet until I found this article - it’s quite accessible and clearly described. Thank you.
Stanislav. 2 years ago:
Thank you very much, the detailed article for HP laptops helped, I suffered for a long time, and then with your help everything was done in 5 minutes, and now Windows 7 is already completing the installation, thank you!
Stanislav. 2 years ago:
Thanks for the detailed instructions! I racked my brain for a very long time, but here it turned out to be extremely simple! The site has been bookmarked, so to speak, for the future!
Paul. 2 years ago:
As luck would have it, I myself had this problem after I activated tens from 8ki. But the necessary programs did not work in it, I decided to install 64-bit seven, but, like many, I encountered the notorious security boot, which did not allow me to do this. Toshiba instructions helped, thanks
Simona Markina. 3 years ago:
I wanted to install Linux on my new laptop. But nothing worked with this new BIOS for me. The article helped one hundred percent. Now I have Ubuntu.
Dmitry Vernik. 3 years ago:
I just have ASUS! Thanks for the article, it was very helpful! I've been looking for detailed instructions for a long time!
Ivan. 3 years ago:
The article saved me, everything is described in great detail and shown in the photo. After reading I was able to install Win 7 instead of the pre-installed Win 8.1)))
Yuri Shokin. 3 years ago:
It’s good when there are such detailed articles and guides on Bios functions. I didn’t understand how to disable secure boot on a Lenovo laptop, I did it by analogy with other brands. With such timely tips, I managed to reinstall the operating system quickly, thank you for the valuable advice.
Evgeniy Maslennikov. 3 years ago:
It’s terrible, guys, there are simply no other words to describe how I suffered over the past weekend, thank you very much for the advice!
Ivan. 3 years ago:
Respect to the author! Finally, I came across an article that properly describes how to disable Secure boot in different UEFI BIOSes. Otherwise you’ll spend forever combing the entire Internet until you get the full picture. Thank you, it made reinstalling Windows 8 very easy.
Ivan Shchepelin. 3 years ago:
Thank you! I’m completely new to this, but with your recommendations and with the help of my friend, we managed to install Windows 7 on an Acer laptop)