What is Download Manager? Basically, not the most experienced users of the Windows system encounter it, who for the first time decided to reinstall their operating system without much visual instructions... This installation happens on a whim and pop-up tips. The latter, in turn, do not always differ in an easy-to-understand language, and some problems arise.
What is Windows Boot Manager
The Boot Manager is the first welcome screen in Windows. It allows you to choose which OS (operating system) installed on the device should be loaded at startup. It does not appear if the choice is obvious and consists of only one item.
How to disable selection of unnecessary operating systems when booting Windows 7
The proposed options may be different, since more than one operating system can be installed on one computer, that is, several operating systems can be installed.
A roughly remote OS still leaves a trace on the PC, which means that the boot manager perceives it as a separate option for the subsequent boot of your device.
Complete removal of the operating system when reinstalling Windows can only provide formatting of the hard disk partition on which it is installed.
So, you are tired of the black gaudy screen that makes you wait for the beautiful Windows to load. Correcting the situation is not as difficult as it seems. There are several solutions for every taste.
Disable selection of operating systems through "System Configuration"
- Open the "Start" menu and enter msconfig in the program search field. Then we select the program found by the Windows system.
- In the window that has opened, go to the "Download" tab. In it we see how many and which OS are recognized by DZ (boot manager) Windows.
- We click the mouse on the item "Current operating system". Click on the "Use as default" button. This action leads to auto-selection of your OS among others, transfers it to the first line in the manager.
- If other systems are not needed, they are an error, or you simply do not want to watch the remote sensing screen for 30 seconds, the rest of the OS must be removed from the configuration. Select the superfluous system in the list and press the "Delete" button.
- After all the steps to optimize the download, we simply confirm the changes with the OK button.
Disable selection of operating systems via the command line
There is another option for clearing the download manager, this time through the command line terminal:
Video: how to remove the choice of boot options for Windows 7
How to configure Boot Manager in Windows 7 through the Computer Properties interface
For those who do not really like to drive in teams and look for services among their abundance in Windows system, as well as for those who do not have a keyboard on this moment, there is a very simple way to configure the download manager with a few mouse clicks.
- First, open the properties of the "Computer" through context menu... To do this, click RMB ( right click mouse) by the corresponding shortcut on the desktop or in the Start menu.
- The "Computer" properties window opens, click on the item " Extra options systems ".
- Another window with five tabs will open. We are interested in the "Advanced" tab.
- In the "System boot and recovery, debugging information" block, click on the "Options" button.
- Another settings window will allow us to select the default OS, enable or disable the choice of operating systems. That is, unchecking this item will allow you to bypass the download manager service and immediately start operating the OS, which is selected by default. You can also choose how long the download manager will run before auto-selecting the OS.
If you do everything correctly, then your operating system will now boot directly, quickly and without any delay.
Learn how to troubleshoot Windows Boot Manager problems to speed up boot times and save you time. Instructions and commands are suitable not only for Windows 7. In versions 8 and 8.1, they are used with success. If you suddenly decide to install a new OS - do not forget to format system disk before installing Windows.
So, you just downloaded the file on your Android device, but where did it go? There are several ways to find out where files are uploaded to Android devices NS.
Method 1: Use the pre-installed Downloads app

This method works for most Android devices. Most likely, if you go to the main menu of your mobile device You will find an application called Downloads. The application provides direct access to the file download folder.
Method 2: Use Android File Managers

Another way to access your downloads folder is to use additional applications file managers similar to those available for Mac or PC. Some Android devices come with pre-installed file managers.
However, if you do not have file manager then you can download it from the Google Play Store. One of my favorite Android file managers is called Total Commander.
TotalCommander - file manager (Is free)
To find a list of all downloaded files using a file manager, simply open the app and navigate to Smartphone Memory, Internal Memory, or SD Card (sometimes called / sdcard).
After you have navigated to the required directory, you need to find a folder called Downloads. Open the folder and you will see a list of all downloaded files.
Method 3: View downloaded files via computer
If you want to access the downloaded files through your computer, you need to connect your Android device to your Mac or PC with via USB cable.
After connecting your mobile device via USB, you will receive a notification on the computer screen with short instructions how to access smartphone memory.

Some Android devices ask for a way using USB such as charging, file transfer, photo transfer (PTP) or MIDI. You need to select File Transfer.

After successfully connecting your Android device to your computer, go to the directory internal memory or SD card and find the Download folder.
This problem occurs quite often and if it bypasses you, then you are very lucky. I have repeatedly encountered various errors and Google completely not working Play Market on Android, so I share my personal experience on how you can return the most popular service from the Dobra Corporation to working order.
So Google crashes Play Store there are various: technical problems on the service side, constant errors, application crashes and complete inoperability. In this tutorial I will give a few useful tips how to fix it all.
1. Restart Android
The first step is to reboot your device. This usually solves most of the problems with Google Play. If it doesn't help, let's move on.
2. Reset Google Play Market settings
For this:
1. Go to settings.
2. Open Applications or Application Manager.
3. Find Google Play Store in the list and tap on it.
4. In the application settings window, select "Erase data" and "Clear cache".

I think this should help yet more users, but if not, let's move on.
3. Uninstall Google Play Market updates
We proceed in the same way as in point 2, but now instead of "Erase data" and "Clear cache" click "Delete updates".

This will return the Play Market to its original state at the time of installation.
4. Reset the settings of the application "Google Play Services"
Go to settings again, open “Applications” and find “ Google services Play ". Open it and also clear cache and data.

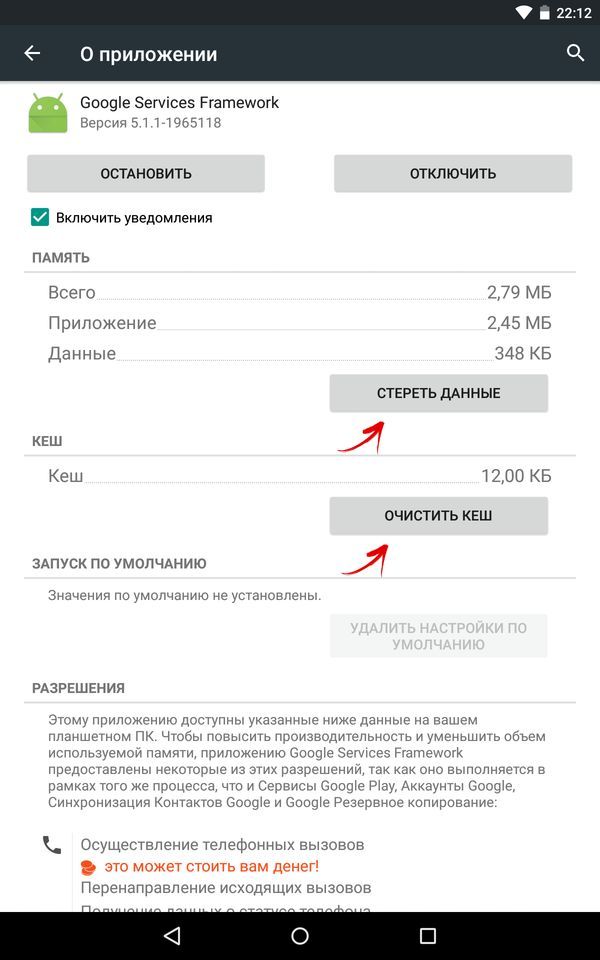
5. Clear the cache and data "Google Services Framework"
Go to Settings → Applications → All tab. Select "Google Services Framework". Click "Erase Data" and "Clear Cache".
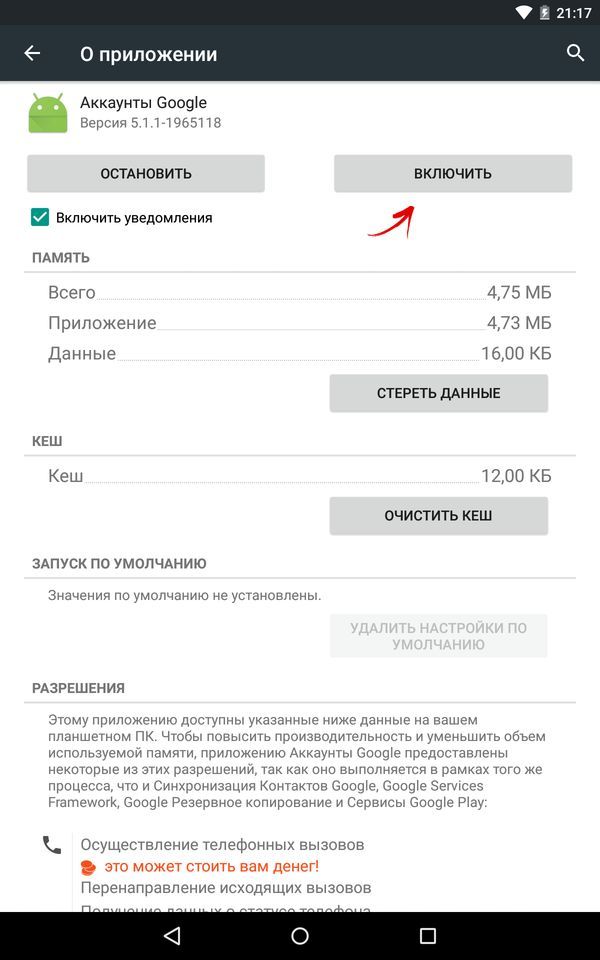
6. The Google Accounts app is disabled
Go to Settings → Applications → All tab. Select " Google Accounts". If this application will be disabled, enable it.
7. Turn on "Boot Manager"
In the application section, swipe to the left, go to the "All" tab and open the "Download Manager". If you have it disabled, click "Enable".

If it is already activated, and the previous tips did not help and Google Play does not work, follow on.
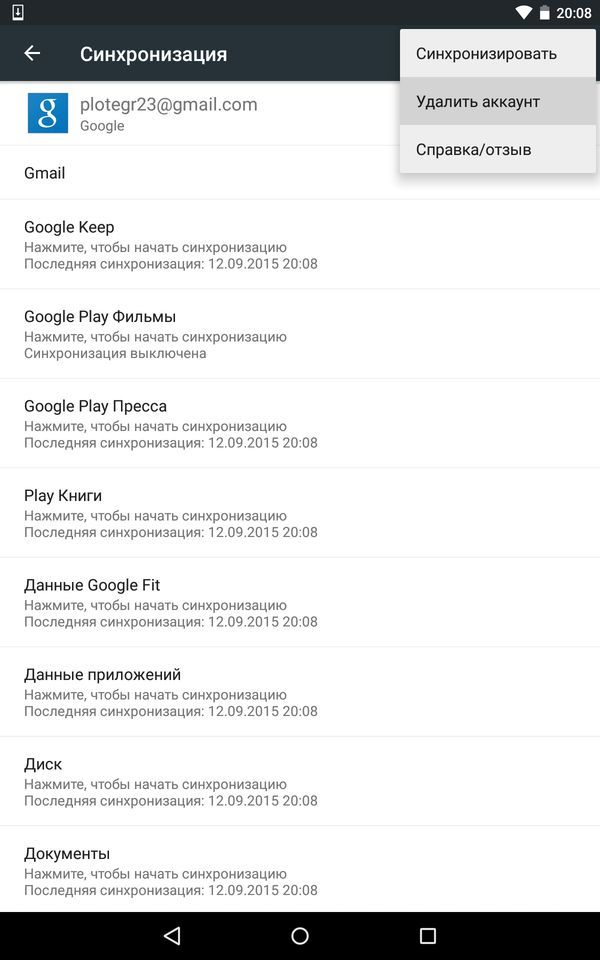
8. Delete Google account and restore it
You can learn more about this in the instructions:. There, in step 6, select "Delete account".
9. Applications blocking the work of the Google Play Market
Some programs may block the Play Store. For example, the well-known application Freedom, which allows you to make in-app purchases for free, may interfere with the normal operation of the Google app store.
10. Configure the "hosts" file
If you have the application installed, then this item is for you.
This method requires root rights. You can get them using the following instructions:
First, disable the Freedom application (in the program menu, item "Stop"), and only then uninstall it.
After that, install the app or. Then find along the way / system / etс / file "hosts", open it with a text editor and leave only this line (if not, write it):
127.0.0.1 localhost

Save your changes. After that, restart your Android gadget.
11. Reset settings (Hard Reset) Android
This is the most drastic method and will erase all data from the internal storage. The data on the memory card will remain intact. Full instructions on our website: (follow the link, you need the second method from the article).

This advice will definitely help, so don't be afraid - you can also use it. The main thing is to create before that backup systems. How to do this, read in paragraph 6 of this manual.
After that, at the first start, you can restore all data from the previously created backup (backup).
12. Check your Internet connection
Check your network connection. If no website opens in the browser, restart your router and that's right.
13. Set the correct time ("No connection" error)
If an error occurs: "There is no connection", although the Internet is working, then this point of our instructions should help you.
Set the correct time and set the correct time zone. It is best to synchronize these settings with the network. To do this, go to "Settings" → "Date and time" and put a tick in front of the items "Date and time of the network" and "Time zone of the network".
14. Blocking IP addresses by Google
UPD 04/23/2018 After the ban on Telegram in Russia, Roskomnadzor blocked more than 18 million Google IP addresses, which caused many users to have problems connecting to the company's services, including the Play Market.
To restore access to the Android app store, use. Since Google Play won't open, you'll have to download a VPN client too (for example,
Sometimes a file can "get stuck" in the download block, the reasons for this failure are different, but they are all software in nature. We will consider the most relevant ways to solve this problem: we will give step by step instructions and analyze non-standard cases of this error.
Where do frozen downloads come from?
The main problem of the Android OS is the presence a large number background processes and data. The system passes a huge number of files through itself and processes them "in the background". A number of these processes are often not needed at all, so programs that clean the boot manager, thereby also the processor, are gaining popularity. Many people ask themselves the question: how to stop downloading on Android?
The symptomatology is usually as follows: there is some file known to us or unknown at all, hanging in the download tray. Nothing really happens to him. In addition to the fact that it strains and torments the system, plus it can eat up traffic.
Disable download
Hanging loading often occurs when there is a disconnect or an error in an application. It may depict violent activity, but it never ends, moreover, the reboot does not always help. You can put a new download to "push through" the stuck one: but sometimes we just get two stuck lines. It is usually easy to stop a download using a simple algorithm of actions:
- We call the menu, usually it is the left button.

- We are looking for a list of applications, where a complete list of installed programs is presented.

- In the general list, go to the "All" tab: there you need to find the "Download Manager".

- Inside the program settings, press the "Erase data" button. This command will clear all current downloads, regardless of their status.

- A warning window will appear, with which you need to agree.
Glitchy downloads can also provoke certain types of viruses that spread through free Wi-Fi hotspots or Internet pages. Now for Android there are a lot of free and effective antivirus that deal with the problem almost instantly.
Alternative way
The algorithm is relevant for system versions starting from 4.0. It gives a plus in that it saves time: the number of necessary actions is reduced.

The effect is similar, no additional action is required.
During the installation of a new Windows OS on a computer, many novice users often forget to format their HDD... Everything would be fine, only if you miss the right moment, in the end, every time you start the PC, you will have to admire the meticulous system window with a proposal to download one of the two installed versions of the operating system. Something reluctant, right? In this case, in order to return to the normal startup of the computer, you will first have to figure out how to remove OS Windows 7 from your boot manager. And, frankly, you can do this in more than one way.
Option # 1: Troubleshoot the System Configuration Utility
Windows Boot Manager can also be reconfigured using System Configuration. You can run it using various methods:
One way or another, after completing each of these actions, the system window we need to work will appear. In it, go to the "Download" tab, select the operating system suitable for automatic launch and click the "Use by default" button with the mouse. After that, we return to the list, click on the unnecessary boot record and delete it by clicking on the "Delete" option. The final touch is to save the settings by pressing the OK button:

As practice shows, as a result of such simple actions, problems with loading Windows OS disappear at once.
Option number 2: Debug startup using the "Command Line"
You can also remove the intrusive list of operating systems when the computer boots up through command line... There are a whole lot of ways to start it today (read about them here), however, in Windows 7, the easiest way to do this is to use search query in the start menu.
What are we doing? We press on the keyboard and enter the value cmd or "command" into the search bar. As a result, the system will automatically display the program we need at the head of the list. We click on it twice, and then we drive in turn, alternating with Enter, the commands:
For assigning Windows 7 operating system default:
bcdedit.exe / default (current)

To uninstall a second Windows OS (e.g. Windows XP from Boot Manager):
bcdedit.exe / delete (ntldr) / f
After completing the execution of the commands, close the window and restart the computer. In principle, after such a setting, Windows should boot normally without displaying a list of available operating systems.
Option number 3: Configuring launch through "System Settings"
You can remove the second operating system when you boot your computer in a matter of minutes straight from your desktop. To do this, right-click on the "Computer" tab, select the "Properties" item in the displayed menu, and then click the "Additional system parameters" tab in the new window:

Next, go to the "Advanced" section and click the "Options" button in front of the "Startup and Recovery" item. After that, we select the operating system suitable for loading, turn off the display of the list and save the changes by clicking OK:

As a result of such simple manipulations, Windows 7 will boot without any delays or crashes. However, if the miracle did not happen, you can either use the special EasyBCD program to debug the computer startup, or check hard disk for mistakes. In the latter case, the procedure will be as follows:
- open the command line (see option number 2);
- we drive the command CHKDSK C: / F / R into it and press Enter;
- give permission to check by pressing the Y button;
- close the command line and restart the computer.
As a result, upon a new boot, the system will automatically search for and fix errors on the C drive, including those related to running Windows... If this method did not work either, you will have to pick up bootable USB drive(disk) with the operating system and repeat the process Windows installations, not forgetting in this case about formatting the hard drive.