Your Panda account is your personal area, available to you as a Panda client and allowing you to:
- Download your products.
- Manage the services of your product, check the expiration date of licenses, renew licenses, etc.
- Receive the required documentation for your product.
- Report incidents involving your product to the Technical Support Service.
To create your Panda account, simply follow the wizard's instructions when installing your Panda product. We strongly recommend that you create an account (if you have not already created one) when installing the product, because... in this case, your account data will be automatically linked to your product activation code.
You can also create your account separately, outside of the Panda product installation process. However, please note that you will then need to manually link your product activation code to your Panda account.
Here's what you'll need to do.
Step 1: Create your Panda account
All you need to do at this point is to confirm your address Email, which you specified during the registration process.
Step 2: Activate your Panda account

Step 3: Add your products
The last step of creating a Panda account after activating your account will take you to the section Your products inside your Panda account. The same thing happens when connecting to a newly created account.
In any case, being in the section Your products, You need to link your Panda product to your Panda account. To do this, follow these steps:

All! Now you have prepared your Panda account and can take advantage of all its benefits!
Additional Information
Have you encountered the fact that when opening a well-known website, your browser was redirected to a previously unknown site called ? Or did this intrusive site automatically pop up when you turn on your computer? If you answer Yes, then you need to know that your computer has become infected with an adware virus. Adware is a group of malicious software that changes system settings so that it can redirect the user to advertising sites or show a large number of pop-up advertisements. Use the instructions below to help you clean your computer from adware and thus remove apple-panda.com advertising. Moreover, this instruction will allow you to configure your computer in such a way that it can block the loading of other advertising, deceptive and dangerous websites.
Malware from the group of advertising viruses usually only affects Chrome, Firefox, Opera, Yandex browser and Internet Explorer. Although there may be situations when other browsers will also be susceptible to a virus attack. When adware penetrates a system, it can change the Object property of all shortcuts that the user uses to launch the browser. Thanks to this, when you start the browser, it will not open Homepage, but an unknown advertising site. Even if you try to reinstall your home page, then this will not help you. Your browser will still be forcibly redirected to the advertising site.
An adware virus can insert advertisements directly into websites that you open in your browser, making it appear as if all the advertisements were added by the website owners. Moreover, there may be cases when adware replaces advertisements added by site owners with another, often dangerous, click on which can lead the user to a harmful or deceptive site. Moreover, such malware has the ability to collect personal information, such as IP address, what pages are opened in the browser, what queries are typed in the search engine, and so on. The collected information can then be sold or transferred to various interested companies.
The step-by-step instructions below will allow you to clean your computer and remove the adware virus. This way you can remove apple-panda.com intrusive advertising from Chrome, Firefox, as well as other browsers you use.
How adware showing apple-panda.com ads got onto your computer
Adware spreads in a simple but very effective way. It is simply integrated into the installation package of various free programs. Thus, during installation, the adware virus will install on the computer and infect the browser. To avoid infection and malware entering your computer, you need to follow a few simple rules: Read the entire 'Rules for using the program' and 'License', select only Advanced or Manual mode installation, which will make sure that the software you install will not install any additional modules. This will protect your computer from the penetration of malware like an adware virus that opens apple-panda.com advertisements.
How to remove apple-panda.com advertising
Undoubtedly, an adware virus harms your computer. Therefore, you need to quickly and completely remove this malware. To remove it and thus remove intrusive apple-panda.com advertising, you need to follow all the steps suggested below. Each of them is important in its own way, only their complete implementation most often allows you to get rid of adware and the results of its activities. The only thing I would like to add is that while following the instructions you may need to close your browser or restart your computer, so that you don’t have to look for this instruction again later, just print it out or make a link to it.
Uninstall the program that was causing the apple-panda.com advertisement to appear
Windows 95, 98, XP, Vista, 7
Click Start or press the Windows button on your keyboard. From the menu that opens, select Control Panel.

Windows 8
Click on the Windows button.
On the right top corner find and click on the Search icon.

In the input field type Control Panel.

Press Enter.
Windows 10
Click on the search button
In the input field type Control Panel.

Press Enter.
The Control Panel will open, select the item Uninstalling a program.

You will be shown a list of all programs installed on your computer. Review it carefully and uninstall the program that you suspect as the cause of the infection. This is probably the last program you installed. Also, take a close look at other programs and remove any that seem suspicious to you or that you are sure that you did not install them yourself. To remove, select a program from the list and click the button Delete/Change.
![]()
Remove apple-panda.com ads from Chrome, Firefox and Internet Explorer using AdwCleaner
AdwCleaner is a small program that does not require installation on your computer and is designed specifically to find and remove adware and potentially unnecessary programs. This utility does not conflict with the antivirus, so you can safely use it. There is no need to uninstall your antivirus program.
Download the AdwCleaner program by clicking on the following link.
Download AdwCleaner
Downloaded 960984 times
Version: 8.0.0
After the program has finished downloading, run it. The main AdwCleaner window will open.


Click on the button Cleaning. AdwCleaner will begin cleaning your computer and will remove all malware components found. At the end of treatment, restart your computer.
Remove apple-panda.com ads using Zemana Anti-malware
Zemana Anti-malware is a utility that allows you to quickly scan your computer, find and remove various malware that show ads and change settings installed web browsers. In addition to the classic method of finding malware, Zemana Anti-malware can use cloud technologies, which often allows you to find malware that other antivirus programs cannot detect.
Download Zemana AntiMalware using the link below. Save the program to your Desktop.
Download Zemana AntiMalware
Downloaded 61297 times

Follow the instructions that appear on the screen. You don't have to change anything in the settings. When the installation of Zemana Anti-Malware is completed, open the main program window.

Click on the “Check” button to start the process of searching for a virus that displays apple-panda.com advertising. The scanning process occurs quite quickly, but may take longer if large quantity files on your computer or in case slow work systems.

When the scan is complete, you will see a list of malware components found. Here, simply click the “Next” button to remove the detected malware and move it to quarantine.
Remove apple-panda.com ads using Malwarebytes
Malwarebytes is a well-known program designed to combat a variety of adware and malware. It does not conflict with the antivirus, so you can safely use it. There is no need to uninstall your antivirus program.
Download Malwarebytes program Anti-malware using the following link.
Download Malwarebytes Anti-Malware
Downloaded 367549 times
Version: 3.8.3
When the program downloads, run it. The Program Installation Wizard window will open in front of you. Follow his instructions.

When the installation is complete, you will see the main program window.
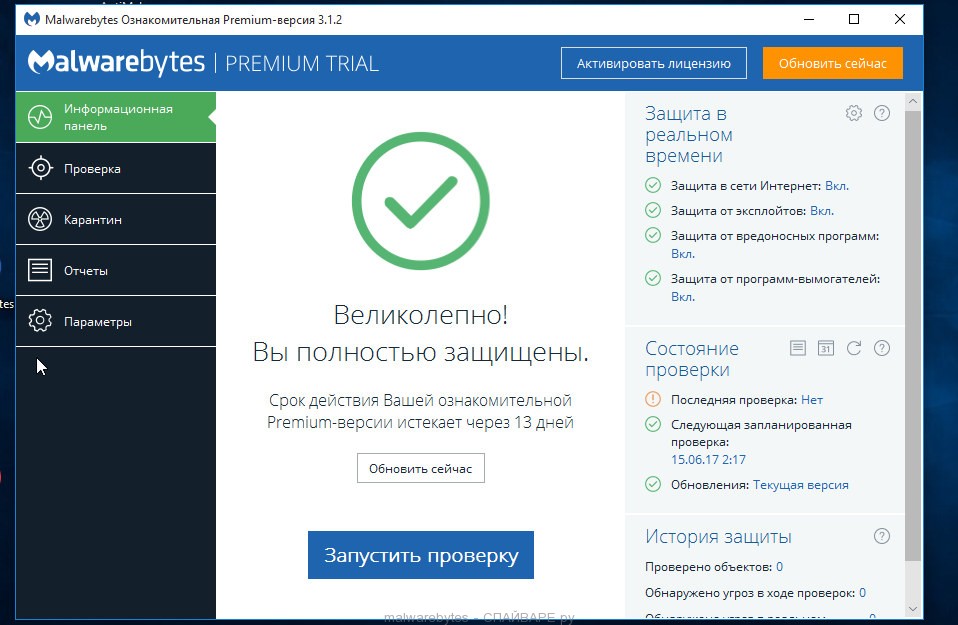
The program update procedure will start automatically. When it is completed, click on the “Run scan” button. Malwarebytes Anti-malware will begin scanning your computer.

When the scan of your computer is complete, Malwarebytes Anti-malware will show you a list of malware and adware parts found.

To continue treatment and removal of malware, you just need to click the “Quarantine selected objects” button. This will start the procedure for removing the ad virus that opens apple-panda.com advertisements.
Remove apple-panda.com ads in Chrome by resetting browser settings
Resetting Chrome settings will remove malicious extensions and restore browser settings to default values. At the same time, your personal data, such as bookmarks and passwords, will be saved.
Open the main menu of Chrome by clicking on the button in the form of three horizontal stripes (). A menu will appear as in the image below.

Select Settings. Scroll down the page that opens and find the Show advanced settings link. Click on it. A list will open below additional settings. Here you need to find the Reset settings button and click on it. Google Chrome will ask you to confirm your actions.

Click the button Reset. After this, the browser settings will be reset to their original settings and pop-ups or redirects to apple-panda.com will be removed.
Remove apple-panda.com ads in Firefox by resetting browser settings
Resetting Firefox settings will remove malicious extensions and restore browser settings to default values. At the same time, your personal data, such as bookmarks and passwords, will be saved.
Open the main menu of Chrome by clicking on the button in the form of three horizontal stripes (). In the menu that appears, click on the question mark icon (). This will bring up the Help menu as shown in the image below.

Here you need to find the Troubleshooting Information item. Click on it. In the page that opens, in the Set up Firefox section, click the Clean Firefox button. The program will ask you to confirm your actions.

Click the Clean Firefox button. As a result of these actions, the browser settings will be reset to their original settings. This will remove pop-up ads for apple-panda.com.
Remove apple-panda.com ads in Internet Explorer by resetting your browser settings
Resetting Internet Explorer and Edge settings will remove malicious extensions and restore browser settings to default values.
Open the main browser by clicking on the button in the form of a gear (). In the menu that appears, select Internet Options.

Here, open the Advanced tab, and in it click the Reset button. The Reset Settings window opens Internet Explorer. Check the box next to Delete personal settings, and then click the Reset button.

When the factory reset process is complete, click Close. For the changes to take effect, you need to restart your computer. This way you can get rid of apple-panda.com advertisements.
Remove apple-panda.com ads by clearing browser shortcuts
When an infection that displays apple-panda.com advertising penetrates a computer, it can change browser shortcuts by adding the address of the advertising site, for example, “http://apple-panda.com/...” in the Object field. Thanks to this, an advertising site will open every time you launch your browser.
To clear the browser shortcut, right-click on it and select Properties.

On the Shortcut tab, find the Object field. Click inside it with the left mouse button, a vertical line will appear - the cursor pointer, use the cursor keys (arrow -> on the keyboard) to move it as far as possible to the right. If you see that the “http://apple-panda.com” argument is added there, then you need to remove it.

After deleting this text, click OK. In this way, clean the shortcuts of all your browsers, as all of them may be infected.
Block apple-panda.com advertising, loading dangerous and fraudulent sites
To increase the protection of your computer, in addition to anti-virus and anti-spyware programs, you need to use an application that blocks access to a variety of dangerous and misleading websites. In addition, such an application can block the display of intrusive advertising, which will also lead to faster loading of websites and a reduction in web traffic consumption.
You can click Skip to close the installer and use the default settings, or the Get Started button to familiarize yourself with AdGuard's features and make changes to the default settings.
In most cases standard settings enough and nothing needs to be changed. Every time you start your computer, AdGuard will start automatically and block pop-up ads, sites like apple-panda.com, as well as other malicious or misleading web pages. To get acquainted with all the features of the program or to change its settings, you just need to double-click on the AdGuard icon, which is located on your desktop.
Check the task scheduler
For complete cleaning computer, you also need to check the Task Scheduler Library and delete all tasks that were created by malicious programs, since they may be the reason for the apple-panda.com site to automatically open when you turn on the computer or at regular intervals.
Press Windows and R (Russian K) on your keyboard at the same time. A small window will open with the title Run. In the input line, enter “taskschd.msc” (without quotes) and press Enter. The Task Scheduler window will open. On the left side, select “Task Scheduler Library”, as shown in the following example.

In the middle part you will see a list of installed tasks. Select the first task, and in its properties, which will open just below, select the Actions tab. Go through each task one by one, paying attention to what it runs on your computer. If you find something like “explorer.exe hxxp://site address” or “chrome.exe hxxp://site address”, then you can safely delete this task. If you are not sure what triggers the task, then check it through our website or in search engine, by the name of the file being launched. If the file is a component of a virus or malware, then this task can also be safely deleted.
Having decided on the task that you want to delete, right-click on it and select Delete. Perform this step several times if you find several jobs that were created by malware. An example of deleting a task created by an adware virus is shown in the figure below.

After deleting all tasks, close the Task Scheduler window.
In order to avoid infecting your computer in the future, please follow three small tips
- When installing new programs on your computer, always read the rules for their use, as well as all the messages that the program will show you. Try not to install with default settings!
- Keep anti-virus and anti-spyware programs updated to latest versions. Also note that you have automatic Windows update and all available updates are already installed. If you are not sure, then you need to visit the site Windows Update, where they will tell you how and what needs to be updated in Windows.
- If you are using Java, Adobe Acrobat Reader, Adobe Flash Player, then be sure to update them on time.
Panda Cloud Antivirus's interface is quite simple, with a small number of options and settings. Everything is simplified as much as possible and implies autonomous operation (Fig. 4.62).
Rice. 4.62. Panda antivirus interface
The main program window has four tabs:
Antivirus - is responsible for scanning the computer in various modes;
Firewall - provides security network connections(available only in the paid version);
Processes - displays data about running processes (programs) on the computer;
Vaccine - controls the protection of portable storage media (available only in the paid version).
SETTINGS
To display general security settings, click the button located in the lower right corner. In the window that appears, you will see four large buttons (Fig. 4.63).

Rice. 4.63. General settings security
Using the function Parental control You can restrict children's access to certain sites. Click the Parental Control button, and in the window that opens, set the OFF/ON switch (Fig. 4.64).

Rice. 4.64. Parental control
Now you need to select those categories that will be limited to visiting. To do this, click the Settings button in the upper right corner and check the required boxes (Fig. 4.65).

You can also configure various exceptions here. To do this, select the Addresses and Domains tab (Fig. 4.66).

Rice. 4.66. Addresses and Domains tab
You can allow or restrict access to certain sites. In the appropriate window, select Add, enter the desired address (Fig. 4.67), click the Add button.

Rice. 4.67. Adding an address
When you are done with all the changes (added the desired addresses, marked the categories), click OK to save them. When trying to access a prohibited site, the user will see a message about the page being blocked (Fig. 4.68).

Rice. 4.68. Message about a blocked page
Undoubtedly, your computer stores personal information (documents, photographs) that you want to reliably protect. The Data Protection feature will allow you to do this. Click the button of the same name (see Fig. 4.63) to get to the protection settings window (Fig. 4.69).

Rice. 4.69. Data Protection Settings
There are three tabs in the central part of the window.
Protected folders - click the Add button and check the boxes next to the folders that need protection the most. Click OK (Fig. 4.70).
Allowed applications - a list of programs that interact with your protected data and are considered safe. You can deny an application access rights by using the drop-down list to the right of its name, or add new or remove old programs (Figure 4.71).
Files and extensions - makes it possible to select files of one type for protection: only documents, photographs, audio or video files, etc. (Fig. 4.72).

Rice. 4.70. Selecting folders to protect

Rice. 4.71. Allowed Applications

Rice. 4.72. Files and extensions tab
Use the button Add to expand the suggested list, or Change to make edits. After all the manipulations, click OK.
After they are configured Parental control from data protection, You may be wondering how to protect these settings. After one simple action, access to the antivirus will be limited.
If you were careful, then when setting up Parental control or Data protection, saw the item on the left Login to the console(Fig. 4.73).

Rice. 4.73. Login to the console
Here you can set a password for working with the program. First, check the box You can connect to the Panda Cloud Antivirus console only after entering the following password, after which you will be asked to create and enter a password (Fig. 4.74).

Rice. 4.74. Entering your password
Enter your password in the top field, repeat it in the bottom field and click OK. Now, when you try to open a program window, you will see the window shown in Fig. 4.75.

Rice. 4.75. Login to the program using a password
Enter your password and click the button To come in. Thus, your antivirus is protected from unauthorized intervention by outsiders.
Let's return to the security settings window and look at the two remaining buttons (see Fig. 4.63):
Emergency boot - if viruses block the work of the antivirus (for example, it was installed too late), you can create an emergency disk (or removable media to disinfect another computer) and use it to eliminate the threat;
You need more - after clicking this button you will be taken to a website where you can offer ideas for improving the operation of the antivirus.
Despite the fairly high popularity of Panda Cloud Antivirus among users, it has several disadvantages: the percentage of virus detection is not very high, the quality of scanning directly depends on the Internet connection. The advantages of the application include the following:
Small size;
High installation speed;
Laconic menu;
No strict resource requirements.
CHECKING YOUR COMPUTER
Virus scanning has three modes. To display them in the main program window, go to the tab Antivirus, press the button Check now. Select the appropriate option from the drop-down list (Fig. 4.76).
Optimized scanning. Recommended test mode. However, the average user is unlikely to guess what is hidden behind the word “optimized”. The manufacturer claims that Panda Cloud Antivirus will scan those computer folders that usually contain malware, and this, in turn, will allow the scan to be carried out as quickly as possible.
Scan my entire computer. In this mode, Panda Cloud Antivirus will check all the information on your computer (disks, memory, etc.). This may take a long time.
Custom scan. Allows you to scan the most suspicious files and folders on your computer. For example, a folder with files downloaded from the Internet. After selecting the Custom scan mode, a navigation window will appear where you need to check the boxes next to the objects that should be scanned for viruses (Fig. 4.77).

Rice. 4.76. Antivirus tab

Rice. 4.77. Navigation window during custom scan
Please note: your computer must be connected to the Internet during scanning. The effectiveness of the check depends on this.
You can adjust the computer scan through the Advanced settings menu. To get to it, click the button of the same name on the tab Antivirus(see Fig. 4.76).
Panda Cloud Antivirus warns you that these critical settings are optimally configured by default. Failure to manage these settings will negatively impact the security of your computer.
So, you have four tabs in front of you (Fig. 4.78).
Check. Combines scan settings. The more parameters are enabled, the more detailed the scan will be (its time directly depends on the thoroughness of the antivirus).
Basket. Previously infected files are stored here for some time, which can be restored after the virus is neutralized. In the corresponding menu, specify how long the infected file will be stored.
Alerts and reports. Here are the settings responsible for timely notification of antivirus actions. You can turn off notifications or, conversely, get more detailed information as a text file.
Exceptions. Allows you to block antivirus scanning specific folders. Use the buttons Add And Delete to enable this feature.

Rice. 4.78. Advanced settings menu
Open the panel Windows management and select the "Uninstall Programs", "Add or Remove Programs" or "Programs and Features" menu. Find them in the list and remove them one by one.

When the removal is complete, check the "Reboot now" option:

If uninstallation fails, use one of the official utilities to remove Panda programs from the system.
Uninstalling personal versions of Panda using the Panda Uninstaller utility
- Panda Dome
- Panda Antivirus Pro
- Panda Global Protection
- Panda Gold Protection
- Panda Internet Security
- Panda VPN
If you can't remove Panda Antivirus in a standard way via "Control Panel" - "Uninstall Programs", or the antivirus has not been completely removed from the system, use a special uninstallation utility. Panda Security offers two versions of such utilities: for removing personal and server Panda versions.
Download the utility to remove personal versions of Panda and Panda Cloud antivirus:
Before running the utility, close all programs and open windows. Launch the utility and click Yes for start complete removal Panda products from your computer:

Wait for the utility to complete - this may take several minutes:

A reboot will be required to complete the utility. Wait for the message Thank you for waiting. Hit OK to reboot and press OK to restart the computer.

After reboot, delete the folders C:\Program Files\Panda Software And C:\Program Files\Panda Security. Panda antivirus products are now completely removed from your computer.
Comment: If the message appears after starting the utility Reboot the machine before Generic Uninstaller, then you need to restart your computer and run the utility again.

Uninstalling enterprise versions of Panda using the Panda Uninstaller utility
Applicable to the following products:
- Panda Adaptive Defense
- Panda Adaptive Defense 360
- Panda Endpoint Protection
- Panda Endpoint Protection Plus
During Endpoint Protection uninstallation, some files or libraries may not be completely removed, which can result in various errors. In such cases, you need to use two official utilities that will completely remove all remnants of Panda Endpoint Protection.
Download the utility to remove the desired version of Panda Endpoint and Panda Adaptive Defense:
Before running the utility, close all programs and open windows. Run the utility DG_WAGENT_8_XX.exe or DG_WAGENT_5_50.exe, depending on your Panda product version, and click "Yes" to initiate a complete uninstall. After the utility finishes, click OK and restart your computer.
After reboot, run the file DG_PANDAPROT8_XX.exe or DG_WCLIENT_5_50.exe, wait until the utility completes and restart your computer.
Experienced users quite often encounter a situation where they need to disable a security program. So how do you disable your antivirus if you need to download or run something that it potentially won't like? In most cases, the operation of such programs can be suspended in approximately the same ways.
Why turn off antivirus protection?
By the way, why might you even need to disable your antivirus? There are reasons. You shouldn’t immediately think about installing and launching all sorts of hacks for programs and applications. Much more often, the “defender” can be a strong obstacle to setting up big plays that are not too powerful computers when, due to the scanning process of installed files, the installation may take an indefinitely long time. So in this case you will simply have to disable the antivirus. In this situation, you simply cannot do without such a forced measure.
Simple ways to disconnect
So how to disable the antivirus without resorting to changing the registry and other complex “tricks”? This is possible using standard means Windows OS. Click on the well-known “Start” button, find the “Control Panel” menu item there, where there is a line “Administration”. Here you are only interested in the “System Configuration” section.
The procedure for shutting down via startup
It should be noted that you can do it much simpler. On the keyboard, you need to simultaneously press the “Alt” and “R” keys (you don’t have to look at the layout), and in the field that appears for typing commands, type “MSConfig”. In both cases, a dialog box will appear, which for our purposes requires the capabilities of two tabs: “Services” and “Startup”. After this, you need to uncheck the boxes next to the name of the antivirus program installed on your system. The system will prompt you to save the changes and reboot, after which the “watchman” will not work. But inexperienced users who are interested in the question of how to disable an antivirus will probably find all these manipulations quite complicated. Well, you can understand them.
Using the capabilities of the resident protection module
It is much faster to use the standard protection capabilities of your program, the settings of which can be found in the system tray. In most cases, you can click on this icon with the right mouse button, and then in the opened window context menu select an item similar to “temporarily disable protection”. If there is nothing similar there, you will have to go into the system settings and look for the appropriate options already there.

Some nuances
Note! If you are thinking about how to disable your antivirus to run a “crack” or cheat on someone, be prepared for unpleasant consequences. Despite the eloquent assurances of their creators that they “do not pose a danger to your system,” most often this is far from the case. The desire to get a program or game “for free” most often results in the need to radically clean your computer of viruses. Even the most effective antivirus completely defenseless against malware when disabled. In a word, do not be fooled by loud promises, monitor the state of the system without clogging it junk files. Then you definitely won’t need to disable your antivirus.
Since you are here, it means you want to know how to disable the antivirus in Windows 7 or XP, temporarily, temporarily or completely.
Why is it not easy to do this, however, since they are different, and it could be avast (Avast), avg, Kaspersky, microsoft security essentials (Microsoft), dr web (Doctor Web), eset nod32 (nod), mcafee, web, avira , norton (Norton), comodo or panda, then the methods are not the same.
In this article (others in the “all articles” menu) I will describe only one universal method how to disable absolutely any antivirus - quickly and efficiently, but at the beginning there are a few useful points.
Manufacturers deliberately make it impossible to disable the antivirus. There are good reasons for this.
Otherwise, viruses will be able to disable them, but they cannot do this, therefore, the protection becomes more effective.
So, to disable any antivirus, go to, after that, look for the “administration” option and click on it.
If you can't find it, look at right side top: it says "view", select "large icons"
I hope the administration has been found. After clicking on it, click on “system configuration”. Another window will open where the antivirus will be disabled.
You will be prompted to reboot, after which it will no longer work.

- I would like to note that all antiviruses can be disabled in another way, especially for NOD, Kaspersky and Avast. . I think they've outdone themselves in the "unplug" department.
Why you may need to disable your antivirus. There are several reasons. Manufacturers often set bans on visiting completely “clean” sites.
They just don't want you to go there because the keys to their "creations" are there and they want you to buy them.
There are also “programs” that are not viruses (kaygens, activators...). To run them, you cannot do without disabling anti-virus systems.
Also, for example, it loads the system, and if the computer needs more performance, then sometimes it is advisable to disable the antivirus.
Of course, there can be many more reasons than described above, these are just the most popular ones. As I wrote above, the described method is not the only one and sometimes it is better to disable the protection directly in the settings of your “defender”.
Category: UncategorizedGood afternoon, dear readers! In today's article, I will show you how to disable Avast antivirus, and then how to enable Avast back. This is done literally in a couple of clicks, so you should not have any difficulties, and you can easily disable avast antivirus for a while.
Avast antivirus is the most popular free antivirus, more than 220 million people use it worldwide. Avast gained its popularity due to its reliable protection against viruses and ease of use.
But there are times when it is necessary to disable avast antivirus for a while. For example, you downloaded some game, and when you try to install it, Avast blocks the process. Also, difficulties may arise when working with certain programs.
The reasons for disabling avast antivirus may be different, but this does not matter. Let's move from words to action!
How to disable avast antivirus temporarily
1. First of all, you need to open the system tray by clicking on the icon in the lower right corner (next to the clock). In the tray that opens, hover over the avast antivirus icon and click on it right click mice.
2. In the window that opens, hover over the line “Manage Avast screens”. In the newly opened window, select the time for which you want to disable Avast antivirus and click on the required line. I selected "Disable until I restart my computer." 
3. In the warning window “Stopping the component” that opens, click the “Yes” button. 
After these steps, we disabled Avast for a while, and you can verify this by opening the antivirus. On a red background, in large font, the message “YOU ARE NOT PROTECTED!” should be displayed. 
How to enable avast antivirus
Turning on avast is even easier than turning it off; to do this, just open the antivirus and click “Enable”. After this, your computer’s protection against viruses will resume in full. 
As you can see, there is nothing complicated about disabling and enabling avast antivirus. However, I would like to warn you about the dangers of using the Internet with the antivirus turned off.
This is especially true for novice computer users, since it is quite difficult for a beginner to identify a site with a bad reputation. And when downloading and installing third party programs, the likelihood of infection increases!
Read also about where avast quarantine is located and how to download and install avast antivirus for free for 1 year.
That's all for me, good luck!
Today, I will tell you how to disable not only the standard antivirus, but also the regular antivirus on your computer; in fact, there is nothing complicated about it.
Sometimes, when working on a computer, a situation may arise when the computer asks you to turn off the antivirus for a while. Or it blocks programs, games, etc. that you need.
The easiest way to disable the antivirus is to go to:
- Through the menu > go to >
- Then in > find the item > and click on it with the left mouse button.
- Therefore, in order to finally turn off the antivirus, you need to select a program > this is where the shutdown process begins.
- In the program that opens, simultaneously in the “Startup” and “Services” tabs, you need to uncheck the boxes in front of the name of your antivirus program.
- Click “Apply”.
- Then a menu will appear asking you to allow your computer to restart, then the computer will start with the antivirus turned off.
DISABLE THE ANTI-VIRUS TEMPORARILY USING THE PROGRAM
IN CCleaner program There is a startup editor that makes it very easy to disable any antivirus. If you don’t have such a program on your computer, then you can go to the site where you can download the program you need
Next, after installing the program, open “CCleaner” and go to the “Tools >> Startup” tab.
Then select the lines responsible for the antivirus and click “Turn off” on the right.
Therefore, we reboot the computer, and then we continue to work with the antivirus turned off.
And then if you want to enable the antivirus, then there is nothing complicated here either, just go to the same tabs and click on the “Enable” button
If you are unable to disable your antivirus using the methods listed above...
There is another way, which will lead to exactly the same result as with the first two methods.
Press the “Alt” and “R” keys simultaneously (the layout does not matter), you will see a window in which you must type the line “MSConfig”. Following this action, a window will appear > in this window we will need the > and > tabs. Then, to disable the antivirus, you need to uncheck the boxes next to the name installed antivirus on your computer.
Yes, you probably already guessed that this method is almost identical to the first... However, this method is not suitable for everyone. Asking the question “how to disable antivirus for a short period of time,” some of you, our beloved readers, will probably find this method too long and complicated. Yes, perhaps you are right.
There is a way for the lazy or simply for those who need to temporarily disable the antivirus as quickly as possible. It is much easier and faster to disable the antivirus on your computer in the following way. This method is located on the taskbar next to the volume control.
The icon for your antivirus product is constantly visible there. After disabling the antivirus, you can right-click on the icon, and then select “Turn off protection” or something similar in the context menu that appears. You can go to the program settings and find a way to temporarily disable protection.
Disabling Windows 10 antivirus permanently:
- Open the Run window (Windows +R), enter the command regedit and click OK.
- Go to the next registry branch
- Right-click on the empty space on the left and create a DWORD value (32 bits) called DisableAntiSpyware.
- Double-click on the newly created parameter, give it a value of 1, and click OK.

- Now you can close the Registry Editor and check the effect of this method through the computer settings. There you can make sure that all Defender-related settings have become inactive. You can also try running the built-in antivirus by clicking the link at the very bottom “Open Windows Defender”

HOW TO DISABLE CHINESE ANTI-VIRUS:
As a result, you will receive a message that Windows 10 Defender is disabled by Group Policy.

If you want to reactivate the disabled Windows 10 Defender, then just delete the DisableAntiSpyware parameter or change its value to 0
Pay attention, our dear and beloved readers! After users begin to resort to measures such as disabling the antivirus. They most often have to call a technician to their home or give the computer to specialists to treat the computer.
Since there are enough viruses on the Internet, and disabling the antivirus can lead to infection of the computer, in order to prevent this from happening, it is best not to disable the antivirus, because in fact, it is not recommended to disable the antivirus at all.
Dear friends, remember that even the most effective or most expensive antivirus will not help protect your computer system if you turn it off often.
But from time to time you will wonder how to disable Avast antivirus for a while (or one of its components).
This usually becomes necessary when installing certain programs or if Avast blocks your favorite website or application. (or maybe you just downloaded a toy from a torrent and Avast won’t let you install it? - stop putting up with it!!!)
ADVICE! If you want to disable Avast just because it blocks your favorite program, then in this situation I recommend using the list of trusted applications (add to the list of exceptions)
I decided that for the impatient it would be correct to describe in a nutshell the process of disabling protection from Avast and below I will describe in detail each of the options. This algorithm is applicable to all Avast antivirus products ( Free Antivirus, Internet Security and so on)
Step 1. Right-click on the orange Avast icon in your system Windows tray(next to the clock)
Step 2. Select "Manage Avast Screens" and select the time for which you want to disable the antivirus
Step 3. Confirm the action by clicking "YES" in the pop-up window
If brief instructions didn’t answer the question of how to disable Avast while installing the program, then move on to the detailed note with detailed screenshots (everything we like)
How to temporarily disable Avast antivirus
Disabling all protection screens means you will completely disable Avast's active protection. Therefore, make sure that you understand what this is for and understand the consequences (if you are asked to disable the protection, then I would think about it)
Step 1. Find in the panel Windows tasks orange Avast antivirus icon (In some Windows versions it may be hidden, click the arrow if you don’t see it). Right-click and select “Manage Avast Screens” from the menu required parameter (if you select “Disable forever”, then Avast will not work until you force it to start)

Step 2. It doesn't matter which option you choose, Avast will ask you to confirm (like User Account Control in Windows) where you need to agree by clicking the “YES” button - all antivirus components will be disabled for the period of time that you selected.

Step 3. We need to make sure that we have disabled AVAST antivirus. To do this, go to the program menu and in the “Status” category you will see the message “All antivirus screens are turned off.”

Don’t forget to turn the antivirus back on later by simply clicking on the green “Solve the problem” button in the program status.
How to disable Avast components temporarily through the menu
Fortunately, there is no need to disable all components of the Avast antivirus; you can permanently or temporarily disable a specific part of the antivirus. Again, make sure your actions are correct and necessary!
Step 1. If you really need to disable Avast while installing the program, then open the antivirus interface (that orange icon next to the clock) and go to the “Protection” section, “Main protection components”.

IN this menu You can disable the main protection components (File Protection, Behavior Analysis, Web Protection or Mail Protection) from the list. Typically installed harmful The program is hindered by “File Protection” and does not allow you to access your favorite website with cats “Web Protection”.

Just click on the switch next to the required component. Next, Avast will offer you four options to choose from with the time for which you need to suspend the protection component.

Step 2. If you did everything correctly, the switch will move to the “Off” position and will be highlighted in red.

Similarly, in the status, Avast will signal to us that the system is in danger and it is necessary to enable the antivirus component. After installing the program, you should admit that the antivirus recommendations are really necessary and do not forget to enable all protection components (just click on the big green “Enable” button)

As you can see, there is nothing difficult to disable Avast for a while. However, do not forget that by disabling any of the antivirus components you are putting your computer at risk.
How to disable Avast service
If the antivirus imagines itself to be in charge and does not allow itself to be disabled using the built-in means, then you can stop the service by force operating system. Open Task Manager and go to the Services tab. Find in the list avast! Antivirus, right-click on it and select “Stop” in the menu that opens.

The exact same confirmation window will appear as in the first option. We just agree and, most importantly, do not forget to turn the antivirus back on after you have completed all the necessary actions that the antivirus interfered with.
Option for the desperate
If none of the options helped you disable the antivirus, you can go to extreme measures, namely, remove it from your computer. No antivirus - no problem.

If you are sure that this is necessary, then check out detailed instructions (I especially recommend their utility from the note)
conclusions
To write this note, I used the Avast Free Antivirus version, but this applies to any other solutions from this company. The question of how to disable Avast antivirus is solved the same way everywhere. Don't forget that disabling any antivirus component puts your data on your computer at risk.
In contact with