This article will be useful for all owners of Apple tablets - iPad and iPad mini. I would even say for novice users, for those who first encountered the iPad tablet. After buying an iPad, joy and other emotions, we need to set up our tablet and be sure to connect it to the Internet. If you didn't connect your iPad to Wi-Fi during the first setup, you can connect it to the Internet later, and it's not difficult at all. But, if you have not encountered Apple technology before, then you may have questions about this.
I think it’s no secret to anyone that without an Internet connection, a tablet is generally useless. iPad is no exception. And in order to use your tablet to its fullest, you need to connect it to a normal Internet. You can use either Wi-Fi or 3G/4G (if you have a version with 3G or 4G support). But, everything is fine, you will connect your iPad to Wi-Fi. Since it is either free or not expensive in comparison with the same 3G. Now we will take a closer look at the process of connecting the iPad mini tablet to a Wi-Fi network.
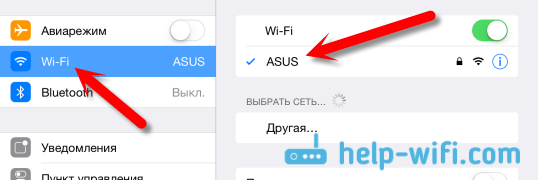
Connecting iPad to Wi-Fi
Open Settings on your tablet.
Let's move on to masonry WiFi and click on the Wi-Fi network to which we want to connect.

If the network is protected, a window will appear in which you need to enter a password to connect to Wi-Fi and click Connect

If you entered the password correctly, your iPad should connect to the wireless network. You can use the Internet, install games and applications from the App Store, etc.
Delete the network on the iPad and set static IP and DNS
If you need to delete a network so that the tablet does not automatically connect to it, then simply click on the network to which you are already connected.
Click on the button Forget this network.

And to change the IP address, DNS, and Subnet mask, go to the tab Static in the properties of the desired Wi-Fi network. And set the necessary parameters.

These are the simple Wi-Fi settings. Basically, like the entire iOS operating system. If your iPad doesn't want to connect to Wi-Fi, then the problem is most likely in the settings of the wireless network itself on the router. Check if other devices are connected. And if the tablet connects to the network, but the Internet does not work, then check the provider settings on the router, and again, whether the Internet works on other devices.
Try deleting the network on your tablet and reconnecting. Make sure you enter the correct password.
You can make a wi-fi router out of an iPhone and distribute the Internet to other devices. Very useful if you are far from home if your laptop does not have a 3G modem. In this article we will talk about how to enable iPhone tethering mode, as well as some problems that you may encounter in the process.

After this, the mobile device will turn into a mobile access point and begin to “distribute” the Internet. You can connect to it via Wi-Fi using the password that is displayed in the mode settings.
Be careful: the enabled wi-fi modem mode is not displayed anywhere. But the battery on your phone drains faster.
When another device connects to you, you will see this message in the status panel.

Setting up another device connection
To connect to the created Wi-Fi network from another device, go to the network settings on this device. Select the name of the wi-fi point that you specified in the settings. And enter the access password.
This is what connecting to an iPhone on a MacBook looks like. On other devices, the connection icons will be identical.

It is worth highlighting several main features of using modem mode:
- Don't expect high speeds, since the Internet connection is via a mobile network.
- When modem mode is activated, the autonomy of the mobile device is slightly reduced.
- Some mobile operators may impose some restrictions on the number of simultaneous connections to one device.
What to do if modem mode on iPhone cannot be activated
In some cases, to activate modem mode, users will have to make a number of additional settings. It depends on the cellular operators. In particular, here is an article on how to enable yota modem mode. The general principle is this:

Mobile operator data:
Russia
Beeline / Beeline
- APN: internet.beeline.ru
- Username: beelin
- Password: beeline
MTS / MTS Russia
- APN: internet.mts.ru
- Username: mts
- Password: mts
MegaFon / MegaFon
- APN: internet
- Username: gdata
- Password: gdata
Tele2 / Tele2 Russia
- APN: internet.tele2.ru
- Password: leave blank
- APN:yota
- Username: yota
- Password: yota
Ukraine
Kyivstar
- Username: leave blank
- Password: leave blank
Lifecell Ukraine
- APN: internet
- Username: leave blank
- Password: leave blank
MTS Ukraine
You can clarify your APN data by calling 111 for MTS Ukraine users.
A familiar situation: you brought home a new Wi-Fi router, you’re already looking forward to connecting to the Internet and watching movies, chatting with friends and sharing photos, but here’s the problem: you don’t have a computer or laptop to configure the router in the usual way : via network cable (patch cord). But nothing is impossible! So, we bring to your attention detailed step-by-step instructions on how to set up a router from an Android phone or tablet, as well as an iPhone or iPad via Wi-Fi without a cable. The process is described in such detail that the manual is suitable for both confident users and beginners. And, by the way, these steps are also useful for setting up a router from scratch via Wi-Fi from a laptop that does not have an Ethernet port as such - for example, a MacBook Air. Of course, it’s worth noting that you can set up a router from your phone only if it broadcasts a Wi-Fi network out of the box. But, as a rule, in all modern models (at least those that I came across) wireless network broadcasting is enabled by default.
Setting up a router from a phone (Android, iPhone) via Wi-Fi without a computer
If your router's web interface is not adapted for mobile device screens, use a two-finger gesture or double tap to zoom. You may find it convenient to rotate your phone 90 degrees to manipulate the settings site.
Some router models have a hardware (i.e. physical) switch Wi-Fi On-Off on the body. Make sure it's in position On before starting (see screenshot below).
How to access router settings from your phone
- Connect the ISP cable to the router port, which is called WAN or INTERNET. Often it is highlighted in a special color and differs from other ports (LAN):

- Turn on Wi-Fi on your phone. To do this, on your iPhone you need to go to “Settings”, select “Wi-Fi” and turn it on:
 Although, on modern iPhones, Wi-Fi is always on by default and you are unlikely to need this item.
On Android, pull down the curtain and press and hold your finger on the Wi-Fi icon: and also make sure it is enabled:
- Connect to the router's network. Different router manufacturers will name the network differently: D-Link may have dlink or, for example, dir300nru; for modern TP-Link the default SSID will be something like TP-LINK_A0816A(where the second part of the name is the last 6 characters of the MAC address).
- Enter the Wi-Fi network password (the so-called security key) and click “Connect”:
 Here again everything depends on the manufacturer. If you have a TP-Link router, use the PIN indicated on the sticker:
  If the default network is without a password, then you will connect without entering the key.
 - Important! Now turn off the mobile Internet on your phone, because if the Internet on the router is not yet configured, your phone will try to access the network through mobile data and you will not be able to:

- Open a browser on your phone. For example Chrome.
- Enter the IP address or website name of the router that is indicated on the sticker in the address bar and press enter. For example http://192.168.0.1
Attention! If you are unable to open the settings using the IP address printed on the sticker, read our article. - Enter your username, password from the same sticker and click ENTER or LOGIN. At the same time, make sure that you enter your login with a lowercase letter:
 On older firmware of TP-Link routers, the login window may look like this:
  If you successfully enter the router settings from your phone, you should see the following screen:
Setting up Wi-Fi on a router from a phone or tablet
After changing parameters such as the network name, network security key from your phone (iPhone or Android), you will have to reconnect to the network each time. I recommend the following sequence of actions:

In this case, long press on the name of the Wi-Fi network and select “Forget network” or “Delete this network”: 
In this case, the network profile with the old password will be deleted from the phone, you will see a prompt to enter the password and will be able to connect normally: 
Setting up router protection from Android or iPhone

Setting up the Internet on the router from your phone

The iPad is a tablet computer from Apple. Since they have nothing in common with devices running the Windows operating system, then, accordingly, you need to look for compatible hardware. For example, a wifi router for iPad is a dual-band wireless router Apple AirPort Extreme.
Contents of delivery
The router is delivered in a white box, on the sides of which there is a photograph of the device, its technical characteristics and, traditionally, a logo in the form of a bitten apple.
In addition to the router, the delivery package includes an external power supply, a setup guide in Russian and a warranty card. I was surprised that the power supply is external, and not traditionally integrated into the device itself.
Router appearance
The appearance of the device is fine. The iPad router has a square shape with rounded corners. The body is made of white plastic - this material is necessary for the operation of the four internal antennas. There is a multi-functional multi-color indicator on the front panel of the device.

All ports and connectors are located on the back of the router:
- Power supply input;
- USB 2.0 port;
- 3 Gigabit LAN ports;
- 1 gigabit WAN port;
- Reset button recessed into the body;
- Kensington Castle. (Small hole for installing an anti-theft lock).
Setting up the router
In the next chapter, we will look at how to connect an iPad to a router. AirPort Extreme can be configured only using a special program that is already included in the standard set of programs for the Mac OS X operating system. An additional version has also been developed for Windows, which can be downloaded from the official Apple website - http://www.apple.com/ru/ . For example, we will use the Windows version.

The router can be configured in two modes - step-by-step configuration mode, in which basic device settings are established, and full access mode to all functions for more experienced users. In addition to directly setting the parameters, this program allows you to programmatically reboot the router, save the changes made, restore the factory configuration, connect and display a list of wireless clients, and view recorded operation logs. After making changes to the settings, you need to update the device configuration by clicking the “Update” button in the window. The update lasts almost a minute, at the end of which the router automatically reboots.

At the top of the settings window there are five icons with links to settings - “AirPort”, “Internet”, “Printers”, “Disks” and “Advanced”.
AirPort Menu
When you click on the first one, you will be taken to the device status page. On it you can see the firmware version, the serial number of the router, MAC addresses of all interfaces, the status of the Wi-Fi module, and others.
The iPad 2 router is equipped with an internal clock that can automatically synchronize the time with an exact time server when it detects an Internet connection. AirPort will also check for new firmware for this device model when it detects an Internet connection, and if it detects it, the LED on the front panel of the router will begin to blink.

Wireless part of the router
The router is designed as a dual-band access point (2.4 and 5 GHz). It is noteworthy that both frequencies can be available simultaneously.
On the "advanced settings" page, we can limit the wireless transmission power or hide the SSID (wireless network name).

Additionally, you can create a guest wireless network with limited rights - with your own network name and other security settings. Clients on this guest network will only have Internet access, but they will not be able to connect to the Apple AirPort Extreme settings.
Guest wireless network
Internet setup
When setting up the Internet, the user is given a choice between two options for connecting to the provider - a direct connection (permanent or dynamic IP) or via the PPPoE protocol. It is also possible to configure the router to operate in bridge mode or router mode without NAT.
The AirPort program has a built-in diagnostic system that checks the availability of the Internet, detects interface configuration conflicts and other possible network problems. If any are detected, the program gives recommendations for correction. (For example, for the “double NAT” mode, the program will offer to switch the device to “Bridge” mode). The DHCP server built into the router can assign fixed MAC-IP mappings.

All network users have the same access rights to all volumes. User identification can be established according to any of three rules - by device password, by disk password, or by a list of users. In the case of a list of users, you will need to create a list of names and passwords in the AirPort program itself, making sure to indicate the type of access - read only, or read and write. Guest rights are also configured there (read only, read and write, no access).

Option "Printers"
In the “Printers” item there is only one page, which displays a list of connected network printers with the ability to change their network names.
External network drives
You can also connect external drives to the device wirelessly. The router supports reading and writing external media and recognizes FAT32 and HFS+ file systems. Disks can be divided into several partitions.

Read more detailed instructions for setting up a router running Mac OS X version 10.5 + Windows on the Apple website: http://manuals.info.apple.com/ru_RU/Designing_AirPort_Networks_10.5-Windows_RS.pdf
The iPad is a great travel gadget. It is lighter, more compact and more autonomous than most ultrabooks, not to mention full-fledged work machines, and the display size is enough for comfortable watching movies and performing other multimedia and even office tasks. In this article, we have collected some useful tips that will make traveling with your iPad as smooth as possible.
In contact with
We deliberately focused on the iPad without a cellular module (iPad + Wi-Fi), because it is the most affordable model, and roaming is not cheap.
Download music and movies before you travel
“Prepare your sleigh in the summer” - popular wisdom.

In order not to get bored on the road to warmer climes, you need to take care of your leisure time in advance. In most cases, you can’t even dream of any free Wi-Fi on a plane, train or bus, and that’s why it’s best to download a TV series or a good movie.

We recommend using free VLC as a player for playback. It supports almost all popular formats, so you won’t have to struggle with iTunes (files can be transferred via FTP over the air, fortunately, this option is available and you can set up a channel in a couple of clicks) and convert movies.
Although, if the size of the built-in storage in the iPad is too small, then it will not be amiss. You see, you can save the lion's share of space with just one resolution without loss of quality.
Download offline maps
High-quality navigation is no less, if not more important, on this list. There are miles of apps out there to help you avoid getting lost, but most may not have offline access, so we recommend downloading maps in advance.
The simplest example of acceptable software would be . To download the map, you need to find and click on the name of the locality you are interested in and click the “ Download».
If necessary, it is possible to increase or decrease the area of the downloaded map.

We also recommend using the cool application MAPS.ME, in which you can download maps of entire countries at once for free with all the attractions, shops, establishments and other places.

Turn off Wi-Fi

Be sure to turn off the Wi-Fi module if you are not using it. This isn't energy-efficient Bluetooth that literally spares your iPad's battery. Anyone can do this, but if not, then swipe up from the bottom to open the Control Center, where the button to turn Wi-Fi on/off is located, or go to Settings → Wi-Fi.
Safety first
Be sure to activate the “ ” function, which will take care of data safety in case the iPad is stolen. Thanks to it, you can easily send a message to your iPad asking to return the gadget to its rightful owner, you can remotely delete personal data and block the device, and you can also see its location on the map, of course, if it is not turned off and is connected to the Internet.

To activate this feature, go to Settings → iCloud → Find iPad and activate the switch opposite the corresponding item.

Also, don't forget to set a lock screen password (don't be lazy and do this even if you don't have a Touch ID fingerprint sensor). To do this, go to Settings → Touch ID and passcode, and then enter the unlock code.