In short, Flexbox layout gives us simple solutions to once difficult problems. For example, when you need to align an element vertically, or press the footer to the bottom of the screen, or simply insert several blocks in one row so that they occupy all the free space. Similar problems can be solved without flex. But as a rule, these solutions are more like “crutches” - techniques for using CSS for purposes other than their intended purpose. Whereas with flexbox such tasks are solved exactly as the flex model is intended.
CSS Flexible Box Layout Module (CSS module for layouts with flexible blocks), flexbox for short, was created to eliminate the shortcomings when creating a wide variety of HTML designs, including those adapted to different widths and heights, and make the layout logical and simple. And a logical approach, as a rule, works in unexpected places, where the result has not been checked - logic is everything!
Flexbox allows you to elegantly control a variety of parameters of elements inside the container: direction, order, width, height, longitudinal and cross alignment, distribution free space, tension and compression of elements.
Basic knowledge
A FlexBox consists of a Container and its Items (flexible elements).
To enable flexbox, anyone HTML element just assign the CSS property display:flex; or display:inline-flex; .
After enabling the flex property, two axes are created inside the container: main and transverse (perpendicular (⊥), cross axis). All nested elements (of the first level) are lined up along the main axis. By default, the main axis is horizontal and directed from left to right (→), and the cross axis is correspondingly vertical and directed from top to bottom (↓).
The main and cross axes can be swapped, then the elements will be located from top to bottom (↓) and when they no longer fit in height, they will move from left to right (→) - that is, the axes simply swapped places. In this case, the beginning and end of the arrangement of the elements does not change - only the directions (axes) change! This is why you need to imagine the axes inside the container. However, one should not think that there are some “physical” axes and they influence something. The axis here is just the direction of movement of the elements inside the container. For example, if we specified the alignment of elements to the center of the main axis and then changed the direction of this main axis, then the alignment will change: the elements were in the middle horizontally, but became in the middle vertically... See the example.
Another important feature of Flexbox is the presence of rows in the transverse direction. To understand what we are talking about, let's imagine that there is a main horizontal axis, there are many elements and they do not “fit” into the container, so they move to another row. Those. a container looks like this: a container with two rows inside it, each row containing several elements. Introduced? Now remember that we can vertically align not only elements, but also rows! How this works is clearly seen in the example for the property. And this is what it looks like schematically:

CSS properties, which can affect the layout model: float, clear, vertical-align, columns do not work in flex design. Here a different model for constructing a layout is used and these CSS properties are simply ignored.
Flexbox CSS Properties
Flexbox contains different css rules to control the entire flex design. Some need to be applied to the main container, and others to the elements of this container.
For container
display:Enables the flex property for the element. This property covers the element itself and its nested elements: only first-level descendants are affected - they will become elements of the flex container.
- flex- the element stretches its entire width and has its full space among the surrounding blocks. Line breaks occur at the beginning and end of the block.
- inline-flex- an element is wrapped around other elements. In this case, its internal part is formatted as a block element, and the element itself is formatted as inline.
flex and inline-flex differ in that they interact differently with surrounding elements, similar to display:block and display:inline-block .
flex-direction:Changes the direction of the main axis of the container. The transverse axis changes accordingly.
- row (default)- direction of elements from left to right (→)
- column- direction of elements from top to bottom (↓)
- row-reverse- direction of elements from right to left (←)
- column-reverse- direction of elements from bottom to top ()
Controls the transfer of elements that do not fit into the container.
- nowrap (default)- nested elements are placed in one row (with direction=row) or in one column (with direction=column) regardless of whether they fit into the container or not.
- wrap- includes moving elements to the next row if they do not fit into the container. This enables the movement of elements along the transverse axis.
- wrap-reverse- the same as wrap, only the transfer will not be down, but up (in the opposite direction).
Combines both flex-direction and flex-wrap properties. They are often used together, so the flex-flow property was created to help write less code.
flex-flow accepts the values of these two properties, separated by a space. Or you can specify a single value for any property.
/* flex-direction only */ flex-flow: row; flex-flow: row-reverse; flex-flow: column; flex-flow: column-reverse; /* flex-wrap only */ flex-flow: nowrap; flex-flow: wrap; flex-flow: wrap-reverse; /* both values at once: flex-direction and flex-wrap */ flex-flow: row nowrap; flex-flow: column wrap; flex-flow: column-reverse wrap-reverse; justify-content:
Aligns elements along the main axis: if direction=row, then horizontally, and if direction=column, then vertically.
- flex-start (default)- the elements will go from the beginning (there may be some space left at the end).
- flex-end- elements are aligned at the end (the space will remain at the beginning)
- center- in the center (space will remain on the left and right)
- space-between- the outermost elements are pressed against the edges (the space between the elements is distributed evenly)
- space-around - free space distributed evenly between the elements (the outermost elements are not pressed against the edges). The space between the edge of the container and the outer elements will be half as much as the space between the elements in the middle of the row.
- space-evenly
Aligns rows containing elements along the transverse axis. Same as justify-content only for the opposite axis.
Note: Works when there are at least 2 rows, i.e. If there is only 1 row, nothing will happen.
Those. if flex-direction: row , then this property will align invisible rows vertically. It is important to note here that the height of the block must be set rigidly and must be greater than the height of the rows, otherwise the rows themselves will stretch the container and any alignment of them becomes meaningless, because there is no free space between them... But when flex-direction: column , then the rows move horizontally → and the width of the container is almost always greater than the width of the rows and aligning the rows immediately makes sense...
- stretch (default)- rows stretch to fill the row completely
- flex-start- rows are grouped at the top of the container (there may be some space left at the end).
- flex-end- rows are grouped at the bottom of the container (space will remain at the beginning)
- center- rows are grouped in the center of the container (space will remain at the edges)
- space-between- the outer rows are pressed against the edges (the space between the rows is distributed evenly)
- space-around- free space is evenly distributed between the rows (the outermost elements are not pressed against the edges). The space between the edge of the container and the outer elements will be half as much as the space between the elements in the middle of the row.
- space-evenly- the same as space-around , only the distance between the outer elements and the edges of the container is the same as between the elements.
Aligns elements along a transverse axis within a row (invisible row). Those. The rows themselves are aligned via align-content , and the elements within these rows (rows) are aligned via align-items and all along the transverse axis. There is no such division along the main axis, there is no concept of rows and elements are aligned through justify-content .
- stretch (default)- elements are stretched to fill the line completely
- flex-start- elements are pressed to the beginning of the row
- flex-end- elements are pressed to the end of the row
- center- elements are aligned to the center of the row
- baseline- elements are aligned to the text baseline
For container elements
flex-grow:Sets the element's magnification factor when there is free space in the container. Default flex-grow: 0 i.e. none of the elements should grow and fill the free space in the container.
Default flex-grow: 0
- If you specify flex-grow:1 for all elements, then they will all stretch equally and fill all the free space in the container.
- If you specify flex-grow:1 to one of the elements, then it will fill all the free space in the container and alignments via justify-content will no longer work: there is no free space to align...
- With flex-grow:1 . If one of them has flex-grow:2 then it will be 2 times larger than all the others
- If all flex boxes inside a flex container have flex-grow:3 then they will be the same size
- With flex-grow:3 . If one of them has flex-grow:12 then it will be 4 times larger than all the others
How it works? Let's say a container is 500px wide and contains two elements, each with a base width of 100px. This means there are 300 free pixels left in the container. Now, if we specify flex-grow:2; , and the second flex-grow: 1; , then the blocks will occupy the entire available width of the container and the width of the first block will be 300px, and the second 200px. This is explained by the fact that the available 300px of free space in the container was distributed between the elements in a 2:1 ratio, +200px for the first and +100px for the second.
Note: you can specify fractional numbers in the value, for example: 0.5 - flex-grow:0.5
flex-shrink:Sets the element's reduction factor. The property is the opposite of flex-grow and determines how the element should shrink if there is no free space left in the container. Those. the property starts working when the sum of the sizes of all elements is greater than the size of the container.
Default flex-shrink:1
Let's say the container is 600px wide and contains two elements, each 300px wide - flex-basis:300px; . Those. two elements completely fill the container. Give the first element flex-shrink: 2; , and the second flex-shrink: 1; . Now let's reduce the width of the container by 300px, i.e. elements must shrink by 300px to fit inside the container. They will shrink in a ratio of 2:1, i.e. the first block will shrink by 200px, and the second by 100px and the new element sizes will become 100px and 200px.
Note: you can specify fractional numbers in the value, for example: 0.5 - flex-shrink:0.5
flex-basis:Sets the base width of the element - the width before other conditions affecting the width of the element are calculated. The value can be specified in px, em, rem, %, vw, vh, etc. The final width will depend on the base width and the values of flex-grow, flex-shrink and the content inside the block. With auto, the element gets a base width relative to the content inside it.
Default: auto
Sometimes it's better to set the width of an element hard through the usual width property. For example, width: 50%; will mean that the element inside the container will be exactly 50%, but the flex-grow and flex-shrink properties will still work. This may be necessary when the element is stretched by the content inside it, more than specified in flex-basis. Example.
flex-basis will be “rigid” if stretch and shrink are set to zero: flex-basis:200px; flex-grow:0; flex-shrink:0; . All this can be written like this: flex:0 0 200px; .
flex: (grow shrink basis)A short summary of the three properties: flex-grow flex-shrink flex-basis .
Default: flex: 0 1 auto
However, you can specify one or two values:
Flex: none; /* 0 0 auto */ /* number */ flex: 2; /* flex-grow (flex-basis goes to 0) */ /* not a number */ flex: 10em; /* flex-basis: 10em */ flex: 30px; /* flex-basis: 30px */ flex: auto; /* flex-basis: auto */ flex: content; /* flex-basis: content */ flex: 1 30px; /* flex-grow and flex-basis */ flex: 2 2; /* flex-grow and flex-shrink (flex-basis goes to 0) */ flex: 2 2 10%; /* flex-grow and flex-shrink and flex-basis */ align-self:
Allows you to change the align-items property, only for a single element.
Default: from align-items container
- stretch- the element is stretched to fill the line completely
- flex-start- the element is pressed to the beginning of the line
- flex-end- the element is pressed to the end of the line
- center- the element is aligned to the center of the line
baseline- the element is aligned to the text baseline
Allows you to change the order (position, position) of an element in the general row.
Default: order: 0
By default, elements have order: 0 and are placed in the order of their appearance in the HTML code and the direction of the row. But if you change the value of the order property, then the elements will be arranged in the order of values: -1 0 1 2 3 ... . For example, if you specify order: 1 for one of the elements, then all zeros will go first, and then the element with 1.
This way, for example, you can move the first element to the end without changing the direction of movement of the remaining elements or the HTML code.
Notes
What is the difference between flex-basis and width?
Below are the important differences between flex-basis and width/height:
- When using the flex property, 3 values (flex-grow/flex-shrink/flex-basis) can be combined and written briefly, but for width grow or shrink you need to write separately. For example: flex:0 0 50% == width:50%; flex-shrink:0; . Sometimes it's just inconvenient.
flex-basis only works for the main axis. This means that with flex-direction:row flex-basis controls the width, and with flex-direction:column controls the height. .
flex-basis only applies to flex elements. This means that if you disable flex for a container, this property will have no effect.
Absolute container elements do not participate in flex construction... This means that flex-basis does not affect the flex elements of a container if they are absolute position:absolute . They will need to specify width/height.
If possible, still prefer flex-basis. Use width only when flex-basis is not appropriate.
The difference between flex-basis and width - a bug or a feature?
The content inside a flex element pushes it and cannot go beyond it. However, if you set the width using width or max-width rather than flex-basis , then an element inside a flex container will be able to extend beyond the bounds of that container (sometimes this is exactly the behavior you want). Example:
Flex layout examples
Nowhere in the examples are prefixes used for cross-browser compatibility. I did this for easy reading of the css. Therefore, see examples in the latest Chrome versions or Firefox.
#1 Simple example with vertical and horizontal alignment
Let's start from the very beginning simple example- vertical and horizontal alignment simultaneously and at any block height, even rubber.
Or like this, without a block inside:
#1.2 Separation (break) between flex block elements
To position container elements along the edges and randomly select an element after which there will be a break, you need to use the margin-left:auto or margin-right:auto property.
#2 Adaptive menu on flex
Let's create a menu at the very top of the page. On a wide screen it should be on the right. On average, align in the middle. And on the small one, each element must be on a new line.
#3 Adaptive 3 columns
This example shows how to quickly and conveniently make 3 columns, which, when narrowed, will turn into 2 and then into 1.
Please note that this can be done without using media rules, everything is on flex.
Go to jsfiddle.net and change the width of the “result” section
#4 Adaptive blocks on flex
Let's say we need to output 3 blocks, one large and two small. At the same time, it is necessary that the blocks adapt to small screens. We do:
Go to jsfiddle.net and change the width of the “result” section
#5 Gallery with flex and transition
This example shows how quickly you can make a cute accordion with pictures using flex. Pay attention to the transition property for flex.
#6 Flex to Flex (just an example)
The task is to make a flexible block. So that the beginning of the text in each block is on the same line horizontally. Those. As the width narrows, the blocks grow in height. It is necessary that the image is at the top, the button is always at the bottom, and the text in the middle starts along one horizontal line...
To solve this problem, the blocks themselves are stretched with flex and set to the maximum possible width. Each internal block is also a flex structure, with a rotated axis flex-direction:column; and the element in the middle (where the text is) is stretched flex-grow:1; to fill all the free space, this is how the result is achieved - the text began with one line...
More examples
Browser support - 98.3%
Of course there is no full support, but everything modern browsers support flexbox designs. Some still require prefixes. For a real picture, let's look at caniuse.com and see that 96.3% of browsers used today will work without prefixes, with 98.3% using prefixes. This is an excellent indicator to confidently use flexbox.
To know which prefixes are relevant today (June 2019), I will give an example of all flex rules with with the necessary prefixes:
/* Container */ .flex ( display:-webkit-box; display:-ms-flexbox; display:flex; display:-webkit-inline-box; display:-ms-inline-flexbox; display:inline-flex; -webkit-box-orient:vertical; -webkit-box-direction:normal; -ms-flex-direction:column; flex-direction:column; -ms-flex-wrap:wrap; flex-wrap:wrap; -ms -flex-flow:column wrap; flex-flow:column wrap; -webkit-box-pack:justify; -ms-flex-pack:justify; justify-content:space-between; -ms-flex-line-pack: distribute; align-content:space-around; ) /* Elements */ .flex-item ( -webkit-box-flex:1; -ms-flex-positive:1; flex-grow:1; -ms-flex- negative:2; flex-shrink:2; -ms-flex-preferred-size:100px; flex-basis:100px; -ms-flex:1 2 100px; flex:1 2 100px; -ms-flex-item-align :center; align-self:center; -webkit-box-ordinal-group:3; -ms-flex-order:2; order:2; )
It is better if properties with prefixes go before the original property.
This list does not contain any prefixes that are unnecessary today (according to caniuse), but in general there are more prefixes.
| Chrome | Safari | Firefox | Opera | I.E. | Android | iOS |
|---|---|---|---|---|---|---|
| 20- (old) | 3.1+ (old) | 2-21 (old) | 10 (tweener) | 2.1+ (old) | 3.2+ (old) | |
| 21+ (new) | 6.1+ (new) | 22+ (new) | 12.1+ (new) | 11+ (new) | 4.4+ (new) | 7.1+ (new) |
- (new) - new syntax: display: flex; .
- (tweener) - old unofficial syntax from 2011: display: flexbox; .
- (old) - old syntax from 2009: display: box;
Video
Well, don’t forget about the video, sometimes it’s also interesting and understandable. Here are a couple of popular ones:
Useful links on Flex
flexboxfroggy.com - flexbox educational game.
Flexplorer is a visual flex code builder.
In this issue we will do horizontal menu with effect on hover. Let's connect font icons, enable the layer blending mode using mix-blend-mode: multiply, use the :hover pseudo-classes, and get acquainted with desplay:flax, all done in pure CSS3.
Menu wireframe in HTML
Download the archive to your computer and unzip it. It contains three folders, css where the style files are located, fonts folder with icons, img in it there is a picture on the background.
Move everything into your development environment where you work. I will write all the code in phpstorm. I copy all the folders and files into it, open index.html and let’s start describing the menu frame.
We write the body tag
Div.dws-menu>ul.dws-ul>li.dws-li*5>a>i.fa.fa-
Icon name:
- shopping-cart
- server
- folder-open
- newspaper-o

CSS styling
After we have made the markup, we proceed to styling. Open style.css in body and set the background and font Verdana.
Body( background-image: url("../img/escheresque_ste.png"); font-family: Verdana; )
We give the block with the menu a background, and indent the top by 100 pixels. and width to fill the entire screen.
Dws-menu( background-color: white; margin-top: 100px; width: 100%; )
In Ul blocks, we line up the lists horizontally using desplay:flax , remove padding, and center our elements using justify-content:center .
Ul.dws-ul( display: flex; padding: 0; justify-content: center; )
We remove the marker from the LI lists and indent them on all sides by 10 peaks.
Li.dws-li ( list-style: none; padding: 10px; )
Remove the underline from the links and increase the text to 18 pixels. and make it black.
Li.dws-li a( text-decoration: none; font-size: 18px; color: #000; )
Move the icon a little to the right using margin-right:10px .
Li.dws-li a i( margin-right: 10px; )
Hover animation
After we've done the basic design, let's move on to the hover animation.
Let's create additional pseudo elements that will highlight the name of the element when hovered.
Let’s describe the left side, select the links and assign them the pseudo-element li.dws-li a::before , write empty content:’’; , 20 pics wide. and a height of 3 peaks. enough. Let's set the color and in order for the block to appear, assign position: relative to the links; , and position it absolutely to the links, lower it to the very bottom, press it to the left edge.
Li.dws-li a( ... position: relative; ) li.dws-li a::before( ... position: absolute; top: 100%; left: 0; )
Duplicate this block and assign it the ::after pseudo-element. Change the left parameter to right , choose a different color #ff2117 .
Li.dws-li a::after( content: ""; width: 20px; height: 3px; background-color: #ff2117; position: absolute; top: 100%; right: 0; )
Then we do the hover animation. Select the li and give them a slightly darker background.
Li.dws-li:hover( background-color: #e5eae8; )
To do this, select the lists on hover and add a pseudo-element to them with a width of 50% and set the transformation along the X axis from left to right. This will give her movement.
Li.dws-li:hover a:before( width: 50%; transform: translateX(100%); )
We'll repeat the same thing for the ::after pseudo-element, only now we'll set the movement from right to left.
Li.dws-li:hover a:after( width: 50%; transform: translateX(-100%); )
Li.dws-li a::before( ... transition: .5s; mix-blend-mode: multiply; ) li.dws-li a::after( ... transition: .5s; mix-blend-mode : multiply; )
It turned out pretty good, let’s now set the width to zero and add red color when hovering the link.
Li.dws-li a:hover( color: #e62117; )
Li.dws-li a( ... padding: 5px; ) li.dws-li a::before( ... top: 90%; ) li.dws-li a::after( ... top: 90 %; )
Basically, I showed you what I wanted, and it turned out to be a pretty nice menu.


The lesson was prepared by Denis Gorelov.
The days of page layouts based on floating elements and manipulation of margins are almost a thing of the past. CSS gives developers new and improved properties for creating layouts. Such traditional layout things as vertical alignment, uniform distances between elements, changing the arrangement of elements without changing their sequence in the layout, and other patterns like “glued footer” are easily implemented using Flexbox.
In this article we will look at layout patterns that are suitable for implementation on Flexbox. As an example, we will use the interface of the Tracks application, which implements the principles of atomic design. I'll talk about situations where Flexbox comes in handy and mention the pitfalls of pairing it with specific layout patterns. We'll look at the patterns that are causing you trouble, offer fallbacks for solving problems, and offer additional tactics to start using this property now.
Flexible Atomic Components
The Tracks interface takes an approach that looks at each piece in isolation, based on the principles of Brad Frost.
The atomic design philosophy can be thought of as the equivalent of LEGO blocks for web design. Scientific terms such as organism, molecule, atom are used to give developers a classification of interface elements and, accordingly, a deeper understanding of each fragment as part of the whole. This method of categorization makes it possible to identify these patterns and prevents external factors such as grids, colors, and distances from influencing this process. Building an interface from the micro level allows for greater reuse of its basic microelements.
Illustration 1: These application elements are used to display data based on atomic design principles. Can you guess which ones use Flexbox? (larger version)

Figure 2. The main interface of the Tracks application, taking advantage of flexbox and atomic design. (larger version)
The interface design was submitted as a set of prototypes to InVision, with documentation of the flow and user interface. During the initial UI audit, I began to identify areas where it made sense to implement Flexbox. I also decided to use Flexbox for the page layout, using the traditional “sidebar on the left, main content on the right” patterns usually implemented with floating boxes.
Html.flexbox ul.flexbox-target, html.no-js ul.flexbox-target ( display: flex; flex-direction: row; ) html.no-flexbox ul.flexbox-target li, html.no-js ul. flexbox-target li ( display: inline-block; /* Could also use a float-positioned-layout system instead */ )
Where flexbox support is not available, we will use display: inline-block . To the same declaration we will add the no-js class, in case of a shutdown in JavaScript browser. The CSS cascade will work even where there is no Flexbox or JavaScript, and even if there are loading problems. Flexbox can coexist with float, display: table and position: relative; Browsers that support Flexbox use it as a priority, while browsers that do not support it will be limited to traditional CSS layout mechanisms.
As always, the final choice of technology will depend on the goals of the project, its budget and analytics data. My golden rule is to always choose the smartest option for a project.
Line patterns
Navigation components turned out to be very suitable for Flexbox, not only because of the ease of implementation, but also due to the reduction in the amount of time spent. Inline patterns are notorious for sucking up developers' time, but with Flexbox we're talking minutes. If you implemented things like this in the pre-IE9 era, you'll understand how important this is.
Figure 3: This admin panel navigation uses a line pattern with vertically centered navigation elements. (larger version)
The admin panel navigation pattern markup consists of a nav tag that wraps links. Here is the HTML of this pattern:
And the corresponding styles:
Nav ( display: flex; align-items: center; /* Center navigation items vertically */ ) nav a ( display: inline-block; /* To avoid layout issues for inline elements with the order property in IE 10 */ ) nav a (flex: 1; )
The CSS turned out to be as minimalistic as the markup. Note the inline-block specified for the navigation links. This declaration solves any possible future problems in IE10 if you decide to change the order of elements with the order property. We also know that all the margins and margins given to the direct descendants of the flex container cause layout problems in IE10; to avoid such things, it makes sense to always check the layout cross-browser.
Illustration 4. The header navigation pattern with a centered logo is often found on the web and easily adapts to Flexbox. (larger version)
Traditionally, the inline pattern is usually implemented using non-semantic markup, with Flexbox we can do without such tricks.
The layout consists of a collection of menu items placed to the left and right of the logo in the center. The markup for this pattern is as follows:
Flexbox can reduce the need for HTML hacks and allows semantics to be preserved, as demonstrated in the markup. Semantic support is important because this HTML has a high chance of being used in the future; There are many other reasons for this that go beyond the scope of this discussion.
Before Flexbox, developers used display: inline-block and even float: left approaches to organize the inline layout. Flexbox is now a viable option and developers are no longer forced to use bad practices for the sake of beautiful design. The CSS required is not as concise as the previous pattern example in Figure 3, but it is easier to implement than the older methods.
Pipeline-header ( display: flex; align-items: center; justify-content: space-between; ) .pipeline-header > a ( display: inline-block; /* IE 10 doesn't recognize order, so we do this to avoid odd layouts there. */ ) .pipeline-logo ( flex: 1; order: 2; text-align: center; ) .pipeline-nav ( flex: 1.25; order: 1; ) .pipeline-search ( flex: 1; order: 3; ) a ( order: 4; )
When using flexbox in the pattern in illustration 3, remember that the sequence in the markup can be changed. If the logo needs to be moved, this is easily done using the order property. Keep in mind that order in markup is important for accessibility and this is controversial when it comes to Flexbox, especially given the varying implementation of accessibility across browsers. Browsers (except Firefox) and screen readers use layout order for keyboard navigation rather than visual order created by CSS.

Figure 5: Flow represented in markup and rendered in the browser, resequencing using flexbox without changing the markup. (larger version)
Below is the code for such a layout. Markup is not used to change the order of elements.
Here CSS is used to change the order of the elements in the diagram on the right of Figure 5.
Container ( display: flex; flex-direction: columns; /* row is the default value */ ) header ( order: 2; ) main ( order: 3; ) footer ( order: 1; )
This type of layout is used for more than just navigation. You might have seen it in the footer.
Figure 6: The same pattern we used for navigation is used in the footer. (larger version)
When using this pattern, be aware that the content may not have enough space in the container. Should content spread from the center to the edges? How will this affect the rest of the layout? Think about these questions before you begin the project. And keep in mind that keyboard navigation is important for users.
Line input fields
Shapes can be a design nightmare, especially when they're tightly coupled with an intricate grid structure made in Photoshop. The “inline label” pattern, as I call it, is as important to our industry as the Fender Stratocaster is to rock music.

Figure 7: Inline labels and input fields are another area where Flexbox can be used. But be careful about how the label text pushes back on the input field depending on the amount of text. (larger version)
As mentioned in the previous section, you need to decide how the content will be distributed within the container when the browser size changes or when there is dynamic content.
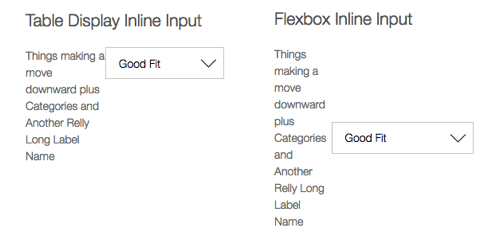
Figure 8: Decide how your content will expand. On the left is a display:table with vertical alignment in the middle, on the right is a flexbox with center alignment. (larger version)
These screenshots clearly show Flexbox errors with dynamic or large content. The effect in the right image is what I call “center pushing,” which means that new content is pushed outward from the center.
Here is the markup for the line label pattern in illustration 8.
The solution to the problem is to use display: table; For long text. This allows content to flow from top to bottom rather than from the center to the edges.
Form-group ( display: flex; ) .form-group label ( display: table; vertical-align: middle; ) .form-group input ( flex: 1; )
The combination of flexbox and display: table is a great technique that is worth exploring further. But when using it, it is important to always check the layout in a test environment in order to identify bugs in a timely manner.
Figure 9: By using input fields and buttons on the same line, balance in the design is created by keeping them equal in height. (larger version)
I've seen a lot of search fields implemented using this pattern. This is a very flexible pattern that can be reused in a wide variety of templates. Of course, CSS can introduce pattern versatility here by using context-specific properties; this should be avoided.
The required HTML is typical and includes a div wrapper for the flexbox structure.
And here are the styles:
Form-group ( display: flex; ) .form-group input ( flex: 1; )
Drop-down menu

Figure 10. A section of the page with a drop-down menu is highlighted using Flexbox capabilities for quick positioning. (larger version)
The drop-down menu consists of a column on the left containing vertically centered inline items, and a list of items on the right with each item on its own row.
Figure 11. The main interface menu is built using Flexbox for layout. (larger version)
The markup for this navigation menu uses the following HTML as a base.
The corresponding CSS is simple and clear, just the way developers like it.
Menu ( display: flex; ) .menu__options ( display: flex; align-items: center; ) .menu__items ( display: flex; flex-direction: column; )
The required layout is done with a few lines of code. Plus, this code is separated from the grid structure and the markup retains its semantic meaning. This is another example of Flexbox's ability to avoid complex positioning and cluttered layouts.
Media objects

Figure 12: The media object pattern uses a flexbox, with a fixed-width SVG placed on the left and the rest of the flexbox content placed next to it. (larger version)
This universal pattern, known as a “media object,” places an image or video on one side with the rest of the content next to it.
Medi-obj ( display: flex; align-items: flex-start; ) .media-obj__body ( flex: 1; )
Figure 13. This is an extreme case of resizing the browser window, the image is set to maximum width and the right side is set to flex 1. Be careful when mixing fixed-width elements and flex elements
Flexbox works great with this pattern, but be careful because media content can interact with other content in the same way as shown above. In the example, you can see how the graphics space collapses and the text is pushed out from above. This may seem like a stupid example, because who would make their browser that narrow? But that's not what's important - we just need to understand how the content relates to its environment before using Flexbox.
A solution to this pattern would be to set the images to max-width: 100% for the media inside the flexbox, or use a fixed image width and media queries to adjust them as needed.
Flexbox calendar

Calendar is one of the most common widgets. You may ask, why not use a table? In our case, the calendar is used to simply select dates, so I decided to use buttons for days, months, and years and limit those buttons to row borders (each week calendar row is wrapped in a separate div). Using this approach allows you to reduce the amount of markup and make it easier to create a layout (many thanks to
In this post I want to show one way to implement a responsive horizontal menu using Flexbox. This method implementation of the menu is used on the Warface Hub website, but with a slightly different structure and used O more whistles.
About a year ago, I ended up in a company where they told me a wonderful phrase: “First we do everything with using CSS, and then we just add JavaScript.” The advice seemed to be good, and I followed it. But as it happens, I got carried away. Now it has come back to me that not everything needs to be done with this approach.
And so, closer to the point. I started studying and implementing.
Goals
- gain basic skills in working with Flexbox properties;
- develop a horizontal adaptive menu;
- Apply the resulting solution in the project.
Tools and Documentation
- NPM – as a package manager (we are now actively moving to Yarn)
- Grunt is a tool that will help you build your project
- Flexbox documentation (see useful links);
Structure

To organize the style structure for the menu, I used the concept described. The author of this concept suggests breaking all style descriptions into several parts:
- layout– describes the position of components and elements on the page;
- component– describes the display and behavior of the elements that are included in the component;
- element– describes the display and behavior of a single element;
- Base- description of constants, basic styles (as in normalize.css)
- Component- description of application components. In our case, the “Menu” component
- Element- description of styles for elements such as button, link, etc.
- Layout- description of the location of blocks on the page
- style.scss- in this file we will put everything together
CSS and HTML input & label tags
Before we start drawing HTML markup, I would like to remind/show interesting behavior of CSS selectors that will be useful to us.
In this example, you may notice that when you click on the label you will get the selected input. There is nothing special about this (see), but the most interesting thing happens with CSS sides selectors.
Input:checked ( border-color: red; )
This CSS selector will only be processed when input is selected (see :checked)
The second point to pay attention to is CSS selectors is the selection of the next element (see Adjacent sibling selectors and General sibling selectors). That is, we can select the next element after the current one.
Input:checked + .label ( color: red; )
In this example, we get the following behavior: when an element with the input class is selected, the next element with the label class will be changed in accordance with the described styles.
Now all this can be combined together.
Menu structure with one element
In this example, I added some input and label elements to create the following behavior:
- Each name=menu-item-trigger element except the first one in the :checked state will change visibility and positions subsequent elements label.menu-item-close and div.menu-sub so that the label.menu-item-close element completely overlaps the label.menu-item-label element, and the div.menu-sub appears below the label.menu-item element -label. That is, we open a submenu and change the behavior when clicking on the main menu;
- The first element name=menu-item-trigger will only be used to undo all applied changes in the previous paragraph, that is, close the submenu;

One menu item selected:

After such manipulations, all that remains is to hide the input elements.
Flexbox
Now we need to add styles so that this menu displayed well at different resolutions and different browsers. Currently, we have focused our efforts on supporting those browsers that are most used by visitors to our resource. The result is a small list: Chrome, Firefox, IE Edge, IE 11 and their mobile versions latest versions.Support is provided by adding prefixes (postcss) and separately writing styles for a specific browser.
Flexbox makes it easy to achieve responsiveness. It is enough to describe the container, but sometimes it will be necessary to solve problems with the content inside. For example:
- menu items with long words like "knowledge base" and its German translation "Wissensdatenbank". IN in this case a wrapping element is added for the text, to which the following styles are applied:
Label-text ( // @link: http://htmlbook.ru/css/text-overflow overflow: hidden; text-overflow: ellipsis; width: 100%; display: inline-block; )
- Pictures that need to be stretched in width, but when setting width: 100%; they extend beyond the parent block. Box-sizing will help here: border-box; for this element;
- There may also be problems with child elements not taking up the full possible length or not being distributed evenly. flex: 1 1 auto might help here.
Menu ( display: flex; align-items: center; flex-wrap: wrap; )
Each element in the container must be styled so that it fills all possible space and aligns the content within itself vertically in the center:
Menu-item ( flex: 1 1 auto; display: flex; flex-direction: column; align-items: stretch; ) 
A more beautiful menu display can be achieved using
In this issue we will do horizontal menu with effect on hover. Let's connect font icons, enable the layer blending mode using mix-blend-mode: multiply, use the :hover pseudo-classes, and get acquainted with desplay:flax, all done in pure CSS3.
Menu wireframe in HTML
Download the archive to your computer and unzip it. It contains three folders, css where the style files are located, fonts folder with icons, img in it is a picture for the background.
Move everything into your development environment where you work. I will write all the code in phpstorm. I copy all the folders and files into it, open index.html and let’s start describing the menu frame.
We write the body tag
Div.dws-menu>ul.dws-ul>li.dws-li*5>a>i.fa.fa-
Icon name:
- shopping-cart
- server
- folder-open
- newspaper-o
CSS styling
After we have made the markup, we proceed to styling. Open style.css in body and set the background and font Verdana.
Body( background-image: url("../img/escheresque_ste.png"); font-family: Verdana; )
We give the block with the menu a background, and indent the top by 100 pixels. and width to fill the entire screen.
Dws-menu( background-color: white; margin-top: 100px; width: 100%; )
In Ul blocks, we line up the lists horizontally using desplay:flax , remove padding, and center our elements using justify-content:center .
Ul.dws-ul( display: flex; padding: 0; justify-content: center; )
We remove the marker from the LI lists and indent them on all sides by 10 peaks.
Li.dws-li ( list-style: none; padding: 10px; )
Remove the underline from the links and increase the text to 18 pixels. and make it black.
Li.dws-li a( text-decoration: none; font-size: 18px; color: #000; )
Move the icon a little to the right using margin-right:10px .
Li.dws-li a i( margin-right: 10px; )
Hover animation
After we've done the basic design, let's move on to the hover animation.
Let's create additional pseudo elements that will highlight the name of the element when hovered.
Let’s describe the left side, select the links and assign them the pseudo-element li.dws-li a::before , write empty content:’’; , 20 pics wide. and a height of 3 peaks. enough. Let's set the color and in order for the block to appear, assign position: relative to the links; , and position it absolutely to the links, lower it to the very bottom, press it to the left edge.
Li.dws-li a( ... position: relative; ) li.dws-li a::before( ... position: absolute; top: 100%; left: 0; )
Duplicate this block and assign it the ::after pseudo-element. Change the left parameter to right , choose a different color #ff2117 .
Li.dws-li a::after( content: ""; width: 20px; height: 3px; background-color: #ff2117; position: absolute; top: 100%; right: 0; )
Then we do the hover animation. Select the li and give them a slightly darker background.
Li.dws-li:hover( background-color: #e5eae8; )
To do this, select the lists on hover and add a pseudo-element to them with a width of 50% and set the transformation along the X axis from left to right. This will give her movement.
Li.dws-li:hover a:before( width: 50%; transform: translateX(100%); )
We'll repeat the same thing for the ::after pseudo-element, only now we'll set the movement from right to left.
Li.dws-li:hover a:after( width: 50%; transform: translateX(-100%); )
Li.dws-li a::before( ... transition: .5s; mix-blend-mode: multiply; ) li.dws-li a::after( ... transition: .5s; mix-blend-mode : multiply; )
It turned out pretty good, let’s now set the width to zero and add red color when hovering the link.
Li.dws-li a:hover( color: #e62117; )
Li.dws-li a( ... padding: 5px; ) li.dws-li a::before( ... top: 90%; ) li.dws-li a::after( ... top: 90 %; )
Basically, I showed you what I wanted, and it turned out to be a pretty nice menu.
The lesson was prepared by Denis Gorelov.