Buy good antenna at the cottage is not always advisable. Especially if it is visited from time to time. It's not so much the cost, but the fact that after a while it may not be in place. Therefore, many people prefer to make an antenna for giving their own. The cost is minimal and the quality is good. And the most important point - a do-it-yourself TV antenna can be made in half an hour or an hour and then, if necessary, it can be easily repeated ...
Digital television in DVB-T2 format is transmitted in the UHF range, and there is either a digital signal or it is not. If the signal is received, then the picture is obtained good quality. Concerning. for reception digital television any decimeter antenna is suitable. Many radio amateurs are familiar with the TV antenna, which is called "zigzag" or "eight". This do-it-yourself TV antenna is assembled in just a matter of minutes.
To reduce the amount of interference, a reflector is placed behind the antenna. The distance between the antenna and the reflector is selected experimentally - according to the "purity" of the picture  You can attach foil to the glass and get a good signal ....
  Copper tube or wire best option, bends well, easy to
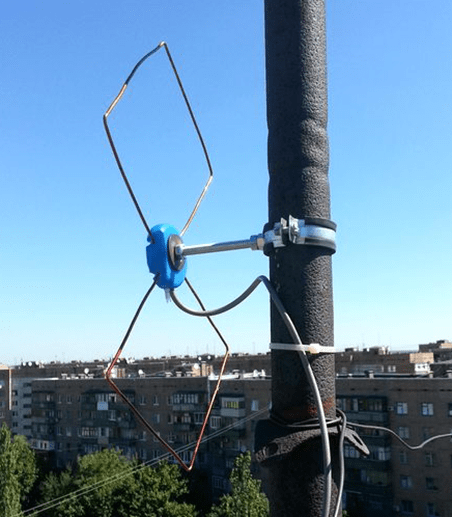
Making it is very simple, the material is any conductive metal: tube, rod, wire, strip, corner. She accepts, despite the simplicity, well. It looks like two squares (rhombuses) connected to each other. In the original, a reflector is located behind the square - for more confident signal reception. But he needs more analog signals. To receive digital television, it is quite possible to do without it or install it later if the reception is too weak.
materials
Optimum for this homemade television antenna, copper or aluminum wire with a diameter of 2-5 mm is suitable. In this case, everything can be done in just an hour. You can also use a tube, a corner, a strip of copper or aluminum, but you will need some kind of device to bend the frames of the desired shape. The wire can be bent with a hammer, fixing it in a vise.

You will also need a coaxial antenna cable of the required length, a plug suitable for the connector on your TV, some kind of mount for the antenna itself. The cable can be taken with a resistance of 75 ohms and 50 ohms (the second option is worse). If you make a TV antenna with your own hands for installation on the street, pay attention to the quality of the insulation.
Mounting depends on where you are going to hang a homemade antenna for digital television. On the upper floors, you can try to use it as a home and hang it on curtains. Then you need large pins. In the country or if you take a home-made television antenna to the roof, you will need to attach it to a pole. For this case, look for suitable clamps. To work, you will also need a soldering iron, sandpaper and / or a file, a needle file.
Do you need a calculation
For reception digital signal no need to count the wavelength. It is simply desirable to make the antenna more broadband - in order to receive as many signals as possible. To do this, some changes have been made to the original design (pictured above) (further in the text).
You can do the calculation if you want. To do this, you need to find out on which wave the signal is broadcast, divide by 4 and get the required side of the square. To get the required distance between the two parts of the antenna, make the outer sides of the diamonds a little longer, the inner ones shorter.

Drawing of the G8 antenna for receiving digital TV
- The length of the "inner" side of the rectangle (B2) is 13 cm,
- "outer" (B1) - 14 cm.
Due to the difference in lengths, the distance between the squares is formed (they should not be connected). The two extreme sections are made 1 cm longer - so that you can roll the loop to which the coaxial antenna cable is soldered.
Frame making
If you count all the lengths, you get 112 cm. We cut off the wire or the material that you have, take the pliers and the ruler, and begin to bend. The angles should be at 90° or so. With the lengths of the sides, you can make a little mistake - this is not fatal. It turns out like this:
- The first section is 13 cm + 1 cm per loop. The loop can be bent immediately.
- Two sections of 14 cm.
- Two 13 cm each, but with a turn in the opposite direction - this is the place of the inflection to the second square.
- Again two 14 cm.
- The last one is 13 cm + 1 cm per loop.
Actually the antenna frame is ready. If everything was done correctly, a distance of 1.5-2 cm was obtained between the two halves in the middle. There may be slight discrepancies. Next, we clean the loops and the place of the inflection to bare metal (treat with fine-grained emery), tin. Connect two loops, compress with pliers to hold tight.

Cable preparation
We take the antenna cable, carefully clean it. How to do this is shown in step by step photo. Strip the cable on both sides. One end will be attached to the antenna. Here we clean it so that the wire sticks out 2 cm. If it turned out more, the excess (later) can be cut off. Twist the screen (foil) and braid into a bundle. It turned out two conductors. One is the central monocore of the cable, the second is twisted from a multitude of braid wires. Both are needed and need to be tinned.

Solder the plug to the second edge. There is enough length of 1 cm or so. Also form two conductors, tin.
The plug in those places where we will carry out soldering, wipe it with alcohol or a solvent, clean it with emery (you can use a needle file). Put the plastic part of the plug on the cable, now you can start soldering. We solder a monocore to the central outlet of the plug, and a stranded twist to the side outlet. The last thing is to crimp the grip around the insulation.

Then you can simply wind the plastic tip, you can fill it with glue or non-conductive sealant (this is important). While the glue / sealant has not hardened, we quickly assemble the plug (we wind the plastic part), remove the excess composition. So the plug will be almost eternal.
DIY DVB-T2 TV antenna: assembly
Now it remains to connect the cable and frame. Since we were not tied to a specific channel, we will solder the cable to the midpoint. This will increase the bandwidth of the antenna - more channels will be received. Therefore, we solder the second cut end of the cable to the two sides in the middle (those that were stripped and tinned). Another difference from the “original version” is that the cable does not need to be looped around the frame and soldered at the bottom. This will also expand the reception range.
The assembled antenna can be checked. If the reception is normal, you can finish the assembly - fill the soldering points with sealant. If the reception is bad, try to find a place where you can catch better first. If there are no positive changes, you can try replacing the cable. For ease of experiment, you can use ordinary telephone noodles. She's worth every penny. Solder the plug and the frame to it. Try with her. If it "catches" better, it's a bad cable. In principle, you can work on "noodles", but not for long - it will quickly become unusable. It is better, of course, to put a normal antenna cable.

To protect the junction of the cable and the antenna frame from atmospheric influences, the soldering points can be wrapped with ordinary electrical tape. But this is not a reliable way. If you remember, you can put on a few heat shrink tubes before soldering to insulate with their help. But the most reliable way- fill everything with glue or sealant (they should not conduct current). As a "case" you can use covers for 5-6 liter water bottles, ordinary plastic covers for cans, etc. AT right places we make indentations - so that the frame “lays down” in them, do not forget about the cable outlet. Fill with sealing compound, wait until it seizes. Everything, a do-it-yourself TV antenna for receiving digital television is ready.
Homemade antenna double and triple square
This is a narrowband antenna, which is used when you need to receive a weak signal. It can even help if a weaker signal is "clogged" by a stronger one. The only drawback is that you need an exact orientation to the source. The same design can be done to receive digital television.
 You can make five frames - for a more confident reception
  It is undesirable to paint or varnish - reception worsens. This is possible only in close proximity to the transmitter.
The advantages of this design are that the reception will be confident even at a considerable distance from the repeater. Only it will be necessary to specifically find out the frequency of broadcasting, to withstand the dimensions of the frames and the matching device.
Construction and materials
Make it from tubes or wire:
- 1-5 TV channel of the MV range - tubes (copper, brass, aluminum) with a diameter of 10-20 mm;
- 6-12 TV channel of the MV range - tubes (copper, brass, aluminum) 8-15 mm;
- UHF range - copper or brass wire with a diameter of 3-6 mm.
The double square antenna consists of two frames connected by two arrows - upper and lower. The smaller frame is a vibrator, the larger one is a reflector. An antenna consisting of three frames gives a greater gain. The third, smallest, square is called the director.

The upper arrow connects the middle of the frames, it can be made of metal. The lower one is made of insulating material (textolite, gettinax, wooden plank). Frames should be installed so that their centers (crossing points of the diagonals) are on the same straight line. And this line should be directed to the transmitter.
The active frame - the vibrator - has an open circuit. Its ends are screwed to a textolite plate measuring 30 * 60 mm. If frames are made from a tube, the edges are flattened, holes are made in them and the lower arrow is attached through them.
The mast for this antenna must be wooden. In any case, the upper part of it. Moreover, the wooden part should begin at a distance of at least 1.5 meters from the level of the antenna frames.
Dimensions
All dimensions for the manufacture of this TV antenna with your own hands are shown in the tables. The first table is for the meter range, the second is for the decimeter range.

In three-frame antennas, the distance between the ends of the vibrator (middle) frame is made larger - 50 mm. Other dimensions are given in the tables.

Connecting an active frame (vibrator) via a short-circuited loop
Since the frame is a symmetrical device, and you need to connect it to an unbalanced coaxial antenna cable, you need a matching device. In this case, a balancing short-circuited loop is usually used. It is made from pieces of antenna cable. The right segment is called the “loop”, the left one is called the “feeder”. A cable is attached to the junction of the feeder and the cable, which goes to the TV. The length of the segments is selected based on the wavelength of the received signal (see table).

A short piece of wire (loop) is cut at one end by removing the aluminum screen and twisting the braid into a tight bundle. Its center conductor can be cut to insulation, as it does not matter. Divide and feeder. Here, too, the aluminum screen is removed and the braid is twisted into a bundle, but the central conductor remains.
Further assembly goes like this:
- The braid of the loop and the central conductor of the feeder are soldered to the left end of the active frame (vibrator).
- The feeder braid is soldered to the right end of the vibrator.
- The lower end of the loop (braid) is connected to the feeder braid using a rigid metal jumper (you can use a wire, just make sure that it makes good contact with the braid). In addition to the electrical connection, it also sets the distance between the sections of the matching device. Instead of a metal jumper, you can twist the braid of the lower part of the cable into a bundle (remove the insulation in this area, remove the screen, roll it into a bundle). To provide good contact solder the bundles together with low-melting solder.
- The pieces of cable must be parallel. The distance between them is about 50 mm (some deviations are possible). To fix the distance, clamps made of a dielectric material are used. You can also attach a matching device to a textolite plate, for example.
- The cable going to the TV is soldered to the bottom of the feeder. The braid is connected to the braid, the center conductor is connected to the center conductor. To reduce the number of connections, the feeder and cable to the TV can be made one. Only in the place where the feeder should end should the insulation be removed so that a jumper can be installed.
This matching device allows you to get rid of interference, a blurry contour, a second blurry image. It is especially useful at a great distance from the transmitter, when the signal will be clogged with interference.
Another variant of the triple square
In order not to connect a short-circuited loop, the triple square antenna vibrator is made elongated. In this case, you can connect the cable directly to the frame as shown in the figure. Only the height at which the antenna wire is soldered is determined in each case individually. After the antenna is assembled, “tests” are carried out. Connect the cable to the TV, move the center conductor and the braid up / down, achieving best picture. In the position where the picture will be most clear, the antenna cable taps are soldered, the soldering points are isolated. The position can be any - from the bottom jumper to the transition to the frame.

Sometimes one antenna does not give the desired effect. The signal turns out to be a weak image - black and white. In this case standard solution- install a TV signal amplifier.
The simplest antenna for giving - from metal cans
To make this television antenna, in addition to the cable, you will only need two aluminum or tin cans and a piece of wooden plank or plastic pipe. Banks must be metal. You can take beer aluminum, you can - tin. The main condition is that the walls are even (not ribbed).

Banks are washed and dried. The end of the coaxial wire is cut - by twisting the strands of the braid and cleaning the central core from insulation, two conductors are obtained. They are attached to banks. If you know how, you can solder. No - take two small self-tapping screws with flat caps (you can use “fleas” for drywall), twist a loop at the ends of the conductors, thread a self-tapping screw with a washer installed on it, screw it to the jar. Just before that, you need to clean the metal of the can - removing the plaque with fine-grained sandpaper.

Banks are fixed on the bar. The distance between them is selected individually - according to the best picture. You should not hope for a miracle - there will be one or two channels in normal quality, or maybe not ... It depends on the position of the repeater, the "cleanliness" of the corridor, how correctly the antenna is oriented ... But as an exit in an emergency - this is a great option.
A simple Wi-Fi antenna from a metal can
Antenna for receiving wifi signal can also be made from improvised means - from a tin can. This do-it-yourself TV antenna can be assembled in half an hour. This is if everything is done slowly. The jar should be made of metal, with smooth walls. Tall and narrow cans are great. If you put a homemade antenna on the street, find a jar with a plastic lid (as in the photo). The cable is taken antenna, coaxial, with a resistance of 75 ohms.

In addition to the can and cable, you will also need:
- radio frequency connector RF-N;
- a piece of copper or brass wire with a diameter of 2 mm and a length of 40 mm;
- cable with a socket suitable for a Wi-Fi card or adapter.
The Wi-Fi transmitters operate on the 2.4 GHz frequency with a wavelength of 124 mm. So, it is advisable to choose a jar such that its height is at least 3/4 of the wavelength. For this case it is better that it be more than 93 mm. The diameter of the jar should be as close as possible to half the wavelength - 62 mm for a given channel. There may be some deviations, but the closer to the ideal, the better.
Dimensions and Assembly
When assembling, a hole is made in the bank. It must be placed exactly at the right point. Then the signal will be amplified several times. It depends on the diameter of the selected can. All parameters are given in the table. Measure exactly the diameter of your jar, find the right line, have all the right sizes.

| D - diameter | Lower limit of attenuation | Upper damping limit | LG | 1/4 LG | 3/4 LG |
|---|---|---|---|---|---|
| 73 mm | 2407.236 | 3144.522 | 752.281 | 188.070 | 564.211 |
| 74 mm | 2374.706 | 3102.028 | 534.688 | 133.672 | 401.016 |
| 75 mm | 2343.043 | 3060.668 | 440.231 | 110.057 | 330.173 |
| 76 mm | 2312.214 | 3020.396 | 384.708 | 96.177 | 288.531 |
| 77 mm | 2282.185 | 2981.170 | 347.276 | 86.819 | 260.457 |
| 78 mm | 2252.926 | 2942.950 | 319.958 | 79.989 | 239.968 |
| 79 mm | 2224.408 | 2905.697 | 298.955 | 74.738 | 224.216 |
| 80 mm | 2196.603 | 2869.376 | 282.204 | 070.551 | 211.653 |
| 81 mm | 2169.485 | 2833.952 | 268.471 | 67.117 | 201.353 |
| 82 mm | 2143.027 | 2799.391 | 256.972 | 64.243 | 192.729 |
| 83 mm | 2117.208 | 2765.664 | 247.178 | 61.794 | 185.383 |
| 84 mm | 2092.003 | 2732.739 | 238.719 | 59.679 | 179.039 |
| 85 mm | 2067.391 | 2700.589 | 231.329 | 57.832 | 173.497 |
| 86 mm | 2043.352 | 2669.187 | 224.810 | 56.202 | 168.607 |
| 87 mm | 2019.865 | 2638.507 | 219.010 | 54.752 | 164.258 |
| 88 mm | 1996.912 | 2608.524 | 213.813 | 53.453 | 160.360 |
| 89 mm | 1974.475 | 2579.214 | 209.126 | 52.281 | 156.845 |
| 90 mm | 1952.536 | 2550.556 | 204.876 | 51.219 | 153.657 |
| 91 mm | 1931.080 | 2522.528 | 201.002 | 50.250 | 150.751 |
| 92 mm | 1910.090 | 2495.110 | 197.456 | 49.364 | 148.092 |
| 93 mm | 1889.551 | 2468.280 | 194.196 | 48.549 | 145.647 |
| 94 mm | 1869.449 | 2442.022 | 191.188 | 47.797 | 143.391 |
| 95 mm | 1849.771 | 2416.317 | 188.405 | 47.101 | 141.304 |
| 96 mm | 1830.502 | 2391.147 | 185.821 | 46.455 | 139.365 |
| 97 mm | 1811.631 | 2366.496 | 183.415 | 45.853 | 137.561 |
| 98 mm | 1793.145 | 2342.348 | 181.169 | 45.292 | 135.877 |
| 99 mm | 1775.033 | 2318.688 | 179.068 | 44.767 | 134.301 |
The procedure is as follows:

You can do without an RF connector, but with it everything is much simpler - it is easier to set the emitter vertically upwards, connect the cable that goes to the router (router) or Wi-Fi card.
Antenna is a radio engineering device designed to receive and radiate electromagnetic waves through the ether.
If you live within a line-of-sight distance of a television tower, then the simplest home-made indoor television antenna, the design of which is presented in this article, is quite suitable for receiving digital television. This antenna is designed to receive television broadcasts in the digital television frequency range (470-790 MHz).
The design of a television antenna is simple and does not require special knowledge to repeat. For its manufacture, you will need 70 cm of copper wire with a diameter of 2-3 mm, a piece of a sheet of double-sided fiberglass, 1.5 m of a coaxial television cable with a characteristic impedance of 75 ohms and an F-plug.
Instructions for the manufacture of a television UHF antenna
The first thing you need is to pick up a piece of copper wire with a diameter of 2-3 mm and a length of 70 cm. For these purposes, a single-core copper wire is well suited for laying electrical wiring. If there are several conductors in the cable, then one conductor must be carefully cut along the groove, being careful not to damage the insulation. It is not needed for the antenna to work, the insulation is left only for an aesthetic appearance.
An aluminum wire is also suitable, but then it will have to be connected to the contacts of the matching transformer board using a threaded connection. Please note that the nut should not touch the shielding foil of the transformer, if it does, then you need to lay an insulating washer or cut the foil.

If a wire without insulation is used, then for beauty you can put a vinyl chloride tube on it.

Next, the wire must be bent into a ring with a diameter of approximately 220 mm. There is no need for high precision. For this, a mandrel in the form of a bucket of paint or any other round container of a suitable size is well suited.
When the ring for the antenna is ready, you can begin to manufacture the printed circuit board of the matching transformer.

The printed circuit board is made of fiberglass or foil-coated getinax on both sides, 1.5 mm thick, 25 × 30 mm in size. The photo shows appearance transformer printed circuit board on both sides.

In this photo, the negative of the antenna circuit board. The width of the current-carrying tracks is 1 mm, the distance between the tracks is 1.5 mm. The size of the antenna board is 25×30 mm.
If it is not possible to make a printed circuit board for the manufacture of the antenna by a chemical method, then it can be made mechanically. To do this, remove unnecessary sections of the foil, leaving only the contact pads, and lay out the current-carrying tracks from a copper wire with a diameter of 0.3-0.5 mm, gluing it to the board, for example, with Moment glue.
To give an aesthetic appearance and increase the mechanical strength of the antenna, the transformer is placed in a plastic box in which holes for the ring and antenna cable are pre-drilled.

When all the details are prepared, you can start assembling the antenna. The ends of the ring, pre-tinned with solder, are wound into a box and bent at a right angle at a distance of 3 mm. Next, the ends are inserted into the printed circuit board of the antenna transformer and soldered with a soldering iron.

The antenna board is placed on the bottom of the box and secured with an M3 screw and nut.
At one end, you first need to install a television F-connector, and cut the other end and solder its ends to a printed circuit board. The center core of the cable is soldered directly to the right end of the ring, and the braided shield is soldered directly to the antenna board foil.
For reliable operation of the antenna, solder or fasten the cable in the following order. First, the shielding braid is soldered, then the cable must be pulled well to take up the slack, and only after that the central core must be soldered. In this case, when moving the antenna to find a place in a room with maximum level signal and pulling the cable will not break the central core.

If the cable screen is made of aluminum foil, then it can be pressed against the board foil using a metal clamp, put on a screw and secured with a nut. The technology for attaching the screen with a clamp is discussed in the article "How to make a TV crab with your own hands".
It remains to close the box with a lid, insert the connector into the TV and set the channels to desired programs. In order for the image quality to be with minimal noise, you need to move the antenna around the room in order to find a place with the maximum television signal.
How to replace the matching PCB
cable loop
The use of a printed circuit board to match the antenna with a coaxial cable allows you to make the antenna more compact.

If there is no desire or opportunity to make a printed circuit board, then without losing the quality of the antenna, it can be replaced with a loop, which is also called a U-elbow, which is a segment of a television cable bent in half connected to the antenna according to the scheme, as in the photo below.

To make a matching loop, you need to take a piece of television cable 162 mm long, with which the antenna will be connected to the TV. Cut its ends and solder the central wires to the ends of the ring, the distance between which should be 60 mm. Next, the end of the cable going to the TV is cut and its central core is soldered to either end of the antenna ring, and the shield wire is connected to the shield wires of the loop, as shown in the photograph.
When soldering the shielding braid, care must be taken not to melt the insulation of the central core, and the braid does not come into contact with it.
The photo shows the soldering of the cable to the antenna ring, made of aluminum wire with a diameter of 3mm. Since it is difficult to solder wires to aluminum with soft solder, the ends of the ring were slightly flattened, holes were drilled in them and brass petals were fixed with rivets. The central conductors of the cable to the petals were soldered securely.
Sometimes a television antenna fails at the most inopportune moment, or it simply is not at hand. For example, during a trip to the country. In this case, the question arises of how to make an antenna for a TV with your own hands from what is at hand.
With a homemade transmitter, you can watch a limited number of channels. Yes, and the reception may be of less quality than that of a purchased device. And yet, knowing how to make an antenna yourself from improvised means can come in handy. An antenna can be either simple or complex. The device will be able to receive almost all types of broadcasting.
Antenna types
Before you start making a TV antenna with your own hands, you should understand the types and technical specifications television receivers.
Depending on the installation location, indoor and outdoor television receivers are distinguished. Indoor devices are effective only in areas with good signal reception. They are not suitable for country TVs. For rural areas and areas remote from the TV repeater, street TV receivers are used.
According to the type of signal amplifier, television receivers are active and passive. Passive type structures receive and amplify impulses due to their own geometry. They do not need power supply, do not introduce their own interference and noise into the signal they receive. It is easiest to make a passive type antenna yourself.
Active devices are equipped with a signal amplifier, which is powered by the mains. Active amplifier he himself creates interference and distortion in the zone of reliable reception in case of choosing too powerful or poor-quality device.
Broadcasting is carried out on meter or decimeter waves. For receiving only meter or only decimeter broadcasting ranges, band television receivers are best suited. For example, to transmit digital on-air television DVB-T2 in our country uses only the decimeter range.
A log-periodic, or all-wave, television antenna can receive waves of both the meter and decimeter ranges. This is a wideband design with 10 vibrators. The log-periodic device in terms of gain corresponds to a 3-4 element all-wave antenna.
Operating frequencies are limited by the largest and smallest receiver vibrators. It matches well with the feeder. Its gain does not change, so balancing and matching devices are not required to connect to the feeder.
A cable with a resistance of 75 ohms enters the bottom tube, exits at the end (which is directed towards the TV center) and is connected with a braid to the end of the bottom tube, and with a core to the end of the top tube.
Outwardly and according to the principle of operation, a log-periodic television antenna is several channel-wave devices connected together. Moreover, each of them has its own vibrator, reflector and director. When a signal arrives, vibrators are excited that are closest in size to half the wavelength of its wave. Such television antennas are used to receive both digital and analog broadcasts.

The wave channel receiver has the simplest design, which can be quickly assembled from simple and affordable materials. It receives an analog TV signal near the TV tower and a digital one outside of large settlements, where there is little interference.
We use beer cans
An antenna for giving with your own hands from beer cans is the simplest and most affordable passive type design. It can be done quickly and in the absence of basic skills. At the same time, it copes well with the reception of decimeter broadcasting ranges.
To assemble an antenna from beer cans you will need:
- cable of sufficient length;
- aluminum cans (for the simplest design, 2 is enough);
- 2 bolts or self-tapping screws;
- plug (F - connector) for connecting the cable to the TV;
- electrical tape or tape;
- base made of wood or plastic for attaching cans (you can use wooden hangers for clothes).
The antenna circuit is simple:
- Each jar is attached with electrical tape or tape to the base pin at a distance of 7 cm from each other.
- The cable is stripped on one side. They are bred and attached to the rings of cans or to screwed screws. It can also be soldered. A plug is attached to the free end.
This simple design is suitable for installation both indoors and outdoors. For external use, jars are covered with a large plastic container with a cut neck and bottom. The cable is pulled through a hole made on the side, which can be sealed with boiling water. The finished receiver is connected and configured via automatic search channels.
You can also make an analogue of a satellite dish with your own hands. For this purpose, a simple umbrella is used. You will also need:
- aluminium foil;
- copper cable;
- 1 tin;
- amplifier and power supply to it.

DIY antenna for TV from beer cans
Operating procedure:
- The segments of the umbrella between the spokes are measured and the elements corresponding to these dimensions are cut out of the foil. They are sewn to the dome of the umbrella, covering its entire inside.
- A television signal receiver is installed at the focus of the metal grating. The amplifier will be a core, from which 4 cm of braiding was previously removed, and a cable shield that protects against interference.
- An oval is cut out of an aluminum can. A hole is made in the center of it, through which a bare core is threaded and a contact is soldered. To protect against oxidation and corrosion, the junction is covered with plasticine.
- The amplifier is powered by a cable.
- The receiver is attached to the handle of the umbrella with adhesive tape so that it does not touch the metal. This will protect against interference and distortion. The connection point must be sealed with plasticine.
- The power supply is placed next to the TV, and the antenna is turned towards the repeater.
- Channels are set by operating the dish until the best signal is obtained.
Such an antenna works best if the tower is located no further than 35 km from it.
We use wire
Another simple design is a homemade wire antenna. For its manufacture, you can use copper or brass wire. These materials are resistant to oxidation.
The wire must be stripped from the ends of the insulation. One of them is connected to the TV, and the other to the battery of the heating system. The pipe is displayed on the roof - it will work as a signal amplifier. Such an antenna can receive no more than 5 signals. The wire can be stretched out onto the balcony and secured to a clothesline.
You can make a TV antenna out of wire in another way. It will require:
- 2 pieces of copper wire 3-4 mm wide and 1.8 m long;
- a plate of plywood or metal measuring 15 by 15 cm;
- amplifier (you can use old decimeter amplifiers);
- electric drill;
- television cable;
- iron pipe or fittings for the manufacture of the mast;
- bolts.
Such a copper wire antenna is assembled as follows:
- Catchers are made, for which they bend the wire in the form of 2 rhombuses with sides of 45 cm. This is the optimal frame length for such a device.
- The resulting rhombuses are fixed on the base. To do this, at the attachment points, flattening the wire, drill holes and screw in the bolts.
- If a metal plate is used as the base, then a welding machine can be used to attach the trap.
- We fix the amplifier in the center and connect the cable to it.
As a mast here, the easiest way is to use a metal pipe, which can simply be dug into the ground or attached to any suitable support. The antenna is fixed at the top of the mast, and the cable is pulled through it. The entire structure is painted to protect against corrosion.
Another popular copper wire television receiver that you can make yourself is a small-sized butterfly antenna of an unusual shape. For external use, such a device is made of wire 2-4 mm thick, for internal use - 2 mm and thinner.
To receive TV channels make a frame. Frame length - 500 mm, width - 200 mm. It is twisted in such a way that 2 identical triangles are obtained, which are separated with wire cutters and soldered to the cable, leaving a 14 mm distance between the vertices. A plug is attached to the other end of the cable. The structure is attached with adhesive tape or electrical tape to a material with dielectric properties - wood, ebonite, plastic.

Home Digital HDTV
A powerful TV antenna capable of receiving a 490 MHz signal is made from a transformer, which is better to purchase, since it will not be easy to make it yourself. You will also need:
- cardboard;
- scotch:
- foil;
- stapler;
- glue.
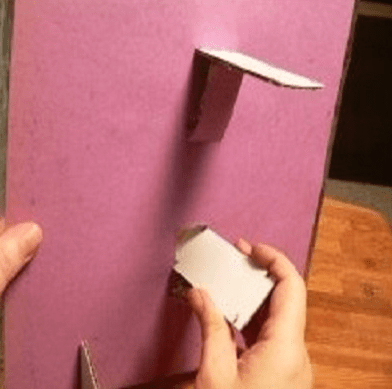
For the manufacture of a television receiver, a scheme is used according to which all parts are cut out of cardboard. Elements are glued with foil, bent and cut. It is best to find the template and diagram first through a search engine and print it on a printer or redraw it from a printed publication.
First you need to make a reflector about 35 cm long and paste over it on one side with foil. In the middle, 2 rectangles of the same size are cut for attaching the trap.
An antenna is assembled from prepared parts. Retreating 35 mm from the reflector, elements of the “butterfly” shape are glued to the plate. They can be attached with a stapler. In the middle of each such element, a hole is made for the cable, to which a transformer is connected and a plug is attached.
Option for an apartment
You can make an antenna for indoor use in any of the above ways.
Another simple option at home is made as follows.
A simple do-it-yourself loop indoor antenna is made of copper wire or a cable with foil in the winding. The device not only receives television channels, but also performs the function of a selective anti-interference filter.
To calculate the size of the loop, you need to know the frequency of the wave for a given region. The length of the loop will be equal to the product of the coefficient (300 units) by the average frequency range.
Cut off the required amount of wire or cable, if necessary, clean the edges. They fold a loop out of it and solder the TV cable leading to the receiver. A plug is attached to it.
The design can be hung or installed on a stand. This simple device, with accurate calculations, is most effective for digital television.
A reliable device for the home is a diamond-shaped antenna. She is the simplest representative of zigzag television receivers. To improve reception, it is equipped with capacitive inserts and a reflector.
The device is assembled from plates or tubes 1-1.5 cm wide made of brass, copper or aluminum. For the manufacture of capacitive inserts, foil, tin or metal mesh is used, which are soldered around the perimeter. The cable is laid from the center and on one side, avoiding sharp bends. It must not leave the frame.

How to make an antenna for a TV with your own hands, so that it is not inferior in quality to a purchased device, this question interests many home craftsmen and TV enthusiasts. There are various ways to make an antenna yourself, from the most simple designs, to devices receiving a satellite signal.
This option is suitable for people who want to install a conventional indoor antenna at home or in the country to view federal channels. Everyone can design such a device, special knowledge is not required.
This is the most elementary way, so you only need copper wire 70–90 cm, 2–3 mm thick. An indoor antenna is made as follows:
- Strip both ends of the copper wire.
- Attach one end to the battery, and insert the other into the TV connector.
The signal will appear immediately, from 1 to 5 channels will become available to the user. So simple method you can make a home antenna in 5 minutes.
The most popular way to make an antenna with your own hands from improvised materials. For the manufacture will need beer cans. Experts say that in order to assemble an antenna from beer cans, it will take no more than an hour.
You will need:
- Connecting cable.
- Several cans of beer.
- Plug.
- Screws in the amount of 2 pieces.
- Screwdrivers.
- Insulating tape or heat shrink tubing.
- Wooden beam or metal pipe for mounting the antenna.
You can make a homemade antenna from tin cans according to the following scheme:

This is another easy option on how to make a TV antenna in a short time. The device picks up the signal well, providing high quality images.
All-wave antenna with amplifier
An all-wave antenna with an amplifier can be of different configurations. Its assembly takes more time than the first two options. But the advantage is that it is very powerful, and receives all analog channels in excellent quality. One of the common options is an all-wave antenna of the “BUTTERFLY” shape.
Tools:
- Board or plywood sheet, dimensions 550/70/5 mm.
- Copper wire.
- Connecting cable PK75.
- Drill.
- Soldering iron.
- Plug.

Instruction:

Do-it-yourself TV antenna is ready to go.
decimeter antenna
Homemade antennas that pick up a decimeter signal can be of various configurations.
Option 1
Most simple option counts it is relatively easy and simple to assemble.
You will need:
- Plywood.
- Cord.
- Soldering iron.

Instruction:
- Make a ring out of the connecting cable, size 53 cm.
- Cut another piece of cable to make a loop, size 17.5 cm.
- You need to solder a loop to the ring, and a cable that will be inserted into the screen.
- Attach the structure to the plywood.
- Direct the assembled device towards the TV tower.
Thus, the UHF band antenna is assembled with your own hands.
Option 2
Another possible method TV antenna manufacturing UHF range called "Eight".
Tools:
- Wire (copper, aluminum).
- Glue gun.
- Cable.
- Wire cutters.
Instruction:

This is another way to make an antenna yourself.
This instrument has a signal range reach up to 490 MHz, which means that the picture quality will be very high. But for the manufacture you need to purchase a transformer.
You will need:
- Transformer.
- Foil.
- Glue.
- Roulette.
- Cardboard.
- stapler.
- Marker.

Instruction:
The device is ready to work.
DIY satellite dish
One of the most popular questions is, is it possible to make a satellite dish with your own hands? There are many videos on the Internet on how to make a viewing plate. satellite television on one's own.
This device can be made at home in two ways:
- Sticker on the matrix.
- Solder mesh and wire.
The first method of manufacture is considered the most optimal and convenient. To do this, you need to make a drawing of the future device. This stage of work must be approached very responsibly, all parameters must be calculated accurately, otherwise the output will be an unusable device. A parabola is drawn in the drawing, which is then transferred to a steel sheet. Its thickness should be 0.05 cm.

Stages of work
- Using a welding machine, make a steel frame with a diameter of 9–10 cm. Steel rods are turned out to the outside, and the bearing is welded to the center.
- Install the resulting structure on level ground, and a pipe is attached to the installed bearing, then a knife is installed.
- Then the frame is poured with concrete mortar and dried for 5 days.
AT final stage it is necessary to glue the antenna, this can be done different ways. For ease of use, it is recommended divide the structure into 8 parts. For gluing, fiberglass or epoxy primer is used.
Apply machine oil to the dried concrete form, insert the pipe into the washer. After the homemade plate is covered with resin and the fiberglass is glued. The manufacturing process of the device is completed. Read also.
Digital TV is sweeping the country, many people are buying TVs that already support this format. And whoever has the previous generation equipment, you can buy a digital set-top box () and connect it to your old TV, which does not support. In general, the standing format allows you to watch television in digital format. BUT many sellers, along with set-top boxes and TVs, “push” the so-called digital antennas, sometimes the price of the antenna reaches 3000 rubles. Although you guys can do it yourself, make an antenna for digital television, and very cheaply ...
ADVICE! Guys, by the way, you can watch TV without an antenna at all via the Internet, but for this you need another prefix - read a really cool topic.
We continue the article ...
To receive a digital signal, a so-called decimeter antenna is required. You can literally make it from an antenna cable. However, it must be calculated correctly. If you do not want to read the article in full, you can find the desired item in the table of contents.
What you need to make an antenna
1) We need a piece of antenna cable, about 30 cm long.

2) Antenna connectors, the so-called F-connector and male-female connector.

F - connector and "father-mother"
3) Tools: a knife, wire cutters, a calculator and a tape measure (well, or a ruler).

Calculation

On the home page we are looking for a tab - “CETV coverage map” and go to it.

CETV coverage map tab
Before us opened a map of coverage of digital television. We are looking for the nearest station for our city (I have Ulyanovsk, you fill in your city).


As you can see in my city, these are channel 56 - 754 MHz and channel 59 - 778 MHz.
Now we calculate the length of the antenna. I will not go into complex technical formulas and terms, we do not really need them. But to calculate the antenna, you need to divide 7500 by our frequencies.
THAT is: 7500/754=9.94 cm, this is for channel 56.

7500/778=9.64 cm, this is for channel 59.

Our antenna should be about 10 cm, and exactly - ((9.94 + 9.64) / 2 = 9.79 cm)
For your city, you also need to display the average length for your stations, if you have more than one in the city. In the video under the article, I calculated the antenna for Ulyanovsk, and for Kazan.
Manufacturing
1) We take a piece of antenna wire and first we attach an F-connector at the end. We simply strip the cable and screw on the connector so that the center wire is in the middle, and the screen (wires and foil were in the mount), detailed (useful).


2) Set aside a couple of centimeters from our connector (this will be a kind of indent), then measure 10 cm and cut off the unnecessary cable.

3) Now from these 10 cm, we need to remove the plastic insulator and remove the "screen" (foil and small wires). You don’t need to touch it further, leave the cable in the insulator.
4) All our antenna is ready. You can try to connect.

Connection
You need to get a good reception point in the apartment, and it's not always enough just to insert it into a TV or set-top box. I have such a place near the window, so I inserted an extension cord into the console and already inserted the antenna into the extension cord. So far, all this has not been improvised removed from me, for an example of work (therefore, the cable weighs), and the antenna itself is inserted into it.


Well, as you can see, all channels are working fine, and "first", and "Russia", and NTV, etc.

"The first"


Thus, if you have 80 - 100 rubles, you can make an antenna for digital television (DVB-T2 standard) with your own hands, easily and simply.
Now video version
For those who do not show - - MANDATORY! There is a solution to the problem!
That's all, I think my article is very useful and relevant. Read our building site.