Today in our country there are two search engines that are leading in popularity and significantly ahead of all others in terms of frequency of use. These are Google and Yandex. Moreover, the latter is an exclusively Russian development. In addition to the search function, Yandex offers a number of other useful services to its users, including email. If you are not yet using this resource, then read about how to create a new one. mailbox on "Yandex" and what opportunities it provides.
The first step is to get to the main page of the search engine. For this in address bar you must enter its url-address - www.yandex.ru. In the right upper corner you will see a small square box called "Mail". We need a button that allows you to create a mailbox on Yandex. It's called "Get Mail". Click on it and go to the registration section.
Instructions for registering a new mailbox in Yandex
In order to register in the system, you must enter your own in the appropriate fields:
- surname;
- login.
How to choose a login?
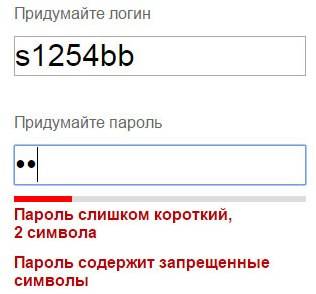
Login is a unique identifier that you will use to enter mail and other services in Yandex. To facilitate the creation of a login, you will be offered a list of 10 names based on your personal data (first and last name). If you are not satisfied with the proposed options, you can come up with your own, but it should not match the names already registered in the system. Otherwise, you will have to pick up another until you finally find a free one. Please note: when the creation of a mailbox on Yandex is completed, it will be impossible to change the login.

We come up with a password
Next, you will be directed to the password registration page for your mail. In order to create a new mailbox on Yandex, you will need a reliable and preferably complex password. The security of your mail from hacking directly depends on this, so take this step seriously. Recommended not to be used as a passcode simple words(they will be easy for attackers to pick up), as well as names, dates of birth, passport details, and similar personal information. To create a fairly complex password, use the "illogical" sequence of:
- lowercase and uppercase letters;
- numbers;
- valid punctuation marks (comma, period, asterisk, brackets, etc.).
You can use a very simple idea - come up with a phrase in Russian and write it using the English keyboard layout. In the future, do not tell anyone your password, Yandex specialists do not have the right to ask him.

Security Question
The next step that you need to go through to create a new mailbox on Yandex is to come up with and answer a security question. It is needed to recover your password in case you forgot it. The question also should not be from the category "what is my name?", and only you should know the answer to it.
Mobile phone
If you wish, you can add your number during registration mobile phone, which will be linked to your mailbox. It will also be used for password recovery. In addition, it will be able to receive some important notifications. This number binding procedure is also available after a new mailbox on Yandex has been created. It can be found in the corresponding section "Phone numbers".
Final stage
Now you only have to go through a few steps. Enter Special symbols(code) generated automatically. This is necessary to prove to the system that you are not a robot, but a real person. After entering, click on the "Create mail" button. Now you have your own mailing address.

We use Yandex mail
First you need to open a mailbox on Yandex. You can also do this with home page. In the upper right corner in the blue block, enter your username and password. If you are logging in from someone else's computer, check the box next to the corresponding item. You will be taken to the box for your letters. Here you can:
- write, read and forward a letter;
- sort, group letters;
- customize the look of the interface (choose design, splash screen);
- customize different ;
- subscribe to RSS feeds;
- much more.
Using the built-in functions, you can set up automatic sorting of letters into folders. To do this, you need to create rules with certain conditions under which letters will fall into a particular section. If you have created separate mail for certain addresses (for example, letters for work), then you can configure their automatic forwarding in the "Mail processing rules" section. You will familiarize yourself with other features of Yandex-mail when you create your own mailbox.

Mail for a domain on "Yandex"
In addition to regular mail, you can create a new mailbox on Yandex, which has a unique address in the form "[email protected]". Here, any word you like can act as a name, and the name of your domain, if any, can be used as a domain. At the same time, you can create up to a thousand mailboxes on a single domain registered on Yandex. This is convenient, including for owners of small companies. So you can connect your organization's domain to Yandex-mail and set up mailboxes on it for all your employees. Or if you are the curator of a group of students - create your own domain mail and communicate with all your students easily and quickly.
For example, email box this kind might look like [email protected] Here sara is the name of the mailbox owner, and artstudio is the name of the organization that owns the mail domain.
How to create a new mailbox on Yandex for your domain
The first thing you need to do is connect the domain to the Yandex service. On the "Domain connection" page, you need to enter its name in the appropriate form and click the "Connect" button. You will be taken to a page with a list of domains you have added. In order to start using the Yandex.Mail service, you need to go through two steps:
- confirm that you own this domain;
- delegate the domain to manage Yandex services.
After that, the entrance to your mailbox will be available at the address mail.yandex.ru/for/domain name.ru. If you want to be able to open a mailbox on Yandex through your interface, then you need to configure access to the authorization form on the domain. In this case, an address of the form mail.domain name.ru will be used.
You can do this using the DNS Record Editor provided by your domain registrar. Here you need to specify the following data:
- subdomain name (mail);
- record type (cname);
- data (domain.mail.yandex.net).

Conclusion
In this article, we looked at how to create a new mailbox on Yandex and how you can use it. In addition, they learned about the possibility of creating their own mail domain on the Yandex service, which allows you to create a huge number of "subordinate" mailboxes for your employees, students, friends, or just for yourself. We hope you found this information useful.
To access Yandex.Mail, you need a Yandex account. If you don't have it, follow these steps:
Enter your first and last name.
Come up with or choose from the suggested options a unique identifier (login) that you will use for authorization in Mail and other Yandex services.
Attention. After registration, you will not be able to change your login.
Create and remember a password to access your account. The password must be strong so that intruders cannot access your personal data.
Enter your mobile phone number. By this number you can recover your password and receive notifications, and you can also use it as an additional login. If you want to add a phone number later, you can do so on the Phone Numbers page. If you do not want to provide a phone number, click the link I do not have a phone and select a security question and provide an answer to it. This information is required to recover your password.
Enter the characters from the picture (this is protection against automatic registration).
Note. If the characters in the picture are hard to make out, click on the Other code link.
Make sure that you accept the terms and conditions are checked. User Agreement and consent to the processing of personal data.
Click the button Register.
After registration you will receive email address, which consists of your username, the @ sign, and the domain name yandex.ru (or one of its domain aliases). For example, [email protected]. Domain alias is determined automatically during registration.
You can change your personal information at any time, ask a different security question, provide alternative email addresses to contact you, or edit your list of phone numbers.
How to change login
You cannot change the login you created when registering on Yandex, but you can register a new one. To do this, click the link Sign out of Yandex services in the account menu in the upper right corner of the page, and then on the page that opens, the link Create mail.
Attention. If you have registered a new mailbox and want to have access to your old emails, you need to set up a mail collector from the old mailbox. If you want to send emails from both addresses, you can add the old one as an additional address.
How to come up with a strong password
Good password- one that is difficult to guess or pick up.
Never share your password with anyone to access your account. The more people who know your password, the more likely it is that an attacker will find it out.
To create a complex password, use:
punctuation marks:
allowed ` ` ! @ # $ % ^ & * () - _ = + ( ) ; : \" | , .< > / ?
;only ~ and " are not allowed.
both uppercase and lowercase Latin letters;
What passwords are weak?
What should not be used as a password:
Passwords you already use on other websites or apps. If someone finds out, for example, your password to social network, with this password they will try to enter not only Yandex, but also other social networks, postal services, online banks.
Regular words ( margarita , begemot ) as well as predictable letter combinations ( qwerty , 123456)
Personal data that you could indicate somewhere on the Internet: name, birthday, passport number, etc. Even the mother's maiden name, which, it would seem, no one knows, should not be used.
Special postal address
If, when registering in online stores, on forums or other resources, you do not want to indicate your real email address, add a + sign to your login and any word by which you can recognize this site. You should end up with an address like this: [email protected]. An email sent to this address will go to the Spam folder of your real mailbox.
A special postal address on Yandex will also be useful to re-register on the site. For example, if you forgot your account password on this site and cannot recover it.
Yandex is not only a search engine, but also a service that offers an easy and simple way to create a mailbox. Registration will take 5-10 minutes, and you can use it for a long time and successfully.
After registering, you will receive a postal address (e-mail), which is necessary for correspondence with friends, colleagues, subscriptions, creating a page in the social. networks.
Possibilities of a mailbox on Yandex
Each mailer has its own characteristics.
Consider the main features of Yandex:
- receiving, sending letters and files;
- information about the sender is in the letter;
- unlimited volume;
- interesting and non-standard interface themes;
- the presence of Yandex.Disk with a capacity of 10 GB;
- quick access to files and links attached to the letter;
- viewing attached files directly in the mail interface;
- creation of a box for the domain.
Via this service you can set up convenient workplace for correspondence. And also share large files.
The creators thought about those who use mail for personal correspondence, and about those who need this service on duty (organizations, domain owners).
Video: create an email inbox
Stages of creation
The basis of this service is not particularly different from others. Therefore, creating an email address on Yandex will not be difficult, both for a beginner and for the owner of another mailbox.

First of all, you need to go to the official Yandex website. In the upper right corner, click "Start a box". In the window that appears, fill in the fields: First name and Last name. If you do not want to distribute your last name over the network, you can enter a fictitious one.
Unique login
Login is your middle name. You will indicate it at the entrance to your mailbox. Also, the login will be the beginning of your e-mail.
Important! Enter a login that you will not be ashamed to send to friends or colleagues.
That is why your email name should be unique, readable and easy to remember.

The login must consist only of Latin characters, numbers can be used. A hint of what your name might look like will appear to the left of the field. For example, it could be your mobile phone number.

One of two things will be written to the right of the field: the name is occupied or free.

If it is busy, you can add more numbers to the name or letters. Or try something else.

If we are free to proceed to the next step.
Usually the system offers you free options. They are based on your first and last name, plus additional numbers.
If you find it difficult to come up with a name, just choose any of the options you like. Click on it and it will automatically go into the input field.
Important! Remember the username you chose, you will use it to log in.
Login password
To protect and enter the mail you will need a password. It should be easy to remember, and at the same time difficult to guess.
Important! For reliability, it is better to use different registers, languages, numbers and symbols.
In the input field, dots will appear instead of symbols. This is to protect your data from prying eyes.
Under the field you will be given the level of protection:
- simple;
- average;
- reliable.
A simple option needs to be finalized, at least to the average.

It is very easy to create a complex password by entering your favorite phrase in the English layout. The original will look like a set of letters and symbols.
Then we repeat the entered password in the appropriate field.
If you do forget and lose your password, there is a way to confirm that you are the owner of the email. About him below.
Question to restore access
A security question is required so that you can easily restore a forgotten password. The phone number is entered for the same purpose.
Important! Do not come up with brilliant questions. After all, the answer to it should always be in your head.
As a standard, they choose the mother's maiden name, because it is unchanged and unforgettable.
In the appropriate fields, you need to enter a question and an answer to it. The system will remember it, and upon your request to renew the password, it will ask you for the answer to your security question.

If none of the suggested options suits you, select "Ask your own question". Write it down and answer below.
If you enter a phone number, then with similar actions, you will receive an SMS with a code. You will rewrite the code in the appropriate field and go to your mailbox.
Completion
The next field is "Enter symbols" or "Enter captcha", below is a picture on which the symbols are written, and that's what they need to be entered in the lowest field.

To complete registration you need:
- check the box to agree to the Yandex rules;
- click on the Register button.
All mailbox has been created.
Now you have reached the page with your letters. There's already one here incoming letter from Yandex. It can be opened by clicking on the inbox, and in the window that appears, click on the letter itself.
How to start an email on Yandex under a different name
Internet users need mail for different purposes. It is very convenient to have, for example, a separate address for subscribing. Then important letters will not be lost among the mailing list.
First you need to log out of your mail:

Click on the "Register" button and fill in all the fields registration form. Only now enter another login, it should also be free.
You can enter the same password, it's more convenient. But repeating passwords makes your security vulnerable. Therefore, it is better to password-protect a box for receiving letters with personal information. However, it should not be used anywhere else.
The security question can be left the same as on the first box.
If you entered a phone number, then when creating a new address, you need to specify a new one. You must have access to this number, as it will receive an SMS with a confirmation code.
Similarly, we complete the creation.
We use mail
Now you need to figure out how to work with e-mail. Immediately after registration, you will be taken to the messaging control panel.

On the left there is a menu:
- inbox - received letters come and are collected here. In order to open a letter, you just need to move the cursor over it and click the left mouse button. Unread items are highlighted in bold. When you open the letter, it will not be highlighted;
- sent - the name speaks for itself. All messages created by you and sent to the recipient are stored here;
- remote- a message can be deleted from any folder, after which it will go to this folder;
- spam - all advertising correspondence gets here;
Important! The messages you need can also get into spam, so it's better to periodically check this folder and delete unnecessary ones.
- drafts - if you have written a text and get distracted, you can save it and not send it. You can find the saved message in the Drafts folder;

In order to create a message you need:
- go to mail;
- select the tab "Letters" - "Write";
- enter the recipient's email address in the "to" field;
- in the "Subject" field - the name of the message (optional);
- in a large white field - the text of the message;
- click "Submit".
All messages have been sent. You can also attach a postcard or file.
There are two ways to delete an email:
- open the letter and click the "Delete" button at the top;
- open the folder where the letter is located, check the box next to it. Click "Delete" at the top.

There is a horizontal menu at the top:
- letters;
- disk;
- contacts.
Each of these items has its own sub-items. Work with letters is described above. Large files are stored on the disk; and in contacts you can create your own notebook, with the addresses of their scribes.
Be sure to leave the box when you're done. So no one can read your correspondence.

To log in again you need to:
- go to the main page;
- enter your username and password;
- click "Login".
Create mail for your domain
If you are the owner of a domain, you can create a box with an address like "[email protected]", where the name is any word. For one domain, the service allows you to create up to a thousand mailboxes.
Plus, you can connect the organization's domain. From it you can create mail for your employees.
Creation algorithm:
- go to the domain connection page;
- fill in the appropriate fields;
- click "Connect".

The system will take you to a page with your domains.
To get started, you should:
- confirm that this is your domain;
- submit the domain to service management.
Creating a mailbox is simple and fast. On Yandex ru intuitively clear interface. Therefore, it is enough to read all the hints and fill in the appropriate fields.
The possibilities of this service are quite wide. It would seem that the creators have thought through everything to the smallest detail, as long as users feel comfortable.
Sometimes there is a need and / or an irresistible desire to "bind" several email addresses to one mailbox at once - well, let's say, to register two different accounts on any site and at the same time not to open a separate mailbox for this purpose (after all, as you know, the vast majority of sites and services follow the logic of 1 mailbox = 1 account). Of course, many people have several mailboxes at once and can set up automatic mail forwarding, but happy mailbox owners on gmail can organize everything much more simply and elegantly...
Actually, God himself ordered me to become interested in this issue - as you can see, this blog is bilingual (English and Russian), and I wanted to keep the same alignment in other services - in particular, in Twitter. Since I absolutely did not want to start an additional mailbox that I absolutely did not need, I decided to find out how those who faced such a need before me solve such issues. And a very good solution was found.
Gmail's hat trick
There are three tricky ways to get multiple unique email addresses that will be accepted by other sites at once for a single Gmail account.1. Using @gmail.com and @googlemail.com domains
If you only need two different addresses (as I needed for the Russian and English versions of my twitters), then you can simply use a different Gmail domain, which are synonymous and will bring letters to your single mailbox at both addresses. In other words, the address of the form [email protected] and [email protected]- This is the same. However, for all other sites, these two addresses will look different, and therefore, you can register two accounts on them at once and receive all letters in one box.2. Using dots in the address before "dog" - [email protected]
Gmail allows you to separate your email name with dots to the left of the "dog" sign - with all options like [email protected], [email protected], [email protected] etc. are synonyms and all letters sent to them will come to their destination - to the original address [email protected]. Naturally, each such address in the eyes of other sites will be considered unique.3. Adding an additional string with a plus to the name - [email protected]
And finally, the most sophisticated trick that allows you to get an almost unlimited number of synonyms for your email address on Gmail is the use of an extra line with a plus sign in front of the "dog" sign. That is, having an address of the form [email protected], as its synonyms can be used [email protected], [email protected], [email protected]- When receiving mail, the system will send a letter to the address to the left of the plus sign.In addition, this method has an additional advantage - as an example: if you include after the plus sign the name of the site on which you registered using this email address - then later it will be possible to calculate which site leaked your address into the hands of spammers, t .to. The "To" line of the email you receive will display the entire address, including all the plus signs. A convenient means of identifying exactly where your address was received from.
Hi all! In this article, I continue the review of mail services that are popular in our country (and some neighbors).
We have already figured out that without modern user Runet, and even more so a freelancer or blogger - nowhere: after all, to register on any Internet service, be it hosting or a freelance exchange, you need an email address. , about how to register there, work and configure the interface, as well as delete and restore mail. Today we will consider in the same detail one of the main competitors of gmail in the Runet - namely Yandex.Mail.
Free Yandex mail: a bit of history
Let's take a quick look at Yandex mail history. Like Google, the Yandex search engine today is not just a tool for finding information on the Internet, but whole system a variety of services designed to make life easier for the user of the worldwide network (well, how to make it easier ... sometimes even more confusing, but let's not talk about sad things). Yandex email is one of these services.
Yandex launched its own mail service in 2000, by which time it was already quite a popular national search engine. By the way, my mailbox on Yandex was registered in 2003. In the same year, Spamodefense appeared - a technology designed to protect mail users from spam. In 2010, the anti-spam algorithm was improved, a personal "Spam defense" appeared: in addition to using general rules spam definitions, the user can customize and use their own.
In 2014 interface postal service was completely updated, added the ability to work with mail offline, as well as work with multiple mailboxes. Since then, the mail has not undergone significant changes, but Yandex does not leave its mail service alone: improvements and changes are constantly taking place. About the history of the creation of these two search engines I have .
Registration by mail
Let's start with registration. To create Yandex mail, you need to register an account with Yandex. How to do it? We go to www.yandex.ru and see the following image in the upper right corner of the browser:

Alternatively, we can immediately type the Yandex mail address mail.yandex.ru and see a different picture:

Select "Create mail" or "Registration". In both cases, we get to the registration form:

Everything is extremely simple.


That's it. Click the "Register" button and you're done. We get into our new mail, and we are greeted by a setup wizard. You can skip this step, you can use its services. It suggests setting up:
- Link to mobile app
- Registration
- mail collector
Yes, it's better to skip it. We will consider these settings in order of the general queue. Let's now figure out how to set up Yandex mail.
The mail web interface looks like this:

If you read my review Gmail, or have a mailbox in this mail service - you can pay attention to the undoubted similarity of both interfaces. There are also differences.
As in Gmail, setting up a mailbox can be divided into two stages - setting up an account and setting up the actual web interface.
To enter the account settings from the mail, go to the upper right corner of the web interface, where a circle with an icon is displayed, and select "Account Management":

If we are not in the mail, but on start page Yandex yandex.ru, then in the upper right corner of the browser we will have the following picture:

Click either on the icon or on the login and select the "Passport" menu item. We get to the Yandex.Passport service, which allows you to manage all account data:

As you know, registering an account on Yandex allows you not only to create email Yandex, but also get access to all other Yandex services. We are now only interested in mail, so let's see what in Yandex.Passport can be attributed to setting up a mail service.
- Photography and personal data is clear to everyone, I think.
- Account security. Here you are invited to link a phone number (if it is not already linked), change the password, security question, and so on.
- Email addresses. In this setting, you can bind a spare email - it can be used if you need to restore the mailbox, besides, it will receive notifications from Yandex if there are any problems with your mail (I would like it without it, of course).
In addition, additional mail addresses (aliases) and third-party addresses from which mail is collected are displayed here. We will talk about all this a little later.
- Access control. There are two interesting possibilities here:
- Enable app passwords
- Set up two-factor authentication
Application passwords
What is it in relation to mail? Let's say mail comes to you on a computer or on a phone where a mail client program is installed. This program should receive mail from Yandex, respectively, log into your account. You can create an individual password only for this mail application: with this password, it will log into your account and have access only to mail. This method allows you to further secure your account without sharing a common email password with individual applications.
Go to Access control - "Enable application passwords":

In the window that appears, select "Create New Password"and select the item" Mail ":

Enter the name of the password, for example, Outlook, and click "Create":

Password generated. We click "Finish". Now we just have to specify it in the settings of the mail program.
- Please note that after changing the general password in your Yandex account, including after recovery forgotten password, you will need to change all app passwords as well.
Two-factor authentication
Login to the mailbox is carried out through the login and password that you specified when creating the mailbox. However, Yandex makes it possible to replace a permanent password with a one-time password using a two-factor identification algorithm. Let's now see how to set it up and how to use it.
Go to Access Control - "Set up two-factor authentication".
There is no way to do without a mobile phone. We indicate the phone number, we receive an SMS with a code that will need to be entered in a special window. After that, we go to step 2.

We come up with a pin code. Please note: I entered 123456 as a code - but this number did not work for me:

This pin code must be remembered, but it is better to write it down in a safe place: we will have to constantly work with it.
Now we need the Yandex.Key app on a mobile device. This application generates one-time passwords that will be used to log into your account.
If it is not installed yet, you will need to download it (by getting a link or by finding it yourself in Google Play or APP Store). After installation, add an account to Yandex.Key by reading the QR code:

Or manually by entering the login and secret key:

After adding an account on a mobile device, you will need to enter the pin code you created in step 2. The application will generate a password that you will need to enter in step 4. The password is valid for 30 seconds; given that it consists of 8 random Latin letters, it can be a daunting task to enter it in time. If you do not have time, wait for the next password.

When you enable two-factor authentication, all apps are required to use app passwords. You can also connect them at this step.

Like this. Pretty complicated process, I must say. The good thing is that you only need to do it once.
There are now two ways to log in to your account:
- First way. Run Yandex.Key on your mobile device. When entering the application, you need to enter the pin code that you created in step 2 of the authentication settings:

The program generates a password that must be entered in tandem with the login:

- The second way. Click on the QR code icon:

We get a picture with a QR code:

We launch the application, click on it "Login by QR code". The camera turns on, when you point it at the code, it is read. Next, the phone informs Yandex about the successful reading of the code, and you get access to your account.
By the way, in the login form you see the “Alien computer” box. This is also one of the ways to protect your account. If you access mail from someone else's computer, especially one that is in public access, I advise you to check this box. If you forget to log out of your account - when you close the browser (or after a few hours if the browser window remains open) your session will be closed. But it’s better, of course, not to forget about the need to log out of your account, especially when logging in from someone else’s computer.
So, we have protected the account and mail. Keep in mind: when using two-factor authentication to enter your mail, you need to have a smartphone with Yandex.Key installed. How convenient and justified it is for your work with mail is up to you.
A few more words about setting up an account. When you click on the icon with a photo (or without a photo) in the drop-down menu, we see the item "Add user":

What is it and why? The fact is that you can have several Yandex accounts for various purposes - for work, for use as a purely home mail address, and so on. You can quickly switch between them without leaving one and constantly entering another. To do this, click "Add User". Enter the login and password of another account and now you just need to click on desired account to enter it:

Pretty ergonomic, right?
Now let's move on to setting up the actual mail service.
Yandex mail is configured through the gear icon in the upper right corner:
. 
Note that the current menu is displayed in the left column. Thus, you can switch from item to item in the settings not only inside the Settings window, but also through vertical menu. This is a feature of the Yandex interface, quite convenient.
As you can see, there are many settings. Well, let's deal with them.
Let's start with the design. To the left of the gear you can see the icon, it is also repeated in the list of settings. This is just a choice of colors and a background image:

In this menu, you can choose various “wallpapers”, all kinds of options for coloring menu elements, play around and choose the design to your liking. But there is nothing particularly interesting here. We move on.

- Name and portrait - there should not be any difficulties.
- Send letters from an address: this is more interesting. If you open the drop-down list, we will see several addresses with different domain zones, in addition, the address on ya.ru. What's the matter, because during registration we indicated only one Yandex mail address - on yandex.ru?

The fact is that when registering a mailbox in any national domain, mailboxes are automatically created in the other three Yandex national domains, in the .com zone and in the ya.ru domain. These addresses are aliases (that is, synonyms, analogues) of your main postal address. Letter sent to [email protected], will come to my mail in the same way as sent to [email protected] Yandex thus takes care of the uniqueness of the user login in all its zones and domains.
So in this setting, we can specify which of the mail aliases is your primary address, that's all.
- In addition, we can immediately make the mail alias and login of the Yandex account our phone number associated with the mailbox: the “Make phone number address” setting. At the same time, a one-to-one correspondence is established between the phone number and the account: only one additional login can be specified for each account, and a specific phone number can be a login for only one account. Phew, are you still confused in these aliases, accounts and logins?
In general, the point here is that we tick the box, make a few mouse clicks - and your phone number will become your login and your email address, while you can continue to use the old Yandex mail login (and address, of course). In addition, only with the old login will you be able to restore access to mail - well, we'll talk about that later.
- Your signatures: here you can create several signatures for different emails and even different aliases. Everything seems to be clear.
Go to the next settings item: "Rules for processing incoming mail."
Here we can set the rules by which incoming messages will be processed, as well as add addresses to the black and white lists. You can independently configure the operation of Spam Defense by telling the algorithm which addresses are spamming and which are clear of such suspicions.
As for setting up the rules, everything is also quite simple and clear. You can create a rule using ready-made templates (move letters, mark with a label, delete) or use a convenient constructor:
It seems to me that, compared to Gmail, the Yandex setup interface is more convenient. How do you think? But let's see what happens next.
The next setting is Mail Collection.
Like any self-respecting mail service, Yandex provides its users with the opportunity to receive mail from other mailboxes.
Enter the name of your third-party mailbox, password - and get into the mail collector settings:
As you can see, you can immediately set a rule for processing mail from other mailboxes: assign a label or place it in the folder you specified, not necessarily Inbox. You can specify an unlimited number of such boxes; in addition, the collector can be disabled at any time.
You can create new folders in the following setting: "Folders and Tags".
I created new folder"Work":
New folders may have different level nesting.
Here you can also create rules according to which incoming messages will fall into certain folders. You can also create rules for labels, in addition, it is possible to create new labels:
In the "Security" setting, we can change the password, bind additional mailboxes, which can be useful for mail recovery. You can also link a phone number to your account here, if you haven't already done so, and create the app passwords we've already reviewed.
A useful feature is the visitor log:
In it, you can see from which ip the mail was entered and the actions in it. If you find any suspicious activity, it might be time to sound the alarm!
We have already looked at the "Design", let's go to the "Contacts" now.
I don't have any contacts right now. However, you can see what actions you can take here:
- Load contacts from a file;
- Save to file - these two options are used to transfer contacts between accounts.
- Contacts can be grouped for the convenience of working with them - for example, group mailing.
Here you can also set the interface settings for displaying contacts in a letter.
If you enable it, a box with "Case" will be displayed in the lower right corner of the interface:
This is something like an organizer-light - it reminds you of the planned things. AT mobile version Cases will also be displayed.
The last item in the Settings is "Other options".
Here you can set the parameters for displaying letters on the page and the parameters of the letters themselves.
Well, we have sorted out the Settings. My opinion has not changed - everything is very simple and easy to understand.
Now let's move on to letters.
Above the list of letters, we see buttons that organize work with letters, as well as the View menu and a gear that appears when you hover the mouse over the button bar:
The disappearing and appearing gear is the control of personal buttons, the value of which can be set independently:
For example, the "Auto Reply" button can be assigned text that can be quickly inserted when replying to an email; "To folder" - specify a specific folder, and when you click this button, the letter will immediately go to this folder. I can’t say that such a tool is very convenient to use, but it can’t be called superfluous either, it can be useful if you often have to perform any of the same actions with letters.
View button customizes appearance interface:
In addition to optional interface settings (may be useful for improving usability when working with various devices), the interface type is set here: normal, two-pane, or three-panel with an email viewing area. You can view the contents of the letter to the right or below the letter.
The “Group by topic” checkbox allows you to create chains of letters: letters united by one topic will be displayed one above the other “in order of receipt”. This feature is similar to Gmail's and can be very user-friendly: no need to set additional terms grouping, all correspondence with recipients is visible at once.
If you open a letter, all buttons become active, you can work with the letter - reply, delete, and so on. Button "This is spam!" not only sends the letter to spam, but also allows the Spamodefense algorithm to know that all similar letters should be sent there without hesitation. On the contrary, if the letter is defined as spam, you can click the "Not spam!" - and "Spamooborona" will also draw the appropriate conclusions.
Thus, spam in Yandex mail can be managed quite flexibly, taking into account the presence of white and black lists.
How to use Yandex mail
We are smoothly moving on to the issues of using Yandex mail.
Before that, we only talked about the Yandex web interface. In fact, this is not the only opportunity to read mail on Yandex (well, write a letter, of course).
In addition to the web interface, Yandex provides its users with three more options for accessing mail:
- Via mobile application Mobile Yandex.Mail - for devices with Android based and iOS, available on PlayMarket and AppStore respectively. The application is suitable for installation on the phone;
- Using the mobile interface. To use it, just enter the mail from any mobile device, for example, a tablet;
- Using mail programs installed on the computer, such as MS Outlook.
Attention! Keep in mind that when using two-factor authentication, all apps need to use app passwords.
Using the mobile version of the interface and application should not cause problems. It is a little more difficult to set up receiving mail in the mail program. If for some reason you are not satisfied with the web interface - let's say you are used to your mail program and persist in your desire to work only with it, then in order to download Yandex mail, you need to make some settings both in the program itself and and in Yandex mail.
You can work with mail using two protocols: IMAP and POP3. In the first case, you will receive mail with the folder structure preserved, your mail program will be synchronized with the mail server, and copies of the letters you send will remain on the server. In the case of using the POP3 protocol, incoming messages arrive in a "single stream" and fall into the "Inbox" folder of the mail program, sent letters will only be in the local program.
In the web interface, you need to set the following settings: All settings - mail programs (we did not consider this setting - it can only be found in the left menu):
Put a tick in front of the protocol with which you are going to work.
In the mail program, you need to specify the following:
In both cases, you also need to specify a username and password to access the mail server (and again I remind you about application passwords).
Web interface
If you prefer to use the web interface, then it will not be superfluous to see what functions there are for sending and receiving emails.
Let's start with the fact that the number of unread emails is displayed in the title of the browser tab in which mail is open, which is quite convenient:
I sent myself a couple of test emails from another account. Please note: one more item has been added to the menu with buttons above the letters: “All letters”
You can check the "People" box, and then the letters that I sent to myself from another account will be displayed, and service letters from Yandex will not be visible. Another handy feature.
You can also see that there are attachments in incoming emails. They are clearly visible:
If you press the button (in the red frame on the screen) - all attachments can be downloaded in one archive.
Open one of the incoming emails:
You can reply or forward a letter not only using the top buttons, but also in the body of the letter. Using the arrow below, you can immediately go to the next letter without returning to the list of letters. Everything is very clear.
Deleted letters do not disappear forever, but are moved to the "Deleted Items" folder, from where they can be restored if necessary. It is convenient to drag letters from folder to folder with the mouse.
Let's write a letter now.
Laconic design, already familiar to us:
But if you look closely, there are also some very interesting "chips".

- Well, notification of receipt by the addressee of your letter is quite traditional here.
Yandex mail for domain
On some mail services there is such an interesting service as organizing mail for a domain. Yandex is no exception.
What is mail for a domain? You can register a mailbox on Yandex with a name ending not with the usual @yandex.ru, but with the domain name of your site.
If you have a website, you must have encountered the problem of organizing mail on it. Each hosting has its own rules that you had to deal with. Yandex, on the other hand, provides a much more convenient tool for creating and using mail. What are the advantages:
- You do not need to deal with the hosting control panel, learn the process of creating and managing mail. You can use your familiar Yandex interface.
- When the site moves to another hosting, the mail remains unchanged - no need to study postal rules new provider.
- In case of technical problems of the host, if your site is temporarily unavailable, the mail continues to work.
- Disk space. Yandex provides an opportunity to create 1000 mailboxes and an unlimited size of the mailbox. If you use economical hosting plans that limit disk space This is a very significant benefit!
- Spam. We have already said that Yandex has a very advanced anti-spam algorithm.
As you can see, there are plenty of advantages of organizing mail on Yandex, and not on your own hosting. Well, let's figure out how Yandex mail for a domain is configured.
The easiest way to find where to organize such mail in Yandex is to enter “Yandex for Domain” in the Yandex search box and follow the first link to go to the appropriate service pdd.yandex.ru. We get to the page for adding a domain:
We specify the domain and get to the page that asks for confirmation that you have access to manage the specified domain:
Let's deal with step 1. There are three options for verifying that you own a domain.
- The first way is to create a file, for example, in Notepad or any other text editor, with given name and content, and with file manager hosting transfer it to the root directory of your site. Pretty simple.
- The second way - through the control panel of your hosting, add a record of a certain type in the DNS editor. To be honest, I did not find the opportunity to do this in the PU of my hosting. So let's skip this option.
- The third way is to change the contact address at the domain registrar. Again, a failure, since registrars do not disclose contact address, and my site is in the .ru zone.
So that leaves the first option.
We throw the file into the root folder of the site and click "Confirm Domain Ownership".
So, now we need to change the MX records in the DNS of the domain (if you don’t know: MX records are used to route mail, the abbreviation stands for mail exchanger - mail exchanger) or even delegate the domain to Yandex - in this case, you don’t need to prescribe anything :
Let's not delegate anything now, let's see what can be done in the hosting control panel.
In my hosting, it turns out that you can choose MX servers for some mail servers. Well, we indicate "Yandex Mail". If this were not the case, it would be necessary to select "Custom MX servers" and register the above values:
Let's come up with the original login admin, enter the password - and the mailbox has been successfully added.
When you enter the mailbox, you will need to complete the registration:
We enter the data, complete the registration - and you're done. You can use mail for a domain; its interface is no different from regular mail.
What are the features of mail for a domain on Yandex:
- Standard access to mail - at the address of the form https://mail.yandex.ru/?pdd_domain= your_domain.ru , where your_domain - Domain name your site:
but it is also possible to configure the entrance to the mail at the address of the form http://mail.your_domain.ru;
- You can place a mail login form on the site - for this, you need to register the corresponding HTML code on the site, which is available via the link in the mail registration window;
- It is possible to transfer the mail of users of your site from other mail services;
- Each domain user has access to 10 GB of space on Yandex.Disk;
- 1000 mailboxes and the ability to increase this number by contacting support.
With the mail setup, you need to work a little, go to the control panel of your hosting and make some settings there, but in general, nothing complicated, right?
What to do if the user forgot Yandex mail?
If the password does not "pass" when you try to log into your account, click the "I can't log in" button and follow the instructions:
Yandex will offer you to restore your mail using your phone, an additional email address (if this data is linked to your account), a security question:
If you do not remember your login, you will need to specify the first and last name for which the account is registered. The system will offer a list of logins from which you need to choose yours.
If no methods to restore access help, you will need to fill out the following form:
Remember as much information about your account as possible. You may have to correspond with the support service, provide documents confirming your identity, and so on - the process is very tedious. So try not to forget your password and enjoy additional features access recovery - linking a phone, an additional email address.
How to delete Yandex mail
If you decide to delete mail on Yandex, I’ll give you banal advice: it’s good to think about whether you really don’t need it: you won’t be able to restore mail after deletion. If you are completely sure that you need to get rid of mail, you can use two methods:
- Deleting a mailbox only
- Deleting an entire account
Go to Settings - All settings. At the very bottom of the page we find a small inconspicuous link to delete the mailbox:
Click "Delete" and once again think about whether the decision is really final:
Click "Continue". You will need to receive the code on the phone, enter it and specify the password for the account. Everything, the mailbox is deleted.
Deleting an entire account
It will not be possible to permanently and irrevocably delete an account if the Yandex.Money, Yandex.Direct or Mail for Domains services are activated in it. The login in this case will be permanently blocked. If these services are not connected, when deleting an account, the same login can be re-registered after 6 months.
It will be impossible to recover deleted data - I remind you again. Of course, it will be possible to enter into correspondence with Yandex technical support, but whether it will be possible to achieve something is a moot point.
So, to delete an account, go to Yandex.Passport, for example, through Settings - Account Management. In the passport we find Other settings - Delete account:
Answer the security question and click "Delete account". Now, when you try to access Yandex mail or any service of a remote account, Yandex will write us a message stating that there is no account with such a login.
Output
Free Yandex mail is a great option if you need a reliable, functional and convenient mailbox.
I see the following advantages:
- Yandex has many different services that integrate well with mail.
- The interface seems to me more convenient than the gmail interface, well, this is a matter of taste and habit
- Fully working spam protection
- Possibility to connect mail for domain
Do you have something to add or argue? Welcome to the comments.