If you need to change or completely remove the background part of a picture, check out our article on how to remove the background in Photoshop.
Removing the background is one of the first difficulties that beginners face when working with the Photoshop editor.
Let's look at some of the most popular and simple ways, which will help you remove the background of a photo.
Using the eraser
Photoshop has a number of tools whose task is to independently determine the boundaries of selected objects.
One such tool is the Magic Eraser. It is available in all versions of Photoshop.
This method is suitable if you need to remove White background Images. The eraser does not accept other background fills:
- In the Tools panel, open the Rubber Tools tab. Then click on the “Magic Eraser” element;
- Now you should double-click the mouse pointer on the white background of the open image. The eraser will automatically detect all borders of the background and main photo. Press the Delete key to delete the selected area. In some versions of the Photoshop editor, you just need to click the pointer and the selected area will be deleted automatically.
It is worth noting that in earlier versions of the program, the magic eraser may not perfectly determine the boundaries of an object. In this case, after removing the background, you will need to enlarge the image by 200 percent and use a regular eraser to erase all the errors. In some cases, white pixels that are not part of the background may be removed.

As you can see, the eraser removed the part of the sword that was painted white and parts of the costume. This effect can be easily removed. Use the following methods:
- Open the Magic Eraser options panel. Check the “Adjacent Pixels” (or Contiguous) option. It should be ticked. The presence of this item in the magic eraser settings allows the tool to select and delete only those sets of pixels that touch each other. This way, other elements of the picture will remain intact. To use the tool again, undo the previous result of removing the background and using the new eraser parameters, remove the background;
- Adjust the Tolerance option in the eraser settings. The location of this settings item can be seen above in Figure 3. The higher the value of this item, the more likely it is that the eraser will remove more quantity detected background shades. Increase the tolerance parameter and gradually the eraser will stop highlighting the elements of the object in the picture. If for some reason you cannot remove the border using this method, try selecting the “Layer” window in the main menu bar. Then click on “Edge Processing” and select “Remove Border”.
Result of background removal using the described parameters:

Removing the background using the Magic Wand
Another popular background removal tool is the Magic Wand. This element can be found in most graphic editors, including in Photoshop.
To remove a background, first open the desired image as a new project in Photoshop. Wait for all toolbar items to load.
Now select the quick selection option. In the dropdown list you see two available tools. Click on the “Magic Wand” as shown in Figure 5.

Now all the actions will be the same as if we used the “Magic Eraser”: just move the pointer to the background part of the picture and click on it.
Once selected, the background area will have clear boundaries. Press the Backspace button to remove the fragments detected by the wand.

Important! Before you start removing the background with the Magic Wand, make sure you have unlocked the background layer. This is necessary to “unpin” it from the main picture. If a layer is not unlocked, the wand will not be able to select it correctly. Deleting may leave white areas or erase non-background parts of the photo.
To unlock the background, go to the Layers panel. Click on the lock icon to set it to the “Open” position.
Only then use the Magic Wand tool.

If the “Magic Eraser” is often used to remove the white background from images, then the “Magic Wand” is more appropriate to use to remove colored parts of the background.
Removing the background inside the picture
Often users need to remove the background, which not only intersects with the boundaries of the main part of the picture, but is also located inside it.
This method of background removal is useful if you work with black and white images or scans of drawings.

As a result of removing the background, we should get a completely transparent image, with a clearly defined outline of the car.
First you need to create a copy of the blue channel of the image. To do this, press the hotkey combination Ctrl - L.
The Levels window will appear. Move the sliders until everything is gray colors began to resemble a black shade as much as possible.
That is, all those elements of the outline that we want to leave should be painted black, and all parts of the background that will be deleted should become white.

Click on the thumbnail of the channel copy that was created at the very beginning. While clicking, hold down the Ctrl button.
As a result, a selected image will appear. Do the inversion by pressing the keyboard shortcut Shift -Ctrl -I .
Now press the Backspace button on your keyboard to delete the extra layer. You can create a copy of it by pressing Ctrl -J .
After removing the background and adding a new texture instead, this is the result:

Adding another background
Typically, users remove the background to add one picture to another or to change the background color/texture of a photo.
Let's look at how you can change the background of a picture whose previous back layer has been removed.
Add a drawing with a texture and a picture with a removed background to one project:

Go to the layers panel and place the structure on top. Set the blending option to Eclipse or Multiply.
As you can see, the element appeared on top of the texture, however, some white parts of the image also took on the color of the texture:

Add an additional layer mask to the topmost layer:

After adding the mask, erase the remaining texture colors from the object using the Brush. The resulting result:

Sometimes, when looking through pictures, you discover that unnecessary objects have entered the frame. Or you need a photo to place a logo, but it already has other inscriptions on it. How to remove an inscription from a picture and delete an extra object in Photoshop?
For these tasks use the tool “Stamp”/Clone Stamp Tool or Patch Tool. The latter is preferable if the extra object is located on a simpler (plain) background.
Working with a tool Patch Tool, we cut out (copy) the donor area and cover everything unnecessary with it. How it works? Hold down the left mouse button, circle the appropriate area and move the patch. This tool has two modes:
"Source". When using it, the selected area will be filled with the donor fragment into which the selection has been moved.
"Destination". In this mode, the selected area will cover the area to which it will be moved.
Let's look at examples.
Patch Tool
Open the photo in Photoshop and create a duplicate layer ( Ctrl + J). On the toolbar, in the group of restoration tools, select Patch Tool. If the instrument in the group is the default, just press the key J.
To make it more convenient to work with the image, scale it ( Ctrl+ And Ctrl-).
We will be removing the Shell logo. So, we select the first donor site. On the control panel press the button "Destination", parameter "Diffusion" set it to value 7. Move the cursor and circle the area for the patch (it will be highlighted with a dotted line).

Then drag the selected area onto the logo. If the patch does not completely cover the area to be painted the first time, move it again until the unnecessary object completely disappears. You can cancel an unsuccessful action by simultaneously pressing the keys Ctrl + Alt + Z.

Save finished image (Shift + Ctrl + S), selecting the file type that is convenient for you (for example, JPG).
Here is our result:


You can learn even more about Photoshop in the course at Fotoshkola.net.
Clone Stamp Tool
Now let's take a more complicated case. Let's remove the person from the image.

For this we need a tool “Stamp”/Clone Stamp Tool. It is called by the key S. You can adjust its size using the keys [ And ] . This tool creates a clone of the donor site. They correct it gradually, in small strokes.
We select the donor area next to the area to be painted. To do this, move the cursor to the donor site and, while holding the button Alt, click once with the left mouse button. The donor site is indicated by a cross. As you move around the image, it follows the cursor, so the donor site needs to be changed periodically. Now move the cursor and click with the left mouse button.

This photo has a lot of vertical and horizontal stripes of different shades. In place of the umbrella you need to draw a ceiling. In front of the boy, one door is slightly open, the second is closed. All this should be taken into account when painting.

To prevent the lines of beams and boards from looking broken, the donor area should be selected carefully. It is important to place the stamp so that the stripes match.

One of the stages. Here is a gap between the doors.

Gradually paint over the lines horizontally and vertically. To complete the door on the left, the donor area is taken from the very left edge, and the vertical lines are taken from the top. We applied the stamp, clearly aligning the sections so that the straight lines ran smoothly.
Good day everyone, my dear friends. I’m with you again, Dmitry Kostin. I remembered here many moments when you are being photographed, and some extra person or some object that is out of place in the photograph gets into the frame. Sound familiar? You only notice this when you can’t take another photo. Leave it as is? No way!
Unnecessary objects can be thrown out of the photo, and no one will notice the difference. Do you want to know how to remove an unnecessary object from a photo in Photoshop? Then read on.
Content-Aware Filling
As you can see, the cat has disappeared, but you are not left with a cut out area as is usually the case. The void was filled with adjacent pixels, which, according to the program itself, would most likely end up in this place.

I had a small problem. when I removed the cat, a piece of the handle appeared in the area where the tail should be (apparently a clothes dryer). But it cleans up in exactly the same way. And now you have a clean blanket without a baby.
Likewise, I decided to remove the textbook from my desk. Do you agree that it is very simple? But that is not all.
Stamp tool
Sometimes the first method may not be entirely suitable for the purposes we need. But it doesn't matter. Photoshop almost always has several solutions for a specific task. And this case is no exception.

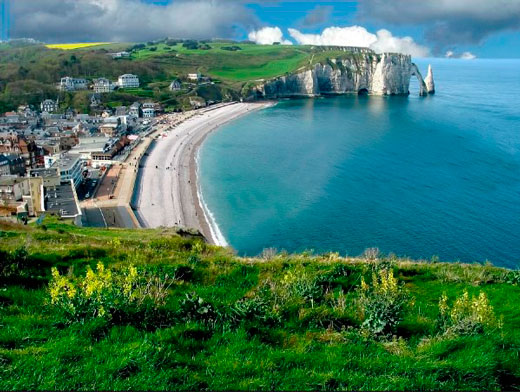
Let's take a picture of a beautiful view of the coast. Beautiful view, but as you can see, a cheeky bird flew by and got into the frame. It arrived beautifully, but let’s say it’s not needed there.
Then we roll up our sleeves, take the lasso and carry out all the operations from the first point. Let's see what we got. Somehow not very good, right?

The Stamp tool will help us with this. This tool is somewhat similar to "Healing brush", which we used, but there are differences. With the healing brush, we took the donor area and painted over the unnecessary detail with it in such a way that the colors that correspond to this area were then superimposed. Nothing like that happens with a stamp.

If it is somehow difficult for you to understand this process in text form, then I made a separate video lesson especially for you. Enjoy watching.
It turned out to be a pretty good picture, as if it had happened. You can combine several methods to achieve the desired result.
Do you have photos where you can remove anything unnecessary? If yes, then it's time to get rid of it. Well, if you want to learn all the possibilities of Photoshop in a short time, then I recommend that you take a look excellent video course. All the information in it is presented amazingly and is designed for any level of user.
Well, that's all for me. I hope you enjoyed my lesson today. Don't forget to subscribe to blog article updates, then you will be the first to know about the release of interesting articles and other interesting information. Check out other blog articles as well. I'm sure you'll find something interesting for yourself. Well, I say goodbye to you. Bye bye!
Best regards, Dmitry Kostin
EXAMPLE 1.
Here is the first photo with a group of people enjoying the sea and sun.
Remember that the original photo before it is processed in Photoshop is called the SOURCE. Who invented this word, but you will see it often.
I decided to leave in the photo only the man reading a magazine on the surface of the sea; I will remove everything else, using mainly a tool that is already familiar to you.
For reference: You can select an object with any selection tool (rectangular, oval, lasso, etc.) .
1. I hope that you already remember how and I will not repeat the screenshot. Menu - File - Open… IN in this case we open SOURCE-1.
4. Now, in order to better see the transformations in the photo, I will zoom in on the working area. The source is 1,900 pixels wide. To do this, write 100% in the left corner.
5. Now we will start removing unnecessary objects from the photo. I'll start with the smallest one. This is a red buoy. To do this, activate the tool rectangular selection and circle this object.
After selecting the object, go to Menu - Editing - Fill…
But we don’t fill it with color, as we did in the lessons on creating frames, but use the fill function ACCORDING TO CONTENT. The CS5 program itself will figure out what background to fill the required object with.
Click OK, and after a while we see that the buoy has disappeared and in its place is a piece of sea.
You can remove the selection by going to Menu - Select - Deselect, and start removing new unnecessary objects.
Or you don’t have to remove the discharge. If you use the same Rectangular Selection tool to select something else, in this case men looking for something in the water, then the first selection (buoy) will be canceled by itself. So I removed the men one by one. The objects are small and there was no need to tinker with them for a long time.
Now all that remains is to remove the woman and her reflection in the water from the photo. This task was more difficult, because the larger the object, the more errors in filling the selected area.
So I started removing it in parts. Select the head and shoulders. Let's go to Menu - Editing - Fill - Based on content.
Click OK, and I didn’t really like filling the sea instead of the head and shoulders, but I haven’t done anything yet.
We select small pieces and remove in the same way its reflections in the water and its legs. And then again we select a large piece of the entire fragment where the woman was,
and repeat Menu - Editing - Fill - Based on content - OK. It seemed to me that the piece of sea that was displayed in the fragment was somewhat different in some places from the main sea surface.
To fix this, let's use a new Photoshop tool. BLUR, I set the parameters of a soft brush with a diameter of 19 px, hardness 41%.
And I blurred this place a little.
I think it turned out well. In addition, I reduced the photo size to 700 pixels in width ( Menu - Image - Image Size).
We save the processed photo in jpg format in a known way: Menu - File - Save for Web and Devices.
And here is a lonely man with a magazine on the sea surface in front of you.
EXAMPLE 2.
This beauty came across on the Internet, but on SOURCE -2 there is the logo of the site’s author.
Let's remove it. I selected the entire logo with the Rectangular Selection tool, then I performed the actions already known to you with filling the selection, taking into account its contents, but...
After these actions, some kind of growth appeared on the girl’s left hand. Let's remove it using a tool RECONSTRUCTION BRUSH. To do this, let's activate it. Hold down the Alt key on the keyboard and left-click on a good area of skin on the left hand and then, using a brush, remove defects in the photo.
I used a hard round brush with equal pressure to the diameter. The diameter was 32 pcs, the hardness was 50%. You can try other parameters, no one forbids you to try.
Now hold down the Alt key on the keyboard and left-click on the right elbow, which is under water.
Tool STAMP remembers this place and transfers it to his left hand. I painted the elbow in 2 clicks. It turned out beautiful! Save the photo in jpg format and rejoice.
Please note that in example 2 I did not convert the background to a layer or rename it.
To summarize: you have learned how to remove unnecessary objects from a photo by using the SELECTION tool and filling the selected fragment ACCORDING to the CONTENT. To correct small fill errors, you learned how to use the BLUR, HEALING BRUSH, and STAMP tools.
The lesson is over! I hope that you can easily repeat it using my sources, or your own pictures to suit your taste.
P.S.: All pictures in the article can be enlarged by clicking on them.
Instructions
Select the Clone Stamp Tool from the Tools panel. The Tools panel is located on the left side of the program window by default. You can simply use " hotkey» S.
Configure the parameters of the Clone Stamp Tool. To do this, left-click on the triangle next to the Brush palette, which by default is located in the upper left part of the window, under the main menu.
The Clone Stamp Tool, like any brush, has two parameters: Master Diameter and Hardness, which are adjusted with sliders. You can also enter numeric parameter values in the fields above the sliders in order to customize these parameters. The first parameter determines the size of the brush with which we will remove unnecessary objects from the photo. The second parameter determines the degree of hardness of the edges of the brush.
In order to remove unnecessary objects from our photo, first select a semi-soft large brush.
Enlarge the image for easier viewing. This can be done by dragging the slider in the Navigator palette to the left, or by typing a numeric value into the field located to the left of the palette slider. The Navigator palette is located on the right by default. top corner Photoshop windows.
Determine the area of the photo that we will clone to remove unnecessary objects. To do this, move the cursor over an area of the photo that is free from wires and, while holding down the Alt button, click the left mouse button. The cursor takes the form of a circle with a crosshair inside.
After releasing the Alt button, move the cursor over the item that needs to be removed. Left click. Some of the wires have disappeared. We repeat this simple operation, choosing the image cloning source as close as possible to the unnecessary object that we are removing.
To move around the enlarged photo, you can move the red rectangle in the Navigator palette. It limits the part of the photo that we see in the window open file with image.
A few minutes of work, and all the unnecessary objects from our photo disappeared.
note
It may happen that the cloning area was chosen poorly and the object that needs to be removed was covered by a spot that does not match the color of the rest of the image. It's okay, an unsuccessful action can be canceled through the History palette, which by default is located in the middle right part of the Photoshop window. Last action in this palette it is highlighted in blue. Hover your cursor over the previous action above the last one and left-click.
To remove unnecessary small objects located on a relatively plain background, it is very convenient to use semi-soft brushes. In fact, the background, which seems monochromatic, consists of different shades of color, softly transitioning into one another, and traces of working with a hard brush with a Hardness value close to 100% will be too noticeable.
Sources:
- Removing a date from a photo using the Patch and Stamp tools
- how to remove unnecessary things from a photo